Every person has a piece of furniture in their home, such as a desk.
It is needed for preschoolers, students, and office workers. You can not only write with it, but also do handicrafts. Despite the fact that the modern market offers a wide range of desks, sometimes it can be difficult to make the right choice.
We offer you to make a table that will fully meet your requirements, room size, and technical specifications.
Advantages
In addition to the desire to make furniture on your own, you need to have a special tool and some skills.
If you have everything, then you can start making a table for a schoolchild. The advantages of making furniture items yourself include:
- saving money;
- the ability to make furniture of any design, size and shape;
- independent selection of consumables.
For a miniature room
The option is designed specifically for use in limited areas. Depending on the type of room, it may have a different configuration. There are models with a retractable and stationary tabletop. Below is a diagram for creating the simplest table.
Large PC table with bureau
Such furniture will become indispensable for an office in which a lot of documentation is stored. Simple design, does not provide a pull-out shelf designed for a keyboard and other attributes. The photo shows the steps for making a bureau and other elements yourself.
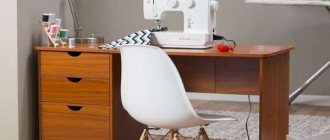
Working studio
The product has impressive dimensions. But if your activity is closely related to computer technology, then a studio table will be the best option, since it has almost everything for work. Desire, as well as a minimum set of materials, will allow you to make such a piece of furniture yourself.
Height adjustable
An original idea for creating a work area for a computer. It is practically impossible to find such a model on the open market. The adjustable surface of the tabletop allows all family members to use the furniture comfortably. Creating such an item is not easy, you will need welding, metal, wood and other industrial style elements, but the effort will be fully justified.
Simple
The easiest PC table to make can be made with your own hands from scrap materials, for example, for the needs of a country house. The product will most likely be universal and can serve as a regular dining or writing desk. The bottom drawer can be used as storage for papers and stationery, or converted into a shelf for a keyboard.
Design and construction
Before creating a drawing of future furniture, it is worth deciding on its design and construction. As for design, it’s worth starting from personal preferences, the general style of the room, and the needs of the owner.
The design of the table can also be anything, from simple to complex shape. If you are new to this business, you should start with a simple table shape without any additional elements .
Most often, such products include classic models consisting of a table top, sides and several drawers.
If you don’t doubt your abilities, you can make a table of complex design with:
- numerous drawers;
- shelving;
- add-ons;
- cabinets.
Table equipped with an extension
This option is more suitable for people of average and tall height. It is comfortable to work at the monitor while sitting in a large chair. The system unit with wires is placed below in the legs, which are made from old book shelves. The LCD screen is placed on stainless steel supports, slightly above the tabletop. The product is additionally equipped with LED lighting, which gives it a futuristic look.
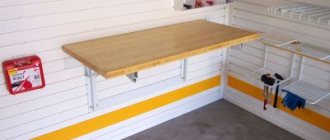
Simple accessory with shelf
A simple, ergonomic option with sectors measuring 0.5 by 1 m. It is made from planed wood or improvised materials (old furniture, pallets). For manufacturing you will need a circular saw, a chisel, an angle grinder and other small tools.
Backlit
High-quality lighting will be the highlight of any design. Furniture equipped with an LED strip appears to float in the air, creating a feeling of lightness. The accessory will fit perfectly and decorate a small room.
Wood, solid wood or furniture board?
You can build a table for a schoolchild from:
- furniture board . In its production, solid oak, birch, beech, and coniferous species are used. To work with this material, you must have experience in making furniture;
- veneer _ This lumber is classified as natural. Its thickness does not exceed 3 mm. Modern manufacturers offer a wide selection of materials of different textures, textures and colors. The advantages of veneer include: environmental friendliness, strength, affordable cost;
- solid wood. Using an array, you can make an exclusive and original piece of furniture. But keep in mind that working with natural wood requires special tools and experience. The advantages of wood include: mechanical stability, naturalness, and a wide palette of colors. Real furniture makers recommend using solid wood: pine, birch, oak. Solid wood products really look luxurious and noble in any interior.
- MDF .
It is environmentally friendly, attractive and easy to use. This material is not afraid of moisture and other negative factors. Thanks to MDF lining with veneer, film and plastic, you can choose any shade and effect; - laminated chipboard. Products made from this material keep their shape for a long time. Laminated chipboard is resistant to high moisture and sudden temperature changes. It is durable and has a long service life. A wide palette of shades opens up endless possibilities for furniture makers. This table can be combined with different shades, and it will become the main decoration of the children's room;
- plywood. This material has been known since ancient times. Modern manufacturers produce plywood from special birch and cherry veneers. This material is not inferior in strength to natural wood. Plywood is in great demand in the manufacture of furniture due to its environmental friendliness, aesthetics and affordable cost.
Advice : if you are a beginner, it is better to opt for chipboard. But for real professionals in this field, you can try making a product from natural solid wood.
Our idea
Most of the designs described on the Internet are stationary solutions, that is, they are mounted on some kind of large table, and transportation or the ability to fold and remove the machine is not expected. There are many options when various hand-held power tools are installed on one workbench, for example, a jigsaw, a milling cutter, a circular saw, etc. In this case, the versatility of such a comprehensive solution takes place, but mobility and transformation are also not provided for in this case.
There are solutions when the machine made from a jigsaw is not large and can be easily moved and removed. But it is not designed to be easily disassembled and folded into a compact form. An example of such a machine is described in the article “Jigsaw machine for cutting with your own hands.”
Our idea is to make a set of devices that would easily integrate with each other and complement each other, while expanding functionality. In addition to integration during operation, our tools must be able to integrate during storage. For example, to be some components of one case, which can easily find its place on a closet or mezzanine.
Thus, our developments will be most useful to those who have limited storage space and space for work. When you have a spacious workshop or a large, warm garage, there is plenty of space (although it varies), but if you want to tinker in an apartment, this option is simply necessary.
Scheme and drawing
After choosing materials for making furniture, it is worth making a drawing of it. Without a well-designed project, it is impossible to make and assemble a table the first time without making mistakes. To make a table drawing without errors, you need to be a specialist in this field. If you do not have such experience, contact professionals or use special computer programs.
When drawing up a drawing, all the nuances are taken into account: the materials used to manufacture the product, its dimensions, and the features of the product.
Help : with the help of a sketch, it will not only be convenient for you to detail the product, but it will also be much easier to assemble the table.
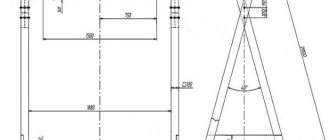
Simple drawing with dimensions
If ease of manufacture is critical to you, we recommend using the following drawing:
Drawing with boxes
If you value convenience and functionality, take a closer look at this option:
The box itself:
Dimensions
If we talk about sizes, then you will have to rely on the availability of free space in the place where the table will be installed. But do not forget that the furniture should be as comfortable as possible. So, as for the length of the table, it should not be excessively short. The permissible minimum that should be free for a person without taking into account the monitor and keyboard is 60-70 cm. The place where the system unit will stand must have dimensions of at least 25 cm wide, and much will depend on the size of the case.
Computer desk drawing
If we say that the table will have drawers and shelves, then more space will be needed. Of course, the shelves can be placed higher, above the table, in the superstructure, but in the case of small furniture it is simply not possible to equip the same drawers, otherwise there will be no room for legs. The depth of the table is usually about 45-60 cm. Moreover, the minimum option is acceptable if there is no superstructure above the table. If you plan to make it, then the minimum depth should be 60-70 cm. If you want to make drawers, you should make sure that the depth of the table is also at least 65 cm.
On a note! The depth of corner tables is greater; its minimum for models of this configuration is 85 cm.
As for height, the tabletop is usually located approximately 75 cm from the floor. Then the table will be convenient to use. If the person is small, then the table can be made smaller. The superstructure can be quite high, but it is advisable to make it such that at least the lower shelves can be reached without getting up from your chair.
The desk may or may not have a monitor stand. It can be in the center of the table or offset to the side. However, this is not always done. But if it is manufactured, then its height should be about 12 cm, length - about 50 cm, and depth - about 30 cm. Then you can safely put a monitor on it without worrying that it will fall.
Monitor stand may be present
The keyboard shelf may be slightly larger in size than the keyboard itself, but it is still better to make it such that you can freely place a mouse pad nearby. If this recommendation is ignored, then using the shelf in many cases will be inconvenient.
Tools
Tools you will need :
- jigsaw;
- drill;
- hacksaw;
- chisel;
- screwdriver;
- hammer;
- drill.
If you are planning to make a complex model of a table, also prepare:
- milling machine;
- sander;
- clamps.
As for materials , you need to stock up on:
- lumber;
- bolts, nuts, washers;
- self-tapping screws;
- furniture glue;
- dowels;
- paint and brushes;
- liquid nails;
- varnish;
- tape measure;
- pencil;
- building level.
Sketches of corner products
Below are assembly diagrams for the most popular models. Making such interior items yourself will not be particularly difficult.
How to make and assemble a table for a schoolchild?
Let's start making and assembling a desk for a schoolchild.
Making furniture begins with cutting the necessary parts . This can be done in special companies, or using a jigsaw. If you contact a specialized company, they will make a competent detailing of the product, according to the created drawing. All you have to do is simply assemble the parts in the right order.
After making all the parts, you can start assembling the children's table.
Attention : when assembling furniture, refer to the drawing.
For a rectangular table, the assembly diagram will be as follows:
We prepare the details : table top, sides, back wall. If the parts are already trimmed, you can begin assembly. If not, carefully trim all the PVC parts with an edge and a hair dryer.- Armed with a drill, we make holes on all parts for fastening . Here again you should carefully check the sketch.
- We start assembly from the side parts. Here it is worth aligning the parts using a building level.
- We connect the parts with furniture screws.
- We put the tabletop on top and tighten it with confirmats.
- We seal the screw caps with special furniture stickers or plastic plugs.
We looked at the manufacture and assembly of a simple table for a schoolchild. If you want to make a more complex model, then the manufacturing process will require the following:
- We take the drawing and prepare the materials (in this case, furniture board);
- We cut out 8 blanks for product supports.
- Each leg will consist of 2 parts. Therefore, we glue the parts together and secure them with a clamp.
- We cut out recesses inside the frame of the product.
- We make a long groove along the inside of the cross member.
- We make a protrusion on top of the supports using a chisel and a hacksaw.
- We drill holes in the sidewalls with a diameter of 8 mm.
- For assembly accuracy, insert pencils into the holes made and apply them to the legs.
- Using wood glue and dowels, we connect the base and support .
- Using a router, we make grooves for attaching the upper part of the product.
- We cut out the side walls with a jigsaw according to the drawn sketch.
- Carefully sand all cuts.
- We make grooves in them.
- We cut out the parts for the drawers , glue them together and reinforce them with furniture nails.
- We attach the facing board to the front part of the product using self-tapping screws.
- Carefully coat all attachment points with glue and leave the item until completely dry.
- We fasten the tabletop to the base with legs using dowels.
- We select fittings for the drawers.
- We carry out decorative work if the product was made of plywood, wood or MDF.
"Two in one"
The sketches and drawings immediately outlined quite a few options for such devices and machines, but we decided to start with the most basic thing that a master might need in the first place, namely a workbench. It all starts with him, because it is the workbench that forms the workplace where it should be convenient to work. In parallel with the workbench, a machine was developed using a jigsaw, since the sawing operation is the most common and in demand. We talked about choosing a jigsaw and files for it in articles. And so we got a case, one half of which is a workbench, and the other is a sawing machine made from a jigsaw. Both halves can be used both together and separately.
We can offer drawings of our devices. To receive them you need: - Pay a nominal fee (200 rubles) - Repost this article on social media (under the article there is a button - click and you're done!) - Write a review (comment) under this article.
In order to use our devices you need a table that is as stable as possible. Fastening to the table is carried out using clamps. This type of mount was chosen specifically because installation is quite quick and simple. The base shape is square (edge length – 500mm). This is also obvious - for versatility. The attachment is made to the edge of the table, and the design is designed in such a way that it can be installed on both the left and right sides of the table.
All elements are made of sanded plywood 15 mm thick.
Crafting table
The main purpose of a workbench is to create a comfortable workspace for work. Since many operations with workpieces involve their rigid fastening, we have developed a design that allows you to fasten workpieces of different shapes and sizes. The resulting design allows you to fasten the workpiece in the following ways:
- Emphasis. One or more stops are inserted into the holes of the workbench, against which the workpiece rests.
This is convenient when planing workpieces with a plane. The stops rotate in their seats, so it is possible to support a workpiece with different shapes of ends (straight, oblique, curly).
- Clamps. The tabletop has special slots into which clamps are installed, and the workpiece is fastened in seconds and quite reliably.
- Vise. If you attach any board to the tabletop with clamps, then a vice (not included) can be easily installed on this board.
- Side clamp. In another way, it can be called a side vice, since it is a persistent board that is pressed with clamps, which are also installed in special slots.
It is important to note that in one position the thrust board is pressed flush against the base, that is, its upper edge with the base of the workbench lies in the same plane.
If the thrust board is turned over, its top edge will be higher than the plane of the base of the workbench. This option is used when it is necessary to clamp a wide workpiece, one of the sides of which will rest against the installed stops.
Since the workbench is made of plywood, you don’t have to worry about the table on which it will be installed - if you don’t overtighten the clamps, then even a varnished table won’t be in any danger. Due to the fact that the space between the working surface of the workbench and the table itself is closed, shavings and sawdust, getting inside through the holes of the stops, do not scatter throughout the room, but accumulate inside - the result is an improvised dust collector.
Sawing machine
As already mentioned above, the fundamental design of such a homemade jigsaw wall is not original, there are analogues. However, it is necessary to note some features of our option:
- The file is fixed not by two (as in many samples), but by three rollers (bearings), where one is transverse, into which the file rests. If you use only two bearings, then during prolonged sawing, firstly, the file will overheat faster due to another friction plane (accordingly, deformation of the file is possible; it will fail faster; the quality of the saw deteriorates), and secondly, the metal plate , on which the file presses, will sooner or later wear out and will have to be replaced.
- The saw blade fixation bracket can be installed in two positions - on the left or the edge of the base farthest from the master. This allows you to turn it over if necessary. In the position when the bracket is installed on the left edge of the tabletop, it is possible to saw workpieces that are not limited in length, but not wider than 300 mm (the distance from the saw to the vertical part of the bracket).
Accordingly, everything is the other way around, when when the bracket is installed on the edge of the tabletop farthest from the master, it is possible to saw workpieces that are not limited in width, but not longer than 300 mm (the distance from the saw to the vertical part of the bracket). The photo below shows the design elements of the bracket.
- The bar with fixing rollers is height adjustable. This allows you to optimally select the fixing distance (from the tabletop level to the bottom edge of the plank). The lower the bar, the better the fixation. It can even be very convenient to saw when the longitudinal roller (on which the file rests) rolls along the workpiece. In any case, the length of the file is important, which will allow you to install the bar with fixing rollers as high as possible. The sizes and parameters of jigsaw files are described in detail in another article.
- Inside the base there is an electrical part - a socket and a switch, the wire is laid in a cable channel. If you simply plug the jigsaw's wire into a socket, then to turn it on you will need to look under the table, find the power button, turn on the jigsaw and lock the button in the pressed position. In our version with the electrical part, all these operations are performed not under the table, where it is dark and uncomfortable, but at the time the jigsaw is installed. In this case, turning the jigsaw on and off occurs by simply pressing the switch, which is located in a convenient place.
- The base is rigidly fixed to the work table with two clamps, preventing it from moving during operation.
Sharing
As was said at the very beginning, our idea is to make a certain set of devices and machines that would allow them to be used together, while expanding the functionality, so our workbench and jigsaw can be used together.
Working on a workbench
When working on a workbench, a sawing machine can be installed nearby (on the left or right). This allows you to double the working surface of the workbench, which makes it possible to work with longer workpieces.
Working on the machine
As in the previous case, when adding a machine to the workbench, we get an expansion of the work table, which allows you to work with larger workpieces. But in this case, the position of the bracket is uniquely determined - on the side farthest from the master.
Assembling the case for transportation and storage
If necessary, the workbench and machine can be folded as two halves, resulting in one case (suitcase). It should be noted that all components are placed inside, nothing unnecessary will remain outside the case. Everything inside is securely fastened, so nothing is loose. Even the fasteners have their own box inside so as not to be lost. In the internal space there is a special place for the jigsaw itself, as well as clamps, so the set is complete and complete.
The case has a removable handle, which is installed in special slots and is simply removed during operation so that it does not interfere.
The case is assembled and disassembled in a matter of seconds. Special hooks are installed on one side (they are removed in the working position), and two “suitcase” latches are installed on the front side.
Decoupage
After making and assembling a table with your own hands for a schoolchild, it needs to be decorated . You can do this using:
- coatings with paints and varnishes;
- installing countertops in contrasting shades;
- pasting self-adhesive film;
- decoupage with napkins or wallpaper.
Important : using the decoupage technique you can decorate not only a new piece of furniture, but also an old desk. For decoupage you can use: napkins, wallpaper, drawings, ornaments and pictures.
To give your table an attractive look using decoupage you will need:
- sanding machine or coarse sandpaper;
- brushes for varnish and paint;
- PVA glue;
- acrylic lacquer;
- materials for pasting.
The workflow itself consists of the following sequence:
- Degrease the surface to be treated.
- Cover the table with primer .
- If we are decorating an old table, we cover all its surfaces with the selected tone of paint in two layers. We are waiting for it to dry completely.
- Using glue, we attach the selected pictures and ornaments.
- We cover the product with acrylic varnish . This will keep the table looking attractive for a long time.
Tip : The decoupage technique can also be useful when decorating a laptop table, sand painting, or even a coffee table.
Corner furniture for PC
This variety is designed to optimally fill the space in the corner of the room. Many existing models will create an ideal area for working with office equipment. Below we will look at the most interesting, in our opinion, projects of corner computer desks with drawings and dimensions.
What is it like?
The corner of the room will be a good place to place furniture for office equipment. Such accessories have a larger surface area. In terms of functionality, this product is much superior to its competitor with a straight tabletop. If you are looking for the most rational and optimal option for a miniature room, then making a corner piece of furniture yourself is a good solution. Just follow the instructions and you will be the owner of universal furniture that will satisfy all your needs.
Photo
Regardless of the chosen drawing and material, you can get excellent results:
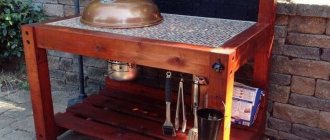
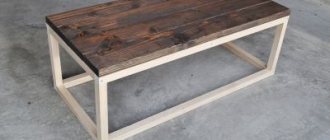
Work surfaces made from pallets
Building materials are excellent raw materials for creating home furniture. From pallets you can make benches, shelves for books and, in unusual shapes, tabletops.
A simple model of a pallet structure
An original solution to recycle unnecessary boxes and at the same time create something necessary for the home. The U-shape fits into limited space. You can place the system unit on the left side, and disks and documents on the right. The tabletop is covered with thick glass according to the size of the pallet.
Classification of metalwork benches
Locksmith workbenches can be of various types.
There are single and double designs. The type of fixture depends on the number of bedside tables it has.
Basically, the diameter of a mechanic's workbench, which has one bedside table, is 120x80 cm, and from 80 cm in height. This type of single-seat workbench is rightfully recognized as the most convenient.
Single workbench
Workbenches, consisting of several bedside tables, are usually made at large specialized enterprises.
The dimensions of the two-seater workbench are approximately 280 cm in length.
There are also pedestalless devices.
The single-pedestal workbench is made of high-quality metal, the thickness of which reaches 2 mm.
The working surface of this design is most often made of wood or galvanized material. Often these workbenches are equipped with hanging shelves for storing equipment and other devices.
Double backpack with hanging shelves
Single and double benches differ from each other only in the number of bedside tables. The more drawers and cabinets a device has, the more convenient it is to store various tools and building materials.
Today, a reinforced workbench with a metal lid reaching 5 mm in thickness is especially popular. All structural elements are connected to each other with fastening bolts.
Types of vices
Before choosing a workbench, you need to find out what kind of vices exist for these devices.
The vice is designed for fastening workpieces to the structure. To ensure the efficiency of the work process, special grooves with wedges are installed on the workbench lid, thanks to which the bars are attached.
The properties of the vice depend on the specifics of the work.
The following types of fasteners are distinguished:
Chair vice.
The vice gets its name because it is attached to a chair-shaped base. They are designed to perform heavy duty work. They are used very rarely.
Chair vice
Hand vice.
They, in turn, come in three types:
– instrumental;
– rotary;
– non-rotating.
For rotary and fixed vices, the width of the jaws is approximately 80 mm.
Hand vice
Universal vice.
They are used for fastening small workpieces.
The universal vice is fixed to the workbench tabletop using mounting bolts.
Universal vice
Special vice.
They are convenient because they can be easily rotated in any plane and adjusted both vertically and horizontally. This allows you to position and fix the element for processing at your own discretion.
Special vice
How to make a DIY workbench
First of all, you need to think about the place where the structure will be located. It is also worth considering where the sockets will be installed.
The optimal size of a single-seat desktop is 80x80x150 cm.
The frame and top of a bench workbench is usually made of rigid metal. In some cases, steel profile pipes are used.
Workbench frame made of profile pipes
The main property that a structure must have is stability. The main thing is that the workbench can withstand heavy loads. The same requirements apply to the desktop tabletop. It must be reliable.
The thickness of the workbench cover is about 5 cm. The working surface is covered with linoleum or textolite to protect it from various damages during processing of workpieces. The thickness of the steel coating is approximately 0.5 cm.
The workbench top must be reliable
In its finished form, a homemade workbench will be a semi-industrial device on which, if necessary, you can install a vice.
Using welding equipment, the frame corners are connected to each other. The steel cover of the workbench is usually welded, and the wooden one is securely fixed with mounting bolts. The free space under the table top can be allocated for drawers, shelves or cabinets.
Recently, transformable workbenches have gained particular relevance. They have a sliding lid and several wooden frames connected to each other in the form of scissors.
Transforming workbench
If a finished metal workbench is impregnated with an antiseptic, it will last much longer.
The desktop frame is usually made of soft wood, and the lid is made of hard wood.
The type of workbench does not affect the choice of the place in which it will be located.
The device must be as reliable and stable as possible.
Original solutions
A non-standard approach to creating a furniture accessory will help you create a truly unique piece of furniture. Below you can get some ideas.
Dresser
A computer tabletop can be combined with such a necessary furniture accessory as a chest of drawers. It is safe for children and takes up no more space than a standard TV stand.
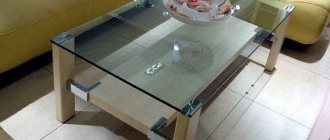
Unusual modding on a coffee table
In this option, an additional pull-out shelf is equipped under the tabletop in which you can store a laptop. It is very convenient and incredibly practical. If you want a similar accessory for yourself, read the detailed step-by-step instructions.
Furniture with built-in PC
An interesting idea on how to hide a computer. The equipment is placed inside the table, so it is not visible from the outside. Looks compact and versatile.
DIY home office
During sedentary work, blood stagnates and muscles atrophy. Uncomfortable furniture is the main provocateur of osteochondrosis. There is an opinion that working while standing is much safer. If you are a fan of this idea, you can create a special high computer table for standing work. The design looks solid and has everything you need.
Non-standard modding of the system unit made of natural wood
The universal covering of the device in a futuristic style will help decorate your room. Unusual shapes and dim lighting will make the equipment the highlight of the interior. I like the idea, try making something similar.
Operating rules
In order for the carpenter's table to last a long time and to work at it safely, it is important to follow the basic operating rules:
- All table parts must be firmly secured. If they start to wobble, they need to be tightened or secured. Any unsteady position can result in serious injury. It will not be very pleasant if the saw or jigsaw comes off the part at the most inopportune moment.
- All items for work should also be held well on the table. This will make the work more accurate.
- The device must be protected from moisture. Wooden boards will warp and crack with sudden changes in humidity. If there is high humidity, mold may grow here.
- When working with heavy objects, you need to evenly distribute the load on the tabletop.
Making a carpentry workbench yourself is not a quick task, but it is exciting, because you need to take into account not only your needs, but also the ergonomics of the entire workspace.
Proper assembly of this device and its correct operation will bring joy from carpentry work, which will give inspiration for creativity.
Photo selection of tables made from pallets
Below are photographs of the most popular DIY models.
Use of building materials
- Planed timber is considered a universal building material for making a desktop. The size of the legs of the structure is usually 7x10 cm.
Workbench legs made of planed beams
- An old unnecessary door can serve as a workbench cover. The thickness of the boards used for the tabletop should be about 5-6 cm.
- Before making the device, you need to decide what type of workbench will be - stationary or collapsible. Based on this, the fastening is selected (bolts, screws, nuts, nails).
- It is advisable that the workbench has several vices. One can be installed on the side and the other on the front. Vices are convenient because they fix products intended for processing. The universal width of the vise jaws is 5 cm.
Attaching a vice to a workbench
Combining parts
The main properties of a workbench for the home:
The surface of the device is made of wood. For these purposes, dry planks with a thickness of 5–6 cm are selected. It is best to use wood that has been pre-treated with drying oil. Otherwise, the workbench tabletop will not last long.
Edged board for workbench
A vice is attached to the cover of the structure, which will fix the items being repaired.
It is preferable to make large vices from wood, and small ones from metal. If the length of the workbench exceeds 1 m, several vices of various sizes can be installed on its working surface.
Vise design
The legs of a carpentry workbench are made from boards of other wood species (maple, linden, pine). They are connected to each other by strips located longitudinally. This ensures reliability of the design.
The space under the workbench tabletop can be used rationally by installing pull-out drawers or shelves for storing work tools.
Workbench with built-in drawers
Recesses are made on the surface of the structure in which heavy items for repair will be fixed.
It is recommended to drill a hole on the back of the tabletop for repairing small parts.