Why infinite? Because the design of the postcard allows you to watch how frames from your life endlessly change, like in a kaleidoscope, if you decided to give a postcard for a birthday or wedding and used photographs for its design, or endlessly delight your child if pictures from cartoons or his funny photos, or to cheer you up on New Year’s, if these are funny holiday pictures... Today we’ll talk about how to make an endless New Year’s card with your own hands.
Now let's get to the fun part - decoration.
In principle, you can use anything to decorate such a card, the main thing is that this “anything” is flat, otherwise it will not close completely when assembled. We took scrapbooking paper of a different color with a brighter pattern and voluminous New Year stickers.
Tip: Since the finished endless card consists of 4x4, 4x8 and 8x8 cm squares and rectangles, it is better not to take stickers or other decorations that will be larger than the size of the squares being decorated. Otherwise, the stickers will bend when folded and peel off.
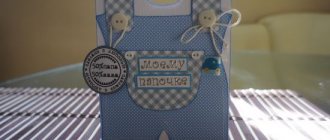
We decorate small squares and rectangles with bright scrapbooking paper. If we have paper with some kind of thematic holiday design (for example, like ours - with Santa and gifts), then individual completed elements of this design can even be cut out and also used for decoration. We decorate large squares (8x8) with stickers.
The main thing here is to look at our endless postcard from all angles. Because a large square that you want to decorate with a sticker, when turned over on the other side, will turn out to be a 4x8 rectangle, and some piece of the sticker will definitely peek out from behind the edge of the square... Therefore, before gluing something, carefully and more than once unfold the postcard from all angles, attach all the decorative elements and see how they will look at different stages of unfolding. This is perhaps the most difficult stage of making an endless card, but if you check everything and look at it from all sides, you will get a real masterpiece!
Here you can see in action what we got:
Additionally, the card can be decorated, for example, with shiny snowflakes, artificial snow, or a small bow, like in this wonderful video. In a word - everything is in your hands.
Be creative and may the holiday never end!
3D postcards using Kirigami technique
Kirigami is the art of cutting and folding figures and cards from paper. This is the main difference between Kirigami and other paper folding techniques and is emphasized in the name: “kiru” - cut, “kami” - paper. The founder of this trend is the Japanese architect Masahiro Chatani.
For production, sheets of paper or thin cardboard are used, which are cut and folded. Unlike traditional 3D postcards, these paper models are usually cut and folded from a single sheet of paper. Most often, three-dimensional models of architectural buildings, geometric patterns and various everyday objects, etc. are developed.
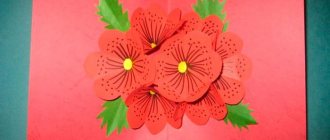
It’s better to start with a simple three-dimensional DIY birthday card. For example, using thick paper of two contrasting colors, you can make a birthday cake card:
To make it, use this template:
Using various templates, you can make more complex cake cards:
Cake for lovers
Happy birthday!
Oksana Hnativ tells how to make a kirigami cake in her master class :
Using this technique, you can cut out various congratulatory inscriptions. The cake can be decorated and colored to your liking.
To create it, take this template:
White embossed paper will also make an impressive postcard:
By combining two mirror “cake” parts cut from different sheets, you can make a whole three-dimensional cake in a postcard!
Mirror Side Cake
There may be more candles!
Very colorful
Use the following template:
There are a lot of options for creating voluminous postcards! Cut and fold your paper masterpieces!
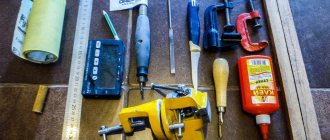
What do we need to create a New Year's card with our own hands?
- Paper for scrapbooking with New Year's motifs. For the base itself, you will need two sheets of paper, preferably double-sided, because... As a result, the reverse side of the sheets will also be visible, and 1-2 sheets of paper with a different design for decoration are your choice.
- For decoration, we took New Year's stickers - naturally, you can choose something else.
- Glue, brush (you can use a glue stick or double-sided tape), scissors, ruler. If you have a creasing machine - ideal, but if not, you can get by with just scissors and accuracy