There are many instructions and blueprints on the internet for building, modding and hacking guitars of all kinds, I intend to demonstrate how you can achieve professional results when building your own electric guitar. I'm also going to tell you about the more difficult task of building a guitar neck from scratch, something that many builders avoid by rebuilding old ones or using "store bought" necks. And let's face it: if you play guitar, you know that the neck can make or break the instrument, so why not customize it to your liking.
I hope some of you will find some inspiration in this tutorial and try to make your own electric guitar.
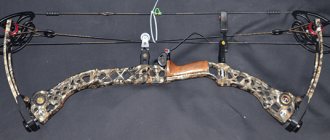
What is a pickup for an electric guitar?
What a pickup is is not clear to all beginning musicians. The device converts string vibrations into electric current. The output is a variety of sound effects. The sound becomes pronounced and unique.
On a note! The first device was invented by George Beauchamp. He began his experiments with coils at the beginning of the twentieth century. His attempts were crowned with success. As a result of his experiments, he invented the U-shaped sensor. The device transformed the guitar into the first power instrument.
Later, Gibson introduced a plate instrument to consumers. Over the years, the audio accessories industry has grown at a rapid pace. Now there are a large number of models and varieties of pickups.
ACCESSORIES
There are master craftsmen who grind pegs and machines on their own. I am very skeptical about them. Those examples of mechanics that I encountered were clearly inferior in quality to serial branded ones. My opinion is this: you need to buy serial accessories for a homemade guitar. It wouldn’t even occur to you to sit with a skein of gimp and wind the strings by hand, would it? It's about the same here. This applies to tuners, bridge (machine), fret wire, and pickups. The only place where you can and should do magic is the electronic filling of the instrument. Production pickups can be completely rebuilt.
Features of manufacturing acoustic and bass guitars
In order to understand how to make a bass guitar with your own hands or an acoustic one, you should carefully study the procedure and prepare all the necessary tools for this.
To make this type of guitar you should:
- print or draw a drawing of an acoustic guitar on a 1:1 sheet of paper
- When making a neck, you need to pay attention to the angle that will be between its head and neck
- A metal rod should be placed in the center of the neck in its middle; to do this, make a mark in the right place and hollow out a hole; after installing the pin, the hole on top is closed with a piece of wood
- the headstock should be cut and fitted with a fingerboard that matches the shape of the size
Making such guitars requires a little more effort and time, due to the fact that some parts consist of several additional ones. Creating an acoustic or bass guitar with your own hands will require more time since the work on them is more painstaking and precise.
DIY piezo and sound pickup for acoustic guitar
This part of the guitar can also be purchased ready-made in a store or assembled yourself, for this you will need:
- decide on the material from which it will be made (wood, plastic, etc.)
- draw a drawing, part of the tool consists of a base in which there are five or six holes, two plates attached, one at the top and the other at the bottom
- holes should be drilled in the base of the acoustic guitar pickup, and the same is done in the plates
- Next, what the cores will be made from is selected, that is, what will be inserted into these holes to hold all the parts together
- Once they are cut to the required dimensions, the pickup can be assembled
- magnets are glued to the bottom of the pickup so that they touch not only each other, but also the existing cores
After this, the wire is wound and should be wound 1200 times if the diameter is 1 mm, and if 0.06 then up to 2500 times. The ends should be attached to contact pins made of wire 1 mm thick and inserted into the holes of the bases, bending them into a ring. Next, so-called screens are made from foil PCB and glued with the foil on the outside
Attention: when gluing magnets, you should know that they are glued with the poles of one magnet in one direction, and the other in the other.
Piezo and pickup
DIY tone block for guitar diagram
Thermoblocks can be divided into two types:
- passive
- active.
Passive ones are manufactured in such a way that they do not require additional power sources and are the simplest in structure. Responsible for switching pickups and adjusting the timbre and volume of the sound. It does not work as a sound amplifier, but corrects the sound timbre by attenuating various frequencies.
Active ones carry out their function using a battery and perform the function of amplifying sound signals. Wiring diagrams can also be found on the Internet.
Tone block circuit
DIY electric guitar tailpiece
Bridges or so-called tailpieces for electric guitars can also be made independently or purchased ready-made in a store. The design, that is, the shape, can be varied, but be sure to take into account that the holes for the strings must be located at the same distance. This part can be made from materials such as:
- stainless steel
- steel
- copper
- and even plastics, etc.
This part is attached to the guitar with a screw and does not have a strap on it.
This part of the guitar must be made from any sufficiently durable materials: sheet metal - copper, brass, stainless steel, steel; plastics - plexiglass, plexiglass. Moreover, it is advisable to polish metal tailpieces with GOI paste. The part is attached to the guitar with a screw, and the strap is also put on here.
Types of tailpiece
ADHESIVES, PAINTS, VARNISHES
In the production of guitars, organic glues (bone glue, casein glue, etc.) are mainly used. Despite all their shortcomings, organic adhesives have good adhesion to wood and approximately equal “rigidity”. This cannot be said about epoxy resins (not only household EAF, but also special ones), which harden “into glass”. This leads to the fact that during manual sanding of glued products, the seam grinds down more slowly and begins to protrude. I can tell you from my own experience: any seam on a guitar made with epoxy begins to crack after 5-6 years. Plus, the adhesive seam cannot be soaked/dissolved/melted (which is a serious drawback, since the repairability of the product is sharply reduced).
Again, within the framework of this article, I will not write: “clean the surfaces to be glued and degrease...”, just as I will not write recipes for adhesives. All this can be gleaned from the literature, besides, each craftsman has his own recipe for the composition of the glue, which, firstly, is “secret”, and secondly, poorly reproducible outside a specific workshop.
Various (including oil) paints and enamels are used to paint guitars. Naturally, they paint with a spray and not with a brush. Sometimes a colored (opaque) varnish is used.
Guitar varnishes are the topic of a separate large article. Lucky is the most controversial topic. Information about their composition and use is scanty and contradictory. I have encountered the use of polyurethane and nitrocellulose varnishes. I can’t say anything bad about either of them. Nitrocellulose varnish is more convenient to use, but it is explosive (if detonated correctly).
In this section, I skip a lot of steps in the technical process of making guitars, such as sanding, priming, polishing wood and finishes. Not because these are unimportant operations, and not because everyone already knows this. This simply applies to the processing of any wooden products, not just guitars, so finding this information will not be difficult. In this same article I would like to pay more attention to the “guitar” topic.
Frame
For the lower (Fig. 4) and upper (Fig. 5) decks, three-layer plywood or thin sawn boards with a thickness of 3...4 mm are used. The dotted line (Fig. 4) marks the area where the timber is glued (Fig. 2), the shaded rectangles indicate the location of the spacers. The angle of rotation of the stand (Fig. 6) relative to the tailpiece is 2 degrees;. The width of the stand is 20 mm.
Rice. 4. Marking the body of the electric guitar.
Rice. 5. Holes for toggle switches and regulators.
Rice. 6. Attaching the pickups.
Rice. 7. Shell, drawing.
The shell (Fig. 7) is cut out of a board 32...34 mm thick and glued to the lower deck. A beam cut from a board with a longitudinal arrangement of fibers is glued there. Spacers are glued or screwed onto the timber. They should be 1.5. .2 mm higher than the shell.
Then the top deck is glued on. As a result, after assembly it will be convex. All holes in the decks are made after assembling the case. Before gluing the top deck, its inner side, as well as the entire internal space of the body, is covered with copper or aluminum foil.
Only the area where the top deck and shell are glued together should be left unfoiled. Then the shielded wires are laid and securely fastened so that they do not rattle later when playing.
Wire screens and foil are connected to the common wire. The covers of the toggle switch and tone block (Fig. 3) are also covered on the inside with foil, which is connected to a common wire.
Vulture
The neck is made of hardwood. Ideal if it is beech. Let's look at the instructions on how to make a neck and handles for an electric guitar.
The first step is to select a bar of the required size. It is ground down using a plane. The top of the bar should be perfectly flat and the bottom should be rounded.
The rounding of the upper part is purely symbolic - from the nut to the end of the fingerboard, the curvature should disappear. It is permissible to use the neck from an old instrument. But it will have to be reduced in width and the shape of the head changed.
For the headstock, the same wood is used from which the fingerboard is made. After cutting it out, do not forget to file and sand it. Using a drill, make holes for the pegs in 3 cm increments. Insert the pegs and glue the head to the neck.
The next step is to carefully position the frets and make cuts using a hacksaw. It is permissible not to paint the top of the neck; you just need to cover it with stain and varnish. To indicate frets, you can use black or white plastic plates or circles. Cut them flush into the neck.
The neck must be covered with putty and painted. It is fastened to the body using a steel plate with nails.