The layout of individual apartments is always different, as is the area, and often this applies specifically to the kitchen. The size of the kitchen may be familiar (several squares), but often this room is converted into a studio. Be that as it may, a bar counter is installed in such kitchens; it not only looks stylish, but is also practical - today, few families find themselves together at the table. And if there is a counter, then you also need bar stools. How to make a bar stool with your own hands?
Making a bar stool with your own hands
How to make a bar stool with your own hands
Why on your own?
Of course, we are not saying that you should forget about furniture stores and instead make all your furniture yourself. But if you look at the photographs of bar stools that can be found in numerous catalogs of furniture stores, you can conclude: you can actually make such a chair yourself !
Bar stools are easy to make with your own hands
In addition, pieces of furniture made by yourself can become a true decoration of the home, pleasing not only the eye, but also the soul.
On a note! In this case, there are also more possibilities, since you decide for yourself which option is best suited for the interior of the room. There is no need to mention once again about people who like to work with their hands.
Original bar stools
Photo
Ideas for decorating the resulting furniture and its use can be seen in the following photos:
We decide on the structure and design
First of all, decide on the size of the chair. Its height, for example, will depend on the height of the bar counter itself. Also remember that your bar stool should not only be attractive, but also comfortable in all aspects. Once you have decided on all this, proceed directly to the design.
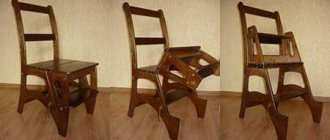
Bar stool with adjustable seat height
To be honest, you can start with the appearance, but then it may turn out that due to ergonomic features some adjustments are required.
Simple wooden chairs without backs
As for the design, first of all, decide how many legs the chair will have and whether there will be any at all. The best option is a product with four legs . It is easy to manufacture, convenient and reliable.
A chair with four legs is more reliable and easier to make
Important! A chair with a back will be even more comfortable, especially if you add armrests to it. If you plan to sit on such a chair during meals, then think about the backrest in advance.
Chairs with backs are more comfortable
Pay special attention to the upholstery (if it is planned). A chair made entirely of wood will fit perfectly into almost any interior, and after varnishing/painting it will also look good in other cases.
The final stage: decoration
After completing the manufacture of a wooden chair, it needs to be painted or varnished. This procedure will not only protect the wood from damage and moisture penetration, but will also give it a more aesthetic appearance. The metal frame needs to be painted, thereby hiding the fastening points and welding seams, and also making it much more beautiful.
It is best to provide the seat with a soft filling made of foam rubber or padding polyester. Then cover it with leather (substitute) or any fabric suitable for use in the kitchen.
More details about bar stool height
Nothing is known about the creator of the first bar stool. One can only guess that it first appeared around the time when, instead of the usual partitions between visitors and the seller, high (1.1-1.3 m) counter tables with comfortable tabletops began to be used. Visitors to drinking establishments no longer had to leave such counters.
As a result, an ordinary “tripod” chair was transformed into a bar stool. For more noble bars, they were made from valuable wood, trimmed with leather and fabric; the poor public was content with cheap options. But even despite their practicality and high “stature”, all types of bar stools remained in the shadows for a long time due to their lackluster design.
Standard height of bar stool and counter according to GOST
GOST 17524.2-93. Furniture for catering establishments. Functional dimensions of seating furniture .
Downloadable file (click the link to open the PDF in a new window). GOST 17524.2-93
Everything changed in the fifties and sixties of the last century, when high chairs became fashionable and attracted the attention of large enterprises. Much has changed since then, today the designs are very diverse: there are models with and without armrests, with backs, rotating and static, soft, with removable pillows and without upholstery... Changes have also affected the material of manufacture - now they use not only wood, but also chrome, aluminum, plastic. And the variety of decor allows you to use it for all possible stylistic solutions!
Despite all this, when choosing a bar stool, its convenience is of great importance. Due to the center of gravity, which is shifted forward (the visitor rests his elbows on the counter), the support is not the back, but the footrest. For this reason, the backrest is more a tribute to tradition than an ergonomic condition.
As for the seating height, it, as noted earlier, depends on the height of the bar counter, and therefore modern chairs are either produced in two sizes (Th and Bh), or are equipped with a gas-lift mechanism , thanks to which you can easily adjust the height seats (within 54-85 cm).
What happens if you choose the wrong bar stools?
A little advice
White central bar counter
When you think about the design of the bar counter, try to keep it in moderation. That is, the structure should not be overloaded with many objects and parts. It is worth starting from three basic rules:
- Functionality. Decide what you want from a bar counter and take into account all your preferences when designing it so that in the end it turns out to be as comfortable as possible.
- Division of space. In the case when it is necessary to zone a room, the stand should fulfill this role.
- Beauty. The stand should not only be comfortable, but also aesthetically pleasing and fit perfectly into the overall design. Combination with all other pieces of furniture is a strict requirement that the design must comply with.
Which tree to choose?
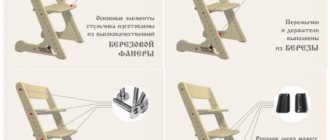
If you are planning to make a wooden bar stool, then remember: it will require about 10 ready-made elements. The same applies to structures made from other materials.
To make your own chairs, it is better to use wood.
When choosing a material, give preference to hardwood (such as oak, maple, beech). In principle, wood is best suited for self-production (although there may be exceptions, which we will talk about later) in terms of the “effort-to-result” ratio. Moreover, wooden chairs will look great in an apartment/house.
The wood for the chairs must be hardwood
Having chosen a suitable drawing or drawn it up yourself, get the materials. Everything you need is sold in construction supermarkets or hardware stores, while you can order the chair parts ready-made in the workshop. If you indicate the required dimensions, they will quickly and inexpensively cut out all the required parts of the structure.
You can order ready-made parts for bar stools in the workshop
On a note! There may be more details - it all depends on the chosen design. In addition, upholstery materials can be added. Also, after assembling the chair, it is recommended to impregnate it with a primer (if it was not covered with paint/varnish) to protect it from moisture.
The design of bar stools may vary
Chairs require additional processing after assembly
But when making a metal bar stool, some difficulties will arise. This option is suitable for craftsmen who are accustomed to working with metal, have all the necessary tools and are able to make all the parts themselves. Additionally, you will need to do some welding if there are no connectors for fasteners.
Making metal bar stools harder
A wooden product, unlike a metal one, is easier to assemble - for this you will need a hacksaw, a screwdriver, self-tapping screws and sandpaper. Of course, the description is very superficial, but it shows the difference well.
Country style bar stools
Use of profile pipes
This is a fairly simple option for quick results. Such assemblies look original and fit many stylistic solutions.
At the initial stage, the main frame is assembled from the profile, which is supplemented with the necessary furniture and elements.
The sequence of this work:
- Prepare pipes, plywood or chipboard sheets using tools: pipe benders, screwdrivers and drills, upholstery materials and a stapler;
- Elements of the product are cut out according to the selected design;
- The upper sections of the pipes are carefully bent in the shape of a semicircle;
- Bent parts are connected using fasteners and a screwdriver;
- Using a jigsaw, cut out the seat;
- As planned, the foam rubber is glued, covered with fabric, using a stapler from below;
- Bolts are used to attach to the frame.
The legs are equipped with plastic plugs to prevent scratching the floor.
Another option is to assemble the frame using metal corners or an iron frame from an old bed.
Based on the photos of handmade bar stools, you can choose your best option based on your individual capabilities and preferences. After all, not everyone is “friendly,” for example, with a welding machine.
Features of making a bar stool
Despite the huge number of ideas (both in specialized magazines and on the Internet), the most important thing in all cases is the correct measurements.
The most important thing is the correct measurements
First, decide what the height of the chair will be. It is recommended that the height from the seat to the tabletop be approximately 35-40 cm. Having determined the height, draw up a drawing or use a ready-made one (choose the appropriate option).
What determines the height of a bar stool?
On a note! To make the simplest bar stool, you will need 4 legs, the same number (preferably) of legs and, in fact, a seat. If a backrest is planned, then the back legs should be about 30-35 cm longer (they will serve as the basis for the backrest).
Bar stools, their features
It is easy to make a mistake at any stage of manufacturing - both when preparing parts of the structure and during measurements. Therefore, it is recommended to double-check all measurements several times before entering them into the drawing or cutting off an unnecessary part.
Check measurements several times when making chairs
The ready-made drawings already mentioned above will help with this, which is more important for people who have not designed anything before. Don’t rush, try not “for show”, but for the result!
You can make a bar stool using ready-made drawings
Photo example of making a bar stool (master class)
Drawing up a drawing
You can't create products blindly. A drawing with exact dimensions is required. The standard sizes of bar stools are as follows:
- seat height - up to 85 cm;
- seat width - from 30 cm;
- The minimum distance between the legs is 40–45 cm.
Patterns for knitting covers for chairs and stools, stages of work
Some models require a backrest. Its height should not exceed 25 cm. All measurements are made on the drawing. Dimensions cannot be changed during assembly and preparation of parts.
The height can also be adjusted according to the height of the stand itself. The distance from the floor to the seat is equal to the height from the floor to the table top minus 30 cm.
The working drawings indicate the dimensions and main components. If you are going to make a flowing product, then all the parameters are already indicated in expanded form. The diagram itself can be obtained in several ways:
- Downloaded from the Internet. No one can guarantee the correctness of these calculations. There is a risk of wasting materials and getting low-quality results.
- Create in a computer program. The program allows you to create an accurate drawing of the product. Skills in working with such software are required.
- Draw it yourself. The easiest way. You will need a piece of paper and a pencil. But it is advisable to check all calculations several times.
Correct drawing is the key to a good result. Therefore, you should not take the first thing that attracts your attention. If the choice fell on an option published on the Internet, it is useful to familiarize yourself with the results of those who have already used this option in their work.
Option No1. Simple wooden bar stool
The first thing you have to think about is how will the seat be, hard or soft? If you don't know which option to choose, do a firm sit like the example below. In the future, you can upholster it with any available material (fabric, leather, etc.) at any time. The diagram below shows the design and dimensions.
Scheme of a wooden bar stool with dimensions
Step 1. For the legs, use wood 5x5x71 cm (in our example it is poplar). Reduce the chamfers/angles at both ends by about 5 degrees so that the legs are angled relative to each other. For connections, drill pocket holes.
Making chair legs
Step 2. Attach the bottom/middle strips by chamfering in the same way (all at the same 5 degree angle).
Installation of cross bars
Step 3. Having fastened all the parts that are parallel, start screwing the transverse partitions to one of these sides. Do one side first, then the other.
Fastening perpendicular partitions
Step 4. When attaching the partitions, take into account the fact that it should be comfortable to place your feet on them while using the bar stool. This is a must.
The process of attaching partitions
Step 5. The seat will have a special shape, which will make the chair even more comfortable. Mark the end of the board that will be used for seating. To get the desired shape, use a circular saw, adjusting it to different cutting depths; although it is quite possible to use a regular saw. First, cut the recesses, and then remove the excess wood with a chisel.
Excess wood is removed along the recesses
On a note! The process, of course, is quite complicated, and therefore, if you have something better at hand, you can refuse the chisel. Once done, thoroughly sand all surfaces with a sander.
Step 6. In the end, all that remains is to connect the legs to the seat. For this purpose, drill holes in the upper part of the legs, make the same ones at the bottom of the seat, and then, using glue, place all the parts on the pins.
Connecting the legs and installing the seat
Sand the surfaces of the finished bar stool using sandpaper. If necessary, seal the holes with putty. Next, you can paint the chair or, alternatively, varnish it.
Step 7. That's it, a simple bar stool is ready (and in our example there are three of them). This design - thanks to the proper placement of perpendicular crossbars, comfortable seating and selected height - may well become the most favorite and comfortable place in the house! Would you like to make the same chair? Feel free to get to work, because nothing could be easier!
This is what finished wooden bar stools will look like
Types of countertop bars
The design of the bar allows you to highlight:
- 1-level racks;
- 2-level bar options.
Single-level racks are the simplest. Here the design is represented only by the tabletop. Multi-level options combine several bar tables that are at different heights. Additional elements of multi-level racks are the presence of storage compartments, shelves, and drawers.
Two-level design
Bar counters are made from various types of raw materials:
- wood;
- plastic;
- stone;
- metal;
- drywall;
- composite materials.
Wooden bar counter
The shape of the bar counter allows it to be classified as one of the options:
- straight;
- radius;
- rectangular.
By configuration you can also distinguish:
- separately located bar tables;
- adjacent tables, which are a continuation of the furniture set.
The combination with the rest of the furniture looks attractive
According to the method of use and placement in space, bars are:
- foldable;
- retractable;
- folding;
- transformable tables;
- mobile.
There are several common bar designs that can be seen in the interior
Table 1. Types of bar tables and their purpose
| Configuration | Functional |
| Wall-mounted | Often it is installed near the window along the window sill or with the short side (depending on the size and dimensions of the window and room). It can also be attached to the wall with its long side, performing the functions of a compact table. The cabinet located below is not provided in such models. |
| Ostrovnaya | The island bar model usually occupies the central part of the setting; guests gather behind it; an additional function is a work surface. |
| Bar Peninsula | Part of the typeface in the shape of letters (P or G). Can perform various functions, including those noted above. |
| Mobile | A non-classic version of a bar table on wheels. It can move in space, be located anywhere in a room or home, and be used at home and at banquets. |
There are a number of additional classifications according to which they distinguish:
- long and short bar counters - depending on the number of people who can be behind them (in the first option - eight people or more, in the second case, the counter can accommodate up to 8 guests, including small groups of 2-3 people);
- classic and original - the classics include a rectangular counter, the original designs usually include a semicircle option, expanding tabletop shapes and other non-standard bar options.
The bar counter can be of different lengths
Option No2. Backless bar stool with metal legs
Let's look at the process of making a simple chair made of walnut (seat) and metal. An old bed frame was used for the legs. The height of the structure is approximately 64 cm.
A simple bar stool that we will make
A distinctive feature of this option is its shape, which makes it easy to weld and strengthen pieces of metal. If you are planning to use a welding machine for the first time, then in the process of making such a chair you will definitely gain valuable experience and learn how to cook well.
The wooden part is made of walnut
Step 1. Start by creating the shape of the future structure. Cut a suitable material (for example, chipboard) into four parts of 54.5x23.2 cm. All elements are fixed with a side joint using screws, resulting in a square “pipe” 58.5 cm high and sides 20 cm long.
You need to cut 4 identical parts
The result is a square “pipe”
Step 2. Make an angled base for the mold using a piece of 9.5 cm thick board. You will need to cut the pieces at an angle so that they all fit. To do this, find a suitable angle using a tape measure and set it so that everything fits. As a result, after cutting you will get beveled edges.
First, a suitable angle is found
The desired angle is set
You can start cutting
Step 3. Fit the pieces with the edges cut at an angle of 45 degrees around the perimeter of the base part. Attach the beveled base using plywood and small nails, as in the photo below. You do not connect this part to the “pipe”, and therefore it can be easily removed if necessary.
The segments are adjusted around the perimeter
Everything needs to be carefully controlled
The parts are attached with pieces of plywood
Step 4. Thanks to the made shape, you can easily determine the location of the legs. No changes are required, just attach and mark.
Future legs just need to be applied
The first leg is applied
First, mark and cut the legs from the bottom. To make the process easier, you can hang a corner of the base over the edge of the table and then secure the iron piece in place. Then cut off the bottom ends.
The corner of the base can be hung over the edge of the table
The lower end of the leg is cut off
The cut leg is attached
After this, place everything in the mold and begin marking the upper ends of the future legs.
Next, mark the upper ends of the legs
Step 5. For the top of the structure, use 4 corners. Mark everything you need using the square you made earlier. Glue the pieces together, then remove them from the mold in order to fit the weld on each side.
4 corners are used for the top part
The parts are glued together
The parts are now welded together
Important! It is better not to place a vice, as in the photo, on wood. Because the bolts that hold everything together can fly out, and everything will have to be redone.
It’s better not to put a vice on wood
Step 6: Cut some more pieces of metal to make the footrest. In our example, the length was approximately 30 cm and the angle was 45 degrees.
Let's start making the footrest
Ready-made footrest
Step 7. The support with footrest was held with the top of the structure and blocks for the supports. Weld everything together. Weld a metal pad on the bottom of each leg. Upon completion of the work, sand everything with sandpaper (recommended grit - 40).
The support is welded to the legs of the future chair
Metal pads are welded at the bottom
Next, everything is processed with sandpaper.
Step 8. Now it's time for the walnuts. Cut the main part into 2 thick boards and sand them with sandpaper. To sand beveled edges, use sandpaper with a grit size of 100-220.
We begin to make a seat for a chair
Wood cut into 2 parts
The boards are sanded
The wood also needs additional processing.
Step 9. Treat the frame of the future structure with a primer, then with black paint. Finally, attach the wooden seat to the pre-drilled holes using screws.
The seat is installed, the bar stool is ready for use
Video - DIY wooden bar stool
Elementary tripod stool
This furniture, which has 3 legs, can be useful for fishing or hunting. Its advantages are light weight, low cost, speed and ease of assembly. The downside is that there is a high probability of going on a “free flight”, especially for people with a decent weight. To make a stool you need the following materials:
- 3 wooden blocks approximately 600 mm long, it is better to take round elements;
- triangular piece of fabric, thick leather is optimal;
- 2 bolts: long and with a loop;
- 6 washers: fastening, decorative (3 pieces of each);
- 2 nuts.
In accordance with the drawing, holes are drilled in the middle and on top of the future legs. They are also made in the corners of the cut fabric. The two legs are connected using a long bolt. A screw with a loop is put on it to secure the third support. Finally, the fabric is attached to the legs with decorative washers. For convenience, you can sew on a strip that will make transporting the chair easier.
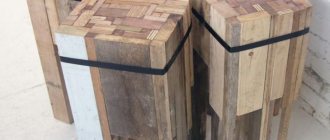
Option No3. Wooden bar stool with round seat
Another great option, but, compared to the first, much more difficult to implement. But first things first.
We are considering another option for making a bar stool
Step 1. First, prepare the necessary lumber. It is better to use a block with a section of 30x30, although in our example we use 30x40 due to the lack of a suitable one on sale. All this will cost a very reasonable amount.
First you need to buy all the necessary materials
Step 2 : Start cutting. Prepare 4 bars 45 cm long, another 4 - 57 cm.
First of all, the bars are cut
Step 3. First of all, make 2 blanks from bars of the “long-short-long” type, then glue 2 more short ones between them. By the way, in our example, in addition to clamps, clamps from a circular saw and a grinder are also used.
A pair of short bars are glued between the blanks
Step 4. Make a milling box from the leftover boards and plywood. It is necessary that the 8-gauge stud goes through the entire rack (although it is better to use larger diameter bolts to minimize vibration). In the example, the stud is tightened with nuts; the workpiece rotates inside the box when the nut is constantly tightened. Ideally, it is better to make a cutter for this, which rotates the blank by 10-15 degrees.
Stages of manufacturing a milling box
Step 5. In the end, you will carve a stand like this.
Turned stand
Step 6. Start making the seat and footrest. They will be round, their diameter will be 31 cm. For greater strength, you can glue them together from two panels, placing the lamellas across each other.
These parts are glued together from two panels
Step 7. Cut a ring from plywood using a router. With this ring you will process the outer edges of the footrest and seat, as well as the inside of the latter.
Using a plywood ring
Step 8. Something like this. The inside was milled using a copy sleeve, and the outside was done using a milling cutter with a bearing.
Photo of the manufacturing process of the seat and footrest
Step 9. Mark the footrest - place the central post in the right place, then trace the outline.
Footrest markings
Step 10. Mark in the corner where exactly the vias need to be made. By the way, a feather drill can “tear” wood; if this happens, you will be forced to putty a lot.
The locations for drilling via holes are outlined.
Step 11. Using a thin drill, mark the point where the pen tip will pass. Next, use a feather drill to make holes of the required diameter, cut out sections with a jigsaw, and then level everything with sandpaper on a block.
Stages of making a footrest for a bar stool
Advice! Experts recommend first making a plywood template and milling out the holes - in this case, you can get a higher quality cut and reduce the amount of work with sandpaper.
Step 12: This is what the wood will look like after filling the gaps left by the feather drill.
Photos of wood before and after treatment
Step 13. Glue the leg blanks from the bars.
Gluing leg blanks
Step 14: Shape them using a plywood template. Be careful and securely fasten the template with nails, otherwise it may be torn off the workpiece.
Plywood template torn from the workpiece
Step 15. Glue the crosspiece, assembled on the grooves, into the seat.
Gluing the cross into the seat
Step 16. Make similar grooves in the legs to assemble them.
Grooves are formed in the legs of the chair
Step 17: After routing the edge, begin assembly.
Finished legs of the future chair
Step 18 Sand the seat with extreme care.
Polished seat
Step 19. Pre-assemble the bar stool (without glue) to try on the parts.
The structure is assembled without glue
Step 20. Connect all the parts together.
Connecting chair parts
Step 21. After final assembly, apply stain and varnish to the glue. The result you get will definitely please you!
This is what the finished chair looks like
Table. The cost of making such a bar stool.
| Expense item | Amount, in rubles |
| Lumber (we still have some) | 500 |
| Emery block (180) | 70 |
| Stain, 2 types | 300 |
| Varnish | About 350 |
| Glue | It was spent a little, you can’t count it |
On a note! In general, making such a chair will cost about 1,400 rubles.
Types of chairs
First of all, it is worth understanding that chairs come in completely different designs and can be multifunctional. In addition, they may differ in their purpose.
Some models are used constantly, others (folding) are designed for mobile use. Let's look at the most popular options:
- Massive home chairs. Convenience, durability, environmental safety, compatibility with fashionable eco-style - these are just a few of their advantages. Even the apparent disadvantage of heavy weight, if you look at it from a different angle, looks like an advantage, since it gives the structure stability and reliability.
- Chair with soft seat. This model is most in demand in apartment conditions. Pros: elegance and elegance.
- Armchair chair. The main feature is maximum comfort and ease of use.
- Folding option. Its advantage is that it can be folded into a flat, compact structure or transformed into another thing at any time.
Option No4. Chic metal bar stool
Let's consider another interesting option for making a bar stool. It looks attractive and original.
Metal bar stool - decoration for your kitchen
Step 1. Draw a pre-prepared shape on a piece of thick asbestos sheet that is used for welding (red lines in the photo).
Applying markings to an asbestos sheet
Step 2. Cut according to the sketch of the workpiece, using a 2.5 cm strip.
Blanks are cut according to the sketch
Step 3. Weld the parts together, as shown in the photo below.
The parts are welded together
Step 4. Select the internal layout. Let’s be clear right away that this stage can take a lot of time. Use the same strip for shredding.
Internal layout is selected
Step 5. Weld the parts and clean them. Also, round the corners.
All elements are connected
Step 6. Proceed to the most important task - start welding the legs. Use a 3x2 cm profile for this.
The legs are welded
Step 7. In our example, the author did everything by eye, that is, he did not make a drawing, did not measure angles, etc.
Leg welding process
Step 8. First, grab the legs at 1 weld point, then gradually move them apart to the required positions.
First, the legs are welded to one weld point
Step 9. This is what you will get as a result.
This is what should happen
Step 10. Mark the level at which the footrest will be located. Try it on yourself, you need to feel comfortable. In our example, this is 45 cm from the seat.
Indicates the level of the footrest
Step 11. To make stops, use the same 3x2 cm profile.
The same profile is used for the stops
Step 12. Make tricky slant cuts for them, then weld them.
The stops are welded
Another photo of the process
Result of work
Step 13. Place special plastic plugs designed for steel profiles on the legs. Although you can, as in the example, make special “heels” from wood: they will also not scratch the floor, but they can be sharpened if necessary to ensure stability for the bar stool.
Making wooden plugs for legs
Step 14. The part of the cork that will fit inside the profile should taper.
Narrowing of the inner part of the plug
Step 15. Such plugs will be held in place only by friction. No glue or screws are needed. Sand the corks to fit the legs.
Ready-made wooden plugs for legs
Step 16. The rough version of the bar stool is almost ready.
Draft version of the chair
Same, top view
This is how the chair will look in the interior.
Draft version of a bar stool in the interior
Step 17. Start painting the product. First, apply a coat of primer.
Primer is applied first
Step 18: Paint everything below the seat black.
Legs painted black
Step 19. Protect the black parts of the structure with something. This way they will not get dirty during subsequent painting.
The black parts of our stool need to be protected.
Legs are wrapped in film
Step 20. In our example, such a cardinal color was chosen for the seat.
Painting the seat red
Step 21. That's it, your DIY metal bar stool is ready for use!
That's it, the metal chair is ready for use.
Video - Another option for a metal bar stool
Video - Original do-it-yourself stool
Photos of DIY bar stools
Required Tools
Before you begin, you need to stock up on the following tools:
- pencil for marking,
- roulette,
- square,
- hacksaw,
- sandpaper,
- fasteners for legs,
- drill,
- drills 3 and 6 mm,
- glue,
- self-tapping screws (5x20, 5x30, 5x80),
- bit,
- hammer,
- screwdriver
Standard dimensions of bar stools are calculated based on the distance from the bottom surface of the tabletop to the floor.
Making a countertop - the whole process
A DIY bar counter for the kitchen is created in several stages. Moreover, the basic element here is the countertop – it is this that creates the necessary interior accents. Therefore, the plate used as it must be attractive, durable and resistant to wear. To make a countertop yourself, you will need chipboard, veneer or other lumber. The desired shape is cut out of it (with a jigsaw). At the cut points, the edge is carefully cleaned and covered with a special tape at the end.
Advice! You can easily change the original color of the tabletop using self-adhesive film.
If you don’t want to make the countertop yourself, then buy a finished product made from chipboard or acrylic stone.