Not everyone would think that a calendar for a year or a month can be made entirely with your own hands, using improvised means and various decorative materials, following your taste and the style of the interior of the room.
Most often, people have calendars right on their phones and other gadgets, so there is no need to even have them somewhere in front of their eyes. If suddenly there is a calendar in the room or office, then most likely it was purchased or given as a gift by someone.
But you just have to arm yourself with the necessary materials, try to put in the effort and creativity, and you will get an incredibly beautiful calendar that will fit perfectly into the surrounding space and will always attract your attention, not letting you forget about important planned events.
Personally made calendars differ from purchased ones in that you can make a completely unique thing that will not only be useful, but will also be an excellent addition to the appearance of the room.
Before creating a calendar, it is important to decide what type it should be and how to make it the most convenient and functional for everyday use.
There are many types of calendars: flip calendars, wall calendars, tabletop calendars, fragmentary calendars, advent calendars with various contents, from sweets to cosmetics, etc.
This article will discuss the most creative and interesting ideas.
Materials
To make a calendar you will not need a lot of things. The easiest way to make it is from paper or simple cardboard, but you can use fabric, buttons, stickers and anything else that you have enough imagination for.
Scissors, a simple pencil and ruler, and glue will also come in handy.
Calendar made in a computer program
In our age of advanced technology, it is not at all necessary to waste precious time and numerous materials for a hand-made calendar, when it is possible to create it to your taste in electronic form and then print it on a color printer.
The simplest computer and mobile photo editors allow you to create your own unique calendar by adding images of your family, nature or other things that you like.
The finished printed calendar can be laminated with tape if it is printed on plain paper, or for ease of use, the calendar can be immediately printed on thick sheets.
The resulting product can be placed on the wall, placed in a workplace or behind glass in a closet in a visible place. This calendar is very practical, because with a few clicks you can make it completely universal for yourself and your family.
To produce each type of calendar listed above, you will need different materials and a lot of imagination. The resulting products will decorate the room, and relatives and guests at home will appreciate the calendar!
Calendar from the Internet
The simplest manufacturing option is to use the Internet and a printer.
To do this, you need to find a calendar for the next year, choose a nice frame for it and print it out.
To make the craft unique and remind your family of family holidays, you can print out or write by hand all the expected events on an empty space.
The following will make the craft unique:
- Own drawings;
- Applications;
- Photos of family or memorable events.
In a similar way, you can print out a calendar by month and glue or pin all 12 leaves onto fairly thick cardboard.
In this case, each new sheet can be decorated according to the time of year or you can create a themed calendar by printing out interesting facts.
When the month ends, the sheet is simply removed.
Advent calendar with photos
You need to select certain photographs that characterize each of the 12 months, colored cardboard and glue with tape. For decoration you will also need ribbons, stickers and magazine clippings.
First, you need to make sure that all calendar sheets with photographs are the same size.
All components of the calendar are placed on one large sheet or on plywood. Such a calendar will delight your household and remind you of significant moments in life when this or that photograph was taken.
Paper calendar
Let's make a calendar out of paper! If it is not possible to print out the finished number, you can redraw it on regular sheets of paper or use a school notebook.
To do this you need:
- Write the name of the month at the top of the sheet.
- Draw a grid of six rows and seven columns.
- Write the names of the days of the week on the top line.
- Take a ready-made calendar and arrange the days in the appropriate cells.
- Starting in December, glue the sheets onto cardboard and fasten them with paper clips or decorative cord.
When using a notebook, such difficulties will not be required. The leaves will simply turn over as needed.
Photo calendar
If you have skills in working with Photoshop, then making such a craft will not be difficult for you, but what about those who are not familiar with computer editors?
We make a calendar with photos with our own hands:
Select and print your favorite photos. If you are preparing a gift for a loved one, then take this into account when choosing.
If this is a gift for your mother or grandmother, then prepare a photo of their children or grandchildren; for your husband, you can make a romantic calendar with photos of you together, and so on.
Lay out whatman paper or a sheet of A3 paper in front of you and divide it into two zones: one for photos, the other for a calendar.
Arm yourself with glue and cover the Whatman paper with photographs in any order. To make the finished product look more attractive, you can give the photo cards different shapes in advance - hearts, stars, circles.
Glue the printed template with months and dates onto the rest of the sheet. The calendar is ready.
This calendar will be a pleasant and useful memorable gift for a loved one.
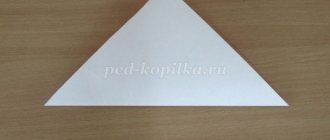
Desk calendar
A desk desk calendar will be made from small sheets of paper and cardboard.
- To do this, you first need to make a “house” out of cardboard in the form of a stable triangle.
- Place ready-made calendar sheets on it and fasten the structure with alligator clips, paper clips, and braid.
- As needed, the leaves are turned over to reveal the next month.
- The base of the calendar can be made a little more sheets and decorated in an unusual way using ribbons, bows, and photographs.
You can do it even simpler:
- Make a small box out of cardboard, into which you put cardboard with the name of the month (highest), day of the week (medium), date (low).
- If necessary, you can put stickers on each cardboard with tasks or reminders for a specific day.
Such planning can be done a month in advance so as not to forget about any important event.
LiveInternetLiveInternet
Today I come to you with a small master class on creating a calendar. 
To make such a calendar we will need:
- base (I took photo cardboard with a density of 250 g/cm2, A4 format);
- scrap paper (I have Fleur Design, Craft Winter collection, Frost sheet);
- decorations (I also have Fleur cutting, lace, lace paper napkin, cork cutting, shabby ribbon, metal connector, brads, button, glass bottle with micro beads);
- a spring or rings if you don’t have a binder;
— printout of the calendar grid (I took it from the 1000moments blog, developed by Irina Fresh).
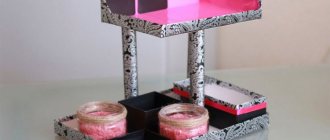
So, to begin with, we take our sheet for the base and crease it, I use a special creasing board, but you can do this with a regular ruler and a non-squeaking pen
We cut according to the following dimensions: 11cm - 11cm - 3cm - 3cm - 1.5cm.
And bend it like this:
Next, we apply glue to that piece, the size of which is 1.5 cm, and glue it to the opposite side, you should get a design like this.
Side view.
Now that our base is ready, let's start decorating it.
We cut out two rectangles measuring 20.7 * 10.7 cm from a sheet of scrap paper, taking into account that on each side we should have an indentation of 2-3 mm.
We select the rectangle that will be on the back side of the calendar and glue it to the base, I chose one with curls so that it would also be beautiful
Next, take a calendar grid, print it out in size 9*9 cm, cut it out and fold it in a pile, being careful that the months go in the correct order.
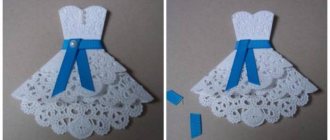
Now we decorate the front of our calendar.
Everything here is to your taste, you can use a sketch, completely different decorations, a different theme.
And we try on the calendar leaves so that the decorated part does not fit under them.
Then we glue the front part to the base and begin assembly.
Let's make holes for the spring (if you don't have a binder, you can hang the calendar on the rings).
First on the grid.
Then at the base.
We assemble our leaves onto the spring in this way.
Be careful when assembling so that the joint of the spring does not come out from the outside; we will hide it under the calendar.
And insert the spring into the holes on the base.
And we clamp it with a binder.
Turn the calendar over to the front side and admire the result
Using this principle, you can make a completely vertical flip-up calendar or the one you want, the most important thing is to be careful when creasing the base
Creative inspiration and good luck to everyone!
When reposting a master class, a link to the blog is required, let's respect each other's work!
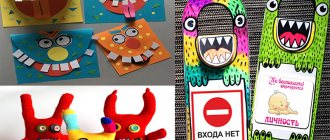
Buttons
You can make a funny DIY children's calendar from ordinary buttons.
- To do this, fairly large clothing accessories are sewn onto the fabric, and cardboard circles with painted numbers are placed inside the buttons.
- This way you can create a calendar for the whole year or change the cardboard numbers every month according to the days of the week.
For convenience, the names of the month and days of the week are sewn above the rows of buttons.
Tags
With your own hands with your own hands. for handicrafts and with your own hands a manual for making with your own hands with your own hands. with your own hands these from your own hands with your own hands you can How to make a calendar, how to make a practical one, How to make a tabletop one, To make it convenient, how to make an eternal one, how to make advent layers of paper are placed Paper from paper with your own, what kind of paper Do it yourself, a calendar with your own hands, This is a kind of visual, created with your own hands. create your own version, details of your dreams, adults with your own hands, a bird with your own hands, papers with your own hands, a calendar with your own hands
New Year's makinginstructions for advent children's craftssimple materialshandicraftsstep-by-stepleafletarticledaybasicgiftsoneallneworiginalappliquereadytowritefollowingdatatoyscardstasksuse
Velcro for clothes
Instead of buttons, you can use pieces of Velcro. To do this, simply draw numbers on them and attach them to a calendar grid created from the second half of Velcro.
This option makes it possible to remake the calendar much faster and easier.
Pages with months
I cut six sheets of A4 size watercolor cardboard in half and get 12 pages. With a pencil I mark the middle of the sheet and draw a line along it. Aligning the center line with the mark in the middle of the hole punch, I make holes on 3 sheets at once.
I repeat the operation 3 more times and get 12 leaves with exactly matching holes.
Cardboard calendar
Instead of fabric, you can use a thick sheet of cardboard or a wooden board.
- To begin with, draw a calendar grid on it, prepare the dates of the month and set them on the grid using regular or curly push pins.
- At the end of the month, all components are removed and placed in a new order.
- Funny stickers with an adhesive base will make the calendar an even more unusual and vibrant creation.
An original calendar can be cardboard houses with a numerical grid printed on its walls.
You can create 4 buildings at once for each season. Three sides will represent a calendar, and the fourth will be designed to accommodate residents. These can be funny snowflakes, green and yellow leaves, flowers.
Wall calendar planner
For lovers of a productive life, when you want to plan your affairs, track progress in development and achievement of skills, you cannot do without a calendar planner.
It is a simple wall or desk calendar, but what makes it special is that it comes with separate fields and space for your entries.
Important events are immediately marked on the calendar layout, and columns are also highlighted for marking the completion of habits. For example, to instill a habit in yourself, you can mark its completion with a symbol every day directly on the calendar.
At the end of the month, it will be possible to clearly monitor whether you managed to cope with the planned tasks.
Perpetual calendar
The question “How to make a perpetual calendar with your own hands?” has several solutions.
In addition to Velcro and buttons, you can sew special pockets into which you can put cardboard with the name of the month, day of the week, and date.
- Such calendars can be supplemented with windows that will contain information about planned weather conditions and temperature.
- To do this, you will have to make additional cards with sun, rain, snowflakes, clouds and additional temperature numbers.
- To avoid making too many cards, it is enough to prepare sets of numbers from 1 to 3 and from 0 to 9.
- This is quite enough to set the temperature indicators. The minus and plus signs are also useful.
- Cards are made from cardboard or felt. In the second case, the elements can be attached using Velcro.
For kids, such a calendar can be made in the form of a train, a car or a ship, over which the sun will shine or the rain will frown (depending on the conditions outside the window).
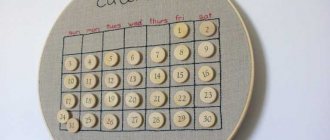
Birthday calendar: beautiful and convenient!
There are different ways to provide timely reminders about upcoming events. Special programs, “reminders” in Outlook and other services. And there are also visual ways for visual people. Like the calendars we’ll talk about today. And, it seems to me, such devices can serve not only as reminders of the holidays, but also become a nice decoration for the interior of the room.
What is it?
The calendar immediately shows how many birthdays there are in a certain month and who specifically has them. See what calendar options exist.
As you can see, they are all different in design, but essentially the same. Although no, there is also this option, which is also very interesting.
The main thing is that the date of your next birthday is at your fingertips. Then the holiday won’t take you by surprise and you won’t have to apologize for missing a congratulation.
In my opinion, such a calendar can be hung in the hallway. Then every morning, leaving the house and taking a quick glance at it, you will be able to assess the situation: is it time to prepare for the next date or is there still enough time ahead?
New Year calendar
A DIY New Year's calendar will be a great opportunity to bring the holiday closer and make the wait more enjoyable.
Unlike ordinary calendars, the advent calendar for 2022 can be called a mirror copy of the usual calendar. It shows how many days are left until the expected event occurs.
Most often it is made for the Night of the Changing of the Year. But you can create a similar creation for any other holiday.
- An unusual calendar can be created using any of the above methods or you can use your own, unusual ideas.
- Most often it is made in the form of a poster with pockets in which fun tasks, small gifts or sweets are placed.
- You can decorate the Advent calendar with paper garlands, figures of Snow Maidens and Snowmen, and snowflakes.
Simple or unusual calendars, created with your own hands, will help decorate any room in an apartment or house and become a good gift for the New Year.
Calendar with predictions or challenges
For those who want to make their life rich and interesting, when they are completely tired of the drab everyday life, and the routine of affairs has pulled them into its embrace, you can attach to each day on the calendar certain predictions for the day, which will definitely need to be followed.
For especially risky guys, you can schedule so-called challenges for every day. To begin with, a list of such “challenges” is compiled, for example, meeting a stranger, getting a new haircut, gathering all your friends together, getting a tattoo, jumping from a parachute, etc.
It all depends on your financial situation and desires. Every day, when you open each of the challenges, you need to complete them. At the end of the month, you will notice how life has changed dramatically.
Photo of a homemade calendar
0
A little lettering wouldn't hurt!
Pages with months can be designed in a thousand different ways, depending on your imagination, from the banal printing of ready-made templates to colorful drawings for each page. You can make free lines for planning or notes. Since I make my calendar for sketches, it is important for me to leave some free space for future drawings. Therefore, I write the names of the months with silver acrylic paint, days and dates with black ink, and draw a stamp-shaped window in the center. This is what happens in the end.