Home House and cottage Do it yourself
Recycling plastic grocery bags and plastic shopping bags is nothing new. If you just return the bags for recycling, they will melt them down to make new bags. This releases more pollutants into the air. The fusion of plastic bags with iron causes harmful odors. Scissors come to the rescue.
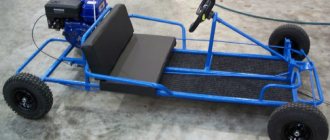
Creating something beautiful and useful with your own hands brings a sense of pride and achievement. Especially when this new item is built from "garbage" that would otherwise be thrown away. People made rugs from woven strips of fabric and then twisted the braid outward. Plus, in a time of inflated prices, it's a real revelation to find useful material that doesn't cost a lot. Finally, it’s always nice to find a way, no matter how small, to solve your waste disposal problems. You can combine a fun home craft with a little attack on both inflation and today's pollution problem by upcycling polyethylene into knitted rugs. Pre-finished flooring is ideal for protecting the floor of a bathroom or under a sink and is just as good for other uses, both inside and outside the home.
You'll need another 150 bags to make a rug like this, so don't take on this project if you only have a few. Also, if you want multiple colors, you should have bags of different colors. There is nothing difficult about preparing crochet wrappers. Start at the open end of each empty bag and cut a continuous spiral - about an inch wide and around the bag until you reach the part that is glued at the other end. The beginning and end of each stripe should taper to a point. One tool—a single metal hook used for carpet yarn—is the only equipment you'll need to turn even the largest stack of spiral wraps into durable, colorful flooring. Making yarn from woven plastic bags is an upcycled craft. Not only can you turn empty bags into yarn, but you can use the plastic grocery bags that accumulate with every trip to the supermarket to make a round rug.
You can still make a crocheted rug if you don't have weaving equipment (which you probably don't). The result is actually pretty cool, and a great way to use up those bags that would otherwise end up as trash. However, if you don't need a rug, you can also make a napkin, a bag, or even a pair of sandals. Who doesn't have a bin cupboard drawer full of plastic bags just ready to be recycled? Why not combine your package with a utility project to benefit local shelters and the homeless in your area? This is a wonderful project where children and adults of all ages can combine their creativity, talents and hard work to provide sleeping mats for people and organizations that need to brave the elements using plastic yarn from plastic bags.
Why are plastic carpets needed?
Plastic bags are one of the worst offenders of wasteful products that pollute the Earth's oceans and take up limited space. This isn't new information, but Australians still produce around four billion recyclable plastic bags each year. The equivalent of 429,000 plastic bags are dumped into landfills every day; or 7250 are ejected every minute.
Opting for eco-friendly canvas bags for grocery shopping is an effective option, but many people still have excess plastic bags lying around. Instead of throwing them away, you can reuse them by investing them in multi-purpose mats.
In particular, plastic carpet can be used as sleeping mats for people who do not have access to shelter. As sleeping mats they are more hygienic, waterproof, easy to carry and provide protection against concrete. Several charities in Australia have taken up this initiative and have enthusiastically agreed to accept donations of plastic mats that will be redistributed to the homeless. So crocheting improves your quality of life.
Start
Your first step in creating a wrapping mat of any size will be to fold one of the inch-wide strips right down the middle so that it is only half an inch wide. Then lay the hook down and pass the end of the strip under and around the widest part of the handle or shaft of the hook and tie the strip securely with a double knot.
The tape is not actually tied to the shaft, but instead the handle is used as a "spacer" around which the carpet start stitch loop is formed and tied.
Once you have knitted the first loop at the end of your first plastic ribbon, lift the hook in your right hand, hold the broken plastic ribbon to the left and slide the newly formed loop down the tail of the tool until the ring is about an inch from the hook end of your tool . Catch the plastic strip using the winder tool and pull the strip through the knotted ring (thereby forming a second loop). Slide the hook forward for another ribbon bite and pull it back to form a loop. The ongoing series of interlocking stitches you make is called chain stitch, and you can extend the procession indefinitely.
When you have snagged within a few cm of the end of your "yarn", open the folded plastic flat, lay the end of the new strip on it (with about three cm of overlap), fold the two strips together and continue with chain stitch. This way there will be no knots in your finished work. This is the yarn, also called plastic thread, that you will use to knit or knit a plastic mat. The plan is constructed from plastic bags and will be used in the same way as using yarn in crochet.
Flowers
To extend the life of a plastic bag, you can help it “turn” into a flower. Brightly colored bags will serve this purpose; even pieces of film or old raincoats and tablecloths will do.
In addition, you need to stock up on:
- Buttons, bottle caps (flower centers);
- Pieces of wire or plastic (stems);
- Synthetic threads, fishing line (for joining).
Progress:
- The polyethylene must be cut into strips and folded into loops to form a flower head.
- The shape of the petals will depend on the width of the ribbons, and the splendor will depend on the number of turns.
- The common edge of the loops should be tied with fishing line to connect the rim together.
- Sew the middle with the same thread or glue it with glue.
- The main thing is that it contrasts in color with the petals.
- You should carefully attach the flower head to the wire stem in order to hide the fastening from below the heap of petals.
- So we got a kind of chrysanthemum.
Photos of such crafts made from bags once again prove that the imagination of craftsmen is limitless. You can decorate an outdoor flower bed with polyethylene flowers. They are not afraid of either rain or heat, and even in a vase they will look very impressive. It is also important that the costs of such beauty will be minimal.
Prepare plastic bags
If you decide to knit a carpet from plastic bags, you need to prepare a plastic bag. This article shows you how to create the plastic ribbon needed to create "plastic yarn" that you can use to knit a new bag.
- Trim the bottom seam from the plastic bag.
- Open up as much of the bag as possible. Smooth it out.
- Fold the bag not quite half-width (with the groove perpendicular to the seam you cut). Let one of the edges stick out about an inch. Fold the part you already folded in half, repeating until the folded part does the same.
- Cut off the handles.
- About every cm or 2.5 cm, cut vertical slits into the folded portion of the bag. Make sure you cut all the way through the folded part, but don't try to cut through the unfolded part of the bag.
- Take the unwrapped part of the bag and shake gently. The folded part will unfold into a fringe.
- Open the unfoldable part of the bag and spread the flat one. It helps to slide a piece of cardboard or cardboard tube under the unfolded piece so you don't accidentally cut through the fringe area.
- Make a cut down the center (width) of the unfolded part to the nearest diagonal cut.
- Continue cutting across the unfolded section diagonally, connecting the different cuts.
- The last cut will be similar to the first, ending in the center along the width of the unfolded part. You've just turned a plastic bag into one long, thin strip of plastic.
- Roll the plastic tape into a ball.
Savage costume for girls
For a Papuan costume for a girl, you need to make a bright skirt (the tulle version looks good) and the top of the outfit with your own hands. For the top use:
- Top or upper part of a swimsuit.
- Sew artificial or homemade tropical-style flowers onto the upper half of the clothing and on the elastic of the skirt.
- For decoration, use jewelry, but there should not be too much of it, literally 3-4 bracelets.
- You can make a headband or elastic band from bright colors on your head.
- So that the child does not feel discomfort in the Papuan costume, under the bottom of the clothes you need to wear tights or a T-shirt with flesh-colored tights.
If the image of an African woman is chosen, then the underwear should be the appropriate color. To make the outfit ready in the shortest possible time, you can make it from New Year’s rain or dissolve a bath sponge and make a skirt from the resulting material. You can sew a T-shirt using tiger or leopard print fabric.
Interesting Egg processing products
Crochet
The second stitch you need to know how to do (and is just as easy to learn as the first) is to assemble the rug using a method known as slip stitch. This is done by passing the hook through the previously formed stitch (while maintaining the loop that is already on the needle) before hooking a new section of ribbon and pulling it through both old loops to form one new one. You'll use this scroll stitch to do something like joining the two ends of a section of chain stitch together.
The only other stitch you need to master to make a rug is called single hook. For the first half of this you will hold the loop on the needle until it is out of the way. You will then take the formed stitch before hooking the new tape grip, which is pulled only through the formed stitch and not through the loop supported on the needle axis. Then one crochet stitch is wrapped by pulling a fresh section of ribbon through both loops on the needle. When you add row upon row to your rugs, you will find that this stitch is almost as important as the main chain stitch.
To start a round rug, line up the quintuple stitch, making sure you don't pull the stitches too tight, and twist the ends of the chain together to form a ring. Now, working through the center of the circle (instead of any of the five individual stitches) for the first half of each and working outside the circle for the second half of each, form enough single crochet stitches—usually about ten—to completely enclose the ring.
Do not stop forming single crochet stitches after completing the cycle. Make the next bottom-up slip stitch used to connect to the ring and continue around the circle, catching - the new row of crochet stitches you just laid down. You'll have to increase the number of single hooks by placing two in every other stitch or so inside. Continue around the developing mat for a few more lines and then lay the piece of work down on a flat surface.
Crafts for the garden
From the bags you can make beautiful decorations for your garden. Polyethylene flowers will look unusual around the edges of the flower bed.
Painting on the fence
If you have a chain-link mesh in your garden, try decorating it with your whole family.
The more diverse the palette of packages, the more interesting the picture will be. We cut long strips from the bags and start creating.
Secure the beginning of the tape by tying it to the stack. And then thread the bag through the holes in the fence and “draw” whatever you want from it. Yellow pacts will make great sun, green pacts will make grass, and blue pacts will make clouds.
How to finish a rug
Continue working around the expanding perimeter until your rug is as large as you want it to be, leaving 3cm of plastic strip hanging from your hook with a few slip stitches. Pull the remaining strip through the last loop and use the crochet hook to stitch from the stitches in the previous row until the strip is used up and none of them are dangling.
Remember that since you will be working around the center (as with a round rug), you will be adding half a centimeter of length for every half centimeter of width, so you should determine the proportions of the finished rug before you begin.
The chain with which you start an oval design should be as long as there is a difference between the length and width of the completed piece. That is, if you need a rug 23 cm long and 14 cm wide, the starting chain should be 8 cm.
To make the technique just described, crocheting a 9cm chain stitch, add three additional chain stitches (for the first turn), a turn and a single back hook (using the top of the 9cm chain stitches as a base). Continue making single crochet stitches right at the end of the series of chain stitches (increase the number of turns if necessary) and continue to knit the rug outward just as you would knit a round design. Increase enough at the ends to keep the rug even and smooth, and stagger the increasing stitches to maintain the oval shape (adding extra stitches at the same points on each round will result in square corners). Finish as you finish the round design.
A square or rectangular rug is made a little differently (working back and forth rather than a round one). Start such a design with a series of chain stitches if there is a desired width for the finished work, then chain three more times, turn and single crochet the next row using the top of the chain stitches as a warp. When you reach the end of the line of single hook stitches, turn (different this time), add another row of single hooks, three times in a row, turn the way you turned the first time, etc.
It's a good idea when you're making a square rug to stop at the end of the first crochet session and count all the stitches in that tier (but not the three chains at either end). Then, as you continue working, check occasionally to make sure you don't increase or decrease the number of stitches you add each time.
You can wash and dry dry wrap mats in the washing machine, but never put them in the dryer. Instead, hang the wet pieces over the line.
Once you have the satisfaction of creating one of these colorful objects, remind yourself again that you received the raw materials for handcrafting for free. And that your recycling efforts have helped limit air pollution. This will probably make you wonder why, when recycling works so well with so little effort on a small scale - big business, government and labor can't make it work on a large scale.
Cockerel
For a bright cockerel you need:
- packages in the amount of several dozen;
- a piece of thick wire;
- a simple pencil:
- adhesive tape or tape;
- several sheets of A4 paper;
- glue gun.
Manufacturing
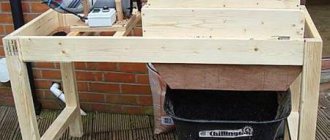
Making the frame of the future cockerel. We draw a life-size template on paper and bend the wire along it. If something turns out unevenly, don’t despair; everything will be corrected when done.
We bend the wire so that the ends become the end of the contours in the places where the paws will be located. A description of the implementation will help achieve realism.
We make a couple of types of stripes from bags. For the torso you will need a strip, the thickness of which is 3 cm, for the upper part up to 2 cm. It is advisable to take it longer, you can get rid of the excess. We string the prepared material onto a wire of small thickness. It turned out to be a crumpled little thing.
To add volume to the cockerel, we put high-density polyethylene on the frame; it is necessary to stuff more material there so that the workpiece does not have too much hardness. We secure the bag with adhesive tape so that the frame takes on the appearance of a chicken. The absence of tape is compensated by wrapping with fabric.
After the workpiece has acquired similar chicken outlines, we form the appearance. We wind strips of wire from the tail, which are wrinkled. High winding density masks errors.
The rooster's head requires a comb and beak. If the figurine will be used at home, then these parts can be made of paper; if outside, then plastic will be needed. You can use a disposable plate for this.
We attach them to the head with a heat gun and continue winding the crumpled strips. We decorate the ruffles on the head with eyes.
- How to sew a decorative mini bag with your own hands
- Crafts from cotton pads - beautiful ideas and tips on how to make decorations and toys with your own hands (70 photos)
- DIY New Year's crafts: 70 photo ideas and a master class on making crafts for the holiday
To make the paws, we create blanks from non-solid wire and attach them to the torso. We fasten them with excess, since later they will be stuck into the ground so that the craft holds itself. The craft is done.
Tools and materials
You will need the following tools:
- Plastic bags.
- Wax paper.
- Iron.
- Scissors.
- Direct contacts.
- Collection of amounts.
You simply save your plastic bags after purchase. If you want a colorful rug, you should collect bags of different colors. The easiest way to do this is to shop in different places. Sometimes the store changes the color of their bags, but this is rare. If you use reusable bags, collecting the bags can be quite challenging. If you really want to do this project, you can ask your friends and neighbors about bags, or you can "borrow" some from the recycling bin at your local grocery store.
The carpet shown in this picture may not be 15 cm long and 17 cm wide, and contains approximately 151 bags. Obviously, for a larger rug you need more bags, and for a smaller rug you need fewer bags.
While blue or yellow bags may be mostly sorted together, white bags tend to have accent colors that can appear in the finished rug.
If you decide to make a carpet with a pattern, then sorting the bags is mandatory. You should look at how many bags of each color you have. As the carpet grows, you will need more bags to go around. Each rug should therefore be different, so use your imagination and your knowledge of your supplies to develop the pattern.
The number of bags needed for each ring varies depending on its size and how tightly you braid it. For example, the inner brown ring has 9 bags, the middle brown ring has 29 bags, and the outer brown ring has 33 bags.
To make comfortable strips, you must cut and fold each bag. The bags are cut along both side seams through the handles. This is the easiest way to get the bag to lay flat, and it also requires the least amount of cutting. Once the bags are cut, you lay the bag open with the original outside (cute side) of the bag facing down. You then fold the long cutting edges inward until the entire strip is about an inch wide. The bags will try to unfurl, but laying them over the back of a chair helps keep them in the correct shape.
If you have very large bags or bags that are thicker material, you can split these bags lengthwise (parallel to the original side seams) to make additional strips.
Easter
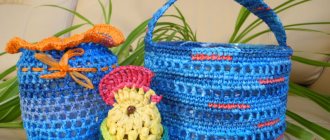
If you need to decorate Easter eggs or need a craft for a child care center, a small attractive basket made of bags will help out.
It is impossible to create such a product without the following accessories:
- yellow polyethylene;
- mayonnaise container;
- glue gun;
- ropes;
- scissors;
- double-sided adhesive tape;
- threads with a needle.
Description
We make a large strip of polyethylene so that it covers the bucket. We wrap the container with tape vertically, gluing it with polyethylene. This is necessary so that there is no visible light between the flounces.
To create flounces, you need to cut off the sides of polyethylene from top to bottom. Along the longitudinal side it should be divided into a couple of parts using scissors. You will need 6 pieces of these blanks.
The long part of the workpiece should be marked with a needle and thread. We gather the part from above, pulling the thread. We tie the workpiece. To tighten the thread, do not forget to see how the workpiece will look on the bucket. It should be wrapped with a flounce once.
Three such shuttlecocks are needed. You need to make sure that the skirts are not too long. If the parameter does not match, you can cut off the unnecessary part.
Use a glue gun to attach the shuttlecocks to the container. Let's start from the bottom. The location of the upper shuttlecock should be exactly along the edge of the container.
We make a flat braid from polyethylene, attach it with glue, covering the sloppy edge of the topmost shuttlecock.
We make a handle by wrapping it around a bucket, or we make it from a thick rope. We decorate the basket with flowers or beads.
The finished product can be filled with cotton wool or other similar material and Easter eggs can be placed in it.
Process
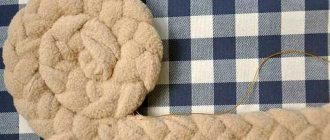
First, start tying the first three strips of bags together. Then place a fairly heavy layer on the knot and then begin braiding. There are only three stripes (bags) in the center, so it won't take much time.
Don't forget to leave a tail for each stripe. This is where you get attached to the next bag. It's actually better if the tails are different lengths because this will force the continuous nodes to be in different places.
To begin shaping the braided bags into a mat, you must lay the braid in a spiral pattern. When you place the braid, use straight pins to temporarily hold the braid together.
You may be better off practicing this step first. Once you have attached the bags to the proper spiral, you are ready to fuse the backing.
The backing is just another plastic bag that has been split apart. You need to have a sheet large enough that everything overlaps. First, place the spiral side down on an iron safe surface. Then place sheets of plastic bags on the back of the spiral.
Be sure to iron only on wax paper. Then wet only on wax paper for a short time. (Time will vary depending on the thickness of each bag). After you separate the iron and wax paper, give the rug a minute or so to cool and harden. If you try to move it while the plastic is still melted, you may ruin the fusion.
As you continue weaving, pinning and merging, there are some things you should be aware of. When you reach the end of the bag, tie the next bag with a square knot (otherwise known as a reef knot). The bags will be tightly compressed so most knots will work.
It is much better if the tails of each bag are tied at different times. When you go to knit the next bag, your knot will make a tiny knot along the braid. This node is very invisible unless all three nodes occur simultaneously. If necessary, cut the strips of the bag so that the tails have different lengths. After the initial cutting, the nodes should fall at different times.
Once you reach the end of your rug, you simply pull the last tails under the rest of the rug and continue the merging process. Once you have merged the rest of the spiral and the final tails, you can trim off the excess support.
While this rug should be quite durable, it is still mostly a showpiece.
Forming a flower
Bend the first petal on the sides inside the bud, secure it with a pigtail and thread. Same with the second petal and loop.
Bend the edges of the remaining petals and attach them to the bud, creating a three-dimensional structure. When the collection is ready, turn all the ends outward. Strengthen the stem with a pair of green leaves.
Plastic bags as hooked mats using different methods
Weave your own mat from a plastic bag:
Method 1
Materials:
- Fixed support for fabric or store carpets.
- Plastic grocery bags.
- Tool for fixing the latch.
- Latch fastening or adhesive tape.
Instructions:
- Press each bag flat.
- Cut off the handles.
- Make a slit on the side so you have a large, flat piece.
- Cut each flat piece to be 1 to 1 cm wide and 6 to 8 cm long. The easiest way to do this is to fold the cutting bag into a smaller rectangle, folding or folding it in one direction only. Cut this rectangle into strips 1 to 1 cm wide; then wrap these strips around a solid object.
- Attach each strip to the base of the rug using a snap fastener tool (easy instructions can be found online or using snap kits, or ask a fabric store associate).
- Leave a border of about three unhooked rows along the edges of the rug to make the binding more durable.
- Tie down the finished rug using carpet tape. Time required: only about 24 hours over the course of a month.
- Fixed support for fabric or store carpets.
Method 2
What you need:
- Plastic bags.
- 2 or 3 large trash bags.
- Large rectangular piece of cardboard.
- Ruler, pencil, scissors.
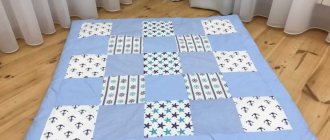
The cardboard serves as a loom, and the strips of trash bags create the warp. The finished rug will be approximately 3cm smaller than a piece of cardboard. Cut ½cm wide by 1½cm indentations, spaced 1½cm apart, along the top and bottom of the cardboard. Cut the trash bags open at the sides and then into long 6cm wide strips. Knit the strips together, then create the bases by wrapping them around the flaps created by the cutouts and up and down the length of the cardboard. Tie the beginning and end diagonally across the cardboard box.
To weave grocery bags, secure the handles, cut the sides of the bags to open them, and tie the handles of the first bag to the base in the top corner of the cardboard. Weave the bag inside and outside the base, alternating the pattern with each row. Tie the handles of the second bag to the end of the first, and continue weaving. Be careful not to weave too much or the sides of the rug will start to pull toward the center. When the braiding is complete, press a row or two towards the ends of the warp. Bring the ends together into a mat.
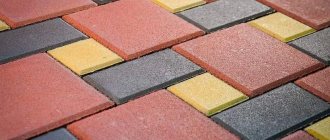
Advantages of a polyethylene carpet
The main advantage of carpets made from garbage bags is the availability of materials. Every housewife has such bags and they are sold in any store. Additionally, the palette of shades of polyethylene products is quite extensive, so there will be no difficulties in choosing. Other advantages:
- Finished polyethylene carpets are wear-resistant. They retain their appearance and remain pleasant to the touch for a long time.
- Polyethylene is resistant to high humidity and temperature changes. When decorating your bathroom interior with this product, you don’t have to worry about it being damaged by water. On the contrary, this material is waterproof and does not absorb liquid.
- Polyethylene rugs are very dense. They do not tear, do not wrinkle or bend. They also do not slip on tiled floors.
- The product is easy to clean. It does not accumulate dirt, so you just need to shake it off or wash it in warm water and soap. At the same time, you won’t have to clean it every day.