Currently, various craftsmen and craftswomen very often create useful and beautiful things from what many throw away. For example, plastic bottles sometimes turn into such unexpected objects. But in their work, such resourceful people require specialized assistant tools.
When working with plastic bottles, for example, many require specialized devices to cut them. It's not just whole bottles that make beautiful works of art.
There are a lot of ways to cut plastic bottles and each gives its own result, from wide ribbons to fishing line.
Slicing devices can have different designs and design features. The photo of plastic bottle cutters shows a huge number of different types of such useful devices.
In our material we will more specifically analyze the design and manufacturing options of the carver.
Device and scope of application
The use of a bottle cutter occupies not only a place in the manufacture of various crafts, but also in other areas.
The plastic thread can even be used to make fishing gear; a very small diameter tape is used in the form of a fishing line. This allows you to use old, no longer needed bottles in the household and other areas.As for the design of the plastic bottle cutter, it all depends on which design was preferred. In general, the principle of operation of all options is the same and only the appearance and functionality changes.
The item consists of a body made of any materials, a razor blade or a stationery knife and fasteners that prevent the structure from falling apart.
To make it easy to secure the bottle in the device, a special groove is made in it. The blade is also attached to a groove, and when cutting several different grooves, it becomes possible to make strips of different thicknesses.
There is also a simpler design that does not contain a separate housing. It is this idea of a bottle cutter using improvised means that we will talk about next.
Check it out here too!
- Crochet a crop top: patterns and ideas
How to make a homemade metal detector - the best diagrams, instructions. Review of proven options for creating a simple do-it-yourself metal detector
- How to choose a washing machine: advice from professionals, the main subtleties of choosing a reliable and high-quality machine. Types, types, programs and functions
Adapting processing to home conditions
There are no difficulties in recycling PET packaging waste.
But there are very important key steps that should be strictly followed:
- Sorting is the most important point. Plastic must be sorted by color, so the quality of the recycled material will be much higher. Caps, rings and labels must be completely removed.
- Pre-wash. If this is a water container, then this stage can be skipped. It is advisable to wash the inside of packaging for dairy products and drinks. This can be done with running water.
- Shredding bottles. Impact crushers with long, sharp blades are ideal. Industrial equipment is very expensive, so homemade devices are suitable for home use. Design options are described below.
- Washing. Regular containers (basins, buckets, tanks) are suitable for washing bottles. For bottles that are not heavily soiled, washing them in regular warm water is sufficient. To remove food residues, you can use a three-stage wash: soaking in a soda solution, washing with dishwashing detergent, rinsing in running water.
- Drying. You can use an oven. Drying temperature 100-120°C, time 2 hours. It is advisable to periodically turn the crushed pieces.
- Extrusion. Since it is intended to use exclusively a home-made device (description below), options for making either a granule, or a rope or thread are possible.
Simple cutter without body
As already mentioned, for this design you don’t need to use any frame or body at all. Many people make such devices by placing them directly on the desktop.
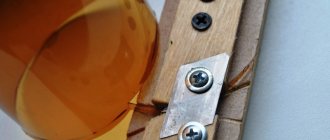
Please note that you can add mobility to the device by making it on a block.In addition to a block or table, you will need two bolts, two nuts, a blade from a utility knife and several washers for the nuts. A drill is also useful for making holes for bolts.
First of all, when using a block as a base, you will need to sand it with sandpaper. Next, we make holes that will be quite a bit smaller in diameter than the bolts so that they can be screwed in steadily.
We screw in the bolts and put one large washer on top of them. In fact, you can put on more washers depending on the exact size of tape you need.
Check it out here too!
Homemade lanterns with your own hands: step-by-step instructions on how to make a beautiful and effective lantern (110 photos)- Grout - use, reviews, leading manufacturers
Replacing a pressure tap - a step-by-step description of how to change a pressure tap with your own hands (80 photos + video)
We put a blade from a stationery knife on top of one of the bolts with a hole and put another washer on top, tighten everything with nuts.
Now the bottle cutter is ready. Next, we’ll look at what else can be used to make a device for cutting bottles.
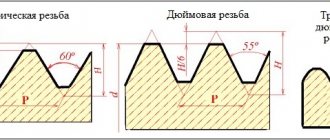
Action No. 3 Making grooves for the blade
Marking the grooves for the blade
At a distance of 5 mm from the deepest point of the slot, several grooves for the blade are located. The distance between the grooves is also 5 mm.
Marking grooves to depth
The depth of the grooves is chosen so that the blade fits completely into them, so their depth should be 17 mm.
Cutting grooves for the blade
The block is again clamped in a vice and holes are made for the blade using a saw.
Appearance of a block with recesses and grooves
Next, you need to clean all the slots using sandpaper.
Using sandpaper, clean all recesses and grooves.
As a result, the block acquires a better appearance.
The bar acquires a better appearance
Slicing block
The following device is designed for the same purpose, but has a slightly more complicated design. With this option, cutting plastic bottles with your own hands will be more accurate and the stripes will become smoother.
To make it you need a block, half a razor blade, screws with a large head, a file and sandpaper. A ruler and pencil will also be useful for measurements and markings.
It is necessary to draw a line vertically from the very top of the beam, and a line is also drawn horizontally about 5 centimeters from the top.
We saw the vertical one 10 centimeters from top to bottom in half. We file the horizontal one so that the blade can be inserted there.
Check it out here too!
What is an acoustic switch: device, operation, types and features of the device (100 photos)- Low and high pass filter: making frequency filters and how to create high-end circuitry (95 photos + video)
Do-it-yourself electric bike: how to build an inexpensive and powerful electric bike from scratch (100 photos)
We sand the cuts and put half of the blade into the horizontal one. We tighten the screws on both sides of the blade so that the caps do not allow it to fall out.
Next, a bottle without a bottom is inserted into the vertical groove with the beginning of the tape cut in advance.
Pull the ribbon and get the desired effect. You can implement these and many other ideas on how to make a device for cutting bottles yourself.
Step #4 Installing the Blade Holders
To prevent the blade from falling out, it is necessary to install clamps. Two nails about 80-100 mm long are ideal as such. They should be hammered 5 mm below the level of the recess and bent upward.
Expanded recess view
After this, it is recommended to expand the recess made at the beginning. This is necessary so that the bottle moves freely when cutting and does not cling to anything. You can make an extension using a saw.
Bottle cutter is ready for use
Operation of the device
To cut a bottle, you need to install a blade in the bottle cutter. It is installed with the cutting side down.
The bottle is installed in the slot
The next step is to install the bottle into the slot.
Cutting by pulling the tape towards you
Cutting is done by simply pulling the tape towards you.
Photos of devices for cutting bottles
Read here - Design of a small dressing room - choosing a location, design, layout, 110 photos of the best design projects
Crafts from plastic bottle caps for the garden
Sealed bag
1.
Trim the thread on the neck of the bottle.
2.
Place the plastic bag over the spout and screw on the lid.
This seals the bag, which promotes long-term storage of food.
Original curtains made from lids
These original curtains can be used as interior doors to decorate a house, cottage or apartment.
Simply connect plastic bottle caps with fishing line or thread. At the same time, the curtain pattern can only be limited by your imagination.
DIY paintings from lids
Plastic bottle caps can even work in fine art.
Try to make such a picture, because even children can do it.
You will need:
- Canvas (any desired size).
- Plastic bottle caps.
- Paint (acrylic) and brush.
- Pencil.
- Ruler.
- Glue (not quick drying).
- An assortment of jewelry, beads, mosaics or buttons.
1.
Using a pencil and ruler, mark the sections on the canvas.
2.
Glue one large plastic cover in the center of each section. Then you can glue lids of different sizes and shapes to the first one.
3.
Paint the entire canvas with black paint and let dry.
4.
Glue an assortment of jewelry in the center of each lid and let dry.
5.
Now the sections can be decorated as you like.