How to repair a scratched disk ? This topic is quite serious and complex. A scratched disc can be repaired in several ways. Let's look at them in more detail.
The first way is to use programs designed to repair scratched disks.
I found a program on the Internet called Non Stop Copy. As user comments and practice show, the program is valuable and copes with its tasks.
The second way is to use available tools. In this video you can see a very interesting method. I think it will help a lot of people!
The main thing is to do everything according to the instructions:
I quote the comments of those who did everything according to the instructions:
— the disc with the game barely loaded, the game did not install, I WASHED IT WITH WATER AND PASTE, I don’t know how, but the installation works. waiting for the end, author +100500.
- Works!!!! Thank you very much author
— I answer, everything works! I RESTORED THE DISK from the XBOX 360, I SWEAR!!!
So if you want to restore a scratched disk , try in practice the method suggested in the video... Everything should work out.
And now a short overview of the tips that are offered to users regarding disk recovery. These are not my advice, but I completely agree with them.
Do-it-yourself car polishing
When you first look at a car, you evaluate its appearance. First of all, the eye is attracted by bright elements - this applies to wheel rims. The condition they are in determines how highly the car will receive an attractive rating. In fact, the condition of the wheels will tell not only about the beauty of the car, but also about the quality of the wheels in general. Let's see how to polish discs at home with your own hands.
Why polish?
New wheels always make owners happy. But their appearance remains as beautiful and shiny only for a few months of use. And then various defects will begin to appear. Discs are highly susceptible to corrosion processes, and they corrode especially quickly in harsh climates and due to poor-quality roads. Therefore, the owner needs to periodically clean them and get rid of scratches and traces of corrosion.
The alloy from which wheel rims are made is most often coated with paint. However, painting is not enough to get rid of the shabby appearance. Wheel polishing is also required. This process is not easy, but it is completely doable on your own.
Estimation of labor costs
The first step is to determine whether you really want to perform this operation. After all, during the process you will have to inhale vapors of chemical compounds and polishing dust for several hours. You will also have to get your clothes and hands dirty. In addition, polishing car wheels will require financial investment. And all this so that the discs reflect the puddle near the garage.
If the car owner agrees to this, then it is worth purchasing protective gloves (preferably rubber). Experts also recommend using a respirator. After all, beauty is good, but health is more important.
Preparatory procedures
Alloy wheels, using factory technology, are coated with a special protective varnish film. When it dries, it becomes hard. The hardness coefficient is equal to that of the alloy itself. It is unlikely that this film can be removed mechanically. Therefore, to remove the protective layer, you need to use a paint remover.
When buying a remover, you should definitely check with the seller what it should be used for and what basic components are in the composition. Paint removers are not toxic, but may be useless if the disc was previously painted using powder technology. But if the element has not been painted, then using varnish remover, according to the manufacturer’s instructions included, the protective layer can be accidentally removed.
Then you should thoroughly wash the disc from the liquid - it can sometimes cause corrosion. It is also recommended to thoroughly clean the element from dirt. Sand can seriously damage the appearance of the part in the future if it suddenly gets into the processing area.
Grinding
Polishing discs should begin with grinding. You don’t have to grind it, but only when the element is already polished and there are no serious defects on it. In this case, you just need to update them. In all other cases, grinding is mandatory.
Grinding technologies
You can sand the discs by hand without using any tools. This is a slow and ineffective method. Hand sanding is used only for hard to reach areas.
You can also grind with various hand tools that transmit torque to the abrasive attachment. As for the type of drive, this is not at all important. You can even use a regular hand drill or pneumatic tool.
In addition, grinding on machines is used. This method is the fastest. But there is a minus - it is very difficult to find special equipment. Some craftsmen are trying to make such machines themselves. The most important thing is to give the disk rotation, while the grinding element must have certain abilities to reach hard-to-reach places.
Another method that can be distinguished is grinding directly on the car hub. Here the machine is simulated. The required wheel is suspended using a jack or lift, and then torque is supplied from the motor. The grinding process can be carried out manually with hand tools, or you can use pneumatic or electric tools at low speeds. The main thing is that such a tool works at low speeds.
If the wheel rim has the correct configuration, then you can do without grinding. In this case, processing is carried out by turning the disk on a lathe.
How to grind?
There is nothing special or supernatural about disc grinding. General principles apply here. Initially, the wheel disk is processed with coarse-grained abrasive materials. As for the type of abrasive, it is selected according to the type of defect that needs to be removed. Then materials with finer grains are used. Finish processing with each material after removing traces of processing with the previous abrasive.
It is important to consider the following points:
- During the processing process, it is recommended to constantly remove the mixture of metal powder and abrasive from the surface. All this again scratches the surface of the disk.
- When switching to a finer abrasive material, the surface of the disc to be treated must be wiped with a cloth.
- Grinding is carried out at the lowest possible speed to prevent overheating.
- There is no need to put in a lot of effort. The process must be controlled visually. If necessary, grinding can be stopped for a while. Using a coarse-grained abrasive for work can result in miscalculation of the effort and disruption of the disc profile.
Tools and materials
A variety of drill attachments are used for grinding. Disc flanges and smooth areas are sanded using flat attachments with replaceable emery discs. For places where the circle cannot reach, small cylindrical tools are used. Unfortunately, there are always areas where no tool can reach. There are no alternatives in this case - you will only have to work manually.
Very often, when polishing discs, the following set is used: abrasive with sizes P240, P400, P600, P1000 and P1200.
Polishing and finishing
After grinding, the discs are polished. The process is usually carried out using the same tools that were used for grinding. But instead of an abrasive nozzle, softer devices are used.
Felt attachments have proven themselves to be excellent for polishing cast wheels. They perfectly hold polishing pastes on the surface. Felt tips are also used. Fabric attachments are excellent for treating difficult areas. Experts recommend using fabric stitching circles. They are produced in a variety of designs. They are intended for initial polishing as well as finishing work.
Materials for work
Do-it-yourself disc polishing can be done using absolutely any materials. Now the choice is simply huge. The main thing is consistency. You should start with a coarse-grained paste and finish with finer ones.
For example, GOI polishing paste, popular in Russia, is produced in various forms. Thus, coarse-grained and fine-grained differ visually. The darker the paste, the finer the grain. To polish wheel rims, you should buy light green and black-green.
If you decide to polish with diamond paste, then you need two types of it. One type is with a grain size from 100 to 40 microns, and the other for finishing is from 14 to 5 microns.
It is important to consider the following features:
- When applying polishing pastes, it is necessary to thoroughly rub them into the surface being treated, while monitoring the color changes.
- GOI paste requires preheating or it can be diluted in kerosene.
- Before moving on to the final polishing of car wheels, they need to be thoroughly cleaned with a microfiber cloth.
- If the disc overheats and black stripes appear on it, the polish should be immediately removed from the surface being treated, and then the whole work starts all over again.
- The paste is applied to the circle and sprayed with slow movements over the entire surface. Over time, it will become visible visually that the surface becomes mirror-like.
- Be sure to remove excess paste from the disc.
Filling scratches
In order to fill the scratches, we can use the usual Pronto polish (most likely, other wax-containing products will do, provided that the base does not dissolve the polycarbonate).
It is necessary to apply a little polish to the scratch, then rub it with a soft piece of cloth - in this case, the wax will fill the scratch of our disk and practically destroy the refraction in this place.
However, this method does not last long. Basically week two. Then you need to either make a copy of the disc, or fill in the scratches again.
Mirror polishing of car wheels
Car rims are like shoes for a car. It’s not for nothing that at first glance a person is judged by his clothes, or more precisely, by his shoes. It's the same with a car. Even if the car is worth several million, if the car's rims are in poor condition, dirty and scratched, this will worsen the appearance of the car. Polishing car rims will help restore the original newness, which any car enthusiast can handle.
A shiny disc really looks very beautiful, don’t be lazy to polish yours
Types and features of wheel rims: stamped and not only
When you decide to polish yourself, study the types of car wheels, because for each type there are rules and costs.
Stamped wheels are a common type of “shoes” for cars. They gained popularity due to their low price, 1000-1500 rubles. More often, stamped ones are “native” to the car, and drivers are in no hurry to change for others. And there’s no point in that, because these ones won’t split when they fall into a hole, but will crumple, as a result of which they can be repaired without any problems
The disadvantage of this type is its weight, unlike forged and cast analogues. Also, the lack of variety in appearance is a disadvantage. But this problem can be easily overcome with the help of wheel covers, which will change the appearance of the car.
Cast
Cast ones differ from stamped ones in their lightness, because while the former are steel, the cast ones are aluminum. The second advantage of this material is thermal conductivity, which helps remove heat from the brake mechanisms. The technology for manufacturing alloy wheels allows you to create any shape, which is why car owners love them.
But there are also disadvantages. If the discs fall into a hole, they will crack, and it is impossible to restore them, only replace them by purchasing one for 4000-5000 rubles. Despite this, the cast material has many supporters among drivers.
Forged
Automotive forged wheels combine the advantages of the first two types. Despite their lightness, forged ones are durable and do not split if they fall into a hole. But there is also a minus here. Due to its strength, the load is transferred to the suspension, so getting into holes with a forged version is fraught with serious damage.
Forging is a very durable invention and is very popular
They do not differ in variety of appearance, but the price is maintained at the level of 3000-4000 rubles.
But no matter what choice you make, over time you will need to polish the wheels, and we’ll figure out how to do it yourself further.
Grinding methods
Wheel rims are polished in different ways:
- Manually, without using additional equipment. This method is not popular due to the waste of time and effort;
- Using equipment for polishing discs, a polishing machine or an ordinary drill with a set of special attachments;
- Assembling a polishing machine with your own hands. Such equipment is only available in service stations, but handymen manage to assemble the machine themselves.
- Using a car hub. To do this, we hang the wheel using a jack and force the engine to rotate it. The polishing itself is done manually or using a machine.
The choice of method depends on your capabilities.
Materials and tools
Whichever polishing option you choose, you will need special tools for the job, without which polishing car wheels is impossible.
- Degreasing car shampoo that will remove surface dirt;
- Lint-free towels;
- A set for polishing discs, including sandpapers of different grain sizes (from P240 to P2000);
- Polishing pastes for metal, with and without abrasive;
- Protective varnish or polish.
The main thing is to choose the right polish for the job. But don’t be afraid to make a mistake, because choosing it is not so difficult.
You will definitely need a wheel polishing kit.
Types of wheel polishes
There are many variations of car polishes on the car cosmetics market, but they are divided into three groups based on consistency: powder, gel and solid.
Powder polishes are of the aggressive type. The composition contains hard particles that help cope with scratches and other defects. Polishing discs from scratches using abrasive powders requires care, otherwise overdoing it can ruin the surface forever. These polishes are considered durable and wear-resistant, since they are applied under the influence of current.
The creamy polish is suitable for owners of new cars that have not been seriously damaged on the road. Metal polishing pastes gently polish the surface and form a protective layer that will retain its shine for a long time.
Solid polishes, for example, GOI, do not lose popularity even after decades. Polishing aluminum wheels with these means is not easy, but the price and high-quality composition attract drivers. In addition, wax polishes provide additional protection, but are short-lived.
Having finished choosing materials, let's move on to the main question - how to clean car wheels and is it possible to do it yourself?
Disc polishing: process and principle of operation
Of course available. But for this you need to master the skills if you take up polishing for the first time.
- Let's prepare the car for work. First you need to lift the car and remove the wheels. Please note that if polishing is carried out for the first time, the surface is probably covered with a special film. It is impossible to remove it mechanically, so take care of the paint remover in advance. Advice. Do not work hastily by lifting the car on a jack - polishing the discs with your own hands will not give results. First you need to clean the surface of dirt and debris, wash it with shampoo and dry it.
- It is advisable to use a machine for polishing discs with your own hands and secure the part to be sanded on it. Pay attention to the presence of corrosion. If it has managed to touch the surface, it must be removed. Slowly clean the surface with coarse sandpaper. It should be selected based on the damage to the disc. If they are minor, start with P600-1000 sandpaper. For serious cases, a coarser grit material will be required.
- Whatever sandpaper you start with, go round and round with lighter grit sandpapers. Polishing with one circle lasts 3-5 minutes. After each cleaning, rinse the surface or wipe with a soft cloth. Grinding of cast wheels is completed with sandpaper of P3000-P4000 grit.
- Mirror polishing of cast wheels is carried out with a special soft paste. To do this, apply the product to the polishing wheel and use circular movements to rub it into the surface. Using the machine, the principle remains the same - make sure that the polishing is uniform and no problems will arise. Polishing discs to a mirror finish takes 40 - 90 minutes.
- We complete the work using protective varnish for alloy wheels. You can apply it with a brush, the task is to ensure uniform application and avoid uneven transitions. One coat of varnish is rarely enough, so after applying the first coat, let it dry (at least 2 hours), then cover the surface a second time. Painting car wheels prevents corrosion.
- We rinse each part with water to remove small particles and wipe dry. Do-it-yourself polishing of alloy wheels is completed.
Do-it-yourself work is always of better quality and the result is doubly pleasant
This is the list of basic polishing works. Changes will need to be made during operation depending on the sanding method and individual needs. Polishing of the wheel spokes may be necessary. Clean with a regular cloth using liquid or aerosol polish.
Precautions and Tips
Any human activity, if not handled carefully, can cause a lot of trouble. To prevent this, take care to ensure health safety and perform the job correctly.
- Before you start polishing, take care to protect your skin: wear gloves and a mask that covers your face, because most polishes and varnish for aluminum wheels are toxic;
- You should not use maximum effort to remove defects. Light pressure on the polishing cloth is enough;
- Do not allow the surface to overheat - grinding the discs is carried out at a slow pace by hand and at low speeds when using a grinding machine;
- Before purchasing a polish, make sure that it does not contain anhydrous ammonia or acids. If they are present, the use of polish will lead to corrosion;
- If it is not possible to remove the wheels, it is better to polish them manually so as not to touch the machine on any foreign surface of the car.
In addition, there are little tricks that will simplify the work.
- Polishing discs to a mirror shine with your own hands will go faster if, using GOI paste, you heat it up or dilute it in kerosene;
- Don't have a sander? No problem - use an ordinary drill at low speeds;
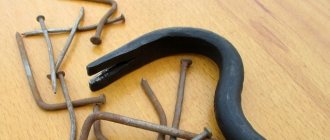
- Deep scratches can be removed with a file, and marks from the curb can be cut off with a grinder;
- Do-it-yourself grinding of brake discs in hard-to-reach places will go faster when done by hand, and to get into grooves or threads that cannot be polished with a machine, use a toothbrush with a polishing cloth wrapped around it;
- Instead of polish, buy regular toothpaste;
- Primer treatment will serve as an additional protective layer;
- The varnish will lay down in an even layer if you spray it from the can in a circular motion;
- Weekly washing of discs with special protective shampoos will help maintain the polishing effect;
httpv://youtu.be/6snNk8fFsd0
The mirror polishing of the discs is complete. Now admire the reflection of puddles in the shiny surface and don’t be afraid of possible damage on the road. Remember to repeat the procedure every season or every 6 months.
Source: https://krasimavtomobil.ru/tune/uznajte-kak-ya-poliroval-diski-avtomobilya-oni-do-six-por-blestyat/
Part 1: Check if your scratched DVD or Blu-ray disc can be repaired
Not all scratched DVDs can be repaired. To save time on pointless attempts, you can take a short test to gain access to damage. Just keep the disc in the sun. If you can see the sunlight shining right through the scratch, then the scratched DVD or Blu-ray disc appears irreparable. You'd better buy a new disk. If your disc is scratched all around, then it is also a badly scratched DVD or Blu-ray disc. In short, it is difficult to repair a badly scratched DVD with little tricks.
If there are only small scratches on the surface, then the likelihood of restoring the scratched disc will be high. Additionally, if most of your recently played discs are scratched, you also need to check your DVD/Blu-ray player or drive.
Warnings
- To avoid damage to the hard drive, you need to make sure that the drives are completely dry after polishing and are free of wax or polishing compounds. Only after this can you try to read data from them.
- You should not apply solvent to the surface of CDs, because it can change the chemical composition of the substrate and lead to the appearance of a film, making the disc unreadable.
- Any of the methods for saving disks can lead to further damage to them, so be sure to follow the instructions.
- If you want to turn the disk towards the light to check it for holes in the protection layer, you should try not to look at the light for a very long time. For this, a 60-100 watt lamp is enough to notice the holes in the foil layer. The disk cannot be turned towards the sun.
Other drive
Just because your drive refuses to read the disc is not a reason to think that others will do the same. If there are still suitable reading devices in the house (office), then we take the damaged item to them. If there are no such people nearby, go to your friends, and if your friends are outside the access zone, go to the nearest computer club or just a store. In general, in our age of advanced technology, finding a drive is not such a big problem. The fact is that there is some possibility that a disk that one drive could not read may well be too tough for another.
In addition, limiting the speed of the drive may be useful. There are quite a few programs that can do this (for example, CDSlow). If they didn’t help, don’t despair – maybe everything can still be fixed.
Part 3: Making a copy of your DVD/Blu-ray in case of scratches or other damage
If you don't want to run the risk of DVD or Blu-ray data loss again, it's better to copy the DVD/Blu-ray contents to a new disk or computer. In addition, you can also upload digitized content to the cloud service. This way, the next time your disc gets badly scratched or broken, you can still watch DVD/Blu-ray movies.
Copy Blu-ray to Digital Files with Free Blu-ray Copy
You can quickly copy Blu-ray to Blu-ray disc/folder and ISO files using Free Blu-ray Copy. Free Blu-ray Copy Software is capable of copying Blu-ray main movie or full disc smartly. Almost all popular Blu-ray discs are supported. You can backup Blu-ray to your local drive or external hard drive without losing quality. It is highly recommended to copy Blu-ray after removing scratches from Blu-ray disc.
- 1. Copy Blu-ray disc/folder to Blu-ray folder/folder or ISO image file in original 1:1 quality.
- 2. Select Blu-ray ripping mode from main movie or full disc.
- 3. Support Blu-Ray in NTSC and PAL formats.
- 4. Fully compatible with all popular Blu-ray discs.
Step 1
Free download, install and launch Free Blu-ray Copy. Insert the Blu-ray disc into your computer and make sure it is detected.
Step 2
Expand the list of sources. Select the name of your Blu-ray drive. Later the program will download Blu-ray movies.
Step 3
Select Blu-ray folder or Blu-ray ISO image file as the destination storage type.
Copy Blu-ray to Hard Drive
Copy Blu-ray to ISO Files
Step 4
Select Blu-ray Copy Mode
from
Full Copy
or
Main Movie
. Later, set the title of your Blu-ray disc in
Disc Label
.
Step 5
Click on Transfer Settings
icon. You can configure Blu-ray ripping settings here.
Step 6
Click Start to Get Started
backup your Blu-Ray collection.
Then click OK
to exit the Blu-ray ripping process.
The versatility of regular wax
In some cases, users need to physically remove the polymer using polishing. But if too much force is applied during this procedure, it can negatively affect the final refractive index of the lens, which will significantly interfere with data reading.
Experts assure that high-quality polishing of shallow scratches with wax is effective, since the laser passes through existing defects, even if they cannot be detected with the naked eye. To avoid errors, you must follow the following recommendations:
- On the surface of the disc you need to apply the thinnest possible layer of wax, Vaseline, colorless lipstick or neutral shoe polish. The product should fill all scratches. The wax should be left on the surface of the disc for 5-10 minutes.
- Use a clean cloth and only use radial movements to wipe the product. If you use wax from a store, then you should definitely study the instructions from the manufacturer.
If the wax helped launch the CD, then you need to immediately transfer the information to another CD. The main danger is that polishing is only a temporary solution to the problem.
Expert advice
Experts have created a certain list of recommendations, thanks to which you can restore the previous performance of the CD so that you can copy valuable information. The most effective tips are:
- Severely damaged disks can be restored only in 2% of cases. If cracks and scratches are too deep, they can reach the protective layer, making the product unsuitable for further use. Modern programs for erasing disks negatively affect the protective layer, reducing their service life.
- To avoid further damage to the CD, you must hold the product by its edges.
- You can try to remove minor scratches with a dry melamine sponge. Using light pressure, wipe the disc from the center to the outer edge. To get the perfect shine of the treated surface, you need to use waxing.
- Before you decide to restore a CD with important information, you need to practice on media that you don’t mind ruining.
- Classic Xbox discs can be sent to Microsoft for replacement.
- It is better to make copies of the polished discs in advance, since they may become unusable due to incorrect movements.
- If the disk with information can no longer be restored, then you can use it as a coaster for glasses. In addition, there are many interesting ideas that can be used to reuse old CDs.
Toothpaste can be replaced with peanut butter, but its consistency should be soft (without large fragments). During the experiment, it was proven that oily viscosity provides effective polishing.
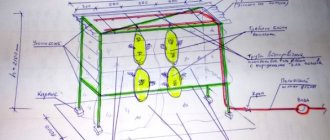
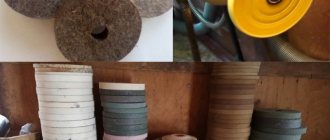
Homemade wheel polishing machine
For a faster and more productive way of polishing your discs to a shine, you can make a homemade machine with your own hands. To make a homemade machine you will need:
- Square metal profile (40*20 or 40*40).
- A car generator or an engine from an old washing machine.
- Belt drive pulleys, 2 pcs.
- The drive belt itself. The number of streams is selected depending on the installed pulleys.
- Welding machine for assembling the structure.
- Electrical wires with crocodile clips.
- Power supply from 220 to 12 V, or battery.
- Fastening bolts, nuts.
- An old wheel hub with a nut for installing and supporting the disc being machined.
Short description
The disc may be scratched due to rough handling or falling. Even small scratches and dirt on its surface can cause an error to occur when reading a CD. Deep cracks prevent the drive's laser beam from reading information. Fingerprints and smudges can be easily removed, but other damage can take a bit of fiddling to remove.
If the scratch is too deep, it not only prevents the laser from reading the recorded data, but can also damage the reflective coating of the storage medium. Tiny damage can be repaired with cotton wool and cologne. The disc must be held by the edges. The surface of the product should be sprinkled with cologne and wiped with cotton wool. After these manipulations, the disc must be playable, otherwise you will have to resort to more radical methods.
You can repair the disk using GOI paste. This product is also used to restore the integrity of monitors and LCD TV screens. To remove cracks, you need to do three main steps:
- Dilute the paste with an alcohol-containing solution, but in strict accordance with the instructions.
- Saturate a piece of soft fabric with the product.
- Perform scratch removal.
At the final stage, all that remains is to clean the surface from any remaining paste and check the functionality of the media.
How to polish a car after painting
Work to eliminate painting defects is carried out in several stages: grinding, polishing, applying a protective coating. Depending on the type of defect (if it is dull, for example), initial grinding is not used. The process begins with deep polishing. In other cases, the order of work does not change.
Grinding
Sanding is done using sandpaper. The wet method involves pre-soaking the skin with 2000 grit abrasiveness for 10 minutes. Then the surface of the body is polished in a circular motion, while the paper is constantly wetted.
Dry sanding can be done using a machine. Use sandpaper to remove possible sagging, making cross-shaped movements with the tool. Use sandpaper with an abrasiveness of 3000-4000 grit.
Abrasive polishing
The second stage will be polishing the car after painting, using an abrasive paste. Can be polished by hand or using a polishing machine.
The paste is evenly applied to the surface, choosing a working area of no more than 40 square meters. cm. Polish in a circular motion, gradually changing the composition of the paste, reaching a polishing composition without abrasive. After each paste change, the working surface of the body must be washed.
If the car is painted with matte paint, then in 80% of cases gloss will appear after polishing. The composition of the matte varnish should use special clay, which retains its matte finish even after polishing, but in order to preserve the selected color of the car, polishing the matte surface is allowed with pastes without abrasives. After the procedure, protective polishing is mandatory.
Protective polishing
Protective polishing of machines is used as a final step. The polish contains Teflon and wax. Protective coatings are applied either manually or by machine with a felt or leather attachment.
Polishing a car after painting takes relatively little time if you choose the optimal tool and the necessary polishes. This procedure can be done independently, which will allow you to save money and gain experience, since protective polishing should be carried out every 3-5 months.
With constant use of a car, various abrasions and defects appear on it, and some of them simply cannot be gotten rid of. Of course, you can regularly contact a car service, but the cost of such services is quite high, and it takes a lot of time to complete all the actions. Although, many people can cope with such a task as polishing a car after painting (and not only) on their own. This and much more will be discussed in this article.
Relevance of abrasive mixtures
To figure out how to remove scratches on a disc, you need to choose a suitable mixture that will have optimal performance characteristics. To polish the surface of a disc, you can use classic household products, but the most effective and safest are Brasso and 3M wipes. You can also achieve the desired result using a fine-grain mixture for rough finishing or polishing vehicles.
If, after studying the instructions, it was decided to use Brasso polishing, then for the procedure it is necessary to prepare free space in a well-ventilated area in order to protect yourself and others from dangerous fumes. Be sure to adhere to safety precautions and available chemical warnings. For example, rubbing alcohol is classified as flammable, and it can cause serious irritation to the skin, mucous membranes of the eyes and respiratory tract. Action plan:
- The first step is to apply the abrasive mixture to a clean piece of lint-free cloth. For these purposes, you can use an old shirt, as well as a cloth to clean your glasses.
- Use gentle movements to rub the mixture into existing scratches. It is best to start from the center of the disk, gradually moving towards the edges. Before polishing, the product must be placed on a flat surface to avoid accidentally damaging the front side. If the product is rubbed in a circular motion, this may lead to the formation of small scratches, which will negatively affect CD reading.
- At the final stage, all that remains is to remove the remaining abrasive mixture under warm running water. The disc must be allowed to dry on its own before using it.
If the manipulations performed did not allow you to achieve the desired result, then you need to repeat all the steps. When this does not help, you will need the help of specialists.
Preparatory work
Polishing the car and wheels separately should be carried out in a ventilated place with good lighting. To make all work easier, remove the rims from the car. This will allow you to easily move them around the room and place them in a comfortable position. Next, prepare the following tools:
- Protective equipment (goggles, gloves, respirator). It is expected to work with chemicals, contact of which with skin and eyes is not recommended. During sanding work, fine dust will be generated. A respirator will protect your airways from it.
- Special means for washing. Necessary for removing old paintwork.
- Grinding tool. A drill with special attachments or a professional grinding machine. In rare cases, sanding paper P240, P400, P600, P1200 is used.
- Felt, rag, felt nozzles for polishing.
- GOI paste, polish.
Having collected the necessary equipment, get to work.
https://youtube.com/watch?v=bP6nDktpFxE