Tired of chopping wood with an axe? We suggest you make a homemade wood splitter with a washing machine engine. This simple mechanism will allow you to easily cope with the splitting of large logs and quickly prepare firewood for the winter.
To make a wood chopping machine, you will need a minimum of parts. Therefore, the result is a productive and inexpensive design.
Do-it-yourself wood splitter from a washing machine engine
Homemade products from a washing machine motor (video selection, photos, diagrams)
1. How to connect a motor from an old washing machine through a capacitor or without it
Not all washing motors will work with a capacitor.
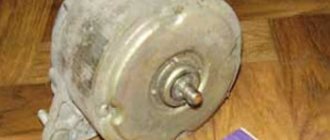
There are 2 main types of motors: - with a capacitor start (a permanently switched capacitor) - with a starting relay. As a rule, “capacitor” motors have three winding terminals, a power of 100 -120 W and a speed of 2700 - 2850 (centrifuge motors for washing machines).
And motors with a “start relay” have 4 outputs, a power of 180 W and a speed of 1370 - 1450 (washing machine activator drive)
Connecting a “capacitor” motor through the start button may result in loss of power. And using a permanently switched capacitor in a motor designed for a starting relay can lead to burnout of the windings!
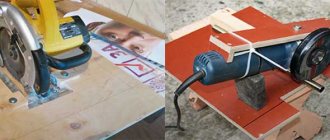
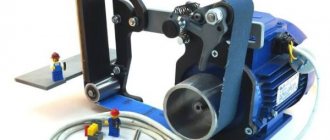
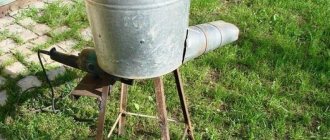
2. Homemade emery from a washing machine motor
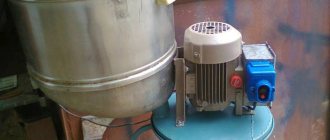
3. Homemade generator from a washing machine engine
Author: Konstantin
Today we will talk about converting an asynchronous electric motor from a washing machine into a generator. In general, I have been interested in this issue for a long time, but there was no particular desire to remake the electric motor, since at that time I did not see the scope of application of the generator. Since the beginning of the year, work has been going on on a new model of ski lift. Having your own lift is a good thing, but skiing with music is much more fun, so I quickly came up with the idea of making such a generator so that in winter on the slope I could use it to charge the battery.
I had three electric motors from the washing machine, and two of them were absolutely working. I decided to convert one of these asynchronous electric motors into a generator.
Looking ahead a little, I will say that the idea is not mine and not new. I will only describe the process of converting an asynchronous electric motor into a generator.
The basis was taken from an electric motor of a washing machine with a power of 180 Watts produced in China in the early 90s of the last century.
I ordered the magnets from NPK Magnets and Systems LLC; I had previously purchased magnets during the construction of a wind power plant. Neodymium magnets, magnet size 20x10x5. The cost of 32 pieces of magnets with delivery is 1240 rubles.
The alteration of the rotor consisted of removing the core layer (deepening). Neodymium magnets will be installed in the resulting recess. First, 2 mm of the core was removed on a lathe - the protrusion above the side cheeks. Then a 5 mm recess was made for the neodymium magnets. The result of the rotor modification can be seen in the photograph.
Having measured the circumference of the resulting rotor, the necessary calculations were made, after which a strip template was made from tin. Using a template, the rotor was divided into equal parts. Neodymium magnets will then be glued between the risks.
8 magnets were used per pole. There are a total of 4 poles on the rotor. Using a compass and marker, all magnets were labeled for convenience. The magnets were glued to the rotor with “Superglue”. I will say that this is a painstaking task. The magnets are very strong, I had to hold them tightly when gluing. There were times when magnets came off, pinched fingers, and glue flew into my eyes. Therefore, you need to use safety glasses when gluing magnets.
I decided to fill the cavity between the magnets with epoxy resin. To do this, the rotor with magnets was wrapped in several layers of paper. The paper is secured with tape. The ends are covered with plasticine for additional sealing. A hole is cut in the shell. A neck is made of plasticine around the hole. Epoxy resin was poured into the shell hole.
Other design options
In order to save money and obtain a fully functional unit, a rack-and-pinion version of the wood splitter can be manufactured. A homemade device takes into account the specific individual requirements of the consumer.
Features of manufacturing a structure based on a rack and pinion transmission:
- a gear is mounted on the output shaft of the reduction gearbox or pulley;
- the movement of the gear causes the rack to move;
- the pressed strip is fixedly fixed on the frame with the laid log;
- the gear receives engagement with the rack through a control handle;
- the working part of the structure is mounted on a durable stationary frame;
- a cleaver is attached to the frame base;
- the gear rack moves along guides that are fixed to the frame;
- The rack is returned to its original position using a return spring.
The functionality of the design can be ensured by any electric, gasoline or diesel engine. The advantage of a homemade rack and pinion wood splitter is the minimal cost of consumables and flexibility of parameters. The structure should not swing, and when building a mobile device, the wheel system must stably support the entire weight of the device. The speed at which the log is fed for splitting must be calculated experimentally.
DIY wood splitter from a washing machine
Sitting near the fireplace, where burning wood crackles, is a pleasure. After warming up in a wood-heated bathhouse, you get no less pleasure. The only unpleasant moment in these events is chopping firewood manually. Sometimes it takes a long time to swing the ax, especially when the conversation turns to lighting the bathhouse. To reduce the labor intensity of this process, engineers long ago invented a special machine called a wood splitter. True, it is not as cheap as we would like. Therefore, it is worth considering a completely unique design of a wood splitter made from a washing machine.
It should be noted that you can chop wood in different ways, using different tools. Therefore, wood splitters have different designs.
- In which the drive mechanism is based on hydraulic technology.
- Which are based on a rack and pinion mechanism.
- And the so-called step-screw wood splitter.
The third option for a wood splitter is just right for making it yourself, using some parts and components of a regular washing machine.
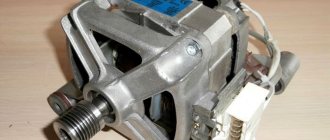
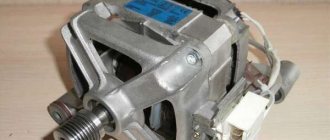
Parts from a washing machine for a wood splitter
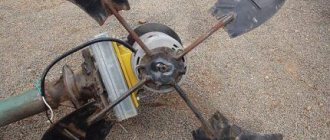
So, for a wood splitter you will need an electric motor with a pulley, a pulley that is installed on the impeller that rotates the water inside the tank, and a belt connecting the two pulleys. By the way, the washing machine only has two pulleys, so you will need both of them.
To turn all this into a wood splitter, you need a base on which the assembly parts will be installed and fastened. It can be made from metal profiles (even used) in the form of a frame. It is important that there is alignment between the pulleys used from the washing machine. It should look approximately as shown in the figure below.
Making your own screw cleaver
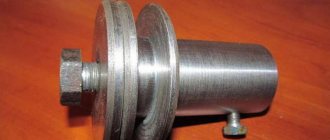
The main problem in creating a homemade product such as a screw wood splitter is finding a working cone, which can be purchased in specialized stores or made with your own hands using a metal blank.
Taper turning:
- place a metal blank on the electric motor pulley;
- during free rotation, remove excess metal from the blank;
- cut a left-hand thrust thread on the surface of the blank.
The final assembly consists of inserting a screw onto a pre-prepared shaft and fixing it with a pin, after which a flange equipped with a motorcycle sprocket is put on the other side of the shaft.
Wood splitter made from a flywheel and motor from a washing machine
List of materials:
— sheet steel, round timber (to make the working shaft); — profile pipes and sheet steel (for the frame); — motor from a washing machine; — flywheel from GAZ-53 or similar; - Belting; — “carrot” for the wood splitter; — speed controller, switch, wiring; — bearings with brackets; - bolts, nuts, washers, etc.
List of tools:
— turner services; - drill; - Bulgarian; — plasma cutter; - welding machine; - wrenches, marking tools, etc.
Wood splitter manufacturing process:
Step one. Working axis
First of all, let's make a working axis, or rather a blank for it. It is made from round timber to which two steel plates are welded. Cutting the round timber is not a problem; the most difficult thing will be cutting out these two “washers” from thick sheet steel. The author cut them out with a plasma cutter, and then brought them to life with files and a grinder.
As a result, the workpiece was sent to the turner, and the author received a masterpiece. The shaft has a flange for attaching the flywheel, and there is also a machined place for installing the drive belt from the engine.
Next comes the most tedious part - the flywheel needs to be balanced, otherwise there will be strong vibrations. To balance, the author clearly welds two corners horizontally, edge up, and places the flywheel on them, resting it on the axle. By rolling the flywheel and releasing it, you can see in what position it stops; the heaviest point will always be at the bottom. To lighten the flywheel in the right place, you will need to drill out the metal with a drill. A little diligence, and the author coped with this task; the flywheel turned out to be perfectly balanced.
Step four. Protective cover
During operation, the flywheel accelerates to very high speeds; if something happens, you won’t even have time to think about anything. Be sure to make a protective casing, weld a frame from profile pipes and scald it with thick sheet steel. If thick steel is not available, you can weld partitions onto the frame to strengthen the structure.
Step five. Finishing touches and assembly
Let's make a table top for the machine, here we will need sheet steel. On the tabletop we install a wedge from thick plates, which will split the stumps. The author welded partitions into the wedge just in case.
That's all, now all that's left to do is paint the machine and assemble it. After painting it looks great and will not rust now. The car is ready for testing.
Manufacturing of hydraulic device
In this design, the most complex unit is represented by a hydraulic part, consisting of a hydraulic cylinder with a pusher, a pump part, and control elements. To make the frame, a metal angle, channels, I-beam or profile pipe are used. The design process involves placing a metal frame on wheels. The design of such equipment does not involve the use of electricity, and wood splitting is carried out using a hydraulic jack.
Self-production technology:
- frame manufacturing;
- manufacturing a stable platform;
- welding of a vertical guide;
- welding the gusset on the back side of the guide;
- making sliders from metal corners;
- strengthening the stop point of the hydraulic jack rod;
- welding the sole of a metal strip 0.6-0.8 cm under the heel of the jack;
- modification of the jack handle for ease of operation;
- welding the roller to the base of the frame and fixing the rubber band to return the pedal to its original position.
The cutting part of the equipment should be a metal strip 3 cm thick, which must be sharpened with a wedge. To attach the cutter to the guide, you need to use three M-12 bolts.
How to make a wood splitter with a washing machine engine
Of course, we all live in the 21st century, when almost everywhere has gas central heating or an electric boiler. However, civilization has not reached all corners of our vast country, especially in remote regions and rural areas. Not all villages and settlements have central heating, but winter happens there too.
People have no choice but to chop wood and light the stove themselves. This is definitely a solution to the situation, but chopping wood is not the most pleasant and exciting activity, especially in the cold season. Technology and progress took care of this too; such a useful thing as a wood splitter was invented. In general, you can buy it, and for those who do not want to waste money, we will tell you how to make a wood splitter with an engine from a washing machine.
Do-it-yourself wood splitter from a washing machine engine
Thanks to this contraption, you can chop several cubic meters of firewood in just an hour or two. For comparison: if you categorically reject “devilish things” and wield an ax by hand, then it will take you 3-4 days. In this article you will find drawings of a wood splitter with a washing machine engine, everything is extremely simple and clear.
In total, 3 types of electric wood splitters are used and available, these are:
- conical;
- hydraulic;
- rack and pinion
The most economical of all is the conical one, but be prepared to do a lot of work not only with your hands, but also with tools. You can’t use a lathe here; if we talk about traditional manufacturing methods, people don’t bother too much and do without a gearbox, attaching the cone to the motor shaft itself. This, of course, can be done, but only on the condition that the step is small and the thread is shallow.
If you plan to spend a little more money and time on manufacturing, that is, to buy a gearbox, then the threads should be deep and the pitch large. All this is necessary in order to adjust the performance level of the wood splitter taking into account the shaft rotation speed.
Directly about what you need. From the name it is obvious that you will need a cone, but you need to buy it only in a trusted place so that it is of high quality. The blank for the cone must be heated and kept in the oven for half an hour to harden it. After this, it must be placed in salt water and left there for several minutes.
Wood cutting technology
The homemade wood splitter is ready for use; you can test cut wood. A block is taken and installed “on the butt,” that is, on the end. Then it is fed to the cone with your hands sideways. Since the cone has a thread, it will instantly begin to cut into the wood, pulling it towards itself. In principle, the machine will operate in almost semi-automatic mode.
In this case, the dry wood will begin to crack, and the wedge will cut into the body of the block, dividing it in half. By the way, you cannot bring the log end-to-end to the wood splitter. Because the wooden block will be very long and can get between the cone and the shaft. Why does the machine just jam? It is good if the electric motor does not burn out, but it may break the bearings or their mounting device.
How to make split carrots (video)
When making a wood splitter yourself, you need to use only well-drawn drawings and diagrams. Particular attention must be paid to the selection of high-quality and durable consumables. Equally important is the stability of the structure, which will make the work process not only comfortable, but also as safe as possible.
We suggest you familiarize yourself with Cleaning coins at home.
Manual splitting of wooden blocks, especially knotty ones, is quite difficult and quite slow. Today, this physically difficult work can be accelerated by transferring it to the shoulders of a factory-made mechanical wood splitter. There’s just one problem: such a “woodcutter” with a “carrot” costs from 20 thousand rubles. But the experience of folk craftsmen shows that, even without knowledge of turning, it is possible to make a mechanical cleaver from scrap materials, adapting it to the place, amount of work and anthropometric data.
Will need
In principle, almost all materials and components for assembling a mechanical cleaver can be removed from old cars, household appliances and found in landfills. But it doesn’t hurt to know how much this or that “thing” costs in the store, how much the motor from an old washing machine will cost, what a turner will charge for the work, etc. So, what should we stock up on if we decide to make a mechanical cleaver:
- round rolled steel (round timber);
- masking tape;
- sheet metal of different thicknesses;
- profile pipe about 14 m;
- flywheel from GAZ-53;
- bolts, nuts, washers;
- motor with pulley and belt;
- paint and brush;
- conical screw carrot cleaver.
Of the tools and equipment we should have on hand:
- grinder with discs;
- plasma cutter;
- metal file;
- welding equipment;
- vices and clamps;
- drill with drills.