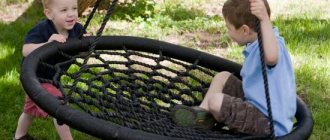
The Perspective technology textbook is full of interesting master classes. But the fact is that the authors of the textbook successfully scanned them from somewhere, without going into details, whether they drew everything there correctly or not. Without a textbook, and most schools don’t issue technology textbooks, it’s even more difficult to figure it out. Here, for example, is the topic for grade 3, “Rocking chair and sandbox.” There is only a rectangle from the rocking chair and it is said that this is only 1/2, that is, half. How is a child without a textbook supposed to find out what this outlandish rocking chair is? We are coming to your aid, you will have a rocking chair and a sandbox with fungus.
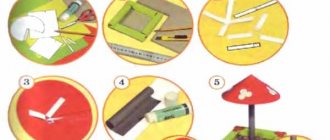
We will need: a rocking chair and sandbox template from a 3rd grade technology notebook, scissors, a pencil, glue, colored paper and colored cardboard, a toothpick and the most original thing - a popsicle stick! Where can I get a popsicle stick when a child starts making a craft at 21 zero zero or even later?? We will look for a replacement for her. Replace it with a cardboard strip.
Tips for making and placement
You need to choose the location for installing the future sandbox and the materials for its manufacture, taking into account the following factors:
- Children, even those who are passionate about play, need supervision. Therefore, the sandbox must be installed so that the child is always in sight of adults.
- The sun's rays can harm a child's health, leading to sunstroke and burns, but solid shade is not the best option. Therefore, it is advisable to place part of the sandbox in the shade, and part in the open, so that the sand can dry out after rain.
- Drafts and excess moisture also negatively affect children's health. Therefore, the sandbox should be located away from water and not exposed to the wind.
- Trees, especially old ones, often fall into dust and dry leaves. Therefore, in order to avoid sand contamination, it is better to install the structure away from them.
- Some plants cause allergies, and some attract stinging insects. Therefore, you need to make sure that there are no honey plants or plants that cause allergies nearby.
- Well-processed wood and reliable fastenings will help avoid splinters and injuries.
- Hard materials such as stone, brick or iron can also cause harm, so it is advisable to avoid using them. And of course, you need to make sure there are no sharp corners, nails, cords, and so on.
In addition to the entertainment function, playing with sand has a developmental and psychological function. Soft bulk material calms and relaxes the nervous system, promotes the development of creativity, fine motor skills, and perseverance.
Preparatory work
Considering all of the above, it is more convenient and practical to make a deep wooden sandbox with a lid.
Drawings and dimensions of a children's sandbox
Initially, you need to decide on the dimensions of the future structure. If there are a lot of children and there is enough space on the site, then you can make a large sandbox measuring 2x2 m. For one or two children to play, it is enough to make a square structure measuring 1.5x1.5 m.
Despite the simplicity of the design of the future sandbox, it is better to have a visual diagram before your eyes. Thus, you first need to draw a drawing that will help you decide on the necessary materials and correctly calculate the dimensions and quantities.
Looking at the drawing, you can see that the side boards on both sides should be slightly longer in order to form the correct closed corner.
How to choose material
Consider the following facts:
- Tree is different from tree. The durability of a structure may depend not only on the quality of processing, but also on the type of wood: pine, linden or larch are less susceptible to rotting.
- The sides of the future design must withstand heavy loads. To ensure strength, it is necessary to use boards with a thickness of at least 30 mm.
- Sanding and sanding an already assembled structure is extremely inconvenient. It is advisable to sand the prepared parts well and treat them with an antiseptic before assembly, which will avoid unprotected areas. It would be prudent to paint the iron hinges in advance as well.
- The main thing is not to forget what’s inside. The sand must be clean, free of foreign impurities, and mold well. Therefore, it is better to give preference to river or quartz sand, having first sifted it through a fine sieve, which will help get rid of dust, possible insects, and foreign objects.
Materials and tools (for a structure measuring 1500x1500 mm)
When purchasing materials, one cannot discount the presence of a foundation. To build the foundation you will need:
- expanded clay, small stones or river pebbles for drainage;
- agrofibre, dense polyethylene or plywood sheet.
The basis of the sandbox is a frame with sides 1500x1500 mm. To make the frame you will need:
- timber 50x50x450 mm (for corner elements) – 4 pieces;
- beam 50x50x1000 mm (for strengthening corners) – 1 piece;
- board 30x150x1500 mm (short side walls) – 4 pieces;
- board 30x150x1560 mm (long sides) – 4 pieces;
- seal - 1620mm;
- self-tapping screws 45 mm - 50 pieces.
The transforming cover will be attached to the finished frame. For it you need to prepare the following materials:
- board 20x125x1560 mm - 12 pieces;
- timber 30x30x250 mm (for fastening the seat) – 4 pieces;
- timber 30x30x450 mm (to strengthen the back) – 4 pieces;
- hinges (canopies) 40 mm - 12 pieces;
- self-tapping screws 45 mm - 50 pieces;
- self-tapping screws 25 mm - 60 pieces.
For processing and registration you need:
- antiseptic for wood processing;
- wood primer;
- paint or varnish for coloring.
The materials are ready, but without tools the process will not move forward. Therefore it is necessary:
- roulette;
- pencil;
- pegs with a rope tied to them;
- shovel;
- hacksaw or jigsaw;
- sanding machine or sandpaper;
- drill and drill bits;
- screwdriver or set of screwdrivers.
Material calculation and tools
To build a sandbox measuring 120x120 cm you will need:
- For the side walls - 8 boards 2.5x15 cm, 120 cm long.
- To make the top cover - 12 boards 5x10 cm, 120 cm long (choose even, smooth boards, as some of them will be used for seats and backs).
- To fasten the seat boards - 6 bars 2.5x7.5 cm, 20 cm long.
- To fasten the boards of the seat back - 4 bars 2.5x7.5 cm, 45 cm long and hold the back in a vertical position.
- To strengthen the corners of the box - 4 10x10 cm bars, 28 cm long (you can use 5x10 cm bars, but the structure will be less durable).
- Pack of 30 mm self-tapping screws.
- Permanent hinges 40 mm (8 or 12 pcs.).
- Window seal - 4.8 m.
- Geotextile or agrofibre, in extreme cases - polyethylene, 1.8x1.8 m in size.
- 2 metal handles (optional).
Tools:
- Hacksaw or circular saw.
- Cordless drill-driver;
- Drill 3 mm.
- Construction stapler.
- Square.
- Pencil.
Step-by-step instructions: making and installing a wooden sandbox with a lid
It is better to carry out the work in several stages. First of all, it is advisable to assemble the frame of the sandbox, then make the base and install the box in the prepared place. And only after that install the cover.
Housing assembly
We fasten the sanded and antiseptic-treated boards together in a square shape using corner elements - long bars, not forgetting to first mark and drill holes for the screws.
If you glue regular insulation between the first and second tier, the boards will fit closer to each other and sand will not spill out into the cracks.
To give greater strength to the future sandbox, you need to securely secure the corners with the help of additional bars.
Construction of the base and installation of the frame
The area chosen taking into account all the tips and recommendations is leveled and cleared of debris. For more accurate markings, it is necessary to add 15–20 cm on each side to the dimensions of the future sandbox. We make markings using pegs with a rope stretched over them, checking the correctness of the angles.
We remove the top layer to a depth of approximately 20–25 cm, making a slight slope towards the center. This is necessary so that water that gets into the sandbox does not accumulate, but ends up in the drainage. In the center we make a hole with a diameter of about 50 cm and approximately the same depth. We fill it with the material prepared for drainage.
Then you need to pour a five-centimeter layer of sand and compact it thoroughly.
On the resulting “pillow” lay the base itself, which can be made of different materials. The main thing is not to forget to make holes in it at a distance of about 10 cm from each other, again to prevent moisture accumulation.
We install the finished frame on the resulting base. Now you can proceed to the main stage.
Installation of a cover that transforms into seats
We thoroughly screw two boards on each side to the sides. Then we proceed to assembling the moving parts of the lid. To do this, we fasten the remaining boards in pairs using bars.
The elements obtained from the first pairs will serve as a seat, and the elements with long bars will serve as a backrest. The protruding parts of the beam will serve as a support, preventing the backrest from reclining.
We attach the “seat” element to firmly screwed boards using three loops located at the same distance from each other. The hinges should be on top, and the bars connecting the seat boards should be on the bottom.
We attach the backrest to the seat, also using hinges, not forgetting that this time the hinges “look” inside the box, and the bars are on the outside.
In this version of the assembly, the last stage is quite problematic, because the back part has to be screwed in almost by weight. There is another way. First fasten the back and seat together, and only then put them on top of the box and attach them to the rigidly attached boards.
Attention! To avoid possible injuries, it is important to “drown” the screw heads. You should also check that the lid opens and closes easily.
Final finishing
So, the sandbox is ready! Now it is advisable to smooth out possible corners with sandpaper or a grinding machine. After this, even if all the wooden and iron parts have already been treated, it is better to go through the antiseptic again.
You can simply varnish the resulting structure, but it is best to paint it. And here fantasy comes to the rescue. Don't forget that this is a children's play area. And kids really love bright colors. Color the sandbox with different colors. Additionally, you can draw patterns, funny pictures by hand or apply using a stencil. The main thing is that the children are happy and feel comfortable in the new sandbox.
Different types of sandboxes: pros and cons (table)
| Classification parameter | View | Description |
| Design features | Open sandbox | A typical simple design that performs the main function of a playground |
| Closed sandbox |
| |
| Material | Tree |
|
| Plastic |
| |
| Other materials | To this day, other materials are used to make sandboxes: brick, stone, metal. But these materials do not guarantee the safety of children. Hard, sharp surfaces increase the risk of injury. | |
| Type of allocation | In-depth | The sandbox can be deepened into the ground, which is very effective for strengthening the foundation. In this case, drainage about 15 cm thick is necessary to avoid moisture accumulation. Then it is covered with agrofibre or a dense film, in which holes are made every 10 cm. Such a base will prevent the germination of grass, the appearance of insects and the mixing of sand with the soil. |
| Elevated | This design is installed on a concrete base or grass. It is necessary to ensure that even the smallest child can climb into it independently; for this purpose, low sides 380–400 mm high are made, which are half filled with sand. | |
| Configuration | Figured sandboxes | Structures in the form of cars, boats, flowers, animals, and so on, serve as additional game details. |
| Game centers | The simplest example is a sandbox made of stumps. The child can not only play with sand, but also run around the structure itself. |
Instructions for making a rocking chair and sandbox
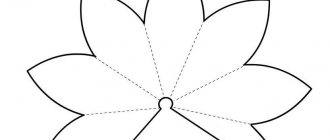
This is what the part templates look like in the workbook:
It is said that you need to transfer the template through carbon paper onto colored paper. For those who don’t have carbon copies, you can print out our picture, cut it out and put the details on colored paper and cardboard, and trace it.
The sandbox with the mushroom should ultimately look like this:
And the mysterious rocking chair is like this:
What to consider before construction
A well-maintained children's sandbox with your own hands at the dacha will help decorate the area and give parents the opportunity to take a break from constantly supervising their children. It’s hard to imagine a well-groomed and tidy place for kids to play without a sandbox. If desired, such a design can be supplemented with swings and benches, or a sports complex. Creating a children's sandbox with your own hands does not require much time, and you do not need expensive material. The simplest models can be built with virtually no experience in construction. Well, if you have skills, for example, wood carving or drawing, the site can be turned into a real work of art.
Square sandbox with protective awning
What is important to consider before starting construction of a sandbox.
- Convenience - the dimensions of the structure correspond to the number of children and their age.
- Good protection from the sun so that kids don't get sunburned while playing. Usually this is a simple canopy, stationary or folding.
- For a sandbox, you should choose an open space.
- There should be no animals in the place chosen for the playground.
- A town for children must be visible and visible from the windows of the house. Sandbox ship with awning
Choosing a design
- Open. These are the simplest models, made of plastic, metal, wood. They are easy to make yourself. To protect the contents, you can pull the tarp down each time.
- Closed. More practical and convenient. After the child has played, this model can be closed. This will ensure the cleanliness of the materials. In addition, the lid often serves as a canopy, so you won’t have to rack your brains about the location of the play area.
However, the canopy can always be made additionally. Below we will look at how to do this.
What places are not suitable for a sandbox?
You cannot place a children's playground in the far corners of the site and behind various buildings, bushes and trees. Obstacles will make it difficult for parents to keep an eye on their babies. If the sandbox is not visible from the window, it should be visible from the yard.
Folding sandbox
Wet, dark areas in the country are not the place for a sandbox. It should not be located in lowlands - these are the coldest places. Soil and sand in shady areas retain moisture longer, especially in the spring when the snow melts, and during rainy periods in summer and autumn. Playing on wet sand can cause children to catch a cold and get sick. The lowlands are constantly in the shade, and the sand, even if it dries, does not have time to warm up enough in the sun.
Sandbox made of linear polyethylene in the shape of a crab
There should be no old diseased trees in the area of the playground, which consists of a sandbox and other structures. Firstly, while playing, dust will constantly fall on the children’s heads. Secondly, in strong winds there is a risk that branches will fall on someone’s head. If there are no open spaces in the garden, then the trees must be checked annually for the presence of dry branches and constantly pruned.
Sandbox truck
A place that is too open is also not suitable for a sandbox. In the heat, children can get hot on their heads, which can lead to heatstroke or sunstroke. It is better to choose a space that is protected from the sun at noon, but fairly well lit at other times of the day. To create light shade in the area of the children's sandbox, you can use man-made canopies that protect from the sun.
Wooden sandbox with roof
Making a sandbox out of cardboard
- For these purposes we will also need cardboard. We cut a square out of it. This will be the base of the sandbox. We will also need four sides along the edges of the sandbox. We also cut them out of cardboard and glue them together with a hot gun.
- We pour semolina inside the sandbox.
- We make a horse out of cardboard. We make symmetrical identical figures of the horse's head.
- We make two semicircles using a stationery knife.
- Cut one rectangle along the length of the semicircles.
- We cut out the mane from foamiran.
- We also make the horse's tail from foamiran.
- Glue the horse parts together. We insert the mane between the two parts of the head.
- Between two hemispheres there is a cardboard rectangle.
- Glue the tail.
- Our playground elements are ready. Now let's move on to decoration.
- Cut out two circles from a white sheet of paper. These will be the horse's eyes.
- We glue the eyes to the head.
- Using a marker, draw a black dot in the middle. These will be the pupils.
- Using the same marker, we draw the horse’s nostrils on both sides, respectively.
- Using a blue marker, draw polka dots on the horse’s body.
- We draw a bridle with it.
- We decorate the sandbox with peas.
- Roll a ball out of airy plasticine. This will be our ball.
- It can be decorated with red polka dots made from red plasticine.
- Roll a sausage out of yellow plasticine. We make a duck from the sausage.
- We use black plasticine to make the eyes and wing. We make a beak from red plasticine.
- We make pyramids and a butterfly from multi-colored plasticine.
- We decorate the entire composition with artificial plants.
The idea of spending time together like this is also suitable for silent people. It’s easier to engage in dialogue with your child in a playful way. The game itself does not require large material costs, and is easier to do than it seems.
You can find even more ideas for joint creativity in the section on crafts made from waste materials.
Which material to choose
To build a children's sandbox with your own hands, you can use both new material and what you can find in garage supplies. These can be objects that can be simply processed; in this form they can be conveniently used to create a sandbox or decorative elements.
Sandbox with protective awning and seats
What can you build from:
- bars and logs;
- boards;
- summer tires;
- plastic bottles;
- nets and various awnings.
In addition to the sandbox, from scrap materials on the playground you can build slides, trampolines, ladders and turnstiles, playing tables with a bench, etc. This is especially convenient if children are of different ages - everyone will find something to their liking. Children need movement and active rest, they constantly play, run, climb wherever they can climb. Therefore, it is important to arrange the playground so that the games are safe.
Bright sandbox with seats
A sandbox, built with your own hands at the dacha, can emphasize the landscape design without being distracted from it, or be an independent bright object. Often playgrounds for children are supplemented with awnings, which are simply necessary in the summer in hot weather. The canopy is made of tarpaulin or awning. If possible, you can build a full-fledged roof with slopes and tiles.
Sandbox boat
The same material can be used to create a sandbox with a lid. It is necessary to protect the sand from rain and animal activity. The sandbox lid can be transformed into comfortable seats for children that fold out when lifted.
Sandbox with mobile lid-house
Choice of material for the frame
The main material is chosen based on its technical characteristics and the skill of the craftsman. Metal structures are more durable, but iron quickly heats up under the scorching rays of the sun.
Wood requires more detailed impregnation and sanitary treatment, but is the optimal material for the construction of children's structures. Sometimes brick or natural stone is used as a consumable material, which also gives the building a stylish look.
It is better to weld the lid for covering the sand from sheet iron so that the bar is solid and hermetically closes the sandbox.
How to decide on the size of the sandbox
It is necessary to choose sizes based on the age and number of children, the area of the yard and the shape of the sandbox itself. When choosing the necessary parameters, it is important to consider several factors.
Small sandbox with sides
- Age and height of small players. The length of the legs of three-year-old children is still not enough to cross the side above 20 cm. For older children, this is not an obstacle, so you can make the side of the sandbox higher - 30 cm.
- Amount of children. If the child is alone, a 120x120 cm sandbox with sides 20 cm high may be enough. Their friends will come to visit the children and play together in the sand and build castles or play with shapes. A sandbox 170x170 cm is enough for three children under 5 years old. These are standard sizes, but nothing prevents you from making the structure even larger.
- The depth of the sandbox for the game. There should be so much sand that children, while playing, cannot get to the ground. Typically, a standard sandbox requires at least a ton of sand, which must be periodically renewed over time.
- The height of the entire structure. If there is a canopy or roof, it should be high enough so that a child standing on the side cannot hit his head or reach with his hands. Otherwise, he may try to climb onto the roof, which creates some risks.
So, the dimensions of a children's sandbox in the country should allow children to sit and stand comfortably, and the height of the sides should not interfere with play.
Small sandbox in the yard
Preparing the site
It is extremely rare to use designs that are removed for the winter or equipped with rollers for movement around the site. In most cases, a children's sandbox is installed on a permanent basis, so care should be taken to prepare the site first. The process consists of the following steps:
- The area for the future children's sandbox is deepened by 20 cm.
- After leveling the soil, it is covered with sand to a depth of 5 cm and treated with a rake.
- It is optimal to use geotextiles or agrofibre as a drainage base for a children's sandbox. If you have a modest budget, thick polyethylene or propylene matting is suitable, which is spread with a margin of 30 cm along the border. This will prevent the germination of weeds and the penetration of pests, while at the same time speeding up the process of drying the sand.
- After installing the box, the unoccupied recess around the children's sandbox is filled with soil and compacted, and the excess edges of the film are trimmed.
See the photo below for an approximate work plan:
Preparing the base
So, let’s say the size chosen is 170x170 cm with a side height of 30 cm. Such a sandbox is quite enough for two or three children from 3 to 5 years old to play. Before erecting the sides, seats and roof (if required), it is necessary to prepare the foundation on the ground.
Small sandbox with lid
To work you will need pegs, a strong cord or rope, and tape for marking. The cord is necessary to mark the perimeter of the construction site on the ground. Now dig a hole 170x170 30 cm deep. The center (diameter about 50 cm) of the sandbox must be deepened to 70 cm. The resulting hole must be filled with crushed stone or small pebbles, this is drainage so that excess water can drain out.
Transformable sandbox unfolded
The pit for a children's sandbox should have sloping slopes towards the center. This configuration will allow the sand to dry out faster after heavy rains or melting snow. A drainage well in the center of the structure will drain excess water into the ground.
Sandbox fungus
Construction of sandbox sides
To build the sides you will need:
- 4 bars 450x50x50 mm;
- 4 boards 150x30x2.5 cm;
- 4 boards for benches, which need to be placed on top along the perimeter of the children's sandbox (it is important to sand them smooth so that children do not accidentally get splinters). Sandbox-transformer with one folded and one unfolded door
- All wooden parts must be smoothly sanded and carefully treated with drying oil. This is necessary to protect the wood from moisture. Instead of drying oil, you can use any other means with the same purpose, for example, bitumen.
- Dig four bars into the corners of the structure; they should be in the ground at a depth of about 20 cm. Now it’s time to nail the side boards. If there is no material of sufficient width, you can use narrow boards assembled in a row. The sides can be made of round logs of the same or different sizes, dug into the ground close to each other.
- So that children can take a break from playing, nail seats around the perimeter of the children's sandbox. They can also be installed in corners. It all depends on what material is available, the dimensions of the structure and the design chosen. Rectangular sandbox with a lid-board for drawing inside
Do I need to make a sandbox with a lid?
A cover made of wood or tarpaulin is not a necessary attribute of a sand structure, but it can be beneficial by protecting the sand from debris, branches from trees, animals, etc. In addition, it is reliable protection from animals that decide to shit where children play. The sandbox can be covered at night with a regular awning made to fit the size of the structure. You can put together a lid yourself from the remaining boards, it’s very convenient. It is enough to knock down a simple wooden panel to fit the size of the structure.
A do-it-yourself sandbox will give your child many pleasant moments
A double-leaf lid is even more convenient, but more difficult to manufacture. The easiest part is to make two shields instead of one. You will need to install hinges to the sides and doors, attach handles and, possibly, a latch. When opened, the shields are located behind the side, resulting in comfortable benches with a backrest, so there is no need to purchase additional items. Even children 4-5 years old can open the hinged lid without the help of adults.
A simple square sandbox made from several boards with a sun umbrella
Benches and tables
To prevent children from catching a cold while sitting on cold sand and earth, they should be taught a healthy lifestyle from a young age. Sitting in the cold can provoke various inflammatory diseases of the pelvic organs, which, of course, does not go away without leaving a trace. To seat children, you can put together a bench right on the side or make separate seats. A full-fledged wooden bench, complemented by a table, looks good next to the sandbox. If desired, such a table can be in the sandbox itself - it is convenient to lay out sand from molds on it.
Simple square sandbox with corner seats and sunshade
If the structure is not square, but polygonal, the seats are usually located on two or three opposite faces. It would not be a bad idea to arrange a place nearby to store toys - scoops, buckets, small rakes and molds. This will keep the site tidy.
A simple square sandbox with wide sides and seats
Decorative design
Before filling the box with sand, you will need to strip and sand the wood as smooth as possible. The inside of the lower part of the walls is covered with alkyd or polyurethane enamel, the rest of the structure will be painted with bright water-based paints.
Despite the fact that the sandbox is assembled from lumber, there is no point in using traditional varnishes and polishes, which are widely used in furniture making techniques. Such coatings only spoil the appearance, and “acid” bright colors and designs would be more appropriate for children.
The seat, back and upper part of the body can be covered with PVC film; this solution will provide a nice design and good protection for the children’s hands. There is no point in completely covering the box. Firstly, it is expensive, and secondly, the kids really like to tear off and remove the film lining, so this may turn out to be a waste of money.
Sun protection
A classic umbrella or “mushroom” will protect playing kids from the sun. A full, square-shaped wooden roof is comfortable - it is high enough so that adults and children do not bump their heads on it, and it protects from rain. But such a roof has a drawback - during a sunny day, the shadow is cast in different parts of the children's sandbox. At the dacha or in the courtyard of a country cottage there is no need for such an attribute; it is enough to place a light folding umbrella on the south side of the site or use an awning. Unlike a roof, such canopies can be easily removed and moved to any place; it is convenient and practical.
In the absence of children, the sandbox can be used as a corner of the sandy beach
Photo gallery of options
You don't have to stick to the traditional square shape
Use of car tires
It is necessary to protect the child from the sun's rays: a bright, large umbrella will help
The cover will help protect the sand from debris and moisture
The bright cover transforms into comfortable seats, thereby adding a place to relax
An easier-to-use, but more difficult to manufacture option with a solid lid
Can also serve as a separate game element
Such a sandbox allows the child not only to play with the sand, but also to walk along the sides and warm up a little
Standard sandbox - easy to make
To protect children from the sun, you can make a canopy
Also protects sand from contamination
An original boat will delight your child
Another version of the sandbox in the form of a ship
Where to get sand
A sandbox filled with river sand with your own hands is the best option. River sand grains are quite small, there is no debris or sharp objects in them. In addition to sand from the river, quartz is suitable. This sand is additionally treated with special agents that repel insects and animals. The impregnation is safe for children, however, eating shortbread “cakes” is still not recommended. To fill a standard children's sandbox (170 by 170 cm) you need at least one ton of sand.
If you notice that animals “walk” in the sand, it must be changed to clean. Cat and dog excrement often contains worms and other parasites that are dangerous to the health of children. Leaves, small twigs, dust, dirt, etc. get into the sand. At least once a summer season, you need to add fresh sand, and use the old one for country paths.
A DIY sandbox will be a great gift for children.
A do-it-yourself sandbox is an easy way to diversify your summer cottage and entertain the children. If desired, you can build entire play towns with turrets, walls, and multi-level structures. For decoration, paints, carved figures of animals or fairy-tale characters, bright soft pillows on benches, etc. are used.