Each of us in childhood loved to dress up as some fairy-tale hero. Modern children also love to fool around and happily transform into fairy-tale heroes, cowboys or Indians. They are looking forward to the New Year holidays to try on the costume of a pirate, magician, fox or other fairy tale and cartoon characters. Today, stores offer a large selection of fancy dress costumes, but many mothers who like to take a creative approach to their child’s party want to make an original Indian costume with their own hands.
How to make an Indian costume with your own hands?
The next step will be cutting and sewing the outer part of the Indian's clothing; it should also be a simple straight cut with or without sleeves, but always with fringe.
To give the greatest ethnicity to our Indian “pajamas”, you can cut out thin ribbons - threads - from leather and stitch them in the form of some symbols (for example, with the usual crossed lines -x) on the bottom and cuffs of the clothing. Now we make the distinctive sign of the Indian - a headband with a feather (described above) or a chief's headdress. For a headdress, we make a cover of cotton fabric 3 - 4 cm x 25 - 30, thread a strip of paper into it and sew it together. Now we sew feathers to one side of the strip and, for reliability, glue them on top, sew another strip of fabric now on the reverse side - on the front side we sew fabric with some bright ornament, a length equal to almost the full circumference of the head, and connect the ends with an elastic band, so when we put on Our headdress will sit firmly on your head. Now cut out 2 circles from cardboard with a diameter of 3.5 cm, 3 cm, 2.5 cm, 2 cm and 1.5 cm. We connect a circle of each size with a thread in ascending order, so we get two small beads. Next, coat them liberally on all sides with glue, roll them in small feathers and attach them to the main headdress at the temple parts. The costume is ready, but for greater effect you need to wear leather bracelets, ethnic necklaces, and of course you need to not forget about makeup. In addition, you can arm yourself with a tomahawk and other paraphernalia. You can also make a costume for a girl who wants to be an Indian, only the shirt should be sewn a little longer, like a dress, and the pants should be removed from the costume or a small skirt tied at the hips should be made. Here are a few examples of costume jewelry: (taken from the Internet)
Bibs:
Amulet-Falcon In the Indian tradition, it is a symbol of swiftness, fearlessness and vigilance. Gives strength to take the first step in new endeavors.
Sun
In the Indian tradition, it is a symbol of the inner light in every person. Helps you realize your true purpose.
.
Eagle Warrior
Gives a powerful impetus to action and determination. Will help you overcome obstacles on the way to your goal.
Owl
Symbol of wisdom, reason and knowledge. She is able to see in the dark, feel, understand and predict events. Represents spiritual calm, intuition and clairvoyance. In the Indian tradition - “Eagle of the Night”. It will help to identify sources of loss of strength and eliminate them.
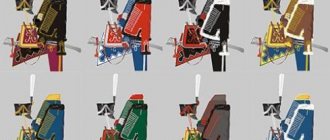
Well, and finally, examples of different costumes of little Indians))))
Each of us in childhood loved to dress up as some fairy-tale hero. Modern children also love to fool around and happily transform into fairy-tale heroes, cowboys or Indians. They are looking forward to the New Year holidays to try on themselves, a magician, a fox or other heroes of fairy tales and cartoons. Today, stores offer a large selection of fancy dress costumes, but many mothers who like to take a creative approach to their child’s party want to make an original Indian costume with their own hands.
Option three - headdress and powerful bow
You can try to slightly diversify the overall design style by adding a bright and stylish look that can impress others and achieve complete combination with the chosen image.
Headdress
In fact, the headdress is no different from the options presented above, with the exception that a fabric headband can be used as a base, onto which feathers of various designs are also attached. It is worth noting that there can be a different number of feathers, from four to ten, depending on the availability of time and the available capabilities of the parents. As the photos show of a DIY Indian costume, the design can turn out to be impressive in its quality characteristics and design, which will make it unique. The elements are connected in the same way using standard glue.
The design of the bow can also be different, depending on the preferences of the parents. It is based on ordinary branches and twigs, which are specially cleaned, additionally processed and a ribbon is attached to them in the area of the connection, the place where the bowstring is held. For the arrowhead, ordinary fabric or paper specially designed in the appropriate form will do just fine. On the other side, plumage is specially created, for which pigeon or chicken feathers are traditionally used.
Halloween
How to make a Papuan costume with your own hands for a boy or girl.
What do we know about this holiday? Halloween is a holiday that originates from Northern Ireland and is celebrated on the last day of October and precedes All Saints' Day.
At the beginning of its history, this holiday was considered a day on which you can talk with the dead and remember your ancestors. Every year, new modern attributes were gradually woven into the traditions: the costumes became brighter, and the holiday turned into a show.
Few people know the purpose of zombie, witch or mummy costumes. It is believed that on this day all evil spirits come to earth and harm people.
In order not to become victims of evil spirits, people themselves dressed up in costumes and pretended to be dead in order to divert the attention of evil spirits from themselves
And the well-known pumpkin with a carved evil face symbolizes the Jack-o-lantern of a drunkard who accidentally managed to agree with the devil that he would not take him to hell.
However, after death, Jack did not go to heaven either, remaining restless on earth with a coal, which he hid in a dry pumpkin, like in a lamp.
Halloween paraphernalia today does not follow any canons; people dress up as dead people, show business figures, and fairies. You can choose any costume for the holiday, and if you make it yourself, then even more so you are not limited by anything other than your imagination.
What you will need
DIY bat costume for Halloween. how to make a bat costume. master class “bat costume for girls”
The materials used can be varied and depend on the imagination of the author. In the process of making a costume, you may need the following materials:
- T-shirt and pants;
- fringe or material from which it can be made;
- pasta of various shapes, but with a hole for the passage of braid;
- fabric paints or markers and food coloring;
- brush;
- scissors;
- feathers;
- cardboard;
- glue and others.
Preparation stages
This type of suit is not without reason called one of the easiest to make. The fact is that the main part of it doesn’t even need to be sewn. Any plain T-shirt, preferably in grey, brown or beige, is perfect. Girls should wear a t-shirt tunic and boys should wear matching pants. Beautiful and even stripes are simply cut along the edge of the hem and the edge of the sleeves. But on the side of the pants you can sew pre-purchased fringe. You can also complicate your task by including a historical component in this clothing. You should study the features of ancient symbols and decorate things with them. This is easy to do using acrylic paints or fabric markers.
ATTENTION! A tunic for a girl can also be made from an ordinary pillowcase. To do this, just cut holes in it for the neck and arms.
An important accessory for a real Indian is massive beads. This is where pasta comes in handy. They can be effectively colored using food coloring. To do this, pasta is poured into a jar and paint is added. Then they should be shaken a little and placed on a baking sheet so that they do not stick together. Next, simply string the pasta onto a cord or elastic band. For greater realism, you can add multi-colored feathers, small wooden decorations or coins. It is better to fix the color of the pasta with clear varnish.
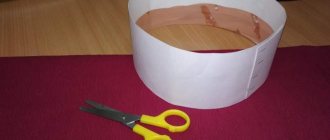
IMPORTANT! Making a roach is also not difficult. To do this, a hoop is made from cardboard slightly larger than the circumference of the child’s head.
A circle of red cardboard or colored paper is placed in the center. This is a kind of symbol of the sun. Next, purchase or homemade feathers are attached.
Creating and combining elements into a costume
A couple of accessories will help add completeness and integrity to the look. So, you can give a boy a bow and arrows, and for a girl you can make a couple of bracelets from cardboard or leather. The basis for the bow can be a flexible branch or twig. They are treated with varnish and the ends are secured with tape. For greater realism, faces are painted with special paints for face painting or ordinary shadows and pencils from a cosmetic bag are used. The most suitable colors are brown, white and red.
This type of outfit is one of the easiest and fastest to make. All materials used can be found in your own home. We hope that this article was informative and will help you make an unusual and colorful costume for the holiday.
Making Pants
When the question arises of how to make an Indian costume, the image of pants richly decorated with fringe immediately appears before your eyes. When choosing a bottom, you need to take into account that they should be standard, not narrowed, but not wide either. A style that is too tight can ruin the overall positive impression of the outfit.
Sewing fringe onto an Indian costume is quite easy. An adult must measure the length of the pants from the top point to the very bottom, then cut two identical strips of felt of the required length. Using specialized clothing glue or, optionally, a needle and thread, the fringe is attached along the entire length of the side seam of the trousers. When the glue dries a little, you will need to make cuts on the fabric not exceeding two centimeters.
DIY Indian costume
How to make a Harry Potter costume for a boy with your own hands?
Children love to dress up as different characters from their favorite literary works, cartoons, and movies. One of the most popular images for many decades is the brave Indian. New Year's carnival is a place where everyone wants to stand out with their exclusive outfit. We suggest making your own New Year's Indian costume for your child. The presented master class will tell you in detail how to make an Indian costume for a boy, but on its basis you can make a girl’s Indian outfit if you wish.
DIY Indian outfit
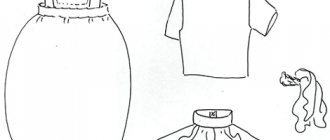
A complete set of Indian attire consists of two main parts: the costume itself and the original headdress made of vertical feathers - a roach; without it, the image of an Indian warrior or a wise Indian leader will be incomplete.
How to sew an Indian costume?
- You don’t have to sew the main part of the Indian costume, but use existing clothes. For the top, any plain t-shirt with short or long sleeves is perfect. It is advisable that the top of the suit be brown, yellow, beige, olive, gray or ocher. The edges of the sleeves and the bottom of the hem can be cut with frequent fringe, but you can use sew-on fringe, combining it with a dense, rather wide braid for decoration.
- The trousers should be a similar color to the T-shirt, with fringe stripes sewn on the sides of the legs.
- It is not difficult to make a pattern for some of the details of the Indian costume - a headband in the form of a double apron and a cape-poncho. The loincloth is sewn from two rectangles, one of which is larger and the other smaller. The details are sewn onto a wide belt. The poncho is based on a square flap, a neckline is cut out in the center, and fringe is made along the edges by pulling threads from the fabric.
Please note that the Indian costume involves a lot of decor! Various types of braid, small wooden decorations, beads, beads, coins, etc. are used as decoration. Moreover, the processing of accessories is quite rough, as required by the created image, and the colors are discreet, corresponding to the ethnic style to which the outfit belongs.
DIY Indian Roach
The costume will be incomplete without the traditional Indian luxurious roach. Despite the apparent intricacy, making an Indian headdress with your own hands is not particularly difficult.
Of course, it’s great if you have real bird feathers for making decorations. They can be painted with aniline dyes and sewn on wide braid. But if you don't have large feathers, you can make a roach with paper decorations.
Roach made of colored paper and cardboard
- A wide hoop ring with a slightly larger girth than the head is made from cardboard. The ring is connected using a stapler or paper clips.
- For the central part of the roach, a bright red circle is cut out, symbolizing the sun - the source of all life.
- To decorate the rim, paper figures are cut and glued on.
- Parts are cut out of paper, repeating the shape of feathers, the edges are cut with fringe.
- The side ribbons for the headdress are made from colored paper; they should be glued with universal glue for strength.
- All parts should be firmly connected using a stapler or reliable universal glue so that during the holiday the headdress does not fall apart into its component parts.
A roach, bow and arrow, or battle hatchet will complete your Hawk Claw or Eagle Eye costume!
You can make other costumes with your own hands, for example, a gnome or a snowman.
Traditional accessories
Almost all members of the tribe wore long hair. To prevent them from interfering with work, the forehead was tied with a thin red strap. For men, it was simple leather; women's headbands were richly decorated with beads and totemic designs.
The national headdress of the Indians is a crown of feathers, which is a cap or headband. Only leaders could wear it. To make an attribute of power, eagle feathers taken from the tail of a bird were used. Ordinary Indians preferred a headdress called a roach. It was made from horse mane, feathers of simple birds, and porcupine quills.
In addition to the costume, additional accessories that served as a symbol of honor and dignity were of great importance for the tribe. The warriors did not part with a tomahawk, the name of which came from the English transliteration of a war club. The standard weapons of the Indians were a bow and arrow, a knife and a flexible spear with a stone or bone tip.
The Indians were very fond of all kinds of decorations, giving them a sacred meaning, considering them a talisman against evil spirits. Bracelets and chest necklaces were characterized by an unusual combination of colors and structures. They were made from animal bones, beads, shells, and metal tubes. Deer fangs, bird claws, coins, or remains of military weapons were strung onto leather strap bracelets.
Original outfit for a boy
The basis of such a suit is a jacket and pants. You can use unnecessary items in your wardrobe or sew them using patterns from thematic magazines. Ordinary straight children's pants and a long-sleeved blouse will do. Color - shades of brown, gray, yellow, olive. You can use a white turtleneck, light or brown jeans or any other clothes. A patterned braid is sewn along the entire sleeve. You can easily buy fringed braid or make it yourself. To do this, you will need to cut a strip of fabric and cut it into small strips.
Exactly the same fringe and braid are sewn onto the panties. You can leave only the fringe without using braid, which simplifies the work. There are many details in an Indian costume for a boy, so try to decorate the outfit you make in an original way. The edges of the sleeves and the bottom of the pants can be cut into fringe. The braid can also be sewn to the knees and elbows.
https://youtube.com/watch?v=XIDPnfpnT_w
Next, they begin to create a loincloth and poncho. For the bandage, cut out two large rectangles from light fabric. Sew smaller rectangles of brightly colored fabric onto them. Sew braid and fringe to the smaller rectangles. You can embroider some kind of pattern, we will need to complete as many details as possible. Large rectangles are sewn to a wide belt. This belt will allow us to tie a loincloth over our pants.
For the poncho, cut out a large square of fabric and fold it into a triangle. An incision is made on the fold in the middle to put the cape and poncho over the child’s head. We cover the cut with braid. A fringe is sewn along the edge of the poncho, pulling out the threads. Appliques are sewn on the surface of the poncho or embroidery is done.
All you have to do is make a roach, which is a feather headdress. Indian hats with feathers can be purchased at the store, but if you have a dozen turkey feathers lying around the house, you can easily make one yourself. The feathers should be painted in different colors and glued to the braid, which the child will put on his head. If you don’t have feathers on hand, you can make a roach out of cardboard and paper. You will need to cut a strip of cardboard that is approximately 2cm wide and slightly longer than the circumference of your child's head.
A circle is cut out of the fabric, which is a symbol of the sun, and glued to the central part of the roach. Various geometric shapes are made from colored paper and glued to the base of our hat. It will be necessary to cut out various shapes from paper that resemble oblong leaves, fold them lengthwise and cut the edges with fringe. The completed feathers are glued to our Indian headdress. Next, long strips of colored paper are cut out and glued to the roach, making a paper fringe out of them. Instead of paper strips, you can also use fabric strips.
To complete the look, you can make a bow and arrows or a tomahawk out of plywood or wood, which you simply cut out of paper.
Features of Indian attire
Indians are the indigenous people of America who have lived there for a long time.
Their clothes still attract special attention to this day. For example, men wore leggings that were made from a pair of leather pieces
They also had shirts, and with the onset of cold weather they also wore ponchos.
Men's attire is characterized by a simple cut. This option was convenient for warriors and hunters and did not hinder movement. The style in this case is quite spacious and the lines are straight.
The tribe's representatives' shirt was quite warm and long, making it as comfortable as possible. Due to the presence of a rounded head, it was convenient to put it on over the head. Thanks to the presence of oval armholes, it was possible to easily raise your arms, draw a bow and throw a spear. The trousers were also comfortable. They went from the waist and had a special cut. A man could ride a horse bareback in such pants and easily jump on it.
Women's attire was more sophisticated. Its basis was a cube dress, but it was transformed into a shirt or tunic. In certain tribes, a straight-cut blouse and a skirt served as a costume. Women also preferred suede wardrobe items. Among men, leather was more in demand. They wore moccasins, which could smoothly turn into leggings, decorated with unusual fringe. That is why they were similar to high boots.
Characteristic design and color scheme
The Indian costume is characterized by multi-layered and colorful, natural colors reminiscent of the colors of the steppes. These are mainly beige, ocher, terracotta, and other shades of brown. Thanks to the rich decoration with beads, deer incisors or porcupine quills, the national costume of the Indians looked very original. Women made extensive use of embroidery, decorating clothes with geometric patterns and lines.
Until the 19th century, warriors' costumes were generously trimmed with beads on the chest and back, which served not only as a circular ornament, but also performed protective functions.
All elements of the Indian national costume were richly trimmed with leather fringe. Sometimes the shirt was painted: the top was covered with blue and green (sky), and the bottom with red or brown (earth). Some especially prominent warriors and hunters applied special drawings to their costumes, showing the number of killed or captured enemies, the number of horses killed in battle, and the number of scalps taken.
Astronaut costume
A bright and memorable costume for a boy can be an astronaut outfit, for which you need: bottles, tape, foil, silver paint from a can, old newspapers, a balloon, flour, water.
As the main clothing we use a tracksuit, which can be coated with paint from a spray can.
To make a helmet, you need to tear the newspaper into pieces. Make a thin mixture from flour and water. Inflate the balloon; it should be larger than your son's head. Dipping the paper into the resulting solution, place it on the ball. The lower part should remain free. Let the helmet dry, burst the ball, pull it out, cut an oval hole for the face.
Cover the helmet with paint or foil using glue. To make a balloon, just take two bottles, wrap them in foil, and secure them with tape. You can put rubber boots on your child’s feet, decorated in accordance with the overall look.
Showing your imagination, you can make from fabric such carnival costumes for boys as: Superman, Carlson, Aladdin, musketeer, knight, etc. At the same time, you decide for yourself whether to buy props to create it or make it entirely yourself from scrap materials.
Roach from scrap materials
Making an Indian feather headdress is not difficult. To create a roach, you can use real feathers, fabric or paper.
From feathers
An Indian feather roach would look most plausible. You can assemble the headdress on a strip sewn from thick fabric, a rigid ribbon with a geometric pattern, or a rim made of corrugated cardboard. You need to take real feathers, at least 10 cm long. It’s a good idea to paint them in different colors. Manufacturing algorithm:
- We measure the circumference of the child's head.
- We choose a material to match the suit or paint cardboard.
- We lay the feathers on the strip, glue or sew them.
- We hide the place of attachment with beads, ribbon with an ornament, or colored paper.
- We make ties on the woven strip or insert an elastic band so that the roach stays on the head.
On an A4 sheet of paper folded in half, draw the following figure
Place the cut out figure on a sheet of polypropylene fabric and cut out the blank
We make holes in each corner and insert eyelets
It is necessary to insert a canape stick into each feather, having previously lubricated it with glue
It is necessary to prepare rectangles of felt measuring 8x12, the number of which should be the same as the number of feathers
Each feather must be wrapped in a felt blank. All feathers must be wrapped with thread. Feathers are attached to a prepared frame.
The sticks sticking out from the bottom are carefully cut off. The resulting structure is covered on top with a cloth coated with glue. A row of feathers is sewn on top of the fabric.
Preparing decorative elements
From fabric
For another, more complex version of the Indian headdress in the War Bonnet style, you will need a tight-fitting Indian hat made of felt or other dense material. You can sew it yourself. To do this, take a strip of fabric 18–20 cm wide, slightly longer than the circumference of the head, matching the color of the suit. The edges are worn down. The top of the warp is gathered onto a thick thread and pulled together. You will get a hat. Step-by-step algorithm for making fabric roaches:
- We take the long, hard feathers of the bird (preferably the tail feathers), straighten them over the steam from the kettle, and smooth them out.
- We trim the tips and shafts, aligning the feathers to length.
- We tie a thin cord 10 cm long on the shaft of each feather and secure it with glue.
- We cut scraps of bright fabric that matches the color of the suit, wrap the rods, leaving a loop. For strength, you can use glue.
- We take a hat sewn in advance and make holes along its edge for attaching feathers.
- We pass the cords through the slits and tie them on the wrong side.
At the end of the work, we arrange the feathers in a fan and complement the Indian roach with a bright forehead. If desired, you can decorate the product with side pendants made of thin strips of fur, placing them in front of the ears. You will get a real Indian headdress.
From paper
One of the available materials for making roach can be plain paper. It should be dense and better tinted in the mass. In addition to this, the work will require scissors and glue. Creation algorithm:
- Fold the paper sheet like an accordion.
- From the blank we cut out a shape similar to half a feather. Leave 3–5 cm at the bottom for fastening.
- We cut the feather a little from the top and to the middle.
- We unfold the accordion, lubricate the attachment points with glue, and press it tightly to the cardboard headband.
- To hide the edge of the feathers, we decorate the rim with a strip of colored paper or fabric.
To make the roach look more fun, feathers are decorated with colored pencils or felt-tip pens. To complete the image of a real Indian, a boy can be given a battle hatchet or a spear, and a girl can wear ethnic bracelets on her hands. Paint the child's face with body paints, using black, white, red and brown shades as a basis.
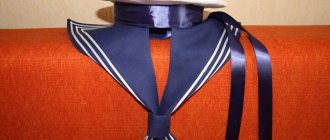
Creating a Collar
If the top of the suit allows for adjustments, then you can make a collar from the feathers found for this. If these parts are not found, you can make it from fabric or paper. One option would be to make a collar pattern from fabric cut in the shape of a circle onto which feathers are sewn. The product can be fastened using Velcro or a standard button.
If you use a simpler method with paper or fabric, then first cut out a circle, then stretch it from the outer edge to the middle using paints or a marker. It is necessary to draw lines for future feathers, trim the jagged edges and hem the stand with patterned braid.
What’s remarkable is that almost all the work can be done together with the baby.
Indian costume for a boy
Let's consider two tailoring options. The first method uses a T-shirt in sand, brown or mustard colors. Since the Indians have a fringe on their costume, located at the bottom of the product and along the sleeves, the fabric is cut into strips of medium width for it.
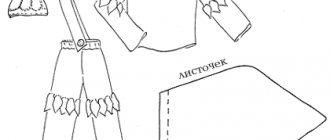
Scheme 1. Pattern of a sweater for an Indian costume.
For an Indian costume made from scrap materials, you need pants. Their color should contrast with the shade of the T-shirt. Therefore, it is better to take unnecessary denim trousers. They will add a modern touch and personality to your look. Fringes are also sewn onto the pants.
For the headdress you will need a strip of fabric, the width of which will be 3 cm, and the length is equal to the circumference of the child’s head. During the carnival, bird feathers are inserted here.
Let's look at how to make an Indian costume using the second method. This option requires knowledge and skills in sewing. To make the costume you will need:
- fabric - linen or cotton, warm shade;
- bird feathers;
- pieces of leather or leather substitute.
Next, cut out the trousers; for this you can use old ones and use them as patterns. Having sewn the trousers completely, do not hem their bottoms, as this will look more impressive.
The jacket is cut according to pattern 1 and fringe is sewn on the sides. The costume can be decorated with embroidery.
For the headdress, use a bandage as in the first option, but you can do everything differently. To do this, cut the ribbon so that after sewing you get a cover 3 cm wide and a length equal to the circumference of the boy’s head.
A cardboard strip is inserted into it, the edges are connected and a ring is obtained. Feathers are sewn or glued onto it. On the outside of this headdress there is a design or embroidery in the Indian style.
The costume is complemented with various leather or wooden accessories. Amulets, stone jewelry, etc. are appropriate here.
Subtleties of self-production
It’s not difficult to make a carnival outfit with your own hands. Making a carnival Indian children's costume is quite simple. It is recommended to start with sewing the top part of the wardrobe. If you make a tunic, it will be an Indian costume for a girl. If you shorten it, you get an outfit for a boy.
You need to take a rectangular piece of fabric of a suitable size and mark the center on it. Having made indentations on the sides equal to 8 cm, the neck is drawn. Its depth should vary between 6 - 8 cm.
In order to make armholes, straight lines with parameters of 2x8 cm are drawn on the sides. It is extremely important that they are 3 cm lower than the shoulder.
The armhole is decorated with fringe. The fabric in the cutout area is cut approximately 4 - 5 cm in depth. You can also sew ready-made fringe to the shirt.
Before creating the side seams, the product is tried on the child. If necessary, the height and length of the armhole are adjusted.
To decorate the hem, cuts up to 10 cm deep are made in the lower part. They should be located at a distance of about 2 cm from each other.
For the neckline, the fringe can be made separately. It is worth taking a suitable piece of fabric and cutting out the desired part from it. Cuts are made on it, after which this decorative element is sewn to the main part.
You can also decorate a shirt using colored pieces of fabric or paint intended for dyeing clothes.
To make trousers, it is recommended to use ready-made trousers. It is allowed to use even things that are slightly different in shade from the shirt.
Fringe is sewn onto the pants. For its manufacture, fabric with a width ranging from 5 to 10 cm is used. The length is chosen at your own discretion. The stripes can only reach the knee or go all the way to the very bottom of the trouser leg.
It is much easier to create a costume from a regular T-shirt and pants. Fringe is sewn onto this garment. Then it is decorated with embroidery and ethnic designs. A cape or vest is worn over these items, which are decorated with a bright bib generously decorated with shells, feathers, fur and beads.