4.1/5 — (148 votes)
Hi all! It’s almost spring, and then summer is here. The most beautiful and warm season will begin, the streams will run and we will all go hiking and have a picnic. The children will launch boats and airplanes into the sky, and we will grill kebabs.
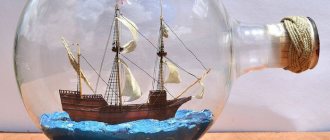
By the way, a paper boat is an excellent gift for both February 23 and May 9. Therefore, if you are still in doubt, you can use this particular toy and you will have an original idea for a small souvenir.
As a child, I really loved such games in nature, and when I grew up I began to sit and fold different figures out of paper, I really liked this activity. Now my favorite naughty girls and I often make such creations.
Paper boat from childhood - the simplest and most popular diagram from A4 sheet
For work, take colored or office paper A4 with a density of 80-160 g/cm2. If the sheet is not double-sided, then bend it so that the colored surface is on the inside: this will make it more beautiful.
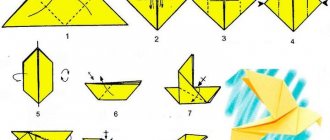
Paper boat diagram
How to make a boat from A4 paper - description of the process with photos:
- Fold the rectangular sheet along the long side. Turn so that the fold is at the top.
- Grab the top corners. Pull both down, connecting along the central axis to form a right angle.
- Fold the free lower strips of the sheet upward, first on one side, then on the other.
- You will get a triangle. Bend small side protrusions that disrupt its shape inward to the opposite side.
- Open the workpiece. Align the corners to create a square with a pocket.
- Bend its free edges upward on both sides to form a triangle.
- Place the corners together again to form a square.
- Gently pull the corners, being careful not to disturb the middle. The paper figure will open up and turn into a small boat.
- Run your fingers along the folds to make the outline of the craft clearer.
Before you send your boat on a voyage down the creek, decorate it. Cut out the anchor and round portholes with scissors and glue them to the hull. Or decorate the boat with markers, make a navy flag or a pirate Jolly Roger. If you have small toy soldiers or Lego figures, you can make them sailors on a boat.
Making a sailboat out of paper
If you want the boat to have a beautiful sail, you will need a square sheet. Also prepare pencil glue.
Scheme of a sailboat made of paper.
To make a sailboat out of paper with your own hands, proceed as follows:
- Pre-fold the square in the vertical and horizontal directions. This will help you find the folds in the future.
- Fold the right and left edges to the vertical axis. Bring the top and bottom to the middle horizontal line too.
- To make the sides of the boat, spread the corners of the workpiece. First, unscrew the corner on the top right. Iron the bottom fold diagonally. Then go over the top of the figure.
- Open the bottom corner on the right in the same way. Repeat the above manipulations with the left half of the workpiece. The result will be the sides of the future sailboat.
- To turn the workpiece into a boat, carefully take its halves with your fingers and pull: the right one towards you, the left one in the opposite direction.
- Turn the remaining protrusion at the bottom to the right and leave it in a horizontal direction.
- Run glue along the bow to attach the port side to the starboard side.
An origami paper sailboat is ready to travel along a spring stream.
How to make a sailboat out of paper with your own hands, see the video below.
Step-by-step instructions for a DIY boat
Do you like the fairy tale Scarlet Sails? There such a beautiful and graceful ship sailed with such luxurious sails. If you are looking for just such an option, you can watch this video:
And if you prefer to do something simpler, then this instruction will come to your aid and will come in handy.
1. Make a square out of a regular sheet of paper and fold it in half to form a triangle.
2. Then unfold it to its original position and bend the sheet in half.
3. These are the lines you will get, one diagonal and the second horizontal.
4. Fold the leaf in half again.
5. And where there is a diagonal, bend the ends to this line to make triangles with equal sides.
6. Now fold the sheet of paper in half in the opposite direction.
7. Unbend again to the starting position and follow further instructions.
8. Take the corner on the left and apply it to the center.
9. And then fold it in half, and the left corner will have to be bent inward.
10. Do the same with the right corner.
11. After this, you will have to bend the very bottom corner of the paper, you will get a base, which you will hide inside.
12. This is such a funny toy that will certainly delight your mischievous baby or toddler.
Boat - a simple diagram for preschoolers
Origami masters offer several ways to make a boat out of paper. A simple option that a preschooler can handle in 10 minutes is given below. For work, prepare a paper square and stationery scissors.
Paper boat diagram.
How to make a paper boat step by step:
- Bend the square along the horizontal and vertical axes to obtain working marks. Open it up.
- Bring the edges to the horizontal axis on the side opposite the main fold so that it looks like an accordion of 4 parallel lines.
- Fold the edges. Move all corners equally to the central horizontal axis. Then bend the corners again, focusing on the vertical axis.
- Having folded the workpiece, open it. The result is something like a boat, but without clear lines yet.
- To make the boat smoother and more beautiful, bring the bow and stern to the main axis. You will get a hexagon, press all its folds with your finger.
- Bend the opposite corners of the hexagon equally, retreating about 5 mm.
- Open the workpiece. Bend the sides on both sides towards the main axis.
- Gently go over the inside corners on each side with your finger until they become clear, so that the bottom of the boat can be outlined.
- Open the finished craft. Straighten the sides if they are wrinkled.
Double boat - catamaran
An ordinary boat is a completed stage, and have you also learned how to make a steamboat? Do you want to continue? Now you can master the assembly of the catamaran. The only materials you need are paper and scissors. First of all, cut out a square from an A4 sheet. Then, step by step, follow the step-by-step description, check the result with the pictures and remember that the clarity of the folds is the key to a neat and beautiful craft.
- Fold the square in half and unfold. You will be left with a fold line. Then fold each side in half towards the fold line.
- Rotate the resulting rectangle 90° and repeat the folding procedure.
- Unfold the workpiece. It turns out to be divided into small squares. Now fold the opposite sides of the square towards the center again.
- Grasp the bottom corners of the sheet and move them apart. Fold 2 inner squares diagonally - you get a blank for one boat.
- Repeat these steps on the other side of the rectangle.
- Fold the layout in half and open it, giving it volume. The catamaran is ready to sail in search of adventure.
Steamboat
Several generations have known how to make a cute paper steamer. Teach this easy craft to your children. The design of the boat is simple and interesting. You need a square sheet of paper.
Paper steamship diagram.
How to make an origami paper boat:
- Fold the square diagonally on both sides to create a center mark.
- Bend all 4 corners to the mark.
- After turning the future steamer over, repeat the manipulations.
- Turn it over again and also direct the corners to the center mark.
- Turning the workpiece over for the last time, open the opposite corners. You will get large steamer pipes.
- Gently bend the resulting boat, simultaneously turning the other two unopened corners into triangles.
The ship is ready to sail.
Origami instructions on how to make a steamship from A4 paper.
We will need
- Colored paper with a pattern
- Paper of a different color for the wings
- Pencils
- Thread and needle
So, before you start creating a bird, you need to draw a template on colored paper or cardboard. The template can be of any size and shape. To make the bird the same on both sides, you can cut out two templates and glue them together. Next we make the wings. To do this, you need to fold a sheet of colored paper like an accordion, and then fold the resulting accordion in half. The resulting wings must be inserted into a hole pre-cut in the upper part of the base. Now you can draw the bird’s eyes, draw its beak, and decorate its body. Then you can make a hole with a needle and thread, thread the thread itself through it, and then the bird can be hung at home. In this paper craft, you can experiment with the size and color of the bird.
Paper yacht
Making a yacht out of paper is as easy as shelling pears, a task that preschoolers of the younger age group can do. The craft can be used as an independent decor or as an element of appliques.
Paper yacht diagram.
To make a paper boat with your own hands , you will have to spend very little time:
- Bend a square piece of paper diagonally to form a triangle.
- Bend one edge so that it coincides with the central fold. You will get the sails of a yacht.
- Fold the bottom strip of the workpiece obliquely. This will be the hull of the boat.
A simple way to make a yacht out of paper is in the video below.
Materials for work
To create crafts in the form of boats and ships, you will need the following materials and tools:
- scissors;
- PVA glue;
- hot glue gun;
- colored cardboard and paper;
- plastic bottles;
- cereals for applications;
- natural material: wood, shells, walnut shells, etc.
- stationery or sharp kitchen knife;
- acrylic paints.
The interesting creative process of creating crafts involves not only paper material, but also all kinds of improvised means.
Multi-colored boat with a flag
Beautiful boats are obtained not only from origami style patterns. For a primary school student, a more complex task will be more interesting, for which you need markers or gouache, canapé sticks, a ruler, stationery glue, a set of thick colored paper, and scissors.
How to make a boat out of paper - step-by-step instructions:
- First make the hull of the boat. Take blue paper, cut out two strips 18 cm long and 3 cm wide.
- Using a ruler, divide the strips into 3 equal parts, make appropriate marks, and bend the paper in these places. Glue the strips together.
- Then make the deck of the boat. Cut out a rectangle from blue paper. On the sides, retreat 15 mm to make it easier to glue later.
- Fold the rectangle along the marked lines. Glue between the sides.
- Next, make the sails. Cut out two rectangles of different sizes from yellow or white paper. Punch holes in them to thread a cooking stick through, which will be the mast.
- Insert the stick into the center point of the deck, after punching a hole in it.
- Cut out a flag fluttering in the wind from red paper. Glue it onto the tip of the stick.
- Use markers or paints to complete the elements of the boat: portholes, folds of the flag.
Video master class on making a simple boat using the origami technique
And finally - a master class on creating a simple boat, also using the origami technique. All that remains is to prepare the sheet and strictly follow the specialist’s instructions.
A paper boat is not just a toy that can be launched in a puddle, river or even a home bath. Such a craft, created with a certain amount of imagination, can be an interesting addition to the main gift for February 23 or just a token of attention.
Most of the variations are very easy to work with, accessible even to children, but if you want to amaze with your skill, get ready for long, painstaking work using the wicker weaving technique. Good luck!
How to make a paper boat not sink
If you float a paper boat along a stream, it will soon get wet and fall apart. You'll have to make a new one. But there is a way to make a paper boat impervious to water.
Light a regular candle. When the wax begins to melt, tilt it over the craft. Let the wax drops fall onto the paper, gently smear them with your finger on the outer surface of the product. Don't overdo it, otherwise the heavy ship will sink. It is enough to lubricate the bottom and sides with wax.
Boat folding diagrams for beginners (pictures inside)
And now I want to offer you a photo selection. But first, practice creating the boats described above, and only then proceed to these.
Although, maybe these diagrams will be more understandable to you and you will cope much faster than I think))
- Most popular type
- A more complicated option
- Ship with two pipes
- Double boat
- boat kayak
- Yacht
- And a couple more simple toys