4.5/5 — (255 votes)
Hello!
Today, on the eve of the New Year, I would like to offer you another wonderful craft that we will make from paper. This is a voluminous Christmas tree that you can easily make with your own hands right now. Because you will have everything you need, these are diagrams and the necessary templates. The forest beauty will turn out lush and fluffy.
Well, if you want to do a more complicated job, you can look here, where we created products from various available materials, and even made a stomp.
Don't forget to decorate your apartment with snowflakes and other winter attributes.
Well, let's start looking at and choosing the works we like and roll up our sleeves to create and surprise everyone. I wish everyone good luck and patience.
Postcard “Corrugated Christmas tree”
To make a three-dimensional Corrugated Herringbone card, you don’t need any exclusive materials.
You either already have everything you need at home, or you can buy it near your home, and quite inexpensively. To make a New Year's card with your own hands you will need:
Materials for the Christmas tree:
a sheet of green colored paper; • a sheet of cardboard or thick paper; • thin ribbon of any color; in our case it is pink; • bead; • PVA glue or glue gun; • metallized paper or candy wrappers, foil - any bright and shiny material that you can find.
A golden ribbon looks good on a card.
Postcard base:
- Bend a sheet of cardboard in half. Probably each of you has made postcards at least once in your life and knows how to fold a sheet of paper.
- Then you need to measure the width of one spread of the card.
- Now we subtract 3 cm from the result and remember - this is the size of the base of the triangle, let’s denote it (1), for the Christmas tree.
- We take green paper, place it vertically in front of us and put a ruler in the middle of the sheet, put a point exactly in the middle - this will be the vertex of the triangle.
The base of the triangle should be length (1).
5. Now use a ruler to bend the triangle into stripes.
6. Using a ruler, create the first fold.
7. Then the second one. And so on until the end.
8. It turns out to be a kind of corrugation.
9. Now you need to pass the tape through the entire workpiece.
- To do this, fold the entire strip of folded paper with the tip of the triangle facing you.
- Place the ribbon in the middle of the very last layer and mark the length of the cut with a pencil.
- Your cut should be exactly in the middle, then the tape will lie flat and pass through all the layers.
- Take a sharp knife and make a cut.
- You won't be able to cut right through.
Therefore, after making a cut at the top, turn the workpiece over and widen the slot at the bottom. 10. When the slot is ready, insert the tape through it using a knife or other object.
11. The tape must be glued to the top of the triangle and wait until it dries.
12. After this, carefully stretch the paper triangle to its full length, straightening the tape.
13. When you release the paper triangle, the ribbon will fall into place in beautiful waves.
14. Trim the ribbon at the bottom, leaving about 3cm for the bead.
15. Make a bow from the remaining ribbon.
Advice:
The bow does not need to be tied; it is much easier to glue it together or sew it with one stitch.
In the photo, the bow is glued together using a glue gun.
Decoration of the card base:
- It needs to be covered with any napkin you choose, like a little decoupage.
- You can leave the cardboard unglued if you used colored cardboard or you don’t want to bother with gluing.
- In the photo, a napkin with silver New Year's motifs was chosen.
Advice:
If you are gluing a Christmas tree using PVA, then the glue is applied to the edges of the Christmas tree blank, which is carefully applied to the base of the card.
Christmas tree decorations can be cut out from foil, candy wrappers, colored paper - whatever you have on hand. Cut out circles, hearts, squares - any shape you can get.
Interesting varieties
Volumetric models look very attractive; on the eve of a festive event, they can well dilute the usual interior of the house. To create such a model, you don’t need a lot of effort and financial expenses; doing it yourself is quite practical; the use of improvised means is encouraged. How to make a Christmas tree so that it is cone-shaped and lush, beautiful, voluminous, for starters, you should select tools and blanks:
- Main material.
- Cardboard sheet.
- Glue stick.
- Sharp scissors.
Important! PVA or other liquid composition is not suitable; they can leave rather ugly stains and the product looks sloppy.
Christmas tree made of corrugated paper for a postcard - step-by-step instructions
Do-it-yourself postcards are valued much higher than their purchased counterparts. You can make a New Year's card using the crepe paper Christmas tree technique. Then the finished greeting card can be signed, supplemented with wishes, decorations, ribbons or decorated.
Necessary materials:
- green corrugated paper – 10 x 15 cm
- a sheet of thick white paper or thin cardboard in A4 format
- piece of red cardboard – 5 x 5 cm
- piece of foil – 10 x 10 cm
- PVA glue
- scissors
Step-by-step instruction:
- Cut the green corrugated paper into 1.5 cm strips. Fold the white sheet (or cardboard) in half into a book.
- Cut each strip into 4 equal rectangles. Form “petals” from these blanks. Twist a piece of strip in the center and then bend it in half.
- Glue the blanks to the front of the card. You can use different numbers of pieces depending on the size of the tree you want.
- Roll the pieces of foil into balls. Cut out a star from red cardstock. Glue these blanks onto the finished corrugated paper Christmas tree.
- Now you can decorate the card around the corrugated Christmas tree as you wish. Ribbons, soft textiles, beads and foil are best suited for this purpose.
Next stage
When all the tiers are ready, you can start assembling, but before that it would be nice to start making the star. If you manage to get chenille fluffy wire, the appearance will be simply charming.
Using a zigzag motion, you need to bend five identical sides and connect the ends, leaving a few centimeters for fastening. A decorated Christmas tree made from corrugated paper is a craft worthy of praise. A truly festive mood is guaranteed with such ideas.
Having secured the made structure on a kebab stick, you should start stringing all the parts. Thanks to the pointed end at the core, there should be no problems with details; it is better to straighten each layer and add fluffiness immediately in the process.
Note!
- DIY wall clocks - the best clock designs for children
Crafts on a military theme: how to make a tank, a soldier, various patriotic models of military equipment
What is a Candy bar - decorating a sweet table for a girl or boy for a birthday and New Year
To make the figure stable, you can cut out a small square of foam and stick the lower end of the stick into it. If you have plastic bottles in the house, you can also use them, cut off the bottom part and fill the space with cotton wool.
Molds filled with wax are perfect for a base; these can be large candles for an aroma lamp. The question of how to make a Christmas tree from corrugated paper no longer seems as incomprehensible and complicated as it might seem at first glance.
Christmas tree made from a cardboard toilet paper cylinder
An unconventional decoration for a New Year's room can be Christmas tree pendants made from a cardboard toilet paper roll. Such holiday symbols can be hung either as individual decorative elements or as a garland.
For decoration you will need:
- cardboard, inner part of toilet paper;
- emerald or green acrylic paint;
- bright ribbon;
- flat parts for decoration. these can be buttons, rhinestones;
- glue (moment crystal is perfect for gluing plastic; its transparent texture will be invisible, plus it dries instantly).
- scissors.
Show your imagination
Factory-made New Year's toys are not very different from each other, which cannot be said about handmade ones. Each item is obtained in an exclusive version. Therefore, it would be a good idea to dilute stationary products with those made from improvised items.
Those with a sweet tooth will appreciate the idea of a candy garland. Such a detail is unlikely to survive until the morning, and the joy and pleasure of the children while eating will be an excellent thank you for the parents who allocated energy to the design.
You shouldn’t stop at certain diagrams and instructions; after gaining experience and making one or two figures, move on to designing models yourself. A Christmas tree made of corrugated paper can turn out much more impressive than ready-made proposals. Fantasizing and creating your free time will be very entertaining; handicrafts are very popular today.
New Year's crafts: DIY blue paper Christmas tree
Since the coming year 2014 according to the eastern calendar is the year of the blue horse, it was decided to make a New Year's craft - a Christmas tree made of paper - in blue. By the way, this shade suited me very well, and the Christmas tree turned out simply magnificent. It looks very beautiful and looks like a blue spruce dusted with snow in the light of the moon.
1. Tools and materials:
- • Corrugated paper
- • Double-sided tape (Can be the same size)
- • Scissors
- • Thick paper
2. Make a cone from thick paper. In this master class, an unnecessary piece of wallpaper was used. The height of the cone is about 18 cm.
3. Cut the corrugated paper into rectangles. The length of each rectangle is 9 cm and the width is 1.5 cm. Do not make a lot of blanks in advance. Because later you will have to reduce their size, and it is difficult to say in advance exactly how many branches you will need. The advantage of corrugated paper is that if you are missing a few millimeters to fill the circle, you can always stretch the workpiece a little with your fingers.
4. Twist each piece in the middle.
5. Fold in half so that you get a sharp nose. You need to slightly bend the spruce branch with your fingers. To make it easier to glue the blanks onto the cone, try to make the lower part a little shorter.
6. Glue tape to the bottom of the cone and secure our blanks. Tape the top again with tape. In this master class, two sizes of tape were used: wide and thin. The spruce branches were glued on with wide tape and secured with thinner tape. Although this is not essential and you can do all the work with tape of the same size.
7. Glue the second row in the same way. Only now we try to place each branch between the branches of the previous row.
8. Starting from the third row, the size of the branches should be reduced. Slightly reduce both the length and width of the blanks (if your tree is taller, then this will need to be done a little later). For subsequent rows, change the size of the branches by eye. Focus on your taste and the external proportionality of the tree.
9. And this is the top of a spruce tree. A blank 4 cm long and only 1 cm wide was used for it. The blank was also twisted. To create the shape of a spruce paw, the end of the workpiece was cut at an angle. We put this blank on top of the tree and thus covered the place where the last row of branches was attached.
10. That's all. The wonderful Christmas tree is ready!
Curly herringbone
This work will require time and painstakingness, so at some stages it is worth resorting to the help of the younger generation. The result is not just a fluffy beauty, but also a children’s craft: a Christmas tree made of corrugated paper.
Devices and materials:
- transparent glue;
- iron (if foamiran is selected);
- scissors;
- cardboard;
- decorations;
- 4 sheets of A4 corrugated paper or foamiran.
The specified quantity is suitable for a craft with a height of 20 cm. If desired, replace the cardboard with a purchased cone.
Manufacturing algorithm.
1) A cone is rolled out of cardboard and glued together, if one was not purchased.
You can fasten it with either glue or a paper clip.
2) Squares measuring 2x2 cm are cut from the sheets.
3) On each square, cut a fringe up to half a leaf long. The cuts are made not on the side, but on the corner.
4) For foamiran. Place the fringe against the hot iron for a minute. It should become wavy.
5) Prepared crafts from corrugated paper for the Christmas tree are glued to the base, but not with “needles”.
6) The crown of the head is decorated.
The Christmas tree can be decorated with beads or other small and light decorative elements.
Crafts differ in complexity of execution and appearance. The second will become an original decoration, as if it came straight out of a picture. And the first and third ones will not only serve as a symbol of the holiday, but will also be a good activity, because you can involve the whole family in making them.
DIY paper Christmas tree for the New Year
A paper Christmas tree has the widest variety of ideas and options for their implementation in practice.
Templates and diagrams for making paper trees
The easiest way to create a Christmas tree out of paper is using a ready-made template. To do this, you need to print the selected figured pattern on thick sheets. Cutting it along the contour is carried out using a special stationery knife or, in the absence of one, using nail scissors. Each Christmas tree blank should be bent in half and the parts of the tree should be glued together. The result is an unsurpassed openwork option.
How to make snowflakes out of paper - https://home-ideas.ru/2015/12/kak-delat-snezhinki-iz-bumagi/
Below are interesting diagrams and openwork templates of different levels of complexity for creating a Christmas tree from paper with your own hands, which can be used not only by adults, but also by children.
Master class on creating a fluffy paper New Year's beauty
There are other ways to make a festive paper tree. And for a visual representation of how to create a fluffy Christmas tree with your own hands, see the master class presented below.
To bring this idea to life, you will need a list of necessary materials:
- cardboard;
- colored paper;
- glue;
- scotch;
- scissors.
DIY New Year's Crafts
Step-by-step instruction:
1. Make a cone out of cardboard, which will be used as a base for the tree. You need to secure the cone with glue so that it does not unfold.
2. Cut sheets of colored paper into thin strips.
Important! You need to carefully ensure that the stripes are approximately the same length and width. This will give the tree a neat, aesthetic appearance.
3. Glue the edges of the strips together to make loops. This can also be done using glue.
4. Glue the finished loops onto pieces of double-sided tape.
5. Wrap the base cone with tape with loops in the direction from bottom to top. The result is a cheerful “shaggy” Christmas tree.
Making a Christmas tree from origami modules according to the diagram
One of the options for making a Christmas tree is to make it using the origami technique. Of course, this option is somewhat more complicated than all those described earlier, but the result is very impressive.
First you need to make modules. To do this, use the following diagram.
Approximately 650 such modules need to be made for a Christmas tree 20 cm high. Done. Now we collect the branches of the Christmas tree. We fasten the modules as follows: In the first row - 2 modules, in the second - 1 module.
We assemble the third row by attaching two more modules to the corners of the second row module. We insert it into the pockets located nearby, as a result the outer corners will stick out to the sides.
We assemble the twig, alternating first one, then two modules in each row.
We make either five or ten such branches. The splendor of the Christmas tree depends on their number. Now we glue the branches together, forming a circle.
You need to make several such circles. Depends on the height of the tree. For the trunk we use a wooden skewer or stick. We stick it into an eraser, plasticine, polystyrene foam - whatever is at hand.
Now we put the finished Christmas tree circles on a skewer. Glue the first row to the base. Then each subsequent row is glued to the previous one.
Having collected the entire Christmas tree, we make decorations for it. Below is a diagram of the assembly of another version of the Christmas tree from ready-made modules.
Master class on Fairytale Christmas tree
To complete this you will need:
- whatman;
- bright green corrugated paper;
- stapler;
- office glue or glue stick.
Algori:
1. We make a cone - this is the basis for our craft. To do this, take whatman paper, draw a circle, cut out a quarter and glue it or fix it with a stapler.
2. To make a Christmas tree from corrugated paper, cut out a strip as long as possible and 5.5 cm wide. We braid it, the process is clearly shown in the video.
3. The result is a beautiful braid that is attached to the cone.
4. Take the braid and glue it to the base with glue. Then we go further along the spiral, do not forget to gather the side without cloves.
5. It is recommended that the teeth do not overlap, but are next to each other. After complete drying, the “needles” must be lifted. This action adds splendor. The corrugated paper Christmas tree craft is ready. All that remains is to dress it up.
Idea #1
To make this beauty we will need: a bottle cap, a wooden skewer, a piece of a bright cloth for decoration and corrugated paper. We start the process by dividing the cork in half, then insert a skewer and decorate the base.
Then we move on to the paper: cut it into strips of different widths, then divide it into equilateral triangles. At the end we string them onto a knitting needle from largest to smallest. All Christmas tree crafts made from corrugated paper are ready.
Idea No. 2
The Christmas tree is made according to the scheme of the second master class, only the braid is not braided. For this beauty, cut strips of 2-3 cm, stretch one side. Glue it to the cone in a spiral and decorate it.
Idea No. 3
Take double-sided cardboard. Fold it in half, draw a diagonal, cut it out. Along the fold line we make an incision of one contour from the bottom up, the other from the top down. We insert into each other. Cut the outer side of the triangle into small strips. Then we direct the strips to the sides.
Christmas tree crafts made from corrugated paper will create a festive atmosphere in your home and will be a creative gift for guests.
Realism and effectiveness
Most secondary schools and similar institutions hold many competitions and exhibitions dedicated to festive events.
Using thick cardboard, you can bring the craft to a good resemblance to a real plant. All the needles will look so realistic that some visitors will be afraid to prick their hand while touching it.
Note!
- How to make a snowman from plastic cups: step-by-step photo/video instructions + master class
- DIY wedding decorations, crafts and accessories: photos of original wedding decor
- Wedding invitations - original and unusual handmade samples with photos, video invitation example
Truly stunning results can be achieved with the help of homemade New Year's decorations, made in a creative style with imagination and diligence. Painstaking work usually does not go unnoticed by the court, and the best handicraft masters are awarded valuable prizes and sweets.
Please your loved ones
The first thing that invited guests pay attention to is the windows of the house, with the help of master classes on snowflakes made of corrugated paper. With your own hands, step by step, you can decorate glass with spectacular patterns.
Such decisions will contribute to a good mood from the very first minutes of the meeting. Some types of doors contain transparent decorative elements; they should also be used.
Various cartoon characters or molds of Father Frost and the Snow Maiden placed around the hallway will undoubtedly make you want to go through and appreciate the decoration of the other rooms and Christmas tree decorations. Such excursions are always accompanied by good friendly communication.
A snowman made of corrugated paper will also take its place and decorate the magical interior of the room. The material is quite universal and extraordinary; with its help, figures acquire interesting visualization.
Christmas tree made of Japanese paper
For this craft, you can take either special Japanese paper or brightly colored glossy cardboard.
You will also need: wrapping paper (magazine sheets with a bright image), white A4 sheet, skewers, pencil, scissors, ruler, PVA glue.
For the base of the Christmas tree, cut a regular sheet of paper into strips 2 cm wide. Twist all the strips into circles. Attach all the elements to each other in a circle using glue. You should get a large circle of spirals. The width of the circle is arbitrary. The wider, the more stable the figure will be.
Cut two rectangles measuring 21 by 28 cm from cardboard. Bend each of them like an accordion so that the sides are 1.5 cm wide. Round the ends of the accordion.
Fold the piece in half, gluing it end to end. A semicircle is formed
Glue the resulting semicircles together to form a circle. This will be the bottom row of tree branches. You can replace the glue with wire by piercing both semicircles and twisting its ends.
Make two rectangles of the following sizes: 18 by 28, 16 by 28, 14 by 26, 12 by 26, 8 by 25, 6 by 23.
Make accordion shapes from all rectangles, connect identical semicircles into 6 circles.
Now you need to prepare the skewers. They need to be wrapped. To do this, you will have to cut a strip several centimeters wide from a bright sheet and wrap it in a spiral.
Place all the circles of branches on a skewer. There should be wider circles at the bottom.
The Christmas tree is a very beautiful decorative element
A Christmas tree made by yourself will perfectly complement the festive atmosphere
To create such a Christmas tree, glossy paper or cardboard is suitable.
Hanging products
In addition to appliqués, you can make corrugated paper pendants - 4th graders, 5th graders and 6th graders enjoy doing such activities. For example, you can put together a colorful composition of butterflies.
To do this, you need to cut 3*10cm rectangles, twist them in the middle and grab them with a stapler so that it completely encircles the fold. At the point of fastening, bend the corrugation in half and cut off the wings.
Fold the top wing so that it overlaps slightly with the bottom one. Connect several of these butterflies into a garland using ribbon or string.
To assemble the pompom, prepare a template and cut out a shape from an accordion-folded sheet of corrugated paper. Now you need to fold the accordion in half and secure the fold with wire or strong thread.
Straighten and bend the leaves to form a ball. These pompoms can be hung individually or by stringing balls onto a garland.
Formation of spruce branches
To do this, take one rectangle, fold it like an accordion, bend it in half, and then open it so as to form a fan, securing the sheets with a stapler. You should get an open fan - a semicircle.
A second fan is folded from the second rectangle in a similar way, after which the two semicircles are also connected using a stapler. Thus, from two rectangles one round tier of the future Christmas tree is obtained.
What is corrugated paper
Corrugated paper is most often called crepe paper - thin, crumpled material in small folds. The real “corrugation”, used first as a lining for hats and then as a packaging material for fragile goods, has a much larger wave size.
The method of producing decorative corrugated (creped) paper has remained virtually unchanged since its invention, that is, since 1856: the paper base is applied with glue to a rotating hot cylinder of a crepe machine, and after drying, the mass is removed with a special knife - a crumpled sheet is obtained. The area of application of corrugated paper depends on its density and ability to stretch - the thinner the corrugation, the worse it stretches. By the way, the price also directly depends on the density.
For simple children's crafts, corrugated paper with a density of 17-25 g/m2 is suitable. Often such paper is sold in sets of several colors and can be colored on one or both sides, decorated with a pattern or glitter. If you plan to make a three-dimensional composition, it is better to take paper of higher density - from 32 g/m2.
How to make a three-dimensional Christmas tree out of paper with your own hands?
You can make a voluminous Christmas tree out of paper with your child in kindergarten with your own hands.
To do this, use a template to cut out a Christmas tree from colored paper.
Paper is ideal for scrapbooking. Exactly along the middle we cut the Christmas tree to the middle. One half on top and the other on the bottom. We insert both halves into the slots. This way the Christmas tree is voluminous and stable.
The next paper Christmas tree is made in the same way. But you need to cut it out according to a template or stencil.
Another paper Christmas tree for children's creativity. Double-sided paper is used here. For the stand - corrugated cardboard, pencil and elements for decoration, glue for fixing the pencil to the base.
Master class on making a paper Christmas tree
Video master class on making a Christmas tree out of paper with your own hands
The New Year is approaching and I want to do something for the holiday with my own hands. A paper Christmas tree will help decorate the interior, or will be an excellent gift. It’s not difficult to make, nothing special is required: colored paper, glue, scissors.
You can make a Christmas tree like this on a wooden skewer, like below. This is one of the simplest options for a DIY voluminous Christmas tree.
In addition to green paper, you need a wooden skewer and beads.
A circle is cut out of green paper and folded eight times, then placed on a skewer and secured with hot glue. At the top is a bead.
Such a Christmas tree can be placed on a saucer, or stand, in a pot and anywhere at your discretion.
You can also assemble a three-dimensional Christmas tree using the quilling technique.
You will need the following items to make a Christmas tree:
First we will make individual elements.
Such curls are made by twisting strips of paper onto a toothpick. After twisting it, let it unfold freely. The free end is then fixed with glue where it ended up after the strip of paper was straightened.
Now we glue the parts of the craft with PVA glue. It is better on a quilling table (foam plastic covered with paper).
Glue the top of the tree.
We attach the star to the top.
In order to make a three-dimensional Christmas tree out of paper, we need paper, cardboard, and templates, stencils of the Christmas tree itself. You can download ready-made Christmas tree stencils and diagrams right here at this link. Making our three-dimensional Christmas tree. Take the template and print it onto a sheet of paper. Then we transfer our template onto thick green colored cardboard, or glue our sheet of paper with a stencil to the cardboard, and then paint it with green gouache. We cut out the details of our Christmas tree. Then, looking at the diagram, we put our parts together and glue them together. When the glue dries, you can decorate your Christmas tree at your discretion.
I suggest making a three-dimensional Christmas tree out of paper using tissue paper, paper napkins or crepe paper.
As the base of the Christmas tree, we can use a ready-made foam cone, which can be bought in art stores, or we can make this cone out of thin cardboard from a third or quarter of a circle.
You can stick pompoms made from thin paper or paper napkins onto the cone,
To do this, cut out circles with a diameter of 3 to 5-7 centimeters, stack about seven pieces together in a stack, secure the stack with a stapler in the center.
Then you should fluff the stacks. to make halves of pompoms.
Next, glue the resulting blanks onto the cone with PVA glue or instant glue.
This Christmas tree can be made in almost any color. both monochromatic and with the participation of another color or colors.
You can also make flagella instead of paper pompoms. twist them into spirals and glue them onto the cone.
You will also get a cute Christmas tree made from napkins and paper.
To make the basis for such a Christmas tree, we cut out a semicircle from paper with a radius equal to the height of our future Christmas tree. Let's roll it into a cone and fasten the sides with a stapler.
Cut wide ribbons from crepe paper. Across these ribbons, with an indentation of a centimeter and a half, we make cuts to the middle of the ribbon. It turns out to be a kind of fringed strip on one side. Starting from the bottom, having previously coated the cone with glue, with the fringe facing down, we begin to wrap our strip of paper onto the cone, gluing it to it. We move upward in progressive turns. We will sharpen the top and coat it well with glue.
It should turn out like this -
Now let’s decorate the Christmas tree with “toys”; their role will be played by foam balls of different sizes, strung on a thread or fishing line. The balls need to be painted in different colors, and also, in a spiral, following the strips of crepe paper, placed on a cone, under our improvised “branches”.
As a result, you will get this voluminous DIY paper Christmas tree -
Master class on a beautiful Christmas tree with red bows
To complete this you will need:
- whatman;
- corrugated paper in bright, green and red colors;
- office glue;
- scissors;
- Styrofoam;
- small beads;
- gold glitter;
- stapler;
- bright bow.
Execution algorithm:
1. We make a base-cone 14 cm high. We take whatman paper and draw a circle with a radius of 14 cm. Then we cut out a quarter of the figure, fold it, glue it or attach it to a stapler.
2. To prevent the Christmas tree craft from showing through in white, cover the cone with green paper.
3. You will need to make 120 dandelion blanks. To do this we use the quilling technique. We take green paper and cut strips of 1.5x15 cm. On one side, we cut it, making something like a fringe.
4. Screw the tassels onto the handle. Glue the end of the strip. We got dandelions for our Christmas tree.
5. Take the blanks and glue them evenly onto the cone. The result: a lush, green beauty.
6. Now let's start making the decoration. We make a red bow and decorate it with a small bead.
7. Take foam plastic and form balls. Then we cover it with gold glitter and let the paint dry. We have a bead.
8. Decorate the craft with bows and beads.
9. Attach a bright bow to the top of the head.
10. The Christmas tree craft made from corrugated paper is ready.
Volumetric Christmas trees made of paper for postcards
Despite the large range of printing products, choosing the right postcard can be quite difficult. In such a situation, it is worth making a greeting card yourself, decorating the first sheet with a three-dimensional Christmas tree made of paper.
Everyone will like an original postcard
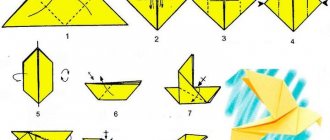
Origami Christmas tree
To make the decoration you will need designer cardboard, from which five modules should be made. The size of the squares should be chosen taking into account the desired size of the tree. The main thing is to make sure that each subsequent one is slightly different from the previous one. This can be achieved, for example, by making a larger square for the origami module with a side of 10 cm, and subsequent ones - 1 cm smaller than the previous one.
The Christmas tree is made as follows:
- fold the square diagonally, then unfold and connect opposite corners to form a second diagonal;
- focusing on the formed fold lines, we bring one of the faces of the resulting pyramid inward;
- proceed in the same way with the opposite side;
- Carefully smooth the fold lines with your fingers;
- bend the upper layers of the free edges on both sides towards the middle;
- glue the resulting module to the future postcard using double-sided tape;
- We form subsequent elements in the same way and glue them above the previous ones.
We invite you to look at the photo so that you can find an idea for subsequent implementation:
The following video describes the process of making such jewelry:
Watch this video on YouTube
Christmas tree made of triangles or rectangles
To form a Christmas tree you will need several squares or rectangles made of cardboard (paper) of different sizes. It is better to choose the aspect ratio of the rectangle 2 to 1. We fold the prepared elements in half. We bend the upper corners down towards the middle. As a result, the free edges will be at the bottom. We glue the elements from top to bottom so that each subsequent one overlaps the previous one.
You can arrange elements arbitrarily
Christmas tree made of paper tubes
If you decide to create a postcard with your child, pay attention to the following master class:
- We prepare the necessary materials and tools. Instead of colored paper to make a Christmas tree, you can take any paper with an original design;
- cut out strips of different lengths;
- we form paper tubes using a pencil as a template;
- glue the resulting elements along the cut line;
- glue the tubes to the future card from bottom to top from largest to smallest.
If you still have questions about making such original jewelry, watch the following video:
Watch this video on YouTube
Christmas tree for opening cards
Postcards in which the Christmas tree is located not outside, but inside, look beautiful and original. At the moment of opening, a three-dimensional figure is formed from it. You can make such a unique gift as follows:
| Illustration | Description of action |
| We prepare green double-sided colored paper, cardboard, scissors and double-sided tape. The latter can be replaced with glue. | |
| We mark a sheet of colored paper, forming rectangles, the length of which will be equal to the length of the sheet of paper, and the width - from 7 cm or less in increments of 1 cm. | |
| We fold the sheet into an accordion. Each fold should be 1.5 - 2 cm wide. The folds are made the same size | |
| We glue double-sided tape to the last folds, with which the elements will be attached to the card. | |
| Fold the resulting accordions in half. We place them along the fold line of the card and glue them to both sides at an equal distance from each other. You can glue a star on top of the Christmas tree by cutting it out of colored paper. | |
| We check our work by opening and closing the postcard. |