If the inner lining of your shoes is worn out, no problem!
There is no need to run to the store in search of a new insert; today you will learn how to make insoles with your own hands. You will be confident in the quality of the materials used, besides, it is always nice to have something that you have made yourself. By the way! In Russia, craftsmen made the first shoe insoles from birch bark and nettle. At the beginning of the nineteenth century, insoles made of compressed cardboard appeared. Supportive orthopedic inserts were invented by Petrus Camper in 1762. And in 1914 a patented technology for taking a plaster cast of the foot, which many orthopedists still use today.
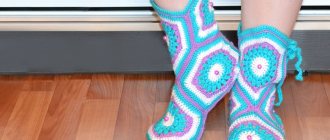
From available materials you can make different types of shoe inserts: thin summer ones, thick ones, warm ones, and even orthopedic ones!
General information
Materials and tools
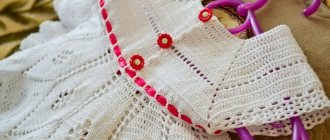
The standard insole consists of two layers. The inner part holds its shape and does not allow the material to unravel. As a base, it is better to use shoe card, or high-density cardboard, or cork, for example, in rolls. To ensure that wearing shoes with homemade lining does not cause discomfort, the material of the front part must be natural and breathable, and durable for durability.
Ideal options include:
- Leather
- Denim
- Thick cotton fabric: calico, linen
The simplest set of tools:
- Soap or chalk
- Sharp scissors
- Glue
- Needle and thread or sewing machine
How to make a pattern for warm house boots
For those who prefer warmer house boots to slippers with an open back, the work will be more difficult. You already know how to make a sole pattern; just outline the foot and add a seam allowance along the contour. But to make a pattern for the top of such slippers (like Uggs) you need complex calculations. Therefore, we’ll better use the “wrapping” method.
Since house shoes do not require a tight fit to the foot, but on the contrary, shoes or boots with flat soles can serve as a template for removing the pattern of the upper part and further modeling.
First you need to crumple the paper so that it lays out better on the convex surface of the shoe. Then wrap it around your chosen shoe or foot. Wrapping the leg is not very convenient, but the pattern is more accurate. If you are satisfied with loose and spacious boots, then use shoes for the template.
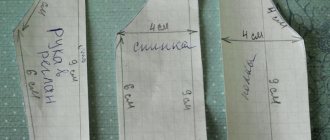
While wrapping the template, you can add folds, securing them with glue or paper tape or pins. Outline the line of connection with the sole, the middle line along the front of the boot and along the heel, the contour of the upper edge of the boots (Fig. a).
Remove the paper (without splitting the pins) if it does not lie flat. Notches are made along the line of connection with the sole in the toe area, and the pattern lines are adjusted. The resulting pattern can be divided into several parts depending on the model you have developed (Fig. b).
Making insoles
Whatever type of shoe insert you choose, you first need to make the base. To do this, outline the outline of the foot on cardboard or cork material. The line needs to be adjusted and rounded, and then carefully cut out the workpiece.
This is the first stage, our pattern is ready. Next, we work with the selected material, take the pattern, apply it to the fabric, and trace it. It is better to choose soap or chalk as they are easy to wash off. On textiles, leave a small seam allowance of about 0.5-1cm.
The insoles can be made one-sided: we need 4 parts, we connect one base and one fabric part together, sew them from the wrong side and turn them inside out, then iron them and cut off the allowance so that the insole fits exactly into the shoes. We repeat the procedure with the second liner. To prevent the fabric from moving out, the insoles need to be darned in a circle using a sewing machine or stitched by hand. Ready!
Double-sided insoles are made in almost the same way, for them we need 6 parts, 2 bases and 4 fabric parts, fabric is placed on top and bottom of the base and sewn together, we cut off the excess and quilt for density.
By the way! If you are tired of gray colors and monotony, then you can make insoles with a unique and original design. To do this, choose textiles with a bright print as the front part! You can buy it at a fabric store or make it yourself, using old clothes from a suitable material as a basis!
Leather insoles are an excellent alternative to store-bought ones, especially if you have a leather jacket, boots or other unnecessary, damaged product lying around at home. Leather inserts are more durable, well ventilated, do not absorb odors and are easy to clean with a damp cloth. Leather insoles are made using the same algorithm as thin insoles.
But since the material is denser than fabric, it will be very difficult to sew by hand with thread and needle. Therefore, it is recommended to choose glue suitable for paper and leather, apply it to our base, wait the time specified in the instructions, and tightly connect the two halves together. After a day, the product is ready for use. Well, if you have a sewing machine in your arsenal, then you can easily sew the parts together, firstly, it is more environmentally friendly, and secondly, you don’t have to wait.
How to sew home slippers
Once the pattern for the sole and top of the slippers is ready, you can begin cutting out the parts. When cutting soles, allow an edge allowance of 0.5 cm.
The gasket pattern is reduced by 0.7 cm along the entire contour so that the gaskets do not unnecessarily thicken the seam. Glue soles cut from leather, cardboard, batting, split wood and trim the edges evenly (Fig. A).
Glue the sole along the edge to the top of the slippers with the seam facing out (Fig. B), aligning the control marks. On a closed model, the excess length of the upper part is pre-fitted along the toe part. If with a closed top you can allow some freedom for the leg, then in a model with an open toe it is necessary to adjust the length of the upper part so that it fits snugly around the leg.
The upper is connected to the sole using edge braiding, edging, and straight stitching.
The welt can be made in the form of an edging or lining along the edge of the sole made of a narrow leather strip (Fig. B). The seam can be closed with a decorative braid woven from thin leather straps, cords, ribbons, etc. You can use a craft glue gun to secure the finishing elements.
As in any work with paired products, operations are performed simultaneously on one and the other slipper.
What to make warm insoles for the winter from?
The classic version of insulated liners is felt insoles. The material is dense and holds its shape, so it does not require a base.
Another original homemade lining option:
- Preparing and cutting out the base
- We make 2 fabric parts, with an allowance of 1 cm
- We take woolen threads and weave them together with a braid
- We sew our pigtail to the base in a circle, from the edge to the center, until the entire space on the workpiece is filled. We cut off the braid and sew the end tightly to the base so that the threads do not unravel.
- We put the fabric part on top, stitch it, cut off the excess at the edges
By the way! To ensure that the insoles can be worn in any frost, there is a little trick: glue foil to the wrong side! It will retain heat. Similar technology is used in many modern products.
A simpler version of the insulated lining can be made using thin insoles technology, but with warm material sewn into the middle. An old wool sweater, unwanted fur, or sheepskin clippings will do. If you use an additional trick and glue the insole with foil, then your feet will definitely be warm!
Select and prepare material
The use of a corrective product involves long contact of the foot with the insole. The orthosis material must meet the requirements:
- naturalness;
- hygiene;
- air throughput;
- should be easy to clean and easy to maintain.
Natural leather and cotton material have the necessary properties. Experienced workers advise taking leather goods and denim. Finished products can be made from cork or plastic. Leather materials must be hard, strong, and free from scuffs and strange bends.
You will also need the following auxiliary materials:
- small roll of cotton wool;
- bandage 3.5 cm wide;
- special adhesive plaster.
If suitable used insoles cannot be used to create orthoses, then you will have to cut a blank from the prepared material. It is necessary to measure your feet in advance.
DIY orthopedic insoles
Orthopedic orthoses are a medical product. They are used for transverse and longitudinal flat feet, arthrosis, and other degenerative diseases of the arch of the foot. The insoles support the foot in the correct position, reduce the adverse effects on the joints and spine, and protect the foot from shock loads. Professionals make custom insoles by first taking an impression of both feet. You can find a lot of ready-made insoles in ortho stores, but they are standard and do not always fit your needs perfectly.
By the way! Before making orthopedic insoles, consult your doctor to determine if you need them! It is not recommended to risk the health of children and make orthoses for them yourself, because you will not be able to evaluate their convenience. It's better to leave it to the professionals.
Step-by-step instructions on how to make orthopedic inserts:
- We prepare the base or take a purchased thin insole, cut out the material for the front part of the insole
- We stand on the pad with our foot and mark the point between the thumb and index finger, roll up a cotton ball and secure it with a plaster
- The lift of the foot must be precise and individual, so we apply cotton wool until the desired result is achieved; the foot should not sag, but there should not be excessive pressure. We increase the volume until the support becomes comfortable. To avoid displacement of the improvised instep support, we also glue it with adhesive tape.
- We put textiles on top of our workpiece and carefully sew them together
- We repeat the same algorithm for the second liner. Since the degree of flat feet can vary, be sure to take measurements for each foot so you will end up with custom insoles.
Video
During the cold season, walking in socks on icy floors is not only uncomfortable, but also fraught with colds. Factory products solve this problem only partially, without creating the necessary amenities. The way out of the situation will be to pattern fur slippers and make them yourself. Hand-sewn shoes look beautiful, keep your feet warm, are environmentally friendly and durable. You can make slippers from fur for all family members, regardless of their age.
Fur toy made from an old fur coat
All kids love something unusual. So why not give them pleasure by making a toy with their own hands. Maybe an old fur coat can make a great bird. To do this you need to take the following steps:
- cut out all the details of the future toy;
- sew together all the details of the head, including the forehead, eyes, eyebrows, beak, carefully process the undercuts;
- side wedges are inserted into the chin, ears and head;
- the abdomen is sewn together from parts;
- feathers are sewn to the wings;
- then the tail, abdomen, back, and wings are sewn together;
- wings, tail and head are sewn to the body;
- eyes are attached to the head (you can use glue);
- The paws are made of fabric and claws are attached to them.
The feathered friend is ready!
In a similar way, you can make any other soft toy: from bunnies and bears to cars and houses.
Fur headphones
To make these headphones you will need:
- scissors;
- black rim;
- felt fabric;
- artificial fur;
- hot melt adhesive.
Using scissors, cut out two interconnected circles from the fabric. Fur is applied to only one side of the circle. The eights are folded and the batting is placed inside. The rim is glued along the contour. The headphones are ready. They can be decorated with a brooch, rhinestones, bows.