A craft for dad on February 23 or for his birthday requires a responsible approach. This could be an inexpensive gift for dad. After all, the main thing is attention. But what gift should I give my dad? There are many different options. We suggest making an original craft - a shoe made of paper. This is a pretty simple DIY gift, instructions included. All you need for the job is a printed color template, scissors and a piece of lace. Instead of a color template, you can use black and white and multi-colored markers with which you will need to print it.
We prepare the materials necessary for the craft. Print the selected template. You can download it at the end of the article.
Cut out the template.
Don't forget to cut out the lanyard holders. To do this, you can use a hole punch.
We bend the template.
It also needs to be folded along the italic lines.
Now let's assemble our craft. We fasten the necessary parts with glue.
Insert the lace.
All that remains is to tie the lace. And the craft is ready.
By the way, you can make a cute pencil holder from this craft. To do this, the work process needs to be slightly changed. First of all, we need to strengthen the nose of our boot. We decided to do this with an eraser.
Then we put a toilet paper roll.
And repeat the procedure with the lace.
This is the craft we made. All that remains is to fill it with pencils, pens or markers.
To make the craft look more presentable, the toilet paper roll needs to be painted or decorated with beautiful paper. And now a nice DIY gift is ready.
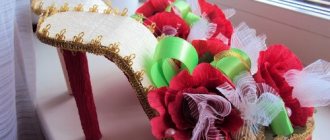
A high-heeled shoe is a favorite ladies' accessory, which is the personification of femininity, beauty and attracting the attention of the opposite sex. A real woman never remains indifferent when looking at a graceful, elegantly shaped stiletto heel. Many ladies enjoy collecting shoes and have them for every outfit, for every event and event.
But that's not what we're talking about now. On March 8th, the holiday of all women, and therefore the holiday of beautiful shoes. The shoe can be given as a gift, not just a simple one, but an almost magical one. This is exactly what a voluminous shoe will look like - a postcard that you can make with your own hands, which will fit absolutely everyone and will suit any outfit on International Women’s Day, and not only. In addition, such a shoe can serve as a container for another gift: chocolate, a perfume or cosmetic set, jewelry or a bouquet of flowers.
In order to make a voluminous paper shoe, we will prepare the following materials: thick colored paper or paper with a pattern (for example, thin colored cardboard, scrapbooking paper, leftovers from bright wallpaper), glue, pattern paper, decorative elements (buttons, bows, beads, paper or fabric flowers, etc.).
Take a paper shoe pattern, use one of the templates, or create a template according to your sketches. It is convenient to make the pattern on tracing paper or a white sheet of paper.
Transfer the pattern onto colored paper. Carefully cut out and glue along the folds intended for this. Use a glue stick or PVA glue to avoid warping the paper with excess moisture, which is present in regular stationery glue. You should get a three-dimensional display of the desired ladies' item of clothing - a high-heeled shoe.
Now comes the fun part: decorating the shoe with accessories. See if you have any nice buttons, rhinestones or beads. The shoe can be complemented with a silk bow, a flower made of fabric or paper, a fragment of a chain and some other elegant things.
The shoe can be an independent object that can be filled with gift filling if the surprise is small. If the gift is larger than a shoe, then it is easy to attach it to the top of the packaging box and insert a note or a small card with wishes into it.
This paper shoe also holds a small bouquet of violets, lilies of the valley or mimosa, which will look super original.
A very successful gift for March 8th, it will surprise and delight the recipient of the magic shoe. However, not only International Women's Day can serve as an occasion for such a gift.
The source of some photos is the website “Fair of Masters”, where you can also see other options for making pretty paper shoes.
We hear the word handmade more and more often in everyday life. But it’s true that something made with your own hands brings more joy and warmth. Heeled shoes inspire femininity, beauty and attract the attention of men. Any woman does not remain indifferent when she sees beautiful stilettos. You can give a shoe, and not an ordinary one, but an almost magical one. A handmade paper shoe can be used for a beautiful and unusual gift, for example, ordinary sweets, perfume or money, which will make the gift original and will definitely not go unnoticed. Depending on the decor, such a masterpiece can be presented for any celebration, be it a wedding, birthday, New Year or March 8th. Below is an example of how to do this and what materials you will need.
Elegant way
Materials we will need:
- paper;
- scissors;
- PVA glue or pencil or glue gun;
- decorations, sweets, decor to our taste.
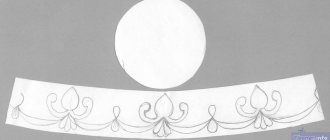
To create it, we need a template that needs to be printed on paper. The paper should be thick. Use a printer to print the template on paper. Carefully cut. The dotted line on the template shows the fold lines, and the red line is the gluing line.
You can put various souvenirs or sweets into the finished shoe, wrap it in a piece of beautiful fabric or organza, secure it with ribbons, and decorate the shoe to your liking.
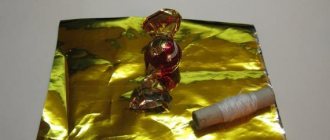
Shoe with candy
Let's consider another very interesting type of gift, which will be the size of a size 36 shoe. You will need:
- Shoes size 36 (or size of your choice).
- Corrugated cardboard.
- Glue gun.
- Double sided tape.
- Wire.
- Penoplex.
- Pencil.
- Scissors and stationery knife.
- Sandpaper.
- Thin cardboard and corrugated colored paper.
- Decor.
- Candies.
Interesting and tender
This is the second version of the shoe, made in the same way as the first version.
This is what the shoe template looks like:
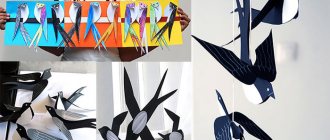
How to make Huggy Waggy with your own hands from scrap materials
Amateur craftsmen on the Internet come up with different methods to create a blue monster. The author of Medialeaks analyzed the three most original and budget methods.
Magnit clamps come to the rescue
Rubber clips from the Magnit chain of stores, which Medialeaks talked about, became a good basis for creating a mini-version of Huggy Waggy. They can be received as a gift with a large purchase or purchased for 49 rubles. To make a monster, you need to choose a staple of a suitable shape - with a triangular head, as shown by TikTok user @nochevkini.
The first step is to erase the existing drawing. Now you need to paint the figure blue and wait until it dries. Then, using a thin brush, paint on Huggy Wagga's famous face with big eyes and a red, toothy mouth.
Stages of creating Huggy Wagga from scrap paper
It is best to choose durable acrylic paint. If you don’t have one at home, then you should take regular gouache and then coat the dried product with varnish.
Congratulations, little Huggy Waggy is ready.
Modular origami
We make modules according to this principle:
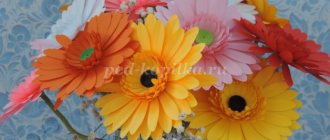
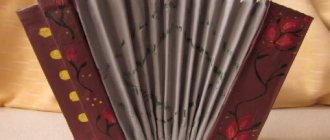
This is the kind of shoe we will make:
To create it we will need:
- 18 sheets of yellow paper;
- 2 sheets of red paper;
- adhesive moment “Crystal”;
- scissors and a stationery knife.
To create such a shoe, you first need to make modules. We will need 279 yellow modules, 21 red modules of standard size. We will assemble the sole of the shoe separately; the heel, straps of the shoe and the flower will also be assembled separately. Then the separately assembled parts are glued together.
Assembling the sole. It is assembled from yellow modules. Red modules for collecting soles are not used. In the first row we have 7 modules. The second row is already one more module - 8 modules.
In the third row: 9 modules. Fourth row: 8 modules.
Fifth row: 8 modules. Sixth row: 8 modules.
Seventh row: 9 modules. Eighth row: 8 modules. Ninth row: 9 modules.
Tenth row: 8 modules. Eleventh row: 9 modules. Twelfth row: 8 modules.
Thirteenth row: 7 modules. Fourteenth row: 8 modules. Fifteenth: 7 modules.
The corners of the previous rows should not stick out; we hide them in the pockets of the modules of the next row.
Row 16: 6 modules. Row 17: 7 modules. Row 18: 6 modules.
Row 19: 7 modules. Row 20: 6 modules. 21 row: 5 modules.
Row 22: 6 modules. 23 row: 5 modules. 24 row: 6 modules. Row 25: 5 modules.
Due to the bends we make the sole realistic.
Let's continue to create. Row 26: 6 modules. Row 27: 5 modules. Row 28: 6 modules. Row 29: 5 modules. Row 30: 6 modules.
31 row: 5 modules. Row 32: 6 modules. Row 33: 5 modules.
Here we have the sole of our shoe.
Now we need to make the heel. In the heel we will have 15 rows of modules.
From the 1st to the 13th row, the number of modules in the rows changes: 2 and 1, and so the alternation continues
Article on the topic: Knitted shirt shirt for a boy: diagram with description and video
From the 14th row to the 18th row, the number of modules in the rows changes. 3 and 2 modules alternate.
The fifteenth row consists of 4 modules and our heel ends with this row.
Glue the sole to the heel.
Let the glue dry and assemble the straps. But we will now use both yellow and red modules.
One strap needs to be made 2 rows longer.
Now let's glue the straps.
Let's decorate our shoe with a flower. We assemble it from red and yellow modules, as shown in the photo:
We glue the finished flower onto our shoe.
The shoe is ready!
How I made Lady's Slipper
Hello, dear needlewomen! There are many different tutorials on orchids on the Internet, but I couldn’t find Lady’s slipper. Maybe I didn’t look well? I’ll be glad to link to the tutorial if anyone has one. I want to show how I MADE this orchid. I don’t claim authorship (right away I’ll make a reservation so that there are no misunderstandings). I just want to share my little experience. Maybe someone will want to make this flower.
.
I used stencils. There are molds in online stores, but I don’t remember which one I saw in. It was from such a store that I copied the shape of the shoe back in the fall, but I was just afraid to take it on.
For the upper and lower petals I used homemade molds. I cut out the side ribbons and the lip using a stencil.
Let's get started. I cut out the lip and thinned the edge with my finger through the film of the folder.
Then, just like in the photo, I smeared it with PVA glue and
rolled it into a tube, gluing the edges.
Helped with a stack. That’s how it goes
.
like this. You need to dry it well.
Even if the seam is not even and beautiful, do not despair. Mine also turned out to be full of holes, but this can be fixed. We roll out a small sausage from HF, flatten it and glue it on top of the seam and smear it with wet fingers and smooth it out.
That's all in order. Dry and
connect to the boot.
The anther or pestle (which is correct?) in V.’s shoe is small. I placed a drop of green HF on the tip of the wire and made a dent with the stack.
I made the upper and lower petals with homemade cutters (see 1st photo). Make a texture on the mold and roll out the upper ones in a stack along the edge, giving a slight waviness and naturalness. I did not roll out the lower ones, but only thinned the edge in a folder.
Side ribbons. I made a texture on the mold. Different varieties have different textures, some don’t have it at all. So it’s up to you to decide whether to do it or not. Then I walked along the very edge with a small bulb and twisted it. I forgot to take a photo of the process.
I dried all the leaves and attached wires to them. I rolled out the sausages and glued them to the back of the leaves with PVA glue and smoothed everything out with wet fingers.
I helped with a thick stack..By the way, it’s very convenient. I soaked it in water and smoothed it out with HF. It doesn’t always work out perfectly with my fingers. On the wrong side, the leaves should also be neat. After drying. I tinted it with acrylic paints and pastels, and drew dots with a felt-tip pen. In general, tinting is an individual matter. Who is used to what and has gotten used to it. Some with oil, some with acrylic….
Assembling the flower is very simple. That’s why I didn’t even bother removing the process. Each petal is tied to the anther with tape in turn. Using tweezers at the base, the wire is carefully bent, as in the photo.
I cut out the green leaves randomly in a stack.
I thinned it along the edge, folded it in half lengthwise and glued it with PVA to the completely finished flower. You can glue wire into the leaves, dry it and tape the tape to the stem.
I planted V.’s shoe in a homemade yogurt pot. Something like this.
Bye bye.