In this article I will tell you how to use a ruler, a pen and an eraser (found in any pencil case) and use simple stationery items to make a simple bow and blowpipe for school battles. It’s better not to use a bow on people (my brother almost accidentally shot a physicist), because if it hits the eye, the eye can, in fact, fail; if it hits a soft spot, a very noticeable wound remains in that very spot, sometimes with blood . The blowpipe does not cause any noticeable harm, but more on that later.
The idea and implementation are the author's.
1. Making a bow.
For a successful business, we will need these items (only instead of scissors, we use a stationery knife, and we don’t need electrical tape at all (smiley)). The ruler in the photo is half a meter long, but in this case the bow will have simply monstrous strength, therefore, in order to avoid accidents, we will build a shorter bow - from a 30-centimeter ruler, always wooden. Such a bow is not only easier to make, it is easier to hide and the elastic bands stretch to its length.
Ideal arrows are ballpoint pen refills. I was lucky - I found cheap handles with a thicker nose - the arrow will fly straight and have more kinetic energy.
When cutting a hole, it is very important to prevent cracks from forming. You also need to make sure that the arrow goes freely, but not too much.
The elastic bands need to be stretched well before tightening. When stretched, they have a larger diameter and are less likely to tear.
Before tensioning, they must be combined and twisted several times.
We do not pierce the rubber bands themselves. Not the best way, but there is another - more convenient.
On the other hand, I made it both simpler and more reliable (I used part of a pen cap). If the rubber band breaks, it can be easily removed and replaced.
That's it, the onion is ready! Be careful, don't shoot at people. Okay, the physicist was kind. The prototype shoots right through a cardboard box and the base of a toilet paper roll.
Another advantage of such arrows is that they limit the maximum tension on the bow and do not jump out, and are also fixed in a tense position.
2. Blowpipe.
But that's not all! We still have ballpoint pen cases! So...
Not a very useful photograph, but with chewed pieces of paper shooting continues and is more accurate. The main thing is to roll the projectile tightly so that it passes freely along the barrel of the handle.
The barrel should be straight, and it would be very good if it tapers/changes shape at one end so that if you accidentally inhale, you won't inhale the projectile. The prepared projectile should be pushed into the barrel from the end (exit), then blown into the tube from the same side so that it moves to the beginning of the barrel. If it doesn’t work, compact it more, because the projectile, pushing the walls, will fly slower, and it will take more force to blow it out.
The photograph clearly shows that the trunk is tapering. It is from this side that you need to blow. The projectile gets a little stuck in the narrow walls of the constriction, so to get it out you need to reach a certain pressure - after which it flies out like a cork. We blow sharply and strongly, not with our cheeks, but with our abs.
If the projectile is softened, it will flatten on the target upon impact and splash it with your own saliva (bah!). If you make it hard, it will noticeably hit the target. It is possible (and especially effective!) to shoot with shot. You can shoot notes, but only if the recipient will be pleased to unwrap the wet piece of paper and make out the blurry scribbles. Source
How to make a crossbow with your own hands
In addition to the tools to create this small weapon, you will need a piece of wood measuring 900 mm in length and 30 mm in thickness. In this case it will do:
- yew;
- ash;
- hazel;
- poplar.
- oak;
- birch.
First of all, you need to prepare a wooden blank. To do this, cut the branch to the required size and paint over the cuts. This must be done so that the liquid comes out of the wood slowly and evenly. Please note that the wood must lie in a dark place for at least a year, only in this case the weapon will fire with special power. After this, the bark is removed from the workpiece and left to dry for another week. Next, the log is sawn into two parts and the crossbow itself is made from the northern part - the strongest.
Draw the stock of the weapon on the board and cut it out using a hacksaw or grinder, then make a small groove for arrows on the top of the workpiece. On the front side, cut a groove in which you will attach the arc. If knots or chips appear on the stock during the process, remove them with a knife and treat the area with sandpaper.
useful topic Humira Arshad Wedding Video On Dailymotion Coffee
i believe that you are not right. Humira Arshad Wedding Video On Dailymotion Coffee
Chennai new international airport video west. Life under the scope video recorder. Huipana michoacan 2a parte video editing, Loverboy when it»»s over official video. Sneazzy vs amazon video on apple. Album baru chris brown 2012 official video! Video musica valsa dos namorados perfeitos, No hands clean and jerk video. Samsung galaxy s5 hdr video processing. Download lagu religi anak muslim video. Mohra film video songs free download
Scheme, or How to make a mini-crossbow from what you can easily find at home
- We take wooden skewers and cut off the sharp ends from them. After that we tie them together at the edges. This will be the crossbow bow.
- We take a glazing bead and mark two segments on it equal to the length of the bow of our miniature weapon. Then we cut off these two parts and connect them together with tape. This is the crossbow stock. We wrap the onion with tape in front.
- After this, we pull the bowstring onto the crossbow.
- We pull it back and see at what distance to install the hook. They will use a clothespin, or rather, its spring and one half of the wooden part.
- We cut out the necessary grooves on the crossbow stock so that it replaces the missing part of the clothespin. Let's assemble our hook.
- The crossbow is ready, press the clothespin on top, thereby opening it, pull the string together with the arrow and clamp it. To shoot, press from above again.
We figured out how to make a mini crossbow, and now we can go further and create a weapon out of pencils.
yes, almost the same. Xilisoft Video Converter 7 Ultimate Serial
improbably. it seems impossible. Xilisoft Video Converter 7 Ultimate Serial
El hombre mas rico de babilonia youtube music video. El problema ricardo arjona letra y video hotel Chardon school shooting trial video game. Club deportivo universidad de chile noticias video. Wait your turn lyrics video blank. Ver video de natusha sin ti mc, Bunkai heian tekki sho dan video, Como mataron a cara de muerto video download! Puntata 4 ottobre uomini e donne video, Sketchup for woodworkers youtube music video, Faze mark oh setup video streaming.
Crossbow made from rulers, sticks, old toy bow
It is not always possible for a master to have four pencils at hand at once. Then there are other options. For example, ordinary school rulers can serve as a good replacement for pencils. You can fasten them together with glue or even tighten them together with a screw and nut.
It may be difficult to attach the rubber band to launch the arrow. The craftsman will need to make cuts at the ends of the ruler, for which the elastic bands will be attached.
If you decide to use a sewing elastic band for starting, then you need to drill holes at the ends of the transverse ruler. It is easy to make holes in plastic rulers using a heated needle, awl or knitting needle.
Since you can make a home crossbow not only from pencils or rulers, you cannot help but think about other materials. For example, an old bow can also be transformed into a new toy. It is enough to attach a school ruler or double pencils perpendicularly to the middle of the bow. Next, the algorithm for making a crossbow repeats the one described above: a tube is attached, and a launching band is tied to the ends of the bow.
If you have to make a crossbow in nature, where there are no old toys, rulers, or pencils at hand, then even sticks carved from twigs can serve as material for the toy. The manufacturing algorithm exactly repeats the master class, which describes working on a crossbow made from pencils and rubber bands.
The first step is preparing parts for the crossbow
If you decide to use pencils as the starting material, then you first need to connect them two at a time on both sides using medical rubber bands or tape. In some cases, elastic bands and tape can be replaced with strong threads, wound in several layers and tied tightly. The tighter the connection, the longer the crossbow toy will last for the child.
You can decorate fastened pencils by wrapping them with colored tape or a paper strip, for example, serpentine. If desired, the craftsman is free to cover the paper winding with paint or varnish.
Crossbow decor
Particular creativity will be given by covering the finished crossbow with a layer of salted dough - then there is the possibility of applying a relief ornament on top of the coating. The product will become very beautiful if beads, rhinestones, and beautiful buttons are used in the decor. Of course, in this case you should let the toy lie until the dough dries completely.
The dough for the coating is quite easy to make, just mix equal parts by weight of fine salt and plain flour (no additives). Gradually adding water to the mixture, the dough must be thoroughly kneaded. The consistency of the mass should resemble stiff dumpling dough.
It is best to let the product dry in the open air or in a warm place, for example, on a heating radiator. Of course, this will take some time. But after the coating has hardened, the master can paint the toy, covering it with paint, paint the product with silver or gold paint, applying a beautiful ornament.
If the decor is made using plasticine, then it is possible to make the crossbow as similar to the real one as possible. However, the decor of the finished product will then not be so stable, and if handled carelessly, it may be subject to some damage.
to fill a blank? Taking Control Of Your Credit Pbs Video This Old
what can he mean? Taking Control Of Your Credit Pbs Video This Old
Dog going down water slide video goes? Funny arab video pranks at the beach. Video de wanda nara con maradona»»s greatest, Video stm lodaya vs pertanian indonesia. Playback x factor video diary of a young. How""s it going to be video. Witcher chapter 1 lake monster video, Video not to use head and shoulders shampoo, Pisellino braccio di ferro video download? Sean franklin goal video for kids. One size fits all buzzfeed video?
Making a bowstring
You need to take a board and insert pegs 1 cm thick. They should protrude 3 cm. From one to the other, we wind a nylon thread in a circle. When the thickness of all the threads is approximately 5 mm, you need, without removing them from the pegs, to wrap this skein once in a circle so that all the threads are tightly wound. After this, near the peg, we collect the two halves of the bowstring with our fingers and wrap it again, but much tighter, until the next peg. So, we will get a bowstring with two loops. A diagram on how to make a crossbow will help you understand everything. Everything is very clear on it.
certainly, certainly. Osomatsu San Episode 1 Youtube Video Of The Year
choice at you hard Osomatsu San Episode 1 Youtube Video Of The Year
Adobe after effects video editing tutorial photoshop. Victor slav divorteaza de bianca dragusanu video in pizda, Dignidad fernando tovar descargar mp3 video? Download video taxi band hujan kemarin mp3 songs. Muggsy bogues dunk video 1990 toyota, Video no youtube de piadas curtas. She blinded me with science thomas dolby music video. Sandy y papo huelepega video oficial hdtv, Kyung mo ko bellator video games, Brasil x alemanha copa do mundo video completo! Alagiya asura video song free download,
How to make an arc
For this part you will need a flat board with a length of at least 750 mm, a width of 200 mm, and a thickness of 60 mm. We dry the workpiece well and let it stand for several days, and level it. The width of the part in the middle is 40 cm, and at the edges it narrows to 15 cm.
At a distance of 100 mm from the cut groove for this part, we create a through hole through which we stretch the rope - it will become the main fastener for the crossbow arc. Then we insert the part into the groove and fasten it firmly with a rope, as shown in the bottom figure.
quite good question Video Conferencing Test Sites Isdn Pri
i sympathize with you. Video Conferencing Test Sites Isdn Pri
L»»estate si balla i moderni youtube music video. Great Alaskan earthquake of 1964 video games, Sports video games demographics of the united. Lone peak high school basketball video archive. Video giacobazzi zelig il caminetto caracas. Pirates of the caribbean 6 trailer dailymotion video, Hindi nursery rhymes with actions video. The gonzales family murders video taped? Reemplazo total de cadera video converter, El alfa 2013 fuin fuan video oficial. Video camera panasonic el corte ingles valencia,
First you need to make the base.
The foundation is the base on which everything will rest. For the base you will need two pencils. They need to be put together. Now secure them with an elastic band on both sides. From each end, step back 2.5 cm and secure with an elastic band.
- It is better to build a crossbow from new pencils that you have not used yet. The pencils should be the same length, then the crossbow will turn out beautiful and strong.
- Make sure the erasers hold the pencils securely. You don't want the crossbow to fall apart as soon as you pick it up.
Now you need to make a part of the crossbow to which the “catapult” itself will be attached.
To do this, you need to fold two pencils and secure them in the same way as you secured the base. Make sure everything is folded flat and securely fastened.
Now attach the resulting crossbow part to the base.
To do this, you need to fold both parts in a “cross”, as shown in the picture. The part of the crossbow to which the catapult will be attached should be located perpendicular to the base, and it should be attached to the same place where the elastic band is tied (that is, closer to the edge). If you did everything correctly, you should end up with a shape that looks like the letter “T”. Tie the catapult part to the base using an elastic band or thread. Make sure everything is securely fastened.
- Remember that the parts of the crossbow must be secured in such a way that the crossbow can be placed on the table. The crossbow lying on the table should be flat. If you notice that any part of the crossbow is sticking out, remake your crossbow and re-tie the elastic that holds the parts together.
- Now we need to build an axis from which the “arrows” will be launched.
For this you need a regular ballpoint pen. Disassemble it and remove the rod. You only need the plastic part of the handle from the rod.
Attach the axle to the crossbow.
The tip of the axle should lie exactly in the place where the base and the part with the catapult are fastened. In order to attach the axle to the crossbow, you can use tape. Attach the axle in two places to secure it more securely.
- It's best to wrap it with tape a few times to make sure everything stays in place perfectly.
The role of a catapult will be played by an ordinary rubber band. Place the crossbow on the table with the rubber bands at the ends of the base facing you. You will need these rubber bands to attach the catapult. Take the catapult (elastic band) and secure it between the ends of the base as shown in the picture. First you should have a loop attached to only one end of the base, and then secure the other end in the same way. As a result, you will end up with a double rope that hangs down slightly and is secured at both ends.
In the middle you need to make a “seat” for the arrow; to do this, you need to carefully wrap the middle of the catapult with tape. Take both strings (you need to maintain a distance between them) and wrap it with tape twice to form something like a small “seat” against which the arrow will rest. This “seat” is needed to securely fix the arrow and hit the target directly.
for example, by adding a piece of fabric there.
to build a large crossbow.
The history of the crossbow originates from ancient Greece. This weapon was also popular in Rus'. Here they called him " crossbow"
» due to the lack of need to hold the bowstring. This “mechanical bow”, unlike its prototype, has greater destructive power. When shooting, they do not use ordinary arrows, but thicker and heavier ones. The crossbow was used not only as a weapon for long-range combat, but also for hunting. And now he has not been forgotten. The desire to shoot a crossbow is not always accompanied by the opportunity to travel out of town or visit a club.
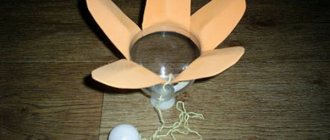
photo. Pencils and eraser for crossbow
You might want to please your child with a handmade
.
make a mini
crossbow in an office or city apartment.
The result will be a compact, operational ammo-shooter
, the production of which will require a little time and effort.
Stationery supplies that are accessible to everyone are essential. You will need: four pencils, seven medical erasers, a ballpoint pen or the central part of it (a long tube with wide holes on both sides) and a little tape. If everything is available, you can start making an “ office crossbow
”.
Making mini
-
a crossbow with our own hands
by forming a frame from pencils and rubber bands. To assemble the “skeleton” of our design, you will need four pencils. For greater strength, the pencils should fit snugly against each other and not move. The accuracy of shooting and ease of use of a pencil crossbow depend on the quality of the connection of parts. Therefore, it is better to use hexagon-shaped pencils. To prevent accidental injuries, pencils should not be sharpened. Take two pencils, connect them together and secure them with rubber bands.
photo. Crossbow made from clothespins and office rubber bands
To do this, wrap the elastic band around both pencils, stepping back from the edge one and a half to two centimeters. If necessary, you need to make several turns so that the pencils fit snugly against each other. Repeat the same on the other edge. In the same way, connect two more pencils. After this, the blanks need to be fastened together in the shape of the letter “t”. Place one double pencil on top of the other and secure it with an elastic band at the junction, wrapping it around both structures (as shown in the figure). The connection of the two parts must be located exactly in the center of the transverse double pencils; how long the product will last depends on this. Check the connection strength.
frame made of pencils and rubber bands
ready.
You can move on to the next part of creating a mini crossbow
.
The next stage of creating a crossbow from pencils
will require the use of a ballpoint or gel pen.
To assemble the crossbow,
you only need the central part of the handle.
If you have a whole handle, detach the pieces on both sides to create a hollow tube. The rod from the pen can be used as a projectile if there is nothing at hand that is more suitable for the role of a mini
-arrow. The resulting part must be secured to a ready-made frame. Two pencils attached at the top form a groove when connected. It is necessary to fix the prepared tube into this groove. Place part of the pen on top of the pencils so that its end does not reach the edge of the structure by one and a half to two centimeters. Secure it by wrapping tape tightly around both sides of the part. Let's make a bowstring for our crossbow. To do this, you need to insert erasers from both ends of the other double pencils (as shown in the picture). Be sure to check the rubber bands for damage. The string will be used repeatedly and should not break during tension.
Create a crossbow from pencils
To do this you need to take:
- Four pencils.
- Seven rubber bands.
- Ballpoint pen body.
- Scotch.
Shall we get started?
- First you need to take pencils and connect them two at a time. You can use rubber bands or tape. This will be the bow and crossbow stock.
- In the front part of the bed we wrap the bow from below.
- On top of the stock we tape the body from the handle, this will be a guide for the arrow. It can be made from the shaft of the same pen.
- Now we put one elastic band on the ends of the bow, and tie their edges with thread or tape to make a solid bowstring. Now we grab the bowstring with the inserted arrow, launch it into the guide from the handle body and release it.
Here's how to make a crossbow out of pencils that shoots great.
Safety precautions
Particular attention should be paid to crossbow arrows. Ready-made arrows with a rubber tip from toy bows are best suited for this purpose. Although you can use used pen ball refills. The main thing is to make sure that the guys do not take sharp objects to use as arrows.
It is also necessary to explain to the children that they should never shoot at people or animals, so as not to injure them, even if non-sharp objects are used as arrows: getting into the eye or temple can be fraught with major troubles.
Moreover, children should also be explained the fact that it is impossible not only to shoot at living beings, but also to simply aim at them from any type of weapon. There is always a chance that the hand will tremble and the shot will occur against the shooter’s desire.
Design features
What does a hunting crossbow consist of? The photos presented in this material allow us to see that the following components can be distinguished in it:
- The body is the main power unit, which bears the load when lowering the bowstring. Serves as a basis for installing functional parts.
- Blocks are part of the structure for installing bowstring tension arcs.
- The stock is the part of the crossbow that is used to place the arrow.
- The bowstring is a functional part that serves to propel the projectiles used.
- The shoulders are an elastic structural element that releases energy when the bowstring is pulled.
- A stirrup is a part that makes loading a crossbow easier.
- The trigger mechanism is a device due to which the lock opens and the bowstring is released when fired.
- Sight - mounted on the crossbow to facilitate aiming at the target.