Crafts from a plastic bottle (master class). Catch the ball toy.
You will need:
- flexics
- glue
- threads
- ping pong ball
- scissors
1.
Prepare orange flexi and cut out flower petals from it.
2.
Using glue or double-sided tape, attach the petals and string to the bottle.
3.
Attach a table tennis ball to the other end of the thread.
That's it - play by trying to catch the ball in the flower.
DIY carved bear sculpture
What is still useful, inspiration and a suitable image of the future sculpture have been found, and the tools have been sharpened - this means we begin to make a carved bear in artisanal terms.
How to carve a bear's head
Since the head and muzzle of a bear is the most difficult part to carve, before creating a true sculpture, it is better to practice a little and cut out the head of the animal separately.
Example of step-by-step cutting of a bear
- An image of a bear's head for carving is selected - you will like the photo, drawing, or ready-made sketches more.
- A stencil is created for carving the bear's head in 3 projections: front, profile, rear view.
- Prepare a linden block of suitable size. The contours of the bear's head are transferred to the sides of the rectangular bar without detailing.
- Excess pieces of wood are cut off, not counting the lower base, so that it is comfortable to hold on to the workpiece and cut out small parts. This part of the block must be removed at the end of the process.
- Auxiliary images of the mowing line are applied to the resulting angular blank: nose, forehead, ears, and the brow ridges are indicated. The head is ground with semicircular chisels, chisels or jambs. The wood is selected in narrow shavings very carefully so as not to cut off excess.
- Small details are being worked out. Elaboration of small details in the sculpture of a bear
The parts are rounded with a Bogorodsk knife, and narrow shavings are removed with gentle movements. Small elements, the cutout of eyes, ears, mouth and fur are processed with small chisels.
How to make a craft from plastic bottles. Vane.
For those who want to know which way the wind blows.
You will need:
- plastic bottle (preferably a pot-bellied one)
- scissors
1.
Prepare a clean bottle and use scissors to cut windows in it. It is desirable that they be approximately similar to the blades of a weather vane.
You need to make 4-6 similar holes and then bend the corners.
2.
Attach the weather vane in a suitable place - on the balcony. This can be done using an iron pole. Make a hole in the bottom of the bottle and put a pole on it.
Now you will always know which direction the wind is blowing.
We draw and model the model
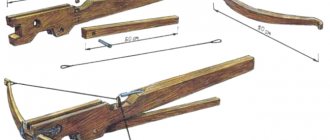
When everything remains to be done for our client, the details and the place of work are ready, we begin solving the problem: “How to make a rifle without the help of others.” For this purpose, take a prepared piece of wood and draw the outlines of the future rifle on it. It is more advisable to do this with ordinary white chalk; if there is none, a marker and pen will do. You also need to keep in mind to draw a sniper scope. With all this, you should draw not in a big way, but in a flat way, in other words, as if your model is lying on one side.
Crafts from plastic bottles for children. 3D glasses.
You will need:
- transparent plastic bottle
- unnecessary sunglasses
- colored markers
- scissors
1.
Cut two parts from a plastic bottle as shown in the image.
2.
Take the glasses out of the glasses and outline them on the cut part of the plastic bottle.
3.
Use a red marker to color both sides of the left glass.
4.
Use a marker to color the right glass blue on one side and green on the other.
5.
Insert the glass back and enjoy 3D pictures.
General characteristics of a sniper rifle
In advance, before starting work and making a regular mock-up of a real gun, it is worth considering the details of the rifle. What is necessary, what does it consist of? Based on its type of model, a rifle may contain various parts. For example, the SVD (Dragunov rifle) consists of the following gadgets:
Next, we will explain to you how to make a sniper rifle out of wood for your staff. Let's say it straight away: there are a lot of options that allow you to make a mock-up of a weapon out of wood. But we decided to use a regular one as a base, which even a child can handle.
Crafts from a plastic bottle (photo). Bracelets.
Crafts from plastic bottles (instructions). Casket.
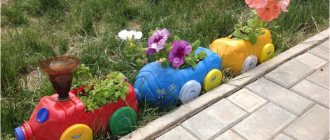
Palm tree made from plastic bottles. Option 1.
You will need:
- brown plastic bottles (1.5-2 liters)
- green plastic bottles (the larger the bottle, the more magnificent the leaves)
- thick rod (for the base of the trunk)
- awl or drill
- scissors
1.
To make tree bark, you need to prepare brown plastic bottles and cut them into pieces 10-15 cm high.
2.
Next, along the edge of the cut, you need to cut out cloves 5-7 cm high and bend them back.
3.
To make palm leaves, you need to cut off the bottoms of green bottles. On one workpiece you need to leave a rigid neck with a lid, since it will play the role of fastening.
4.
Start cutting out the leaves - you need to do this so that there is about 5-7 cm left to the edge.
5.
Start collecting green blanks, putting them on the same blank with a neck. Screwing the lid will hold everything together and you will have a palm tree crown.
6.
Now you need to make connecting holes. Their diameter must match the diameter of the base rod. Such holes can be made using a drill or a hot awl. Make a hole so that the crown of the palm tree does not fall through.
7.
We begin to collect the palm tree. When you have strengthened the rod, begin to place blanks of brown plastic bottles on it. The design ends with a green crown.
Preparing the workplace and materials
If you decide to make a model of the gun yourself, you need to prepare the work site, tools and materials in advance. With all this, if you are under 12 years old, it is better for our client to do the main woodwork and put it on the shoulders of dad, as grandfathers also call him.
To carry out the work, we will need a rectangular piece of wood, the size of which depends on what dimensions, in your opinion, the model you made should be. For example, the dimensions of the finished rifle are 1220 mm in length, 230 mm in height (taking into account the sniper scope), and 88 mm in width.
The material for the model is not wood, but a large piece of broken furniture. You will like this better, for example, a wardrobe door, the bottom of an old street door, etc. In short, a wooden sniper rifle is made on your own from any wood or furniture that is nearby. You also need a steel tube.
Next, prepare your wood carving tools, sander or plane, router, plane, saw, glue, nails, hammer, vice, drill, chalk and varnish. As a place of work, you will choose a garage, as it is also called a labor office.
How to make a palm tree from bottles. Option 2.
You will need:
- brown plastic bottles
- green plastic bottles
- knife, scissors
1.
Use a knife to cut off the bottom of the bottle.
2.
Next, use scissors to divide the bottle into 4 equal parts and cut out each part in the form of leaves.
3.
Start stringing the blanks one on top of the other to form a palm branch.
4.
Turn the structure upside down and you will have a palm branch. To make a branch you need to use about 10 - 20 plastic bottles. If you want to use fewer bottles, you can also use the bottoms that were cut off from bottles earlier. Simply insert them between each bottle of cut leaves.
*You can have branches of different sizes - their length can vary from 60 cm to 150 cm.
5.
Preparing the frame. To do this, prepare brown bottles. Cut off the bottom and make cuts along the edge in the form of a fringe.
6.
Place the finished branches onto the crown frame. You can decorate it if you wish.
How to make working with wood easier?
If you are just thinking about how to make a rifle yourself, and our step-by-step instructions seem complicated to you, it is always natural to simplify it. How to do it? For example, you can take a wood element, draw its outline, cut it, sand it and varnish it without using additional steel elements. So you, the positive thing is that. simplify your work, and on the other hand, you will make the long-awaited layout with not enough time spent.
As for other parts of the rifle, there is always the option of finishing them. When other types of weapons are made according to a similar principle.
READ Wood Saw Steel Grade