Crafts made from plastic bottles are distinguished by their versatility: they can decorate both your home interior and your garden plot or playground. In terms of manufacturing technology, they are practically the same: garden products simply need to be coated with waterproof types of paints, and also not to use paper or cardboard in their design, which can get wet in the rain. Plastic products are durable and practically not susceptible to external factors, so they are ideal for decorating summer cottages and flower beds. Below is a master class on making an owl from a plastic bottle. This instruction leaves room for imagination; the bird can be made in several versions, differing in their complexity, so this craft is suitable even for children.
Owl made from plastic bottles
The owl is rightfully considered a symbol of wisdom and education; many supernatural powers are attributed to it.
The nocturnal bird creates a lot of unsolved mysteries and mysteries around itself. For example, even among the ancient Slavs, the owl was a talisman and personified the unknown and mysterious, and also helped to find treasures and missing things. Many people still use owl figurines to attract wealth and prosperity to their home. By the way, figurines of an owl and an eagle owl not only attract finance, but also protect the home from the “evil” eye and evil spirits. We suggest making owl figurines with your own hands to decorate your home and garden. For the work we will use accessible and inexpensive materials, and we will take plastic bottles from drinks and household chemicals as a basis. Using the proposed master classes, you can make your own unusual owl - the keeper of the hearth.
Ideas for garden crafts made from plastic bottles
PET material is lightweight and, moreover, durable, so you can easily and quickly make any thing from it. I'll start by showing the huge vehicles. Oh, and now there will be impressions.
All sorts of bottles, even canisters, will be suitable for this purpose. Look how much work there is here. If you have children, they will be interested in such products. Choose any job and create a whole composition in your garden plot.
You can also take equipment, airplanes or helicopters as a basis.
You can also make a masterpiece from a shampoo jar and you will get an airplane. Paint with acrylic paints so that weather conditions do not spoil the craft.
The furniture still looks wonderful, it would seem, that’s it. Of course, you need quite a lot of the required material here.
And the author of this work thought of making a boat. It looks awesome, don't you think?
Entire houses are already being cultivated and greenhouses are being built. Gazebos made from such waste materials also began to be in demand.
And of course furniture items such as chairs, stools and trash cans. Well, everyone will definitely like this.
You can also make an ottoman and place it, for example, in a bathhouse or gazebo. So don't throw away your juice cans.
Let's move on and see that you can design and decorate the trees in the garden.
And place mushrooms under them, and these could be fly agaric mushrooms. Imagine and success will come on its own.
Decorative decorations are also made for the fence, the bottoms of bottles are cut off and scenes are laid out.
Stumps and benches are also decorated. It comes out bright and beautiful.
Flowers and sunshine are cultivated in playgrounds and schools. These are the most famous works.
And of course you can’t do without flower beds and flower beds. You can even make it from one ordinary transparent soda bottle. What a wonderful mouse came out.
Or make regular pots and plant any climbing plant or flower there.
It looks quite wonderful and cute, they even built a magic ball.
Whoever is good at something creates. It surprises us, but we follow the example and don’t lag behind.
This picture is also very beautiful, but imagine if you also plant daisies or other flowers and how it will all bloom.
Unusual butterflies will also be an excellent decoration. They will cheer you up and make the interior even more beautiful.
You will need a template, cut it out of paper, and then attach it to the bottle.
Trace and paint with acrylic paints, and then cut out along the outline.
Or these funny turtles.
Make them with your children and decorate the veranda or dressing room. Here's a step-by-step photo instruction in detail; by the way, it's also a piggy bank.
Owl planter made from plastic bottles
You can make an original stand for flowerpots in just a few hours. To work you will need:
- plastic drink bottle;
- white acrylic paint;
- tracing paper;
- black marker;
- scissors with sharp ends or a stationery knife;
- brush or sponge for applying paint.
How to make a flowerpot in the shape of an owl is shown in step-by-step photos, but for greater clarity, we suggest using detailed instructions:
- Using scissors (a stationery knife), cut off the top part of the bottle - we won’t need it. Only the lower part will be used in this work.
- Using a sponge or thick brush, apply white acrylic paint to the surface of the cut bottom. Wait until the paint is completely dry.
- While the paint dries, apply a sketchy drawing of an owl onto thin paper (tracing paper).
- Attach the paper to the painted base and secure it with paper clips on top so that the template does not move during further work.
- Using scissors with sharp tips (by the way, it is very convenient to use small manicure scissors), make slits along the drawn contours.
- Remove the remaining tracing paper and trace the outlines of the slots with a black marker. Draw a diamond-shaped beak and circles near the eyes.
- To prevent the edges of the bottle from being so traumatic, hold the inverted part over a fire (lit candle, lighter, gas stove). Under the influence of high temperature, the sharp edges will melt a little and become denser.
Insert an ordinary container with herbs into the resulting pot and you will get an original interior decoration. The cut out craft can also be used as a stand for stationery. The office will celebrate not only your creative skills, but also your creative approach to using recycled materials.
Using crafts made from plastic bottles in flowerbed design
- If you have a lot of clear plastic bottles, you can paint them by pouring a little paint inside and shaking it.
- Initially, a border is made of stones: it will hold the future flower bed.
- Soil is poured inside. Lines for installing bottles are marked on it.
- The bottles are screwed into the ground upside down along the marked lines.
- Flowerbeds look more elegant if you use smooth, clear lines. You can lay out flower beds in the shape of stars, unusual symbols, or animals. It is very interesting to combine planted fresh flowers with compositions made from plastic bottles.
Single flower beds made from large bottles (baklag) in the shape of different animals look fun. To do this, cut off one side of the eggplant, make several holes at the bottom of the resulting container for drainage, fill it with soil and plant flowers in them. Such container flower beds are mobile and can be installed in different parts of the yard. They are also portable.
Little owlet
To make a funny owl that will appeal not only to children, but also to adults, you need to prepare a liter cola bottle, acrylic paints, scissors and a spitting gun.
Progress
- Prepare the bottle: remove the top label and rinse the inside.
- Cut the container into 4 pieces. The first part is the neck (not needed in further work). The second part is the expanding part from the neck to the beginning of the label. The third part is the straight part of the bottle (not useful in work). The fourth detail is the bottom.
- Take the second and fourth parts and glue them together using a glue gun.
- Turn the resulting figure over and paint it with acrylic paints (draw big eyes, an orange beak, and the owl’s chest).
You can decorate the area with such crafts in different ways. You can simply place the owl on a vertical thin stick (there is a round hole at the bottom), or you can make several holes with a hot awl or nail, thread a wire, and use it to secure the craft to a tree or fence.
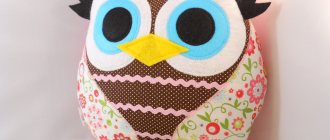
Shampoo Bottle Owl
When making crafts to decorate your garden plot, various plastic containers from household chemicals will be useful. Most often, plastic containers are simply thrown away, but original crafts can be made from them.
For this craft you will need the following:
- container for shampoo or detergent;
- felt in brown and gray colors;
- scissors;
- super glue (hot glue).
Making this toy will not cause you any difficulties. Invite children to take part in working on a homemade owl - they will be interested not only in the process itself, but also in joint creativity.
To make the felt parts even and identical, first make templates from cardboard. Cut out pieces from material of different colors and glue them to the bottle.
You will be surprised how your garden will be transformed, decorated with such bright crafts in the form of a wise owl. And the children will be proud that they were the ones who took a direct part in the transformation of the plot.
What you can do for your garden with your own hands from plastic bottles
At the very beginning of the article it was said that gardeners have found a wide variety of uses for plastic bottles. First of all, this is decorating your garden plot.
The most common and, one might say, traditional option is the organization of flower beds. You won't find any kind of flower beds among gardening enthusiasts.
Flowerbeds
These include simple round flower beds and flower beds shaped like animals.
You can just take the bottles and decorate the lawn with them.
In addition to creating flower beds from bottles, the bottles themselves can play the role of vases where you can plant different flowers.
Flowerpots
There are a lot of options for placing and decorating such vases made from plastic bottles. If you don’t bother with something very creative, then you can just cut the bottles, attach them to the wall and you’ll get a whole flower garden.
Well, if the pangs of creativity haunt you, then these pots made from plastic bottles in the shape of a train will look very good on your summer cottage.
Plastic bottles can be used as flower beds and vases not only on the soil of your site. If you urgently need a flowerpot, but have nowhere to buy it, then take a plastic bottle, decorate it and attach strings for hanging. As a result, we get pots no worse than those purchased in the store. Or maybe even better.
Here's another interesting idea for creating a flower bed from plastic bottles.
Decorative crafts
If, in addition to bottles, you also have old car tires, then by combining these two materials you can make such a decoration for your site.
In this photo everything is painted white, but if you paint it yellow, you will get a sun. This is what such a structure looks like. Very positive indeed.
beds
But let’s return closer to the garden, to the ground, so to speak. When arranging beds, in most cases we use boards to create a bed box. However, in addition to boards, siding panels and plastic bottles are also suitable. Using bottles, you can fence a garden bed that will not only look, but also function quite well.
Another good thing about this version of the bed is that if you cover it with film on top, you get a small greenhouse.
Owl made from bottle bottoms
When making poultry, prepare the following materials and tools:
- plastic bottles of different sizes;
- plastic eyes;
- wire;
- glue gun;
- scissors;
- plastic plate.
We make an owl according to the step-by-step description:
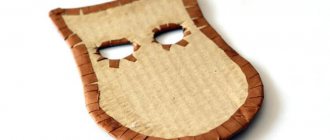
- Cut off the bottoms from brown liter bottles. To make the owl look like a real one, you need to make the edges of the blanks wavy, imitating the plumage of a bird. To do this, touch the edges of the cut parts with a hot nail for a few seconds. The result is wavy cuts that look like feathers.
- We make a hole in the middle of each piece.
- We string the resulting parts in a checkerboard pattern onto the wire. To prevent the parts from moving, we fix the holes at the bottom and top of the work with a glue gun.
- From the remaining flat parts of the bottles, cut out 4 wings (2 large and 2 smaller). We glue them together in pairs and glue them on both sides to the owl’s body.
- We glue the head from two evenly cut bottoms. For the head it is better to take bottles of light shades. It turns out a three-dimensional detail, which now needs to be decorated: glue on the beak, eyes, crest.
- The bird's beak can be made from the protruding part of the bottom of a dark bottle. Using a glue gun, glue the cut piece in the middle of the head.
- The bottoms of white yogurt or milk bottles are suitable for the eyes. Make identical pieces out of them that resemble suns and glue eyes into the middle of each of them.
- Tufts can be cut from smooth parts of brown bottles and cut the edges.
- We glued all the heads we made.
- In order to completely assemble the owl, we make 2 through holes in the head with a hot awl and thread it through the wire. We wrap the edges of the wire on top and pinch the excess part with pliers. If you plan to hang the owl as a decoration in the future, you can make a loop from the ends of the wire.
- When working on the bird’s legs, we cut out the bottom part from small half-liter bottles and fix them on a plastic plate using screws or a glue gun.
- Now all that remains is to connect the owl’s paws and body - and the wise guardian of the garden is ready!
Now, if desired, you can coat the craft with silver or bronze paint from a can. This will give the work a more natural look.
As noted earlier, the owl represents wisdom, spiritual strength and intelligence. Make such an unusual decoration for your garden plot and thereby attract wealth and family well-being to your home. And the wise owl will definitely help you with this!
Butterflies made of plastic
Butterflies from plastic bottles Cutting template No. 1 Cutting template No. 2 Cutting template No. 3 Plastic bottles are an ideal material for making beautiful and bright butterflies. Depending on the size of the bottle you use for this, you can get either very cute little butterflies or very large ones that can be an independent object for decorating a garden or the yard of a private house.
The best part is that making these insects does not require any special skills from people. All you have to do is stock up on bottles of the right size, scissors, paints and, of course, imagination.
- To begin, cut off the neck and bottom of the bottle (you should still have the most pliable middle part in your hands)
- Draw a butterfly on a leaf or find a suitable template on the Internet
- Using a black marker, trace the outline of the butterfly onto the bottle.
- Cut out the design with sharp scissors and decorate it as you see it.
- Ready-made butterflies can be attached to a wire and then placed in flower beds or just on the lawn
Yes, and if you have stained glass paints, then you can use them to paint the transferred outline on the bottle, and after they have completely dried, cut out a completely finished butterfly. Since in this case you will get rather convex lines, you will have the opportunity to fill them with small rhinestones or sequins.
Ladybugs made from plastic bottles Ladybugs made from the bottom of a bottle
If you want to make a ladybug as quickly as possible, then stock up on bottles of red (1 pc.) and black (2 pcs.), as well as an ordinary stapler. One bottle will imitate the body of a bug, and from the other you will make characteristic points.
So:
- Cut a blank simulating wings from a red bottle
- Next, take a black bottle and cut out circles from it
- Draw beautiful eyes on one of them and attach it to the bottle cap
- Use a stapler to secure the remaining black circles onto the ladybug's wings.
- At the last stage, attach the wings to the bottle and the craft will be ready
If you wish, you can make a similar bug from plastic lids. To do this, you just need to take paints and paint them correctly. These little ladybugs will be a wonderful decoration for plants growing in pots.
Owl from a plastic bottle for the garden: master class with video
Crafts made from plastic bottles are distinguished by their versatility: they can decorate both your home interior and your garden plot or playground. In terms of manufacturing technology, they are practically the same: garden products simply need to be coated with waterproof types of paints, and also not to use paper or cardboard in their design, which can get wet in the rain. Plastic products are durable and practically not susceptible to external factors, so they are ideal for decorating summer cottages and flower beds. Below is a master class on making an owl from a plastic bottle. This instruction leaves room for imagination; the bird can be made in several versions, differing in their complexity, so this craft is suitable even for children.
Children and teachers: we create crafts from bottles for kindergarten together
Colorful flowers, birds and animals will decorate the kindergarten if adults, along with children, show imagination and ingenuity.
Video lessons for different age groups will help you make unusual crafts from plastic bottles for kindergarten. The best master classes on crafts made from plastic bottles are presented on our website. After familiarizing yourself with them, you will understand the magic of creating hand-made beauty. Having set the goal of decorating a kindergarten area from plastic bottles, you can come up with three-dimensional compositions, paintings, panels and other decorative items. The smallest pupils can create a bright bouquet that does not fade.
How to create a simple bouquet from plastic bottles with your own hands:
- We paint the inside of a plastic bottle in different colors.
- We attach the “vase” to thick cardboard.
- We attach several tubes for juice in the form of stems.
- We glue the multi-colored caps with hot glue in the shape of flower petals.
- We cut out leaves from paper that complete the original three-dimensional composition.
A colorful airplane made using the papier-mâché technique will become an indispensable attribute of boys' battles.
Step by step creation
To make an owl you will need:
- Bottle of any size. You need to choose a bottle of a certain shape - for an owl, “fitted” ones, which taper slightly in the middle, are more suitable. It will be easier to form the body of a bird from them;
- Scissors or stationery knife;
- Scotch tape or construction stapler;
- Paints and brushes.
Two parts should be cut from the bottle. The first is the bottom and bottom of the bottle to the point where it begins to narrow. If you turn it upside down, it will look like an owl's head with ears. The second is the part of the bottle between the neck and the label, that is, another expanding part. The neck of the bottle should be cut off. The resulting part will have holes on both sides, into the wider one you need to insert the first blank - the owl's head.
The product will look neater if the parts of the bottle are cut in such a way that when connected, a smooth transition from one component to another is obtained. If this effect could not be achieved, you can straighten the joint using a stapler or tape. It is important to use them on the inside of the craft so that they are invisible after painting it.
If it is intended that the owl will be used to decorate the house, it is necessary to trim the only hole remaining in the product for stability.
The next stage is painting the owl. To maintain proportions, it is recommended to draw eyes with a diameter of about a third of the entire height of the product. It is better to use acrylic paints - they are better suited for coating plastic products. The paint must be applied in several layers so that the insides of the owl, for example, the tape used to fasten it, do not show through.
If the owl was created for the home, the product is ready. But if you plan to install the craft in the garden, a few more modifications are needed.
- for attaching an owl to a tree: in the lower part of the owl you can make a couple of holes through which you can thread a rope. You can use it to tie an owl to any tree branch, while masking the hole in the product;
- for fastening on the ground: to prevent the owl from being carried away by the wind, you can pour any heavy filler into it, for example, sand or stones. At the same time, it is recommended to fix even a weighted owl in one place - for example, surround it with pebbles or dig it slightly into the ground.
Owl decorations
A common way to decorate owls from a plastic bottle is with hats. One of the most consistent with the image of a wise bird is a professor’s cap, which is made from another bottle and plywood.
To do this, you need to cut off a flat part of the bottle, glue a square piece of plywood onto the resulting cylinder and paint the resulting headdress black. Then the cap is glued onto the owl's head; if it seems that it is not held securely, several slits can be made in the owl's head into which the edges of the cap should be inserted.
Another way to decorate an owl is with professor's glasses. They are made from waste CDs, which are glued to the bird's eyes with the mirror side facing out.
It is worth noting that such decoration is only suitable for products made from large bottles, for example, five-liter bottles.
However, if desired, you can cut out circles from the disks, suitable for decorating smaller items. The eyes of owls can be decorated using all sorts of methods: pupils from unnecessary buttons or beads look good, glued eyelashes that are cut out from the remaining unnecessary parts of the bottle. In addition, to decorate the owl, you can glue a voluminous beak to it, also cut out from leftover plastic. If desired, you can give the owl additional volume by gluing feathers to it. They are easy to cut from the same bottles; you can also use disposable plastic spoons.
When attaching them, it is important to follow the order and move from the bottom rows to the top so that they overlap the joints. Feathers can be used to decorate the entire owl or just its wings. With this design, it is important to remember that a product with many details is more difficult to paint without leaving transparent parts of the plastic, so if children are making an owl, you can paint all the feathers and the body of the owl separately, and then assemble the already tinted parts.
DIY owl made from plastic bottles
The flight of imagination of a creative person knows no bounds. Taking used material as a basis, you can create an innumerable number of masterpieces that are especially relevant in the landscape design of the site. Usually crafts are placed on the ground; an owl made of plastic bottles, conveniently located among the branches of the garden, will surprise those around you. There are several ways to make a night bird, they differ in degree of complexity. The proposed master classes will help you choose the appropriate option for making an original owl from plastic bottles with your own hands.
Large bird
This craft will be an excellent decoration for any garden. Owls of this type look best in trees. To make it you need the following materials:
- 2 plastic bottles of 6 liters;
- paints;
- bottle caps;
- 2 plastic bottles with a volume of 1 liter;
- hot glue;
- wire;
- twine.
Do you want to grow phlox on your property?
Planting and caring for this plant are described in this article. DIY garden path shapes - step-by-step instructions and arrangement methods.
Impressive night hunter
Let's start with the most time-consuming option. To work you will need:
- Plastic bottles, preferably the same color.
- 5 liter plastic canister.
- PVC pipes Ø 20 mm, length 0.9 m.
- Scissors, knife.
- Self-tapping screws.
- A piece of foam.
- Aerosol paint for exterior use.
Be patient and get started:
Work begins with the formation of the owl's frame. Pipes that serve as claws are fixed onto the plastic canister with self-tapping screws. Cone-shaped shapes from the top of plastic bottles placed on the pipes with their necks down will help to give them volume. Part of the 5 liter container plays the role of an owl's breast.
When some of the parts are ready, they begin to cover the owl's paws. Having previously pierced the elements of the owl with an awl, the feathers are fixed to a plastic frame with wire.
The next stage is the torso. Usually the back of the bird is decorated with feathers first, then the sides and belly. The owl's back is left open for further fixation of the wings from plastic bottles.
In order for an owl to sit on a branch, it will need strong claws on its feet. The part is made of wire, which is decorated with a corrugated pipe. When constructing the shape, space is left between the fingers for the PVC pipe. This will give the owl additional stability. The wire part of the claws is clamped between the pipe and the bottle and secured with electrical tape or tape.
The basis for the bird’s head will be a fragment of foam plastic; the optimal thickness is 10 cm. Cutting out the desired shape will be easy with a stationery knife. The top of a 5 liter plastic bottle will help you create a voluminous nape.
Simplified version
The following master class will help you make an owl with less time and effort. For creativity you should prepare in advance:
- 2 liter bottles of dark color – 5 pcs.;
- transparent plastic container;
- tin eye covers – 2 pcs.;
- glue gun;
- acrylic paints, brushes;
- scissors, awl and knife;
- pliers;
- nylon threads.
Owl made from plastic bottles master class:
- The bottom and neck of the container are removed, and cuts are made along the edges.
- A hole is pierced in each petal with an awl, after which a nylon thread is threaded through them and pulled together.
- The upper part of the plastic bottle will later become the owl's head, the lower part the tail.
- The remaining bottles are spent on cutting out feathers; this can be done gradually, as the body and other details of the night bird are decorated. Sheathing with feathers begins from the bottom, fixing the parts with an overlap.
Finally, the remaining elements are treated with paint and the owl from a plastic bottle is ready to take up residence in the garden.
By choosing different categories of difficulty, you can make an original bird within a day or by spending more time and effort, but the result will impress everyone around you.
Another unique design option for the nocturnal predator is presented in the video:
How to make an owl from plastic containers
Any plastic container is suitable for this craft. A little imagination and skill - and even a shampoo bottle will turn into an elegant little owl.
To create such an owl you needed a shampoo bottle, pieces of felt for the paws, wings and eye caps
The night guard of our garden is made from a 5-liter bottle, spray-painted with façade paint.
This craft is easy to make and looks very impressive.
Preparation of tools and materials
You can make an owl from one plastic bottle by simply painting it and attaching it to a decorative fence.
To make such a figurine, the top part of the container is cut off, turned upside down and painted with façade paints.
Or assemble the bird from plastic containers of different sizes, using a 5-liter canister as a basis. To do this, you need to paint the body and wings cut out of plastic bottles white with black feather strokes, to decorate the eyes, use metal lids with plastic lids-pupils glued to them, and for the paws, use plastic forks painted black.
Such a cute polar owl can be easily made from plastic containers
Or you can make the figure more textured by complicating the design with plumage and additional parts made of foam plastic, corrugated tubes.
The large figure of an eagle owl is made of plastic containers, and the head is made of foam plastic
For the owl you will need:
- Two 5-liter plastic bottles.
Large bird parts are made from bottles
Dark bottles are needed to make wings
Polystyrene foam cuts well with a knife
Metal mesh is used as a frame for the wings
Universal glue quickly and reliably holds any parts together
The toes are decorated with a corrugated tube
Using aerosol acrylic paint it is easy to create an original sculpture decor
Manufacturing stages
This craft consists of a large number of elements that must first be prepared and then assembled.
Plumage
For the plumage, you will need plastic blanks of different shapes and sizes: long and smooth for the tail, convex and smaller ones for the body, head and wings, and very small ones for framing the eyes. Wings with plumage made from corrugated plastic containers look beautiful.
Feather blanks must be of different lengths
Large tail feathers are cut out from the middle part of the bottle, cutting off its neck and bottom. The resulting cylinder is cut lengthwise, cut into long strips and rounded on one side. For feathers around the eyes, cut thin and short strips.
Scissors cut the bottle lengthwise into strips
Feathers for the body, head and legs should be voluminous. To make them, cut off the neck of the bottle and cut it lengthwise into strips, starting from the top and capturing the convex parts of the bottom by 0.5 cm.
It is very important to cut the bottle correctly so that the feather has a convex shape.
Figure frame
The base of the body is made from a canister, in which 2 holes are made at the bottom for tubes - legs. Using self-tapping screws, the tubes are attached to the body and bottles without a bottom are placed on their lower part, neck down. The bottle legs are screwed to the canister with self-tapping screws.
The legs are screwed to the body with self-tapping screws
The base of the neck is the obliquely cut top part of a 5-liter bottle, which is also attached to self-tapping screws.
The base of the neck is made from a plastic bottle
A metal mesh is used as wings, which is first covered with feathers and only then secured to the canister with staples or wire.
The mesh is cut at the edges in the shape of a wing and bent down
Strong paws with long claws are made from bottles, wire and corrugated tubes. 8 strips are cut from the bottom of the bottles so that they are curved at one edge. They make a wire frame for the paws.
The frame of the paws is made of wire, the claws are made of plastic
Plastic strips are placed on them and a corrugated tube is put on each claw. The junction of the fingers is covered with a piece of cut corrugation.
This is what finished paws with claws look like
Head
On a piece of foam plastic they draw a neck, a head with ears and cut it along the contour with a sharp knife.
Using a sharp knife, cut out a head blank from a piece of foam plastic
Then cut off the excess foam.
Cut the workpiece into the desired shape
A voluminous head with a curved beak is formed.
After trimming, you should end up with a head like this with a neck, ears and beak
The surface of the workpiece is sanded with sandpaper and coated with primer or white paint.
Cut off the top of the 5-liter bottle.
To decorate the back of the head, use the top of a 5 liter bottle
The neck is cut off and the remaining part is attached to the back of the head with self-tapping screws.
The plastic back of the head is fixed to the foam with self-tapping screws
Assembly of the structure
When all the parts are ready, the structure is assembled.
- Cover the legs from bottom to top with convex feathers, overlapping them and securing them with staples.
Completely cover the legs with feathers
The entire body except the back is covered with feathers
For greater strength, the legs are secured to the paws using electrical tape.
The head, dried after painting white, is covered with feathers.
Small feathers are placed on glue around the eyes
The head is attached to the body with screws and glue
Feathers of different sizes are attached to the wings
It is better to paint the parts in the desired color before starting assembly, especially if they are made of transparent plastic.
Crafts from matchboxes
It would seem – a matchbox is so small, what can come out of it? In fact, this is an excellent material for all kinds of crafts, the creation of which requires very little time and skill. From these cardboard “bricks” you can build, make toys and educational games.
Alphabet
Many people think that the alphabet and the alphabet are one and the same. In fact, there is a difference, the alphabet is drawn letter signs, and the alphabet is letter signs accompanied by illustrations.
The letter itself is difficult for a child to understand; first he must understand how it works. Therefore, the alphabet was invented for preschool children; it is a bridge between the drawn message and the letter designation.
To develop a child’s interest in the alphabet, you can make “houses” for letters from matchboxes: each box should be covered with colored paper, leaving the retractable part uncovered. You can write letters on the top side, or stick on printed letters, cut them out from old magazines, newspapers, or colored alphabet (you can find them in any bookstore).
In each “house” hide a small object whose name begins with the corresponding letter. You can put a pebble in the box with “b”, a cotton pad in the box with “b”, and leave the box with “y” empty.
When the child learns the letters, you can additionally make a set of “houses” and make words from them. It is very good to make such crafts from waste for kindergarten.
Educational games
By analogy with the alphabet, you can make a game that teaches counting. Just stick numbers instead of letters, and put the appropriate number of small items inside the box: buttons, peas, matches.
To understand the animal world, you can use an image of the animal’s habitat in the same way, and put an image of the animal or its miniature in the box:
Toy houses and furniture
Even a preschooler can handle building a house from match bricks:
- To do this, you can take 10-12 boxes (depending on the number of floors) and cover the fixed part with colored paper.
- Glue the resulting boxes in pairs so that on one side the inner box opens to the side.
- Then these glued pairs are connected in height using glue. The result will be a multi-storey building.
- On each “brick” draw a window, and on the lowest floor - the front door and the gate to the garage. On each floor, the inner part slides out to the left and right, in which you can draw different interiors (kitchen, bedroom, hallway). On the lower floor, a car is “moving out” of the garage.
Now the stores are full of toys on any theme, including a variety of doll furniture. But the one he makes himself will be his favorite. Children as young as 3 years old can handle “making” furniture.
Show your child how you can make a bed out of five boxes. To do this, glue three boxes together using double-sided or masking tape.
Only 3 parts are needed for the simplest table. Between two boxes laid vertically, one piece is attached horizontally at the top. Depending on the desired size, the number of boxes increases both in height and width.
By gluing together several rows of boxes it is easy to make a chest of drawers.
To fill the living room with furniture, you can make a chair, a bedside table, a TV, for the bathroom - a washing machine, for the kitchen - a table, chairs, a stove, a wardrobe.
Organizer
There are always a lot of little things in the house that are difficult to find at the right time. An organizer will help you cope with this mess.
Of course, you can buy it in a store, but if you like to turn waste into useful things, then creating an organizer for small “lost items” from matchboxes is the best option. It's quite simple to do:
- Remove the moving parts from the required even number of boxes (they will be needed later) and glue them together using a glue gun. Glue the boxes neatly one on top of the other, then attach as many vertical rows as wide as you need.
- To prevent the boxes from slipping through, the back of the structure is covered with cardboard. This way you can make the organizer two or four sided. If you plan to keep the organizer in a visible place, then you can decorate it.
A student can make such an organizer as a gift for mom for small jewelry or for dad to store nuts, screws and other small items.
Decorating crafts
In order for the craft to fit organically into the composition of the garden, it is necessary to decorate it. Acrylic façade paints will help you create different colors of a bird’s plumage and paint its beak and paws.
You can give the bird a decorative look using spray paint, and decorate the eyes with beads
To decorate large round eyes, you can use CDs by gluing them to the head with the mirror side facing out.
Expressive owl eyes can be easily made from discs
You can paint the metal lids of the jars white with black edging and glue the dark bottle lids in the center. Or just draw the eyes and beak.
You can do without additional details by simply drawing the eyes and beak
An important attribute when creating the image of a wise bird is a professor’s hat, which is easy to make from a bottle and a piece of plywood. To do this, cut off the top and bottom of the bottle and glue plywood to the resulting cylinder. The cap is covered with black façade paint and secured to the owl’s head with glue.
A professor's cap is made from a bottle and a piece of plywood
Even disposable plastic spoons in skillful hands become fluffy plumage, giving the owl's figure a more voluminous appearance.
If desired, you can give the owl more volume by making plumage from plastic spoons
Ideas for inspiration
Owls are very popular now, no matter what they are made of. Almost any waste material, antique dishes, anything - plus a little imagination!
Photo gallery: cute owl figurines made from different materials
Owl from a colander Owl from a crystal salad bowl Owl's head from a pumpkin Bright owlet from a CD
Owl made from five metal lids Owl made from an old grater Cut-out owls made from plastic bottles
An owl painted with acrylic paints from a 2-liter cola bottle. A shovel, a rake, horseshoes - that's an owl! Owl friends from wood cuts
Master class on making an owl
Making a garden figure of an owl from plastic bottles is not that difficult, the main thing is to have the desire to create. And detailed video instructions will help you understand the simple secrets of making crafts.
Video: how to easily make an owl from bottles
Using available tools, you can transform ordinary plastic containers, turning them into a garden sculpture of an owl. The decorative figure of a bird will become an original decoration for a flowerbed or miniature pond and will delight you in any weather.
Decorative crafts from plastic bottles for the garden: ideas with photos
It’s nice to have a dacha, and if it’s also beautiful, then it’s a hundred times more pleasant. As you know, you won’t surprise anyone with crafts made from plastic bottles. But such decorative elements are practical, inexpensive and beautiful. You can make bird feeders from plastic bottles, which will be a wonderful decoration for your garden. Large bottles and containers can be an excellent material for exclusive flowerpots.
Small colored bottles can turn into ever-blooming plants that will never wither. And if you have a large number of bottles, you can “plant” a tropical palm tree in your dacha. Plastic is very versatile: a little imagination and you will turn it into an exclusive decoration for your dacha.
DIY owl made from plastic bottles
The flight of imagination of a creative person knows no bounds. Taking used material as a basis, you can create an innumerable number of masterpieces that are especially relevant in the landscape design of the site. Usually crafts are placed on the ground; an owl made of plastic bottles, conveniently located among the branches of the garden, will surprise those around you. There are several ways to make a night bird, they differ in degree of complexity. The proposed master classes will help you choose the appropriate option for making an original owl from plastic bottles with your own hands.
Cement and gypsum: reliability and simplicity
Garden crafts made from cement and gypsum are reliable.
To make a concrete flowerpot with your own hands you will need:
- containers for molds (you can use old troughs, basins, buckets, jars);
- cement;
- water;
- vegetable oil;
- putty knife.
Manufacturing process:
- Carefully treat the outer and inner container with oil for easy removal.
- Mix a solution of cement, water and sand. The solution should not be too liquid.
- Fill a large container with approximately 3-5 cm thick cement. Use a spatula to level the surface.
- For drainage, place plastic tubes 5 cm long.
- Place smaller dishes on top of a large container and press lightly.
- Pour the solution into the space between the containers.
- Cover the mold with a bag or plastic and leave for a day.
- After the solution has hardened, remove the small container.
- The larger container is removed when the cement has completely hardened.
Impressive night hunter
Let's start with the most time-consuming option. To work you will need:
- Plastic bottles, preferably the same color.
- 5 liter plastic canister.
- PVC pipes Ø 20 mm, length 0.9 m.
- Scissors, knife.
- Self-tapping screws.
- A piece of foam.
- Aerosol paint for exterior use.
Be patient and get started:
Work begins with the formation of the owl's frame. Pipes that serve as claws are fixed onto the plastic canister with self-tapping screws. Cone-shaped shapes from the top of plastic bottles placed on the pipes with their necks down will help to give them volume. Part of the 5 liter container plays the role of an owl's breast.
When some of the parts are ready, they begin to cover the owl's paws. Having previously pierced the elements of the owl with an awl, the feathers are fixed to a plastic frame with wire.
The next stage is the torso. Usually the back of the bird is decorated with feathers first, then the sides and belly. The owl's back is left open for further fixation of the wings from plastic bottles.
In order for an owl to sit on a branch, it will need strong claws on its feet. The part is made of wire, which is decorated with a corrugated pipe. When constructing the shape, space is left between the fingers for the PVC pipe. This will give the owl additional stability. The wire part of the claws is clamped between the pipe and the bottle and secured with electrical tape or tape.
The basis for the bird’s head will be a fragment of foam plastic; the optimal thickness is 10 cm. Cutting out the desired shape will be easy with a stationery knife. The top of a 5 liter plastic bottle will help you create a voluminous nape.
The head is covered with fragments from plastic bottles. The eyes are framed with two rows of small feathers using Moment glue.
The head is attached to the body with self-tapping screws and proceed to the formation of the wings. Chain-link mesh is used for the frame. The optimal cell size is 25x25 mm. Main stages of the process:
- Begin by fixing the tail feathers.
- Attach 2 rows of long plastic feathers.
- The back area is covered with details similar to the entire body.
- Feathers cut from corrugated bottles will help make the wing more decorative.
It is preferable to paint an owl from a plastic bottle with aerosol paint, which goes on in an even layer. The areas around the eyes are highlighted with a different shade. There are many options for eye design; in our case, they are made from ready-made beads. The final touch is mounting the wings and tail onto the rest of the body.
Such an owl will successfully participate in an exhibition of folk crafts.
Simplified version
The following master class will help you make an owl with less time and effort. For creativity you should prepare in advance:
- 2 liter bottles of dark color – 5 pcs.;
- transparent plastic container;
- tin eye covers – 2 pcs.;
- glue gun;
- acrylic paints, brushes;
- scissors, awl and knife;
- pliers;
- nylon threads.
Owl made from plastic bottles master class:
- The bottom and neck of the container are removed, and cuts are made along the edges.
- A hole is pierced in each petal with an awl, after which a nylon thread is threaded through them and pulled together.
- The upper part of the plastic bottle will later become the owl's head, the lower part the tail.
- The remaining bottles are spent on cutting out feathers; this can be done gradually, as the body and other details of the night bird are decorated. Sheathing with feathers begins from the bottom, fixing the parts with an overlap.
Finally, the remaining elements are treated with paint and the owl from a plastic bottle is ready to take up residence in the garden.
By choosing different categories of difficulty, you can make an original bird within a day or by spending more time and effort, but the result will impress everyone around you.
Another unique design option for the nocturnal predator is presented in the video: