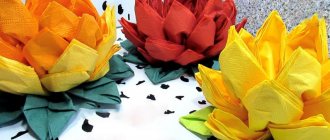
From napkins you can create a variety of beautiful and unique crafts and works with your own hands! For example, magnificent hand-made flowers that will look very impressive and natural.
The ideas and possibilities are endless, the most important thing is to decide on the choice of the desired product. This article presents various ways to make paper flowers. We can start!
Recommendations for choosing material
Paper crafts can be created from almost any napkin, regardless of color, length, width and quality. But when choosing a material, it is worth considering that not every napkin produces elegant three-dimensional flowers.
For example, single-layer napkins retain their shape a little worse. Consequently, from such material it is possible to make only a delicate, airy product, without clear and precise lines.
The best material for creating floral decor is plain colored or white napkins. It is important that both the outer and inner parts have the same color, otherwise the finished product will not look neat.
Choose the master class for beginners that is exactly suitable for your set of materials, for example, stunning carnations are made from white napkins. Especially if you have paint or a red marker.
There is no need to use scented napkins - you can add fragrance to the finished bouquet using essential oils.
Unusual vase with three-dimensional ornament
If you urgently need a tall vase for your favorite flowers, but the store does not have products that match the interior of the room, you can easily make it from scrap materials, spending a small amount of money. Materials for making a vase:
- PVA glue;
- Can-opener;
- Scissors;
- Paper towels that match the color of the wallpaper;
- Three or four cans of peas;
- Napkins of a contrasting color to the main background;
- A simple pencil.
Step-by-step master class
- First, empty jars are prepared. One remains with the bottom, and for the rest it is cut out.
- Next, the prepared jars are placed one inside the other, forming the desired height of the future vase.
- Using PVA glue, the structure is covered with paper towels. You will need at least three layers.
- After complete drying, a drawing is applied with a simple pencil. It is more convenient to make it from large geometric shapes that make up an interesting abstract composition. It can also be hearts, flowers, butterflies in accordance with your own creative ideas.
- From squares cut from napkins, balls are formed, which are filled with the depicted figures by gluing.
Elegant and practical vase made from tin cans
Pink roses
When you first try to make flowers from napkins with your own hands, you will be helped by numerous photos of finished professional works and step-by-step instructions for beginners.
First, you can try making such a charming rose from a pink napkin. To do this, place a fully unfolded napkin on the table, bend one edge 2-3 cm towards the center and twist it, but not too tightly, so that the roll is free.
Note!
DIY fruit bouquets - TOP-200 photos with instructions for creating a bouquet of fruits with your own hands. Unconventional ideas with simple diagrams and work overviews
- Crocheted flowers: TOP-160 photos and step-by-step knitting pattern, review of finished products with your own hands. Crochet master class for beginners
- Paper lily - TOP 100 photos of the best product options. Master class with step-by-step diagrams and drawings for creating an origami lily with your own hands
Now twist the bud at the base and begin to form a stem. You can form a leaf by straightening the napkin a little and twisting it to the end. A very delicate pink rose is ready!
Bouquet of tulips
Paper tulips are one of the easiest DIY napkin flowers to make. To make them you will need 4 plastic spoons, a yellow, red or pink napkin for forming a bud and a green one for leaves.
We cut the colored napkin into 4 squares, each of which we wrap 1 spoon. Having wrapped all four spoons, we form one bud from them as follows: we apply 2 spoons with their front sides facing each other and tie them with tape, and similarly attach the remaining 2 spoons to complete the composition.
Next, cut out a large leaf from a green napkin and wrap it around the workpiece. We make several similar tulips and make a bouquet, tying it with a decorative ribbon at the end.
Carnations
Carnation is another option for a light flower made from napkins with your own hands.
A universal bouquet of carnations can be given to both men and women. To create one such flower you will need 6-8 red napkins, a twig to form a stem or a stick for balloons.
Note!
Crochet rose - diagrams and descriptions of how to crochet a rose with your own hands. Crochet technology + interesting craft ideas
- DIY edible bouquets - TOP 130 photos with instructions for creating a bouquet with your own hands. Creative ideas with simple diagrams and photos of finished works
Craft primroses - simple instructions for creating crafts from scrap materials. Schemes of beautiful DIY products + photo reviews
First of all, unfold all the napkins, fold them on top of each other and cut off 2 opposite edges with scissors in the form of cloves. Fold the stack like an accordion, tie it in the center with soft wire and attach the workpiece to the future stem.
Next, one by one, separate each napkin, lifting it towards the center and straightening it. Upon completion of the work, you will get a lush bud.
Butterfly
Step-by-step process for making a butterfly:
- Prepare a base from a regular napkin: lay fold lines along the 2 diagonals of the workpiece, then bend it in half.
- Using the laid folds, you need to form a triangle.
- Fold the ends into a triangular shape with the apex on one side.
- Turn the craft over and connect the top point to the base of the figure.
- Bend the product in half.
- Take a piece of wire and fold it in half; it should be slightly longer than the body of the insect. Wrap the cellulose material on both sides, twist it a little and form antennae. Cut off excess length.
Another option for making a butterfly:
- For the upper wings, you need to unfold the napkin fabric and form it into a triangular shape, then fold it like an accordion. Secure the center of the part with a small colored clothespin.
- The lower wing segment is made from a different cellulose material. Place it unfolded in front of you like a diamond. Fold the workpiece like an accordion, the center of which will be long and the sides will be short.
- Connect both prepared configurations, remove the clothespin and secure with colored wire.
Dandelion clearing
You can make the most beautiful three-dimensional flowers from napkins with your own hands by mastering very simple simple techniques. If you learn how to roll yellow fluffy dandelions, then in the future you can decorate your child’s nursery by gluing yellow flowers to green Whatman paper and decorating the composition with the sun, bugs and butterflies.
To form 1 dandelion, 1 yellow napkin is enough. We fold it into four and fasten it with a stapler in the middle. Next, we trim the edges so that the workpiece has a round shape. For verisimilitude, this can be done with curly scissors.
Next, we begin to form the flower - lift each layer of the napkin, press it to the center and straighten the petal.
Ideas for work
Using available paper napkins of different colors, it is easy to make colored appliqués: chicken, autumn or winter forest, various flower arrangements.
Using step-by-step technology for creating flowers, you can make pompoms or even original New Year's garlands.
Small flowers are easy to decorate gift wrapping, add to a postcard or holiday invitation.
It’s easy to get new ideas for creativity by studying photos of crafts made from napkins.
poppies
We are used to seeing these stunningly beautiful flowers with red buds. And it is little known that poppies have white, yellow, pink and even purple petals. After reading our instructions, you will understand how to make this amazing flower from a napkin with your own hands.
Note!
Crafting tulips from paper - TOP-100 photos of interesting ideas for creating tulips from paper + simple instructions for beginners
- Mimosa craft: TOP-160 photos of simple and complex crafts. Master class for children and adults on making mimosa with your own hands
DIY paper flowers: a detailed master class with simple work patterns + photo examples for beginners with interesting color options
Cut 2-3 red napkins into 4 parts and form petals. We twist the core from a dark strip cut into fringe. Roll up a ball or roll from a white napkin and place it in the middle of a dark piece, gluing all the parts together. Guided by our scheme, you can make a very original and elegant applique.
If you want to place your creation in a beautiful vase, then for variegated poppies you will need a wire to secure the bud, and a green napkin for wrapping and forming leaves.
Doll
Master class on making a Maslenitsa doll:
- Take 4 cellulose squares of different colors.
- Unfold one napkin and bend the opposite corners of the workpiece towards the middle.
- Place a ball made from a napkin inside the unfolded cloth.
- Turn the part over and place a circle cut out of white cellulose in the middle.
- Shape the doll's head into a ball shape and tie it with thread.
- Roll another napkin with a weak roller to make puffy sleeves.
- Draw the ends of the rolled figure with a thread like candy to create hands.
- Place the roller into the prepared base and secure it with a thread underneath.
- Cut a triangular shape from the raw material - this is a scarf.
- Tie a napkin and secure the ends with glue.
- For a full skirt, you can add another colored napkin at the bottom.
Peonies
This step-by-step guide will help you quickly and easily make flowers from napkins to decorate gift wrapping or create a decorative element in the interior.
To make a bright, voluminous peony, you will need 2-3 plain napkins; the greater the number, the more magnificent the finished flower will look. We unfold the napkins and fold them on top of each other, form an accordion out of them and tie it tightly with thread in the middle.
Using scissors, we cut the ends of the workpiece to give them a rounded shape. And to complete the work, we lift each layer up in turn - first on one side, and then on the other, until a voluminous bud is formed.
Openwork products
If desired, thin napkins can be used to create delicate crafts with an openwork pattern. A similar technique is used to create not only snowflakes, but also flower arrangements, as well as airy Christmas angels.
To create an angel, a white napkin is cut along the edge with sharp scissors in accordance with a pre-designed pattern. A small paper ball is placed in the middle and wrapped with thread, forming a head.
The workpiece is folded into a cone, the edge is glued, and dried.
Wings in the shape of triangles are made from the second napkin. They are also decorated with carved patterns.
Glue the wings on the angel and decorate the product with a ribbon.
Yellow roses
Such lush flowers made from paper napkins can be made with your own hands without much difficulty. To simplify the work, you can watch a special training video or study a detailed diagram with the step-by-step production of lush roses.
In this case, you will need thread and napkins: yellow and green for the stem. We unfold the yellow napkin and carefully divide it into 2 parts, each of which we wrap around a pen or pencil.
Leave 2 cm in reserve and compress it towards the center. We remove the roll and form a bud from it. We twist the remaining sheets, pressing them tightly with our fingers. We wrap the bud in a green napkin and tie it with thread so that it does not fall apart.
What are towel rolls useful for?
Don't throw away cardboard towel rolls - they will also come in handy in everyday life.
- If you cut each cylinder into two or three parts, place them in a plastic tray and fill them with soil, you will get excellent “cups” for growing seedlings.
- When you need to bake a round cake, but there is no special mold at home, you can use a small-diameter frying pan, placing a cardboard sleeve wrapped in foil or a baking sleeve in its center (this is necessary so that the dough does not stick to the cardboard).
- By making a longitudinal cut on the sleeve and putting it on a hanger, you can avoid creases on the trousers that will hang on it.
- Transporting knives and skewers will be much more convenient and safer if you place them inside a cardboard sleeve.
Products made from paper towels and paper rolls have only one drawback - fragility. However, this can also be considered their advantage - given the low cost of consumables, there is no problem in replacing them over time with similar, but already improved or modified ones.
Red blooming roses
To make such a spectacular scarlet rose with a blooming bud, you will need 2 large napkins measuring 20 by 20 cm. Cut each of them into 4 parts and put them together. Fix the center with thread or a stapler. From the resulting square of napkins we form a circle, cutting the edges with scissors.
Next, we lift each layer in turn and form a petal with a wave-like shape. For work, we prepare a large number of napkins to make the rose look even more natural.
Holiday decorations - numbers
Large volumetric numbers symbolizing the age of the birthday person are very popular. Photos with them are always spectacular.
To make any number you will need:
- cardboard (boxes from household appliances work very well);
- regular or masking tape;
- pencil and ruler;
- scissors and stationery knife;
- stapler;
- napkins;
- PVA glue or “Moment”.
Mimosa branches
Mimosa is a lovely, delicate flower that is used to decorate bouquets on the eve of spring festivities. Each of us can contemplate such beauty all year round if we make a paper mimosa sprig in the form of a wall panel and an artificial three-dimensional plant for a vase in the living room.
The painstaking work begins with the formation of a large number of flowers, each of them is made from a narrow strip of napkin, cut like “grass”. After this, cut the green napkin into leaves with fluffy edges.
The applique does not require a stem, but a wire is required to create a bouquet. We wrap the wire with a green napkin, attach leaves, and cover it with many flowers.
Bird
To make a dove of peace, you need to follow these instructions:
- As a background, you need to select a sheet of colored paper in green, blue or dark blue.
- Draw the outline of a bird of the world on the base. If you take a white blank, then you should make a background on it using watercolor paints.
- Cut ordinary snow-white table napkins into squares, the dimensions of which are 10-20 mm. Roll them into balls.
- There should be a large number of pellets.
- It is necessary to apply glue over the entire figure of the dove, after which it is necessary to paste it over with round napkin blanks. The layer may be uneven, but with a volumetric effect.
- You can paste an image of the globe from colored paper on the bottom.
Daisies
Using the following method, you can fold a voluminous chamomile, decorate a gift with it, or make a bouquet. To work you will need 7-9 white two-layer napkins, cotton wool and thread.
Fold the white napkin in half, twist it in the center, and form a butterfly. After which the “wings” should be folded and collected at the bottom - you get a petal. The same must be done with the remaining white napkins.
And from the yellow one we form the core of a chamomile - place a piece of cotton wool in the middle and wrap it around it. And finally, each petal should be tied with a thread to the yellow center. Now the lush chamomile is ready!
Using napkins for decoupage in the interior
For deucapage, special multi-layer napkins with a more durable top layer are used, but ordinary table elements are also suitable, provided that the decoration is done very carefully. To prevent the product from tearing and to adhere better, needlewomen use some tricks: apply hairspray to the surface or glue them using a file.
Decorating and refreshing any piece of furniture using the decoupage technique is very simple. First, you should select and prepare a suitable surface (table, chest of drawers, picture frame, etc.), choose napkins with a thematic picture. To work, you will need the paper material itself, PVA glue, a roller, and brushes.
You can decorate various furniture and accessories by completely covering them with paper or partially by cutting out individual motifs. In any case, the work involves applying glue to the surface and attaching a picture. Then the decor is leveled with a roller or soft brush. Using this technique, you can easily decorate interior parts of any shape.