To make a sliding door with your own hands, you need drawings, a description of the work plan and step-by-step instructions, because this is a rather non-trivial task, especially for a beginner. At the same time, installing a sliding door is an opportunity to save space, which is especially important when the room area is limited.
In this way, you can still zone the room, without having to build durable floors. You can even make such a design with your own hands, using new materials or old fabric - you just have to purchase a special mechanism and components for it. Today we will dwell on this type of work in detail.
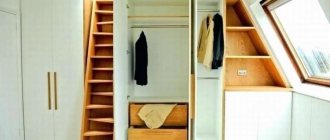
DIY sliding door
How do sliding systems work?
The compartment door is designed in such a way that its doors slide apart to the sides. This can be either one or two door leaves, moving parallel to the ceiling or sliding inward. And if the general operating principle of such doors is the same, then the installation and opening methods are different. Let's talk about this in more detail.
Table No. 1. Main types of sliding systems.
| View | Description |
| Mounted | In this case, the canvas is fixed on guides - on the ceiling or directly above the opening. This way the doors will move along the wall with a slight indentation from it. It is not recommended to install furniture or any other objects near the door - they will be an obstacle to the door panels. |
| Hanging | In this case, the door leaf is fixed to the cut of the opening. Accordingly, the door moves close to the wall, which looks more neat and aesthetically pleasing. Hanging doors allow you to place pieces of furniture next to the opening - they won’t get in the way. |
Table No. 2. Types of interior sliding doors by opening method
| View, illustration | Description |
Coupe | This is the most primitive version of sliding doors, so even an inexperienced person can handle the manufacture of such a model. The design comes with either one or two panels. |
| Radial | The movement of the canvas does not occur along a smooth guide, but along a circle. This option is ideal for rooms with curved ceilings and is good for corner cabinets. The design has a very original appearance, but not every person can handle its manufacture. |
Cassette | They also come with one or two doors and move in different directions according to the same principle as sliding doors. The difference is that they slide into special recesses in the wall, which makes this design very convenient, because you can place furniture near the wall without any problems. Of course, making such a door will be a little more difficult, because you will have to provide for a niche in the ceiling. |
Telescopic | The design is designed in such a way that a separate guide is fixed for each blade. Such doors are often installed as interior partitions and for decoration. They can be assembled in a single part of the opening - just pull one panel by the edge, and the others will follow it. Of course, this is also a rather complex system, just like the radius, so it’s not easy to make. |
Intra-opening | The canvases are fixed in the opening and move towards each other. The design assumes the ability to open only one half of the opening. However, you can place various objects against the walls that will definitely not interfere with the opening of the doors. |
| Harmonic | This is a very simple hinged door design. The canvas moves on rollers attached to the top. The disadvantages include not the best sound insulation. |
Design diagram with top movement mechanism
Main types of door frames
Types of doors - pencil cases.
Sliding cabinet doors require the installation of a special niche into which the open door will move. These niches can be made in different ways.
If the wall towards which the door is supposed to move is not load-bearing, then it can be dismantled and in its place a new wall partition with a niche for the door leaf, the so-called false wall, can be erected. That is, the pencil case for the door will act as a partition. In this case, you can save the space of the room without increasing the thickness of the wall.
If the wall is load-bearing or for some reason its dismantling is impossible, then a wooden or metal frame is added to it, which is then covered with plasterboard.
What mounting options are there?
Depending on the type of structure, the following installation methods are distinguished:
- With two guides.
They are fixed on the ceiling to a wooden beam (which is previously installed there) and from below. Thus, the canvas is securely fixed, allowing it to move smoothly and without obstacles. The only disadvantage that can be highlighted is that for the lower profile in the floor you will have to make a recess in advance using the gating method. If it is not embedded into the floor, the structure will look unsightly and the profile itself will quickly become unusable. In addition, contaminants often accumulate in it. Doors with two tracks - With one guide. For canvases of this type, special fasteners are provided. They are installed in the opening and move along the profile, which is located on top. An additional rail is not installed at the bottom, because usually such doors have a small mass.
Size calculation
When assembling a sliding wardrobe door yourself, there are two options. The first is to measure the opening, think about how many doors you want to have and contact a door manufacturing company with this information. Just make sure they sell the parts without paying for assembly. The manager himself will count all the necessary materials for you, give you the dimensions and announce the amount. It's simple. But you will have to purchase everything from this office, i.e. choose from what is available.
The second way is to calculate everything yourself and look for the necessary components from different companies. It’s more complicated and more expensive, but there’s a wider choice. For those who do not like simple paths, we will describe the calculation of the components.
Doors
Calculate the width of the doors so that when closed, only one handle is visible, but it should not cover the door leaf itself. For a sliding door with two leaves, you calculate it like this: measure the width of the opening, add the width of the profile and divide in half. This will be the width of the sash.
For example, the opening is 1600 mm, the width of the handle profile is 26 mm. We get 1600 mm + 23 mm / 2 = 811.5 mm. Please note that the width of the handle profile is taken arbitrarily. It can be different in shape and, naturally, in width. When making calculations, substitute the width of your chosen structure.
Profiles may be different, so they must be measured individually
To calculate a tricuspid one, you will need to add twice the profile width and divide by 3.
Example: opening 2100 mm, handle width is the same - 26 mm. We count: 2100 mm + 2*26 mm / 3 = 717 mm.
Everything is easier with height. Subtract 40-45 mm from the height of the cabinet and obtain the required height of the sash, as well as the length of the side profiles. That's all about the dimensions of the sashes.
Filling
Since the filling is in a frame of profiles, we subtract twice the profile width from the total width of the sash. We do the same with the height - subtract the height of the lower and upper profile.
Measuring the width of profiles
So, the width of our sash is 811.5 mm. The measured width of the handle profile is 18 mm. Since the handles are placed on both sides, we double this figure. We get 36 mm. Total filling width 811.5 mm - 36 mm = 775.5 mm.
We also calculate the height: let the initial one be 2350 mm, the width of the upper profile 12 mm, the lower one 48 mm. Total filling height 2350 mm - 12 mm - 48 mm = 2290 mm. This is if the filling is solid and it is laminated chipboard, which does not require a silicone seal. If the sash is a solid mirror or glass, the thickness of the sealing rubber must be subtracted from the found height. It is 1 mm, but since it is put on around the perimeter, it takes up 2 mm in general - above and below. In this case, the filling height is 2290 mm - 2 mm = 2288 mm.
If the sash filling consists of fragments, the thickness of the connecting profile is also subtracted. It is also approximately 1 mm.
Profiles
The height of the vertical profiles of the frames is equal to the total height of the sash. The width of all horizontal ones is calculated depending on the width of the handle: from the width of the sash we subtract twice the width of the handle (there are two of them).
How to measure handle width
Let the handle width be 26 mm. We get the width of the vertical profiles: 811.5 mm - 26 mm*2 = 759.2 mm.
Materials for making sliding doors
The reliability of the structure will also depend on the quality of the materials from which it is made, so special attention should be paid to this point.
The sliding system is a mechanism that consists of guides, rails and rollers. It can be made from various materials:
- Steel. It is these durable mechanisms that are best suited for installing heavy interior doors. They securely fix the canvas and do not deform under load. The only drawback is the noticeable noise when the doors move.
- Aluminum. Guides made of this metal should be chosen only if you plan to install a weightless canvas. One of the advantages of such a mechanism is the silent movement of the canvases.
- Plastic. A mechanism made from this material is used only for simple hinged doors.
It is recommended to use only durable, steel guides
Note! An equally important point is the choice of material for the canvas itself. In this case, the purpose of the structure will be of great importance.
Table No. 3. The most popular materials for making door leaves.
| Material | Description |
| Wood | Sliding doors are usually made from natural solid wood, which are best suited to a classic interior. It should be taken into account that the canvas will have a large mass, therefore the fastenings must be as strong as possible. In addition, if you make your own door from natural wood, you need to take care to protect the structure from fungus using special treatment. |
| MDF or chipboard | Such materials are often used to make doors, because they are much cheaper than natural wood, but at the same time have good resistance to temperature changes and humidity. However, it should be noted that MDF is much easier to saw - it is from this material that a structure of any shape can be cut. In addition, it is environmentally friendly compared to chipboard. Most often, craftsmen prefer to choose laminated panels, because such a door does not need to be primed or painted. It is strictly not recommended to use chipboard for sliding doors in a children's room, because this material contains toxic synthetic resins. |
| Plexiglas | In this case, we are not talking about standard glass, but a special organic material that is resistant to mechanical damage. Such doors have an unusual appearance - they can be matte, glossy, with or without various patterns. Of course, such a canvas serves as a decoration rather than as protection from noise or prying eyes. An excellent replacement for glass construction are polycarbonate sheets. This material also has an unusual appearance, but it is quite durable. Another obvious advantage of polycarbonate is the huge variety of colors. |
Glass doors are often used by designers to create respectable interiors.
If you have the desire and opportunity, you can combine the listed materials. Some craftsmen prefer to install glass or mirrors in wooden doors.
Important point! It is important to use only high-quality material in your work, otherwise the door leaf may become deformed. This especially often happens when natural wood is poorly processed and dried.
Sash design
The wardrobe door leaf consists of profiles:
- lower;
The lower profile has deeper sidewalls - upper; Upper profile for sliding door leaf
- handle profile;
The handle can stand on both sides - intermediate.
These profiles are placed between parts of the door leaf, but you can do without them - if the door is solid and not composite
All this together looks like in the photo. The door material you choose is inserted into this frame, into the grooves. It can be glass, mirror, chipboard and other materials.
Sash design without filling
Separating profiles are optional. They are needed if you assemble the sashes from different materials or you simply like them this way better. The maximum thickness of the filling material is 10 mm, the minimum is 4 mm. Thinner ones - glass, plastic, mirror - are inserted through a sealing gasket.
In order for the sash to be able to move, rollers are installed on it - at the top and bottom. The lower rollers bear the entire weight of the door, and the upper rollers stabilize the vertical position of the leaf, preventing it from deviating.
Rollers for wardrobe doors
The rollers are attached to the side profiles using special fasteners.
Making a sliding door
Even a novice master can handle a simple version of the sliding design. We will look at the main stages of manufacturing a sliding door.
Before starting installation, you must prepare all materials and tools
Materials and tools
During the work we will need the following devices:
- electric drill, screwdriver;
- chisel;
- electric jigsaw;
- Bulgarian;
- building level;
- roulette;
- Screwdriver Set;
- a simple pencil and a ruler.
In addition, you will need to prepare materials:
- chipboard sheets for door leaves;
- guide rails, rollers, fittings;
- bars with a cross section of 5×5 centimeters;
- anchor fastenings;
- decorative additions;
- self-tapping screws
Calculations and drawings
It is recommended to draw up a drawing of the door leaf with dimensions. To do this, we will need to first measure the doorway (it is necessary to take into account the distance to the ceiling in order to determine the method of installing the sliding doors). In addition, you should take into account the distance from the opening to the corners, because in all cases it is not enough for the sash to slide out freely.
If you decide to install a frame over a doorway, then first of all you need to take into account the thickness of the floors - if there are too crooked walls, the measurements may not match, so they will have to be double-checked several times. In addition, you should make sure that the floor is level and not sloped.
This is what the measurement diagram looks like
According to the standard, the canvas has the following dimensions:
- width – from 40 to 90 centimeters;
- height – 275 centimeters.
When making a door yourself, you should not make it too large, because the rollers may not withstand excessive load.
When choosing the classic version of sliding doors, you need to make a leaf that will be 20-50 millimeters higher than the opening. The width of these doors should be 20-30 millimeters larger on both sides.
The table shows the maximum dimensions of door leaves. The possibility of deviation from these values is not excluded, but only to a lesser extent
In the case of installing a cassette mechanism, it is necessary to cut out the canvas exactly to the size of the opening, because first the mechanism itself will be installed, and only then the niche.
By combining materials, you can make the door leaf weightless. Here are some of the most popular lightweight design options.
If you think that it will be easier to make a door leaf from wooden blocks, then the following diagram of their connections will be useful in your work
In this case, you should use polished timber, which will not have to be further processed. In order to make the most accurate cuts, it is advisable to purchase specialized carpentry equipment.
The process of making a sliding door: step-by-step instructions
Step 1. First of all, we need to cut out a door leaf of the required size from a sheet of chipboard. This can be done at home, but it is better to turn to professional furniture makers. Next we need to process the edges. This is quite simple to do, using an iron or hair dryer with hot air, after which the edges can be cut off with a utility knife.
Treated and untreated chipboard edges
Important point! During work, you must use protective gloves for your hands and special glasses for your eyes.
Step 2. Now you need to take a wooden beam and measure the required length from it.
You should mark and saw off the beam using a jigsaw
Now, according to preliminary markings, we will need to fix the beam above the doorway (in our case it will be held on by four long screws)
Step 3. Now you need to measure the required length of the rails.
You can cut the metal guide using a grinder
Now you should make holes in the guide for the screws
It is necessary to place it on a chair, holding it with one hand, and drill through holes.
Step 4. Next you will need to screw the guide rail to the wooden block above the opening.
You need to hold it with one hand and screw in the screws one by one
Important point! If the guide is installed without a bar, then it is necessary to fix it a few centimeters further from the wall, otherwise the door will touch the trim when moving.
It is necessary to carefully check the correct position of the bar and the guide using a level, because the ability to freely open the door depends on this.
Step 5. Now you need to attach the metal fasteners from the kit to the door leaf.
We attach the hanging mounts for the rollers with self-tapping screws
Step 6. Now you should mark the location where the door handle is attached.
It is important not to make mistakes in the calculations and put marks on all sides
Now you need to make holes using a drill along the marking lines
This is necessary in order to place a jigsaw blade there and cut out a recess for attaching the handle.
You should also cut out the hole carefully, moving exactly along the marked lines.
Tips for choosing a jigsaw
It’s better not to rush here and, if necessary, make a few more holes with a drill on the other side.
The door handle mount should be installed in the resulting hole, after which you will need to insert the door handle itself
Step 7. The next step is to insert the rollers into the top guide.
You need to insert two rollers into the guide
Now you need to screw the door lock from below
The groove in the door leaf must be made using a grinder and a special circle.
Step 8. Next you need to hang the door leaf.
Using the screws located on the rollers, you should set the canvas to the optimal level, after which it can be secured with nuts
Next, you need to insert the clamps into the guide and wrap them up - this will be needed so that the door does not go beyond the rails
Step 9. The fastenings will need to be covered with decorative trim in the color of the door leaf.
First you need to measure the exact length of the extension, and then you will need to cut it to size with a jigsaw
The extension can be secured to small nails with decorative heads. It is important to carefully fix it on both sides. Now we need to mark and cut the side panels for our door. Then all that remains is to install them according to the same principle.
Upon completion of all work, it is necessary to check the functionality of the structure - the door should move smoothly along the guide without any obstacles.
Video - Sliding door from an ordinary one. DIY compartment door
This is the simplest option for making a sliding structure at home, which is suitable for beginners. If desired, you can also install a lower guide with rollers. In this case, it will be necessary to make a recess according to its dimensions in the floor. It is worth noting that this is a more modern option, because such a mechanism operates silently.
Important point! In this case, when hanging the door, the door leaf is first inserted into the lower guide, and then into the upper one.
What might be required for the job?
Sliding door mechanism diagram.
Pencil cases for sliding doors, completely ready for installation, can be purchased in the store. However, they are very massive and have a fairly high cost. Making a pencil case for a door with your own hands will cost almost twice as much. It is possible to install a cabinet door yourself, but this requires some experience and knowledge. Installation should begin at the stage of finishing floor leveling. The pencil case should be erected when the level of the finished floor is known, down to the thickness of the floor covering and underlay.
To work you will need:
Advantages and disadvantages of sliding doors
Before you start manufacturing sliding doors, you need to carefully study all the advantages and disadvantages of such structures. It is worth considering that sliding doors are also not suitable in all cases.
Interior sliding doors can be incredibly aesthetic
The following advantages of sliding doors should be highlighted:
- such doors take up minimal space compared to any swing models;
- you can open and close the canvas without much effort; even a child can handle such actions;
- even if there is a draft in the room, the door will definitely not slam or open from it;
- this is the best way to divide a room into several zones, because glass sheets are often used as decorative partitions;
- some door designs do not provide for a threshold, so this option is suitable if disabled or elderly people live in the apartment;
- the design is perfect for any room, including the bathroom, kitchen, bedroom;
- If you have additional funds, you can install an automatic door opening mechanism.
Installing this design allows you to visually expand the wall
However, it is necessary to note the disadvantages due to which some people refuse to install interior sliding doors:
- if the canvas moves along the wall, then it is impossible to place furniture near it (it turns out that the design conceals useful space);
- poor sound insulation from extraneous sounds is often observed - this is due to the fact that there are gaps between the canvas and the frame;
- Because of such doors, heat in the room is worse retained;
- the cost of installing sliding doors will be significantly higher compared to the standard option;
- if you buy budget components, the door may fail within a few months;
- If you are going to install compartment doors with two leaves, then it will be more difficult to cope with this process, because these parts should be perfectly matched to each other, so you will have to involve a professional craftsman in the work.
Video - Installation of sliding doors in thin ceilings
Only if it is assembled correctly will you be able to evaluate the ease of use of sliding doors, so when installing it yourself, you must carefully take measurements. Even minor deviations will lead to the design not functioning properly. The work must be carried out slowly and carefully, then the result will definitely please all household members.
You can learn more about how to make sliding doors with your own hands by reading our article.
DIY pencil case door: installation recommendations
Sliding doors are very popular now. A type of door is a door that hides when opened inside a wall. If necessary, they silently disappear and leave free space without occupying it, such as swing doors.
The pencil door saves space, does not slam shut due to drafts, and closes and opens silently.
A pencil door is an excellent solution for saving space and simply adding sophistication and elegance to the interior. Such doors, together with a ready-made cassette (pencil case), can be bought in a store or made independently. However, it is worth considering that installing a cabinet door with your own hands is not easy. This issue must be approached very seriously, having studied the information and found out all the subtleties of its installation.
Varieties and features
All sliding systems are identical in design. They may differ in dimensions, material, design of rollers and guide rails . The dimensions adhere to standards that imply a door height of 1.9–2 m and a width of 0.6 to 1 m. For large openings, built-in double compartment doors are installed in the wall. If you need to deviate from the standards, the cassette is made to order in the required sizes.
The factory design is supplied in its entirety. The pencil case is already folded and ready for installation. When manufactured independently, the cassette is assembled from a thick board, timber, or galvanized profile. The door leaf can be adapted to any suitable size.
Of the additional devices, the system is most often equipped with a door closer . The mechanism creates a smooth closing of the sash. For complete convenience, the sliding interior door, hidden in the wall, is equipped with automation. The canvas opens when a person approaches and closes after he passes through the doorway. The automation is triggered by sensor signals. The canvas is moved by an electric motor.
Automation is rarely installed in residential premises due to cost and impracticality. Autonomous systems are in demand in stores and other buildings where a large flow of people passes through the day.
Types of cabinet doors
Sliding cabinet doors consist of a frame, transoms, a roller device, handles, and a pencil case.
Sliding pencil doors vary in the number of leaves and the design of the pencil case.
The following types are distinguished:
Important! The design features of the pencil case depend directly on the wall to which it is attached.
When the wall is not load-bearing, in this case it is possible to dismantle it and build a new partition with a niche, the parameters of which are identical to the parameters of the canvas. Such a partition is called “false walls” and serves as a pencil case. When constructing a false wall, it is possible to save useful space, and the thickness of the wall remains unchanged.
Cassettes for sliding doors inside the wall
When the wall is load-bearing, in this case it is necessary to think about fastening the “skeleton” of the future structure.
Tips for installing a cabinet door
Important! The frame for a sliding internal door should be 20 mm wider than the panel and half its thickness deeper.
To avoid the occurrence of hum or vibration when using the structure, it is necessary to ensure that the bars are placed inside the rack at the time of installation.
Do-it-yourself cassette door installation
Before you start making a pencil case for a sliding door, determine the width of the opening. The design of the entire system will depend on this parameter. There are two types of cassette coupes:
When making a pencil case for sliding doors with your own hands, take into account the type of wall. The usual non-load-bearing interior partition is completely dismantled. In its place, a structure with a niche is being erected. A sliding door with a plasterboard partition forms a false wall, which is a cassette. The construction of a new wall allows you to save useful space by maintaining the original thickness.
A load-bearing wall cannot be dismantled. The frame of the pencil case will have to be attached to the surface and covered with plasterboard on top. The result will be a double thickening of the wall and a reduction in space, but there is no other way out.
The cassette compartment door is installed after the finished floor has been installed. By this time, the final leveling should be completed, and the thickness of the floor covering should be taken into account.
Installation procedure
They try to roll the hung door on rollers. The movement should be smooth, easy, without rumble or jumps. It is important not to forget about the limiters that serve as a stop for the sliding sash.
After successful testing of the sliding structure, the niche frame is sheathed with sheets of plasterboard. Further actions are aimed at decorative finishing of the false wall and framing the ends of the cassette, forming the door frame.
Source
Drawing and detailing
Today, wardrobes are popular among tenants of small city apartments and owners of spacious country cottages, because they are highly functional, practical, serve for a long time without breakdown, and also retain their appearance for a long time. Furniture can be adjusted to almost any size, style of room. And to spend a minimum of money on this, make your own furniture. How to make closet doors and what do you need to do to start installing closet doors? Floor plans and details of drawings of the future project indicating where this or that investment will be carried out will significantly speed up the work.
SchematicDrawing
Frame and profile assembly
The location of the door leaf assembly depends on its type. When using glass inserts, the silicone gasket is first placed on the end surface. After this, all elements of the canvas are connected by central frames. Unlike sealant, which is easily pulled out with your fingers, difficulties may arise at this stage; in particularly difficult cases, the putty is covered with a rubber hammer (which is not always possible when working with a mirror or glass). The upper and lower frame profiles are attached to the already assembled sash with similar forces.
The side profile is installed last, starting from the top:
- To secure the frame in the pre-drilled hole, carefully insert the screw, with the tip extending 10-15 mm.
- This tip is inserted into the groove of the top profile of the frame and tightened with a hex key until a distance of 3-4 mm is reached.
- Insert the upper support roller fork into the space created, and then tighten the screw until it stops.
- The process of assembling the cabinet doors is completed by attaching the bottom of the frame at a distance of 42 mm from the edge and attaching the support roller (in the same way, but without careful tightening).
Design, details and assemble your wardrobe with your own hands step by step
Some craftsmen approach the assembly process differently: first they fix the door frame without filling, after checking the work, this structure is partially unscrewed and filled with glass or particleboard flooring. A description of this method can be easily found on thematic resources; the basic rules for assembling and fixing the profile remain unchanged. To avoid mistakes, it is worth installing cabinet doors in accordance with the recommendations of the sliding system manufacturer and clarifying this point in advance.
Fixing the guides
Particular attention is paid to installing the rails directly into the body. These elements are fixed with vertical strips and aligned vertically to the nearest millimeter. First, the upper horizontal rails are fixed, then the lower ones after checking their evenness. Their location depends on the type of side profile. When installing doors with an asymmetrical C-profile, the lower guide moves away from the line of the facade until it coincides with the internal guide of the upper guide. When using an H-profile, all horizontal rails are located in the same plane and aligned with each other.
Characteristics of installation of a cabinet door
The sliding pencil case design is equipped with a roller suspension mechanism. This type of device, with care and control, can last a long time.
Important! The perfect and easy movement of the doors is ensured thanks to the design features of the roller mechanism, which has large diameter wheels with rubberized tires and metal bearings.
Different models of roller devices have different permissible load capacities. Therefore, when choosing such a device, it is necessary to take into account the weight of the panel.
The roller device is equipped with special screws that help regulate the panel.
Door structure sliding into the wall
If a thin profile (up to 0.5 mm thick) is used in the manufacture of the “skeleton” of the structure, then it is necessary to consider strengthening the pencil case using bars. If the skeleton is not strengthened, then during the movement of the transoms the partition may tremble, which will subsequently lead to sagging of the guide.
In order to prevent possible distortions during the installation of the structure, it is necessary to secure the spacers.
When installing the door structure directly, it is necessary to determine the width of the pencil case as accurately as possible. If you install a narrow niche, then the door will cling to the skeleton, and wide gaps will worsen the soundproofing properties of the door and spoil the appearance of the entire structure.
Important! When open, the door should not completely fit into the frame, otherwise difficulties will arise regarding the removal of the transoms, and the installation of additional devices will be required. Or provide a travel limiter in advance.
The sliding door frame must be mounted on a finished floor covering.
A sliding door product is an ideal solution for small spaces. However, installing such a structure requires experience and a serious approach.
Source
Features and installation procedure
You can install sliding doors yourself even without much experience. It is quite possible to do without installers. It will take a little time, and also installation instructions. We will try to give a detailed description of the process with photos and video materials.
Self-installation of sliding interior sliding doors
The systems may differ slightly, but the general rules remain the same. There are several requirements that must be met before installation:
Next we proceed to assembly. First you can attach the rollers. Different manufacturers have their own recommendations. Some recommend retreating 1/6 of the width of the door leaf from the edge; in other systems, they are attached immediately from the edge, and the mounting plates provide the indentation. This is the system we install: in it, roller platforms are installed immediately from the corner.
Marking the installation location of the rollers
We center them, measuring so that the distances are the same. Having positioned the plate, use a pencil or marker to mark the locations for the fasteners. Drill holes in the marked places. The diameter of the drill is 1 mm less than the diameter of the screw.
Securing the Roller Shoes
We set the plates and screw in the screws. The length of the fastener depends on the weight of the canvas, but not less than 70 mm. We twist them exactly perpendicularly, otherwise unnecessary stress will arise.
Supports for the rollers are inserted into the installed plates. They are fixed with a lid on the side surface. Next, roller platforms are screwed onto the threaded pins.
It is also convenient to install handles and locks before hanging. They need special, mortise ones. If you bought a ready-made kit, the required holes are available. If you have used a regular canvas, you will have to trace the outline with a pencil and remove the excess with a chisel. After the handle or lock fits into the recess, the attachment points are marked, holes are drilled for them and the fittings are installed.
Next, you can begin installing the guide. With mounted rollers, this will be easier: you know exactly at what height the bottom edge of the rail should be.
The most convenient way is to hang sliding doors on a dry wooden beam. Its cross-section is less than 50*70 mm, its length is twice the width of the door leaf + 5 cm. We cut the guide to the same length.
We measure the length of the carrier and mounting bar
Having aligned the guide along the beam, it is attached to the beam with self-tapping screws no less than 8 cm long. The number of fasteners is at least three, departing 10 cm from the edges and in the middle (more often is possible, less often - not).
Attaching the guide to the beam
Now you can measure at what height to mount the timber. A guide with a beam is “rolled” onto doors with installed rollers. This way you can accurately note how tall the doors are. We drill at least four holes in the side edge of the beam for mounting to the wall.
The guide with the beam “rolls” onto the rollers on the door
Add 7-10 mm to the resulting mark - the doors should hang and not shuffle along the floor. 7 mm is the minimum gap, which is sufficient if there is no floor covering in the opening. If they are planned (later to lay laminate, carpet, linoleum, etc.), then the thickness of these coverings must also be taken into account.
Trying it on to the doorway
To prevent the canvas from “walking” during installation, it is wedged with small wooden wedges. At least two stops are required - near both rollers.
We wedge the canvas
Having placed the beam against the wall and adjusted its position using a level, we mark its position with a pencil. If the wall allows, you can fasten it to the wall through and through, but for this you need to use self-tapping screws at least 120 mm long, or better yet, place it on anchor bolts.
If the wall, for example, is concrete, the installation of dowels is required. To do this, you need to transfer the marks for the fasteners to the wall. This can be done using a thin and long drill, the diameter of which is smaller than the drilled hole.
Transfer the marks to the wall using a thin drill
An even simpler option: a long thin nail. It is inserted into the hole and a mark is made on the wall with a couple of blows. The following procedure is known: drill holes for the dowel plugs, insert the plugs, hammering them in if necessary. Then we install the doors.
Attaching sliding doors to the wall
Stoppers must be secured along the edges of the guide. They are inserted from the sides, the required location is established experimentally (so that the canvas covers the opening completely when closed, and rolls back sufficiently when opening. They are fixed using clamping screws.
Installing stoppers on sliding doors
Having opened the doors, we install the flag roller on the floor. It fits into a groove cut into the bottom of the blade. It is necessary to ensure that the doors do not deviate vertically.
Installing Flag Roller
First, we insert it into the groove, mark holes for fasteners, drill, then secure with short self-tapping screws (length about 15-20 mm).
This is what the installed flag roller looks like with the doors open
At this point we can assume that the sliding doors have been installed. They are already fully functional. Finishing work remains. The mounting beam with the guide is covered with a decorative overlay, matched to the tone of the door leaf. It can be nailed directly to the timber with finishing nails.
The decorative overlay can be nailed directly to the beam
Only when you put it out, make sure that the wheels are closed. It’s much more beautiful this way)) Now that’s it, you’ve installed the sliding doors with your own hands.
A video tutorial on how to install such a door is shown below. There are several installation options.
We install cassette-type sliding doors (in a pencil case)
The process of installing the guide and hanging the door leaf is almost identical to those described above. There is no need only for finishing, but all other stages are necessary. Instead of installing a decorative strip, a false wall is mounted at a distance of at least 10 cm from the wall. It is usually made from plasterboard profiles, which are covered with wall plasterboard. But this is not important - you can use gypsum fiber board or plywood, or any other suitable material.
Where does the distance of 10 cm come from? The thickness of the door leaf and the gaps on both sides are 5 cm. At least another 5 cm is added to this for installation of the profile. So it turns out to be 10 cm.
Since the main load will fall on the wall, the frame made of profiles need not be reinforced. If such a wall does not seem very reliable to you, you can insert wooden blocks inside, which are screwed with self-tapping screws. This will make the structure very rigid.
The basic principles for calculating a pencil case for a sliding door, as well as marking features and principles for preparing a doorway for installation, see the video.