Making a barrel of honey from cardboard
I present to your attention a master class on creating a barrel from cardboard.
- Using a glue gun, I glued strips of cardboard to the rim, having previously rounded them off.
- I attached cardboard strips in the shape of a lid to tape.
- She rolled a tube out of newspaper and twisted it in a circle.
- I connected it and got a handle for the barrel lid.
- I glued two tubes of newspaper around the perimeter of the barrel.
- Inside I covered everything with pieces of thick paper.
- I covered the outside with paper napkins.
- I cut out and glued letters from cardboard.
- I glued decorative pearls.
- Covered the outside with putty.
- I covered everything with a final layer of acrylic varnish and painted it with acrylic paint.
LiveInternetLiveInternet
—Categories
- delicious recipes (2176)
- baked goods (759)
- canning (188)
- salads and snacks (179)
- candies and dessert (177)
- main courses of meat and poultry (128)
- vegetable dishes (83)
- drinks (54)
- drinks (46)
- cakes and pastries without baking (41)
- sauces (37)
- spices and seasonings in the kitchen (19)
- cook in a slow cooker (15)
- first courses (13)
- FISH (4)
- My recipes (2)
- miscellaneous (1731)
- Useful tips (357)
- Tags, templates, inscriptions (226)
- from waste material (91)
- cosmetics (82)
- from waste material (80)
- inscriptions, tags, silhouettes (55)
- aroma and fresheners (34)
- shopping in online stores (22)
- diamond embroidery (3)
- master classes (1306)
- papier mache (2)
- for home (877)
- we sew pincushions ourselves (36)
- Alterations from different materials (31)
- postcards (652)
- scrap paper (210)
- boxes, bonbonettes (148)
- newspaper weaving (484)
- paper products (436)
- quilling (2)
- knitting (380)
- our health (322)
- prayers and spells (8)
- for a summer residence (304)
- health (299)
- wedding (296)
- everything for a wedding (256)
- soap making (239)
- work on the Internet (206)
- work from home (36)
- from ribbons (91)
- fabric flowers (13)
- crochet (80)
- SEW (75)
- Various flowers (66)
- shawls, scarves, hats (54)
- felt (48)
- from soutache (37)
- Useful programs (33)
- useful tips (29)
- from soft toys (15)
- bags (14)
- from pompoms (13)
- Fresh flowers (12)
- Gifts for the holidays (9)
- properties of stones (6)
- beading (5)
- candles (5)
- translator (3)
- pincushions (3)
- cook in a slow cooker (0)
- cook in a slow cooker (0)
What can be made from boxes - a barrel, a chest for storing threads
DIY pig feeder
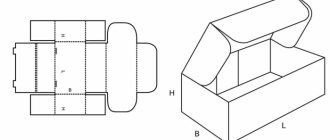
When you think about what you can make from cardboard boxes, pay attention to the following masterpiece. If you have a thick corrugated box from household appliances, then it will work perfectly
You will need to disassemble it, then you can start crafting.
This barrel consists of three containers. See how to create each one. To do this, you need to cut out a circle and a narrow rectangle of the required diameter.
Notice how you then glue the triangle to the circle to create a seamless connection
To do this, remove the strip of cardboard at the bottom, align the two sides of the rectangle, and then place the remaining thin strip of cardboard on top.
Then take the same material and cut a small strip from it. She will become a pen. You will need to make two of these things to glue them opposite each other on the outside. Pre-fold the strips so that they resemble handles.
See why these elements are needed. When you make several trays like this, you will put this kind of fastener here. Its fixed parts will help connect the handles, and you will tilt the sliding parts down when you need to get one of the containers.
To ensure that the containers fit well together when you decorate each container, make an additional narrow bottom. Then one container will fit well into the other.
Now for such a craft you need to make a lid from cardboard. To do this, cut out a large circle. This will be the basis. In the center, you need to glue a few more, but small, cardboard circles onto it in a stack. They will become comfortable handles.
The sliding mechanism consists of four cardboard parts. Two are equal. They are strips of the same size. You will insert them into the handles of the containers. At the bottom, these strips are connected to a cardboard frame. When necessary, you simply lower it. A handle made of the same material is glued to the top of this frame for convenience and beauty.
Now you can use a fine-tip marker or a regular pencil to create these designs on your work. Or you can cover such boxes with colored paper.
You can put various little things in them. It will be especially convenient to store small sewing supplies here. You can also place small toys, which will no longer be lying around the house, but will be in their places.
And to make a chest for storing thread, you will need a shoe box with a folding top. Mark its bottom to see how far apart the spools of thread will be. Make dots at these places.
Now, from the reverse side, pass the nails of the required height here. It would be nice to additionally fix them using the hot rods of a silicone gun.
To make the thread storage box even more reliable, it is better to additionally glue a rectangle of corrugated cardboard to the bottom, and then fix the nails.
To avoid injury, it is better to first remove the point of the nails and polish it.
Here's what else you can do from a cardboard box.
Take a shoebox and prepare it. To do this, rub the surface of the lid and box with a candle. Bring some white acrylic paint here. Then all that remains is to lightly rub with sandpaper on the folds to give this antique effect.
To make the container look like a suitcase, take pieces of leather and glue them on the corners. Make handles and clasps from leather belts. You can place sewing supplies, toys, and other items inside.
Making a miniature of an antique barrel
To make this miniature, we will need a very ordinary shovel handle with a diameter of 27mm, a small piece of leather measuring 10cm * 5cm, wooden toothpicks, a wooden block measuring 3cm * 3cm * 2cm, stain, varnish.
You will also need everything that is shown in the photo below.
To begin, cut off a 38 mm long piece from the cutting.
Then the cylinder needs to be processed with a stationery knife on both ends, giving it a sloping shape.
Be careful with the utility knife blade to avoid injury!
Now, using sandpaper wrapped around a small wooden block, we process the entire surface of our workpiece, achieving a smooth surface of the product.
Next, using a pencil, we draw the lines of future joints of the staves (boards) of our barrel.
After this, using a triangular file (small file), we saw through one of its corners along the lines drawn with a pencil, giving our barrel a relief.
Now you need to cut out the sweet clover from both ends of the barrel. To do this you will need a set of wood cutters.
First, we draw circles from the ends of the product, retreating 1.5 mm from the edge.
We draw a grid in this circle. Then use a semicircular cutter to press a 1 mm indentation along the circumference line.
Next, using cone-shaped cutters, we make slits, duplicating the drawn mesh.
We do this to make it easier to remove the top layer of wood inside the circle.
Now with the same cutters we remove the same top layer that is indicated above.
Be careful not to cut off the edge of the rivets!
Just in case, I want to post a photo of a set of cutters that it is advisable to have for work.
After the sweet clovers are completed, you will need to extend the slots between the rivets from the edges of the barrel to the sweet clovers.
To do this, you will need the same triangular needle file that was used earlier.
Then you need to sand the entire product.
We mark with an awl the places of future traffic jams. The filler should be located in the middle of one of the rivets, and the drain should be turned 180 degrees relative to the filler and located on the clover.
Now we drill holes 2-3mm deep in these marks.
Next we need to cut small cylinders from our toothpick to make the plugs. The length of the cylinders should be 1 mm greater than the depth of the holes so that the plugs stick out slightly.
Glue the corks into the holes, but if they fit tightly, you don’t have to glue them in, because the varnish will subsequently hold them securely.
Linden honey barrel
The boards for the barrel are planed and driven through a surface planer. The size of the planks is 20*140 mm. Boards are cut along, not across, the grain. Using a circular saw or miter saw. When cutting, you need to use a protractor, because the cross-section of the planks should be trapezoidal in shape.
Note! The width and number of slats are calculated based on the required barrel size and the thickness of the available material. For example, there may be 12 of them.
Each plank should be sanded to remove any unevenness and wood fibers. Then the planks are laid out in a circle, with the narrow sides inward. They are either glued together or steamed and bent, secured only with hoops. How to glue:
The procedure for calculating barrel parameters
Based on its purpose and installation location, dimensions and design features are selected. There is some confusion with the concepts in everyday life. In principle, both a tub and a barrel are containers of a certain capacity that are assembled by hand from separate boards (rivets, frets in the language of professionals). The only difference is in geometry. The pictures explain everything well.
What is defined for a drawing:
- Barrel height
- Diameters (large and small).
- The bending angle of the rivets and their number.
To simplify calculations, it is advisable to focus on standard data that is used by specialists when drawing up drawings of barrels.
How to make a bear out of cardboard with your own hands
I present to your attention a step-by-step process for making a moving paper toy “Teddy Bear”. The master class will be useful for primary school teachers, kindergarten teachers, and young parents who have a small child. The baby will find it interesting because the toy’s legs move with the help of a thread. In addition, mothers and fathers can make similar toys themselves and introduce their children to wild and domestic animals in a playful way. Also, older children, following step by step and relying on photographic material, can make a bear cub with their own hands and give it to their younger friends.
For manufacturing you will need the following material:
– sheets of colored paper in blue, red and orange; – white cardboard (1 sheet); – PVA glue or pencil; – scissors; – a coil of wire with a diameter of 0.45 mm; – a simple pencil; – an awl; – a stand for making holes with an awl in the places where the parts of the teddy bear are attached; – a spool of thread; – a black thin marker for drawing the eyes and nose of the teddy bear (can be replaced with black paper); – a toy template – a teddy bear: the base of the toy, the back and front legs (elements of movement), 12 washers PC.
Description of work
Step No. 1. Using a pre-prepared teddy bear template, you need to cut out “clothes” from colored paper to make the toy bright. To do this, mark out the decoration elements for the teddy bear on colored paper. From orange paper - a teddy bear's nose, a blouse (upper body), from blue paper - a tie and panties (lower body).
Step No. 2. Now we cut out all the parts with scissors.
Step No. 3. Using a glue stick, glue the orange parts onto the teddy bear (nose, blouse).
Step No. 4. Then glue the blue parts in the same way: pants, tie, draw the eyes with a black marker and outline the outline of the nose.
Step No. 5. Take an awl and a stand to make holes in the parts - the legs of the toy and on the main part of the teddy bear.
Step No. 6. Take a spool of thread and cut 4 parts from it, each up to 20 cm, then fold it in half (for strength). We pass it through the upper holes into the bear's paws and tie it with a knot.
Amazing Barrel - From a log on a lathe!
Step No. 7. To fasten the parts we will need wire, scissors and an awl.
Step No. 8. You need to cut a piece of wire about 10 cm. Then thread it like this: washer, main part (body), washer, foot, washer. We twist the ends of the wire with a spring using an awl.
Step No. 9. We managed to attach the upper and lower legs to the body in this way.
Step No. 10. On the back side of the toy we tie together the threads of the upper and lower legs. We cut off the excess threads.
Step No. 11. Now you need to connect with a thread the upper fastening of the thread, which connects the front paws, with the lower fastening of the thread, which connects the hind legs of the bear cub, in order to make movements using it, pulling it down.
Step No. 12. The toy - the teddy bear is ready to start playing!
An accordion paper bear is an excellent and easy craft for children. The technique is popular, using it as a basis you can make many funny animals and birds.
The following materials are used in the work:
- Brown cardboard;
- Orange cardboard;
- A simple pencil, a compass, scissors, a glue stick;
- Markers.
Tags
with your own hands with your own hands with your own hands with your own hands with your own hands with your own hands with your own hands Making a barrel with the creativity of a master Fair of Masters who love to tinker and want a master class DIY furniture Do-it-yourself shoes Clothes with your own hands Do-it-yourself candles Do-it-yourself bags Do-it-yourself packaging Do-it-yourself crafts Do-it-yourself barrel Do-it-yourself jewelry
dollsblanksdiameterfabriccanprocessafternowholesurfacesstepprocessingdollsnoscript
How to make a wooden barrel with your own hands
Cooperation is one of the most difficult crafts, so the answer to the question of how to make a barrel with your own hands will also not be easy. This is a very labor-intensive process that requires the performer to have a decent professional level and a large number of tools for wood processing.
Before you are interested in how to make a barrel, you should decide what you need it for. The choice of material and manufacturing method depend on this. This type of container is manufactured for the following purposes:
- for fermentation, aging and storage of spirits, wine and beer;
- for preparing and storing pickles;
- for storing dry products;
- for storing honey, etc.
Beverage barrels have two bottoms and a hole for inserting taps. The same type of container, but without holes, was previously used for long-term storage of certain products (for example, corned beef).
Wooden oak barrel
For other purposes, barrels with one bottom are sufficient - they are also called tubs. They are covered with a lid or a circle on top for oppression. These parts are much easier to make than the bottom. You can make a wooden barrel from such types of wood as:
- oak;
- ash;
- cherry;
- Linden;
- alder and others.
The wood of the first three types is the most versatile. It is equally suitable for containers for any purpose. However, the “champion” should be recognized as the oak barrel, which, being strong, reliable and durable, provides ideal conditions for storing food.
Oak products have antiseptic properties, release tannins into alcoholic drinks, improving their taste, and also easily withstand the effects of brines when preparing pickles.
Ash and cherry are the first “substitutes” of oak wood. They have similar, but weaker properties. Therefore, we will look at how to make an oak barrel with your own hands.
The production of containers from other types of wood, such as linden, has no fundamental differences except for the nuances of finishing.
Oak barrel for honey
Rules for procuring material for barrels
Before you start making a wooden barrel with your own hands, you should prepare and prepare high-quality material. The wood must be mature, healthy, and free from defects (knots, cross-layers)
Wooden barrel base
The best time for harvesting material is late autumn or winter, when the natural moisture content of the wood is at a minimum level.
It is unlikely that you will be able to meet all the requirements. For example, to make staves for wine and cognac barrels of the highest quality category, the process of drying and aging wood takes 6–8 years, but if you are only concerned about how to make a barrel for yourself, adhere to the following rules:
- Before drying, the logs are split into pieces of the required thickness;
- drying is carried out in a place protected from direct sunlight - under a canopy, in a barn, etc.;
- The duration of drying depends on many factors and can take 1–3 months;
- The residual moisture content of the wood before treatment should be about 25%.
Accelerating the drying process using hot air and other methods usually leads to a deterioration in the quality of the wood and its properties in the finished product. Tips on how to make a wooden barrel with your own hands also take into account the need to condition the processed rivets before assembling the product. As a result, the residual moisture content of the wood should be 17–20%.
Making rivets and tools for this
For those who want to make an oak barrel themselves, the most difficult thing will be making the staves. The process of marking and chopping logs is clearly presented in the following figure
Preparing materials for a wooden barrel
As a result, you will receive blanks of conical cross-section, from which, after drying, they are made into rivets. This part has a complex shape, so its production places high demands on the skill of the performer. The main dimensions of the barrel and its elements, depending on the volume, are as follows:
This table will help you figure out how to make a barrel, and the drawing will help you understand how to give the rivets the desired shape
Tool
and what tools you will need for this. The curvature of the sides should provide the barrel with a taper of about 8°, due to which the product becomes resistant to loads from the outside and inside.
To process the surfaces of rivets, a plane, jointer, sherhebel, plow and other tools of this group are used.
In this case, the outer surface of the part should have a slightly convex shape, and the inner surface should have a concave shape.
| Barrel capacity, l | Height, mm | Center diameter, mm | Diameter at the edges, mm | Riveting width, mm | Rivet thickness, mm | Thickness of bottoms, mm |
| 15 | 345 | 295 | 262 | 40–90 | 14 | 16 |
| 25 | 420 | 340 | 300 | 40–90 | 14 | 16 |
| 50 | 535 | 420 | 370 | 40–90 | 17 | 19 |
| 100 | 670 | 515 | 450 | 40–100 | 18 | 19 |
| 120 | 770 | 525 | 460 | 40–100 | 18 | 19 |
Popular containers of our time
For the mass consumer, wooden barrels and ceramic dishes are expensive delights. The most popular and affordable utensils are containers made of glass, plastic and metal:
- Glass. This container is perfect for storing many products. Glass is chemically inert and does not allow moisture and air to pass through. The disadvantage of this container is its transparency and fragility. Plus, glassware is never too big. There are, of course, 20 and 10 liter bottles, but it is not advisable to fill them with honey, because such a vessel will be very heavy. Honey is usually stored in small jars at home, in a dark and cool room.
- Plastic. This material has a low price and light weight. Plastic utensils are attracting retailers. Recently, plastic cube containers adapted for storing food products have begun to be used. However, honey is chemically active. It quickly absorbs plastic odors and some substances. Such containers are not prohibited by GOST and sanitary control, but people still have a prejudice against plastic
- In order to store a lot of honey for a long time, beekeepers usually use aluminum flasks. They are chemically inert, lightweight and easy to transport. Stainless steel barrels should not be used to store honey. Metal compounds quickly pass into the contents of the vessel and make it less healing.
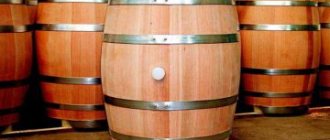
- A barrel of honey is considered the most environmentally friendly way to store a sweet product. The advantage of such containers is that honey in a wooden container only becomes better: it acquires the aroma of wood. It's like cognac, which is usually stored only in oak barrels. It is in this case that cognac acquires its signature oak smell. Linden honey barrels will add shades of the smell of this tree to any honey. However, not every barrel can store a sweet product. A wooden barrel should be made only from deciduous trees.
- In our time, ceramic dishes as a vessel intended for long-term storage of large quantities of food products have lost their relevance. The reason is its relative high cost, fragility and heavy weight in large volumes. Honey pots are popular only as a gift option, which combines the beauty of the form and the taste of the contents.
Honey barrels are usually made from oak, linden, acacia, maple, mulberry and other aromatic, but not resinous, types of trees. The ideal option is linden. However, linden is also an excellent honey plant, so every felled tree is a loss for bees and beekeepers.
A barrel produced specifically for storing a sweet product can be manufactured in the following options with:
- a lid that allows the contents to be hermetically sealed;
- hoops made of various alloys and metals;
- decorative carvings;
- weaving from wicker and jute rope;
- print and logo.
In other words, this is not only packaging for a sweet product. This is a work of art that will decorate any cellar. Moreover, it is a wonderful gift that can please any person who is not alien to the joys of life and the desire for beauty.
What is the best way to ensure safety?
Honey should be stored in any container at a temperature from +5 to +10°C. It is believed that the ideal place for this is the refrigerator. However, you can’t fit a lot of cans there.
If you have stocked up on the product in large containers, then you need to place them somewhere in the underground or the coolest corners of the house, protected from light. Honey in barrels and aluminum flasks can stand without additional shading, but transparent plastic needs to be covered with something dark. The same should be done with glass jars.
Products sent for long-term storage must be checked periodically. This should be done even if storage conditions are ideal.
The fact is that honey can separate, crystallize and ferment. Crystallization is a natural process, but separation and fermentation can occur due to poor quality production. Usually such incidents happen with a product that contains a lot of water. As a result, the bactericidal properties of honey are weakened, which leads to increased activity of fungi and bacteria.
Such honey can increase in size, which leads to leakage from the vessel, tearing off the lid and other troubles. As a result, not only are the medicinal and taste properties lost, but in the absence of a sealed lid, the foaming liquid may leak out of the vessel. For this reason, you should never fill the vessel right up to the lid; you should leave some free space in case the fermented mead climbs like dough, tearing off all the lids.
Bees take a long time to prepare their product. They pass the collected nectar through their crops, enriching it with enzymes, and then dry it for a long time. And only after a sufficient amount of water has evaporated from the sweet preparation, it becomes honey and is sealed with special wax caps.
In an effort to start selling their goods earlier, beekeepers can remove early, not yet dried honey. It cannot be stored. You just need to eat it soon. It is advisable to purchase autumn products for storage, preferably in September.
For long-term storage of honey at home, it is best to use wooden barrels, glass jars and aluminum flasks. Plastic, despite the fact that it is considered food grade, still has its own smell, incompatible with the aroma of the bee product.
Thus, storing honey is a complex and delicate process. The more sweet amber you stock up on, the more care is required to ensure its safety.
Design and principle of operation of homemade products
To understand how a honey extractor works, it is enough to familiarize yourself with its design. Different materials are used to manufacture the equipment, but the principle of operation remains identical for all models: a centrifugal force is created in the drum, under the influence of which the sweet product is pushed out of the honeycomb. Honey scatters along the walls of the barrel, and then gradually flows down. At the bottom of the device there is a hole through which the product enters the container.
Regardless of the internal design, the honey extractor consists of:
There are mechanical and automated models. In the first case, a manual or foot drive is used, and in the second, an electric motor.
Depending on the arrangement of frames, radial and chordial honey extractors are distinguished.
Honey pots: what are they, what kind of wood are they made from
A wooden linden barrel of honey is a harmonious union of two related natural materials. The shelf life of honey in contact with linden wood that is tolerant to it is unlimited! A tub is a container similar to a barrel, only a slightly different shape. It can be made from the same material, the pros and cons are almost the same. The only caveat is that the tub cannot be kept on its side, while the barrels fit perfectly in a horizontal position.
I made a “barrel” bottle decor from jute and cardboard. DIY gifts
Wood for making barrels and tubs: oak, spruce and pine, cedar, linden, aspen, larch, sedge, beech, birch. The best options for storing honey are linden, aspen and chin. Deciduous trees are also suitable: poplar, alder, willow. Although some experts criticize them, giving preference exclusively to linden wood. But an oak barrel, so valuable for storing drinks and pickling, is absolutely not suitable: the honey in it will darken. It is also better to exclude tubs made from coniferous wood: the honey in them will acquire a resinous smell.
Pros and cons of tubs
To store honey, in addition to barrels and tubs made of natural wood, the following can be used:
- glass containers,
- glazed ceramic,
- aluminum, tin coated inside with food grade varnish,
- stainless steel flasks.
Important! Copper, lead, and galvanized utensils are prohibited - honey reacts in them, forming oxides dangerous to human health. Of the permitted types of containers, the palm belongs to linden tubs and barrels.
Advantages of a tub made of linden wood:
Linden lends itself well to processing
- Gives products unobtrusive, very pleasant flavor shades that harmoniously combine with the taste of honey.
- Ease of manufacture. Linden lends itself well to processing. This is a juicy, light and pleasant material.
- Beautiful wood. Of course, this is a matter of taste, and one can argue which is more beautiful: oak, cherry or walnut. But linden, even not being among the top five most beautiful types of wood, has a pleasant appearance. The color of the wood is fresh, white with pinkish tints and a harmonious fiber structure. Products made from linden are bright, cheerful, and light.
- High density of wood, which protects honey well from external influences.
- A linden honey barrel can be kept empty for a long time, the wood has a low percentage of shrinkage, and the product does not lose its insulating properties. They do not need to provide special conditions for storage.
- Linden barrels do not need to be soaked before use, like oak barrels.
- And finally, the elongated and slightly truncated shape at the top allows the honey to maintain its natural structure.
Note! In winter, natural honey acquires a thick consistency. This is a natural and obligatory process: the honey pumped out of the honeycomb begins to crystallize. When stored in a barrel, a dense core is formed, which floats to the top, forming a natural plug. This honey will last for decades.
Crafts from newspapers “Barrel of Honey” ❀
The disadvantages of wooden utensils for honey are due to purely economic issues:
How to make wax candles. Nuances./ The Fetistov family
- such containers are more expensive than glass or plastic,
- when choosing them, you need to “be in the know” so as not to purchase a poorly made barrel,
- Usually they are convenient for storing fairly large volumes of honey, which not everyone can afford.
However, the traditions of cooper craftsmanship have recently experienced a rebirth. Environmentally friendly natural materials and products are highly valued, which is why wooden tubs and barrels for honey are increasingly being bought and sold. And if this valuable household item is made with your own hands, it will bring even more pleasure.
Barrels for honey
- discount Barrel 0.3 l. (linden), waxed, hoop (rope)
- discount Barrel 0.5 l. (linden), waxed, hoop rope
- discount Barrel 0.75 l. (linden), waxed, hoop (rope)
discount Barrel 1 l. (linden), waxed, hoop: (gold)
discount Barrel 1.5 l. (linden), waxed, hoop: (gold)- discount Barrel 1.5 l. (linden), waxed, hoop: (pigtail)
- discount Barrel 3 l. (linden), waxed, hoop: (pigtail)
- discount Barrel 3 l. (linden), waxed, hoop: (gold)
- discount Barrel 1 l. (linden), waxed, hoop: (pigtail)
- discount Barrel 0.75 l. (linden), waxed, hoop (braid)
- discount Barrel 0.3 l. (linden), waxed, hoop (gold)
- discount Barrel 0.3 l. (linden), waxed
- discount Barrel 0.5 l. (linden), waxed
- discount Barrel 0.5 l. (linden), waxed, gold hoop
- Barrel 15l (linden) waxed, lid with rope handles
- discount Barrel 0.75 l. (linden), waxed
- discount Barrel 0.75 l. (linden), waxed, hoop (gold)
- discount Barrel 1 l. (linden), waxed
- discount Barrel 1 l. (linden), waxed, hoop: (rope)
- discount Barrel 1.5 l. (linden), waxed
- discount Barrel 1.5 l. (linden), waxed, hoop: (rope)
Bee protection
The leadership of the US, EU and other countries are trying to take concrete measures to prevent or slow down the development of events regarding the extinction of bee colonies in some areas. Issues of protecting beekeeping and the bees themselves are discussed not only at scientific and beekeeping forums, but also at meetings of governments and parliaments.
Various public campaigns are constantly being conducted that are aimed at protecting bees. Various environmental organizations, individual food industry and agricultural companies are constantly joining these campaigns. Numerous monographs are published, documentaries are made, and materials from various journalistic investigations are published.
Beekeeping is constantly analyzed by scientists. Over the past 3 years, approximately 200 different reasons have been reviewed that can cause mass deaths of bees throughout the planet or in certain regions. Half of the scientists place the main blame for all the modern ills of beekeeping on the use in agriculture of pesticides that are deadly to bees.
This point of view is supported by the majority of members of the International Association of Beekeeping Associations, in particular their president, Gilles Ratia. Other reasons include varroa mite, beekeeper mistakes, depleted diet of honey bees, bee diseases, bee parasites and viruses, climate change, environmental pollution, as well as constant interaction between all factors and a certain “still unknown” factor. .
Since 2008, two UN agencies have been involved in the protection of bees and other pollinating animals: the Food and Agriculture Organization (FAO) and the Environment Program (UNEP), which have been allocated approximately $25 million for these purposes. Pollinator protection ( bees in particular) is included in the development strategy of the World Organization for Animal Health (OIE). So, beekeeping is under reliable supervision.
Installation and operation
To install the honey extractor, you should find a good stand. Beginners can get by with a simple box or basket. To prevent the device from falling, it is better to strengthen the structure with steel rods and metal rings, welding them at the corners.
Before starting the honey extractor for the first time, you need to thoroughly rinse and clean its parts. After making sure that the internal parts are clean and dry, you can place frames with printed honeycombs into the cassettes and start rotating. Place a container under the hole for draining the bee product.
The key rule for operating the equipment is high-quality fixation of the tank. This guarantees comfortable pumping of honey and protects parts from deformation.