A pusher is a device for the housewife or owner if he cooks in the kitchen. Used for crushing and kneading berries, potatoes, etc. when preparing food. This is a universal device, especially for berries, making it a very convenient tool for the kitchen. You can also use it as a rolling pin to roll out something. It is especially pleasant to see the reaction of women to a homemade masher - they are delighted: how is it possible, a new masher made from some kind of log, its appearance causes genuine surprise. This is a very interesting item that is difficult to find in a store, but making it yourself is quite simple if you have the skill.
We will show you how to make a masher on a lathe from wood, almost from a log. In our example, a homemade machine is used. So, the log is already inserted into it. The author of the video tutorial preferred to make the handle to fit his own hand, since it is larger than a woman’s hand and, presumably, it will be uncomfortable for him to work.
Now you need to move on to the decorative part. For beauty and convenience, varnish the handle to make it more beautiful. It can be coated with any wood varnish. The master uses furniture nitrocellulose colorless varnish. And coating a wooden masher with varnish is very simple - turn it on and set the rotation to minimum.
So, all that remains is to wait until the pen dries, for this you need to wait about thirty minutes and then sand it with sandpaper.
After a certain time, you should slightly trim the contours of the product. Well, perhaps the work is finished. You just need to remove the device and saw it off. And finally, we smooth it out and sand it with sandpaper. After the master grinded the ends, he lightly sanded the product in a circle. As you can see, everything worked out great.
Source: izobreteniya.net
What is
The appearance of this piece of kitchen utensil is associated with the spread of potatoes in Europe. This began en masse in the 18th century. Tuber puree became a common dish in the last century. In each country it was made using a device consisting of a vertical handle and a working area. Today, a puree masher is also used in households. Sometimes it is also used for chopping refried beans, vegetables, and apples. It helps in creating some types of sauces.
The handle makes it easy to use while the potatoes are still hot. Boiled tubers do not come out of the pan. The crusher is easy to clean from food residues. The cost of the product is low, it is affordable for any family. Takes up little space.
It takes some effort to get the perfect puree. You need to thoroughly mash each potato. It’s especially difficult to start work, so you can’t do it without strong hands. As a result of the effort and time spent, you will get a wonderful side dish.
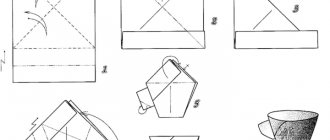
Presentation for the technology lesson “Drawing of a pusher”
The presentation shows sequentially (through animation) the process of making a drawing of a pusher
Target audience: for 6th grade
Author: Masalitin Nikolay Ivanovich Place of work: MAOUSOSH No. 2 of the village of Uspensky Krasnodar Territory Added by: nmasalitin
Physical education minutes provide short-term rest for children during the lesson, and also help switch attention from one type of activity to another.
Dear Colleagues! Add your presentation to the Teacher Portal and receive a free certificate of publication of teaching material in international media.
Subscribe to the Teacher Portal mailing list and receive links to new lesson developments, presentations, tests and other teaching materials by email. It's free!
Diploma and certificate of publication for each participant!
© 2007 - 2022 Community of subject teachers “Teacher Portal” Media registration certificate: El No. FS77-64383 issued on December 31, 2015 by Roskomnadzor. Distribution area: Russian Federation, foreign countries. Founder: Nikitenko Evgeniy Igorevich
Use of site materials is possible only with the permission of the portal administration.
Responsibility for resolving any controversial issues regarding published materials and their contents is taken by the users who posted the material on the site. The portal administration is ready to provide support in resolving any issues related to the operation and content of the site.
Source: www.uchportal.ru
Varieties
There are a lot of potato mashers in the world. They differ in the type of working surface, shape, and material of manufacture. Despite such diversity, the item is easy to distinguish from other kitchen utensils.
The first crushers include stone devices of the ancient world. With their help, herbs, nuts, and roots were crushed. They looked different in different nations. Modern models are distinguished by sophisticated style and practicality.
Holders are made of wood, metal, plastic. To save space, models with folding handles have been invented, when the design has a steel roller that holds it in a vertical position.
There are museums where potato crushers are exhibits. Their variety is impressive. An example is the Potato Museum in Idaho (USA).
By type of pressure surface
The main part of the device is the pressing surface. It can have a wide variety of types. A frequently encountered model is a disk with holes. The tubers pass through them, as if through a meat grinder, turning into puree. The mashed potato masher may look like a zigzag. There are designs that combine both types - after the steel tubes there is a disk with small holes.
Solid options came from past centuries. They are easy to wash and can be used for crushing various products. In some villages they still make devices for crushing root crops and vegetables with their own hands. For this, a pine branch is used, at the end of which there are many sprouts. It is cleaned, the branches are cut, and bent in the opposite direction. The result is a handle with 5-6 bent knots. Passing through them, the potatoes are crumpled and mixed.
Modern models include metal spirals that resemble a whisk. Pushers in the form of paddles with many holes are practical. After making the puree, you can apply it with the same object. One utensil replaces a potato masher and spoon.
According to the shape of the pressing surface
The shape of the working surface is most often round. But there are also square, rectangular, crescent, and oval options. The holes are made in the form of round holes of various diameters, oblong slits. In solid models, the pressing surface contains protrusions that crush the root crop.
The effectiveness of original form models is difficult to assess. The pusher in the shape of a rocket looks unusual when the working surface consists of 12 rounded parts, reminiscent of smoke from a launched ship.
According to the material of manufacture
Among modern potato masher, one cannot single out a leader in terms of material type. Each of them has its own characteristics of use. You need to focus on efficiency, ease of cleaning, and safety.
- Metal products are light in weight and can mash several potatoes at once. To prevent aluminum from entering into a chemical reaction with products, it is coated with a special compound. Once it wears off, the potato masher becomes unusable. Models made of medical stainless steel, consisting of chromium and nickel, are more durable. The utensil is not suitable for Teflon-coated pans or ceramic containers. Preference should be given to models made of solid metal.
- Wooden masher consists of a pestle with a solid pressing surface. It is better to use juniper, which practically does not absorb moisture. The utensil is not deformed and preserves the inner layer of the pan. The disadvantages include the inability to prepare large quantities of puree and the absorption of odors.
- Plastic crushers weigh little, have a variety of shapes, and are compatible with all coatings, including non-stick ones. But such products break quickly and are only suitable for kneading warm potatoes. At high temperatures, plastic releases toxic compounds.
- Silicone - made from modern material, they are durable, suitable for hot products, can be cleaned in the dishwasher, and do not damage the dishes. Models can be used for no more than five years, after which they emit chemicals that are harmful to humans.
- Teflon - metal products coated with a special compound do not deform, preserve dishes, and mash large portions of potatoes. They require careful handling, since the Teflon coating can break off from mechanical stress or aggressive detergents.
If a wooden product begins to emit an unpleasant odor, it must be treated with a special solution. To do this, take a teaspoon of baking soda and clean water. The item is soaked for half an hour, rinsed with running water, and completely dried.
Making a crush
First of all, we take a grate from a meat grinder (I just had an extra one, so not a single meat grinder was damaged) and a hexagonal rod that fits the diameter of the hole in the center of the grate.
Next, we clamp the rod in a vice and grind it with an angle grinder and a flap disc.
Then I took an ordinary wooden handle, the kind usually used for hand tools.
We wrap it in a rag, clamp it in a vice and drill a hole along the diameter of the pin.
Then we also clamp the drill in a vice, put a handle on a piece of a pin and sand everything with sandpaper.
After sanding, you can oil everything for shine and smoothness.
Then, to ensure that the handle sat tightly on the stud, I used two-component welding.
Next, we clamp the pin in a vice, place the grid on it using a hammer and secure it with welding. Then we grind everything using an angle grinder.
And it turned out to be such a wonderful masher!
Now you can try it out.
This homemade masher copes with its main task perfectly, and nothing more is needed from it. Bon appetit!
Although no, she is still very comfortable cracking nuts)))
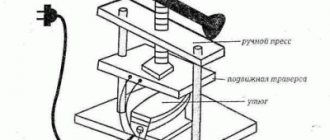
Puree press
The mash press allows you to make perfect mashed potatoes without any lumps. This is achieved thanks to small holes located evenly in the base, on the sides of the base. The mass of tubers is saturated with air, making it light and tender.
Main advantages of the press:
- It is not necessary to drain the water - it will drain from the holes;
- saves time - in one click you get a plate of side dish;
- ease of the process - fill the container 2/3 with potatoes, press the lever;
- practicality - it can be used for preparing a variety of purees, juices, and mousses.
You need to choose high-quality products without damage, with well-treated seams. Some models may cause rust. It is important to wash the press completely to prevent rotting.
The classic model includes a handle, a piston, and a container with holes in the base. The device has two holders. There are designs with replaceable disks in which the holes differ in diameter and number. Some devices resemble a mill because they have a rotating handle.
Famous brands
The product will serve for a long time if you choose it taking into account the basic criteria. It should be durable, with a non-slip handle. Lightweight models are more suitable for work. Burrs, cracks, stains, and roughness on the surface should alert you. A foreign chemical smell is a reason not to choose this crusher.
List of famous brands:
- WMF is a German manufacturer that creates stainless steel crushers.
- Rondell, a German cookware manufacturer, makes stainless steel mashers in the shape of a bent spatula.
- Gefu - utensils from Germany, the material is stainless steel.
- Tefal is a French company that produces models made of plastic, coated with Teflon.
- Krauff, a German manufacturer, creates pusher blades from durable food-grade silicone.
- Tupperware is an American company that produces a solid steel model with a round base and oblong holes.
The most convenient diameter of the working surface is considered to be 7-8 cm, the handle should be 25 cm long. The loop for the handle allows you to secure the product to the railing.
DIY potato masher
Authorization on the site
How you can make a wonderful potato masher with your own hands from scrap materials.
Hello to all DIY lovers! I’ll say right away that, of course, you can very easily buy such a pusher in a store and not worry about it, but it’s always more pleasant to use something made by yourself! This is of course my personal opinion, but I think that many will support me.
It turned out that our pusher broke, its plastic handle and the platform itself fell off. There was no point in repairing it anymore, but I had half an hour of free time and all the necessary materials.
Drawing of a wooden crusher
Sawmilling and woodworking waste from the most common coniferous and deciduous species is used as raw material for the manufacture of various household products.
In order for the products to better retain their shape and size and not come apart, they are made from dry wood. On collective farms, state farms and inter-farm associations, wood must be dried to a moisture content of 10.12% before processing. In organizations and enterprises that do not have artificial dryers, natural air drying is performed. Then the products are dried on racks arranged in workshops near central heating pipes.
KITCHEN CUTTING BOARDS
Kitchen cutting boards are designed for cutting dough, cutting meat, sausage, cheese, cleaning fish, vegetables and fruits (15, 16). They are made in various sizes from soft hardwood and softwood (9). The following defects are allowed in the wood: hard knots, fused, size ds 15.20 mm, in the amount of 3 pieces, on a board with an area ds 0.1 m2, cross-layer with deviation of the fibers from the straight direction up to 10 cm per 1 m of length, redness and hard darkness, false core, curling, blueness, through cracks no more than 5 mm long at the ends, tarring no more than 5 mm deep. On the front surface of the boards, superficial traces of tobacco, loose falling knots, sprouts and tar, as well as shells and hard fused knots (at the junction of the handle with the board) are allowed.
The preparation of elements of kitchen cutting boards should be mechanized as much as possible. For this purpose, auxiliary enterprises, collective farms, state farms and inter-farm organizations for the production of household wood products use circular saws and pendulum saws, planing, drilling and grinding machines.
After sorting the waste pieces by size and type, they are cut to a given length and the handle is cut out. If the waste is taken from unedged material, then its edges are sawn down to width. After this, the layers, edges and ends of the boards are thoroughly planed, as well as sharp corners are rounded and handles are processed. The surfaces of the boards must be flat, smooth, cleanly and evenly planed, and the front surfaces of the boards must be sanded. The edges of the cutting boards that make up the board must be tightly grooved without gaps, the dowels fit tightly into the grooves, and the sides are adjacent to the edge and ends. Sharp edges on the handles, edges and sides of the boards are removed and rounded. The joints of the sides are cut “on a mustache”. The boards are secured with nails no longer than 50 mm (the number of nails is at least 3 in each board). The panels of each board are assembled from wood of the same species. A hole with a diameter of 15.20 mm is drilled in the handle on a drilling machine. Finished boards are inspected and marked. Boards of the same size are folded in pairs so that their front surfaces touch and placed in bundles.
The following deviations in the dimensions of kitchen cutting boards are allowed: length ± 10 mm; width ±5 mm; thickness ±2 mm. Kitchen cutting boards are manufactured in accordance with OST 13-35-83.
Lesson 17. Kitchen set
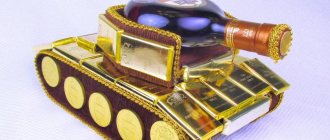
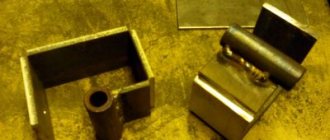
A magnificent decoration of any home will be a kitchen set (Fig. 204), the use of which will bring pleasure to the most whimsical housewife. This work fits into any interior - both traditional folk and modern. (For templates, see Fig. 213-216).
The set consists of the following eight parts:
- base;
- suspension;
- rolling pin;
- masher;
- two cutting boards;
- two pins for hanging boards.
1. Start by making the base. For it you will need a plank or a lath, which must be cut to the dimensions shown in Fig. 205.
2. Then make the pendant (Fig. 206). For it you need to prepare a board 170 x 65 x 10 (Fig. 207, a), and use a template to mark (Fig. 207, b), drill two holes Ø24 mm (Fig. 207, c), and make cuts with a jigsaw ( Fig. 207, d), cut off the corners and grind sharp edges (Fig. 207, e).
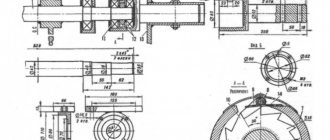
3. For a rolling pin (Fig. 208, a) and a masher (Fig. 208, 6), you need two bars, the cross-section of which should be square: 45 and 55 mm. These items are easiest to make on a lathe in the school workshop. If this is not possible, they can be done manually.
Technological map for making a rolling pin by hand
4. Draw up a technological map for the production of a crusher similar to this map. I think that you will cope with this task, especially since many operations in the manufacture of a pusher are repeated.
5. You have templates for making cutting boards, so mark them using them. Then saw and sand as always.
The preferred thickness for boards is 15-20 mm, since they will be used for their intended purpose and will experience sufficient loads when cutting meat and fish, preparing chops, etc.
6. You can use dowels as pins for hanging cutting boards. You know that their diameter is 8 mm, and calculate the length yourself, taking into account the thickness of the board and base.
When all the parts are ready, use screws to connect the base and the pendant (Fig. 209), make sure that everything fits perfectly, separate these parts and begin marking the threads.
The middle of the base is decorated with a “rosette” and “sparkles” with long rays, which are located inside the radius lines. The first figures are well known and understandable to you. Cut the radius lines using the “straw” method. But here it requires very great care when performing, since it is one of the main elements of the composition.
The “sockets” along the edges of the base have new elements. These are flat rays. In Fig. 210 they are designated by the number 2. They are not cut, but are revealed by cutting “straws” 3 and elements 4. The surface of these rays can be covered with small holes using an awl. This will make the composition more decorative.
You will find the same rays on the handle of one of the cutting boards.
In previous lessons, you performed carving only on a plane; now you will have to do this on the cylindrical surfaces of a rolling pin and masher.
Actually, the thread itself will not cause any difficulties. The difficulty lies in the markings. To make parallel lines, you need to make the simplest device - a strip of hard paper. In our case, the width will be 12 mm. Wrap it around the rolling pin and draw parallel lines (Fig. 211).
To apply a design to a product, first draw it on a paper template, the length of which should be equal to the circumference of the rolling pin or masher. If it matches, then apply it to the product using the same dimensions and cut it out.
Cut out lines parallel to the ornament using “straws”.
Concluding the lesson, I want to please you with another new element - “honeycombs”. In Lesson 10 you were introduced to "honeycombs", but there they were completely different. A new variety is now offered (Fig. 212). It is she who decorates one of the cutting boards. It's easy to do. The point of piercing is at the intersection of the diagonals, and piercing occurs on all four sides. Pruning is carried out in the same way as when making “pegs”. The result is a concave honeycomb.
All other elements are already known to you, and you can easily cope with them on your own.