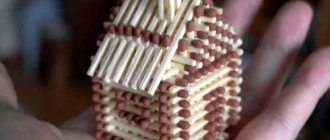
The “quilling” style is no longer new, but for some reason it is associated mainly with non-voluminous compositions. Paintings, postcards - yes, but did you know that this technique can also offer a three-dimensional object? The box made using the quilling technique is a clear confirmation. Moreover, it can be quite a durable thing if it is made correctly. Read a variety of step-by-step MKs that will be clear to beginners, improve your skills with each new work. Moreover, what you made with your own hands carries your energy - take advantage of this by filling your home with objects that bring joy and positivity!
Quilling box: required accessories
Tools for quilling have long been invented to make it comfortable for the craftsman to work with paper. With the help of such things, the process of rolling paper becomes simple and relaxing. Work is more like a relaxed vacation that clears the mind and calms the nerves. Many people lack the latter after difficult work.
Quilling kits can be purchased at a craft store or ordered online
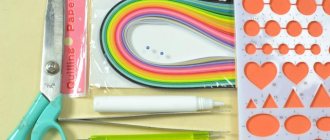
Kit for creating a quilling box:
- Quilling tool. Its role is either a specialized tool from the store, or improvised material - an awl, a toothpick, a knitting needle. The main condition for a homemade tool is a slot to secure the paper. The secondary thing is strength, it concerns the wood.
- Tweezers. You need flat tweezers, without distortions and with easy fixation. Otherwise, the paper may become deformed.
- Sharp and serviceable scissors.
- Sample. For it, you can use a ruler, which contains various shapes for tracing.
- Glue. PVA is possible.
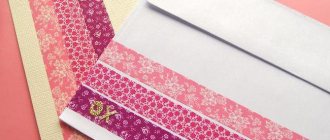
- High density paper for the base of the box.
- Colored paper for quilling.
The main thing in quilling is paper. Do not use hard paper or regular offset paper. It is enough to purchase school colored paper at any stationery store.
Having the tools and material, you can begin making the box. But first you need to understand its design.
Manifestation of creative imagination
Quilling will allow you to realize various ideas. One of the main directions is making gifts. You can turn the simplest thing into a masterpiece that will delight anyone.
If you are passionate about this type of creativity, you can constantly update the interior of your apartment. It’s great when adults and children are involved in the process; common hobbies create a special atmosphere in the house.
Quilling is a fun activity for the whole family
In order to get the most ideal solution, you should purchase high-quality paper. There are special strips on sale that will allow you to quickly get started.
The main feature of quilling is the fact that you must approach the process carefully and responsibly. You need to be patient and careful. Creating large paintings will require perseverance.
Sometimes a project involves twisting several hundred tubes, all of which must be identical. Therefore, there is no hurry. If you want to get a beautiful result, the process will take a long time.
Quilling boxes: patterns for independent work
The scheme for creating the box is no different. It is important to work on its elements step by step. Quilling boxes have a special feature - creating decor. Here the master has freedom for imagination, since the body, as a rule, is made of durable material. And only then comes the process of decoration.
The decoration of the external walls consists of decor. To create it, use the following schemes:
- Spiral. It is created using the technique of directly winding paper tape onto a needle.
- Free spiral. It can be created in the same way, but you should let it unravel before sealing the end. Only then should the end be glued. It turns out to be a magnificent decoration.
- A drop. It is created similarly to a free spiral, only one side opens.
- Curved drop. Created by pulling out one side.
- Eye. The opposite sides are pulled out.
There is a wide variety of patterns for quilling boxes that can be easily found on the Internet.
These are the simplest circuit diagrams. You can master them at an early stage.
Next are more complex elements:
- A triangle is a free spiral compressed in 3 places.
- A leaf is a free spiral bent in one place. The extended end is bent down or up.
- Arrow – after creating a triangle, you need to squeeze its 2 corners towards each other.
- Crescent - Somewhat similar to an eye, but the ends should be curved in one direction.
- The bird's foot is made from a triangle. You need to squeeze 2 corners towards the third and press firmly.
When creating complex shapes, you need to work carefully with the paper and avoid bending or excessive compression. If you are not careful, the paper will tear easily. For examples, you can look at pictures on the Internet.
Using the presented schemes, you can create decorations to suit your taste in boxes. By combining them with their location, craftsmen achieve the attractiveness of their projects. At an early stage, it is important to learn how to make all the elements, and only then begin to use them widely in boxes.
Quilling for beginners step by step with photos - instructions
There are many options for making crafts that you can use to please your loved ones. One of these is making a painting using the quilling technique. Creativity requires perseverance, time and certain materials. Let's look at the quilling technique for beginners step by step with photos.
Understanding the concept of quilling
Even those who see one of the crafts using this technique for the first time immediately understand that quilling is a work based on twisting paper. You can make both flat and voluminous crafts from paper spirals, these can be:
- framework;
- paintings;
- figurines;
- postcards;
- albums.
It is believed that the founders of this technique were monks who cut off the edges of gilded books and wound these parts onto bird feathers. Thus, imitations of gold engravings were created.
Finished works using this technique look original and beautiful. But before we start making and consider quilling crafts for beginners, let's get acquainted with the available tools that you will need.
Selecting the ingredients correctly
We have compiled a list of the most necessary ones and added a few recommendations to them that will help you understand how to do quilling.
Let's start with the basics. Paper strips are used in crafts. What you need to know about this material:
- The strips can have different widths from 3 millimeters to 1.5 centimeters. You can cut them yourself, but it's a painstaking job. You can purchase a special cutting machine, but at the initial stage, it’s enough just to purchase them ready-made in a specialized craft store.
- It should also be taken into account that the stripes for these crafts are completely the same color on all sides. In ordinary colored paper, the edge turns white when cut.
- Today, stripes can be purchased in a wide variety of colors, from metallic to glitter-coated. Which one to choose depends on the final goal and your imagination. You can purchase a set with the same shades or transitional shades.
- Their length is standard and corresponds to the length of an office sheet of 29.7 cm. If necessary, you can cut them yourself to the required length or, conversely, increase them by gluing.
A special handle is used as a twisting tool. What you need to know about this tool:
- They are different. This is a metal or wooden handle with a fork or ball at the end. A ribbon is inserted into the slot of the fork and twisted to form a spiral.
- The tip of the pen can have different heights from 3 millimeters to 1.5 centimeters. That is, the parameters are selected in accordance with the width of the paper strips. It is better if your set has several options for handles.
- By the way, you can make such a pen yourself. Take a needle with a large eye. Separate the tip of the ear and you will get a fork, and simply attach the tip to the cork. (Homemade handle)
Template with diameters. In simple terms, this is a wide ruler in which circles of different diameters are cut out. It is convenient if you need circles of the same size. You simply twist the tape, insert it into the desired circle and get the perfect workpiece.
In stores you often find rulers with only circles, but if in the future you are going to seriously engage in this type of creativity. You can purchase other rulers with various geometric shapes.
You will need tweezers for this work. They are also different. The most popular is the one with the tips down. If you don’t have a special one, you can use the regular one from the manicure kit.
Tweezers are an important component in the work. Only this will allow you to press the glued paper tightly and carefully lay the spiral into the template.
Another important material in quilling is glue. It is better to opt for high-quality pencil glue or transparent glue.
These are the basic materials and tools you will need if you are just starting to learn this technique.
Now let's get down to work and look at quilling crafts for beginners.
Learning to make basic elements
Craft lovers are always looking for something new. We have already made origami with you, but quilling can surprise everyone.
First of all, let's try to learn how to make basic figures together with megamaster.info. The skills will be useful if quilling for children is being considered. By making crafts, the child will develop fine motor skills.
What we need:
- double-sided paper or special tapes;
- toothpick or special pen;
- scissors;
- ruler;
- glue;
- pencil.
First prepare the strips for quilling. You can cut them from double-sided colored paper. Let's start with a simple spiral, it is very easy to make. We begin to roll the roll using a toothpick. Depending on the size of the spiral you need, the paper can be slightly loosened or, conversely, tightened.
To fix the spiral, you need to lubricate the tip with glue and fix it. You can simply hold it with your hands or use a paper clip.
The next basic element is called a droplet. We wrap a strip of paper around a toothpick. We don't make it too dense. When the spiral is ready, on one side we press the ends together with our fingers. Next, lubricate the tip with glue and press it.
And one more detail is performed in the same way. Roll up the paper. We repeat the action as with the droplet, but now we need to press the roll on both sides. So, we get an element called “eye”
These basic elements only take a few minutes to make. From them you can make a wide range of crafts using the quilling technique.
Additional elements in quilling
We have examined three basic elements, but if you are considering how simple quilling and more serious crafts are done, then it is better to familiarize yourself with other details. Let's consider a few more options for elements:
- Above we learned how to make a simple spiral. But this was a way to make a tight roll. For a large part, you need to slightly unravel the finished spiral to the desired size. By the way, the ruler we talked about in the materials can help you get the desired diameter. You should also take into account that a tight roll can be glued to the surface, but a loose one needs to be treated with glue only in the center and along the edges. After gluing, the center of such a spiral can be directed in any direction, so the future craft will turn out even more beautiful. In the future, we will take this loose roll as a basis.
- The droplet can be rolled up even more beautifully. We roll the spiral, making it flattened on one side. Bend from the sharp edge. For convenience, you can use a pencil. You can bend the droplet on both sides. So, we will have a beautiful month.
- You can make a heart. We use a roll for this. On the one hand, we compress it, and, on the other hand. We push through the center.
- If necessary, you can make a variety of geometric shapes. For a triangle, twist a strip of paper. Unravel and add three corners to the resulting circle. You can also have a diamond. We create something similar to an eye, then we press the sides of it like this. So that corners are formed on the sides. But making an oval is very simple; just gently press the sides of the circle.
- The square is made by pressing on the circle from four sides.
- Now let's make a semicircle. Let's just make one of the sides of the circle flat. You can get a bell from such a figure, you just need to press harder on the corners.
- The following figures will help you detail the finished painting. You can make an onion from a semicircle. Flatten it on the opposite side from the flat one.
- You can also make a star. A simple one is made like a diamond, but a five-pointed one is more difficult to make. Let's add five corners to the spiral.
- There is another way to make unusual elements. For this method, twist the roll tightly. We do not glue the end. Slightly unravel the part and give it an oval shape. We unravel the spiral, we get a figure with interesting curls inside. It is ideal for making flowers.
Based on the figures discussed, it becomes clear that the principle of quilling is to create details using your imagination. We twist, bend and create crafts.
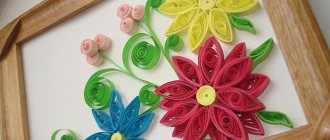
Using all of the listed elements, you can make any picture, for example, a butterfly. But first, let’s look at quilling crafts for beginners step by step with photos and instructions.
Summer flower quilling master class
A simple example of making a flower using the elements that we discussed above. What you will need for production:
- quilling strips (green, white and orange);
- pen;
- scissors;
- White list;
- PVA glue;
- ruler with circles.
Let's start creating the flower:
- Take two green stripes and one white. Glue them together at the ends. Place the white one in the center. We twist a roll from one large ribbon. Insert the workpiece into a medium-sized circle on the ruler. Unravel the spiral. Glue the tip. After this, we form a figure called an “eye”.
- We glue four more blanks. We twist the spirals. We place them in the same circles. We give the remaining four spirals a flattened shape on the sides. We bend them so that they fit snugly against each other with the rest of the elements. Glue the resulting petals together. Press tightly. In total we will need to make three such petals.
- We move on to stripes of orange and white.
Glue three strips into one. On one in the center we place the color orange, on the other white. We twist the part. Place the spiral in the middle circle. Glue the end together. Using tweezers, we shift the center of the roll, and on the other side we push the edge to form an angle. We treat the smooth edges with glue and glue them together. We twist the second multi-colored ribbon. We repeat the work. - Now take one wide orange ribbon. Glue a thin strip to one side. We cut fringe from this part.
- Take a sheet of white paper. We draw a circle that was used for twisting. Inside we add another circle and separate these circles with two lines. Cut it out. We will need six of these parts.
- Glue petals with an orange surface to one of the circles. Gently bend the circle from below so that the petals rise. We take our fringe, twist it and place it in the center of the flower.
- Now all that remains is to apply glue to the circle below and glue the flower to the leaves.
Done, the quilling master class on making a flower is over. You can make the rest of the flowers yourself using a similar pattern.
You can also make beautiful flowers from corrugated paper
Bright picture with a ballerina
Now let's try to create a beautiful picture with a ballerina. We will add many beautiful elements to it. To make it, use paper with a variety of colors, the brighter they are, the better. And to make parts, use our quilling patterns. What you will need for the painting:
(Ballerina template)
- quilling strips;
- white sheet of paper;
- ballerina template;
- scissors;
- quilling pen;
- glue.
Let's start creating a picture:
- Let's glue several multi-colored strips into one big one. For one large stripe we use three standard ones. Using a quilling pen, twist the spiral. Seal the end of the roll with glue. Therefore, on the same principle, we also make multi-colored twists. We will need a lot of them.
- Now we take about six strips of regular size and twist them into a spiral without a handle. Let's disband. We glue the ends with glue. We cut off the ends to make the edge smooth. Make about four of these parts. You can use different colors or shades of the same color.
- Let's take a few more multi-colored stripes. Let's cut them into small strips. From each individual part we will form a shape similar to droplets. If you want to make quilling droplets just go back to the quilling patterns above. Make as many of these details as possible too.
- Now let's print out the ballerina template. Cut out the silhouette and glue it on top of a white sheet of paper. The base is ready, all that remains is to decorate it.
- You can decorate your painting as you wish, the main thing is to show your imagination. We attach three twists to the ballerina’s leg. We attach the figures that we made in the second paragraph. Decorate the top with rolls and drops.
- From the figure located at the bottom left, we begin to lay out the remaining spirals. We lay them out in a neat wave towards the ballerina’s hand and add them above her head.
- Decorate the picture with the remaining elements. Let's add a few more curls at the bottom and glue the droplets. Try to make the bottom part of the picture the most saturated and bright. When decorating a picture with quilling details, do not cover the ballerina, she should remain the main accent.
Ready.
This is how you can create real works of art using elementary paper details.
For those who like to develop in other directions, we recommend trying the scrapbooking technique
Source: https://megamaster.info/kvilling-dlja-nachinajushhih/
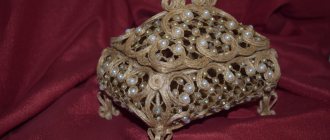
Quilling box step by step: progress of work
As an example for novice craftsmen, the creation of a box is given, which will simultaneously take on the functions of a vase. That is, she will be able to store things and decorate the house with flowers placed in it. You'll have to work hard to create it, but the time spent is worth it.
To make the box stylish and original, you should use paper of different colors when making it.
First of all, flowers are created, the work progresses in stages:
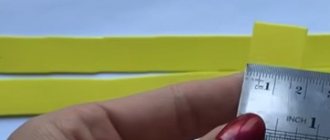
- To do this, you will need colored paper, cut into strips 1 and 0.5 cm wide. Narrow ones must be the same color. There should be 5 dozen strips in total.
- On wide strips, fringe should be applied two-thirds of the width.
- The ends of the wide and narrow tapes are glued together with glue.
- The resulting strip is wound around the needle. You need to start with a narrow strip and end with a part with fringe.
- After twisting and gluing, the fringe of the flowers straightens out. The result was daisy flowers.
The wider the color palette, the brighter the decor of the boxes will be. But you should not make the color scheme too colorful.
You can use any type of flowers for decoration. You can use roses - they are easier to make. Minimalism will help reduce time. At the same time, complex elements will make the product more expensive.
A little history about quilling
Unlike other types of needlework, little is known about quilling. According to one version, Catholic nuns were the first to start doing this in the 14th century. The products were simple, but nevertheless they quickly attracted the attention of society ladies. Since then, only wealthy people have been engaged in this type of needlework. Over time, it began to be practiced in other countries, where various techniques were invented.
Today, not only noble people engage in such handicrafts. This is a completely affordable hobby, so absolutely everyone can afford it. Of course, in the initial stages you will need to learn different ways to curl strips of paper. But over time, you will be able to create real masterpieces that you can decorate your room with and even give as a gift.
Quilling vases and boxes: making lids
A homemade vase-box will have an egg-shaped base. The choice of an unusual shape is associated with the dual purpose of the product. A square box will not look like a vase with flowers. And on the semicircular frame, multi-colored buds made with your own hands using quilling will harmoniously be placed.
If you are a beginner, then you should make crafts using the quilling technique from compositions that do not contain complex elements
The process of manufacturing the upper part of the frame step by step:
- You need a hard lid, shaped like an egg. It can be made from cardboard in the absence of such on the farm. Or use a real egg.
- Wrap in film and seal.
- Cover the frame with paper on all sides with 4 stripes that will intersect at the tip of the egg. Glue the flowers onto the paper frame.
- The gaps should also be filled with flowers.
There is no need to rush to cover the frame with flowers, since the hive must dry. If there are too many gaps, then you should glue the petals to the flowers.
The resulting herbarium on a paper frame must be removed after the glue has dried.
Tips and ideas
Draw several sketches of boxes in advance and choose the one that suits your work. It is unlikely that you will find any specific templates, and this is not necessary - your imagination will help better!
Step-by-step descriptions are great to begin with, but later you need to try some new ideas yourself. How to make other figures, in addition to boxes, see the photo. The entire box may generally consist of the same elements:
Not only is the entire box assembled from quilling, but also individual elements are simply decorated:
But boxes can be made not only from paper. For your child, you can prepare a whole puppet theater:
Very voluminous things will be made from corrugated cardboard:
And the video will tell you step by step and show you about “quilling” what remains unclear in the pictures.
How to make a quilling box with your own hands
The final part remains - to create the lower part of the future vase-box. To do this, you need to paste over the form and decorate it. Some decorations will serve as supports. Therefore, their creation needs to be given increased attention. The stability of the homemade box depends on them.
Before you start making a box using the quilling technique, it is recommended to study the advice of experts and watch a master class
Bottom form creation process:
- Cover the bottom part of the base with film. Fasten the frame tape along the edge of the widest part. The ends should be tightly glued
- On the frame tape you can glue decorative details in the form of square rolls that have been pre-twisted.
- This way the entire lower part is covered.
Rolls should be made in the color of the entire frame – green. They should be about 8 mm in diameter. You can play with the size.
The stand of the vase-box is made from decorative elements. To do this, you will need to create 16 shapes in the form of tree leaves from green paper and arrange them in a circle. The box is installed on this stand, the lower part of which is connected to the stand. The craft must withstand the load.
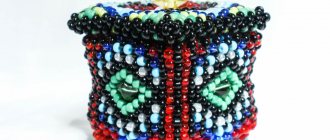
Homemade quilling: box and master class on it
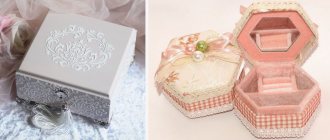
It’s not always possible to do a difficult thing the first time. To avoid any problems for beginners in creating an egg-shaped box, below is a master class on quilling a simple box in the shape of a pentagon.
You need to choose the color of paper for a quilling box based on the interior design in which it will be located.
Stages of work:
- You will need 5 columns of 5 cm each. Their sides should be round. You also need a large number of wound spirals.
- You need to glue 10 strips of spirals. Each strip has 11 spirals.
- The strip is glued to a long post on both sides. A base is formed in the form of a pentagon.
- Next, decor of different shapes is created. Can be used in leaf form. They need to be glued into the walls of the box.
- The lid and bottom may differ from the walls in the shape of decorative elements. In the middle of the top part, a lid should be made from individual elements so that they stand out.
There is nothing complicated in the design. The main thing is to use elements of different colors. You can create a box of any shape, even heart-shaped or round.
Types of quilling
There are two directions: Korean and European schools. The first is characterized by complex volumetric compositions consisting of many small details. All elements are always made by hand, without the use of any tools, and are combined into one exquisite pattern. European craftsmen usually use a special rod and stencils for rolling paper roll modules. The compositions are laconic and consist of a small number of elements.
Depending on the technique, there are several types of quilling.
Contour
Strips and finished elements are fixed on the base along pre-designated lines. This technique is also called graphic quilling. The contours of the pattern can be outlined in separate strips or covered completely or partially with rolls of different colors and sizes. A cut-out silhouette is also often used as a basis. The finished drawing turns out graceful and airy. Thus, you can even create a landscape:
Volumetric quilling
Involves the creation of three-dimensional figures and objects. Several dozen rolls of various shapes are pre-twisted from the strips, and then connected to each other in a certain order. As a result, the product looks lace and weightless.
Corrugated quilling
This is a type of volumetric quilling. The elements are rolled up from micro-corrugated cardboard. It bends easily, holds its shape well and is much more convenient to use than regular paper. The characteristic rib gives the product a beautiful texture. More details can be seen in the video:
Hasting
Other names: looped, spikelet quilling. In this technique, all elements are twisted at the base of a loop. To give the part the desired shape, craftsmen usually use a stencil. Most often, hasting is used for laying out plant designs.
Beehive ("bee hive")
The essence of this technique is that the empty space is filled with curls from one long strip of paper, and not from short pieces, as it might seem at first glance. The curls are made tight or more or less loose, depending on how much they should eventually straighten out inside the contour. An example of the work can be seen in the video:
Don't be afraid to experiment with colors and curling methods! Who knows, maybe you will invent a new original technique!