Paper tape rolls are one of the most readily available waste materials. They are quite durable, so they make excellent pencil holders, desk organizers, and jewelry boxes. The materials needed to create crafts from tape sleeves are quite inexpensive and easily available. Well, for decoration you can use what you have at hand.
In my master class I will show the main stages of creating a box or pencil holder from a paper sleeve. After watching this video, you can easily make simple crafts from paper rolls for adhesive tape. Well, you can decide for yourself how to decorate the resulting boxes and stands. I'll show you some options, and you can use them or come up with your own, new ways to decorate.
To create a box, one cardboard sleeve will be enough; for a pencil holder, it is better to prepare two and glue them together. This is the main difference in the process of making a box and a pencil holder. So let's get started.
- Necessary materials
- Stages of creation
- Video on making a box from a tape spool
- Decorating a box or pencil holder
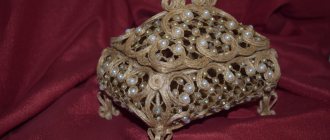
Original jewelry stand
Two sleeves, two pieces of cardboard, two sushi chopsticks, scissors and decorative yarn are all you need. They do this:
- cut out the bottom for both bushings from cardboard;
- the blanks are wrapped with yarn;
- the bottom is glued, hiding the ends of the yarn in the seams;
- sticks are wrapped in yarn;
- onto the edge (along the top) of the first sleeve, fix one end of the sticks with hot glue, placing them horizontally with a distance of up to 2 cm;
- The second sleeve is glued onto the sticks, stepping back a couple of millimeters from the edge of the first.
It turns out to be a double stand. The decor can be anything - leather, fabric. If the sticks protrude beyond the edges of the second sleeve, they are trimmed and sanded, but you can leave them that way. You can make a multi-tiered stand, placing the sticks on different sides of the sleeve so that the entire structure does not lose balance. In this case, they take one large (lower) bushing, and make all the others of a smaller diameter.
Second manufacturing method
There is another way to make decorative tape. To create a more artistic and beautiful adhesive tape you will need:
- white napkin;
- stamps for creativity with small designs;
- stamp holder (if necessary);
- ink pad of any color (preferably archival quality);
- sponge or very soft brush;
- pencil glue;
- adhesive double-sided tape;
- decoupage or any finishing glue (optional).
You need to stamp the design on a napkin using an ink pad and let it dry. Before use, separate the lower layers from the napkin. Glue the patterned layer onto the desired surface using pencil glue. For greater durability, the design can be covered with a layer of finishing glue.
As in the first method, you can glue the top layer of a napkin with a pattern to double-sided tape and cover it with decoupage glue to add strength.
Materials for work
To make decorative tape with your own hands, you will need a simple set of tools: double-sided adhesive tape of the desired width and scissors.
The following can be used as a decorative layer:
- lace of small width (preferably synthetic);
- printout on ordinary office paper;
- sheets of colored thin cardboard;
- wrapping paper;
- long strips of fabric (it is better to take cotton with a polka dot, checkered or striped pattern, such material will fray less along the edges and will not spoil the look of the finished tape);
- napkin with a pattern (decoupage or ordinary);
- foil for creativity (food grade will not work, as it is too thin and not flexible).
Wall panel
You can make an unusual panel from narrow bobbins. First you need to take a base made of thick cardboard and paint it. You can also draw or write something on it.
After that, they are painted and glued to the panel to create a composition. Pictures, photographs or other elements are inserted inside. Finally, the panel is decorated with rhinestones or flowers.
Recommendations for choosing a gift for mom: unusual ideas
This themed decoration is suitable as a gift for a wedding anniversary or birthday. It can be used as an unusual interior element.
Decorative adhesive tapes
They come on a basis made of fabric, paper, film with various color patterns, regular and openwork, with or without glitter.
Colored translucent adhesive tapes
Just like the regular clear tapes we used to call tape, colored adhesive tapes come in different widths. More often they are sold individually, less often - in sets of several pieces.
They come in a dispenser. In this case, the dispenser is a plastic device for quickly and conveniently unwinding adhesive tape.
Colored glitter foil adhesive tapes
Shiny adhesive tapes with a holographic effect look especially impressive in crafts.
Examples of how my daughter and I used glitter tape in creativity:
- covered pens made by hand from paper,
- decorated a homemade crown for dolls,
- made a goldfish from a Kinder Surprise container,
- made other flat and three-dimensional Christmas tree decorations,
- Halloween lantern made from waste material,
- cards, applique, bookmarks and much more.
My daughter and I made an applique with koi fish (Japanese carp) and water lilies using leftover scraps of shiny adhesive tape. Just like flower leaves for a postcard. My daughter made the greeting card three-dimensional: inside the card there is a paper step on which an applique with a bush of flowers is glued.
Where to buy decorative adhesive tapes (scotch tape)
Decorative adhesive tapes can be purchased in office supply stores, bookstores, children's art departments, or ordered online.
At the time of writing this article, we only had regular transparent tape and colored translucent ones in our stores. I ordered openwork, patterned and holographic ribbons from online stores.
Why do we need stickers, what types are they?
Stickers can be useful for children's games and studies. They can be used in household chores, interior decoration, and gadget design.
Pictures with a sticky base come in different types:
- Small ones. Used to decorate small items such as phones or tablets.
- Decorative. They are used for decorating premises - residential, work, public.
- Advertising. They depict brand logos and brand names.
- Labels. They are glued to food packaging, medical products, equipment, and household chemicals. The labels indicate information about the composition, shelf life, and methods of use.
- Directions and warning signs. Needed for retail and catering establishments, medical institutions and so on. This could be the organization’s work schedule, directional arrows, prohibition signs, and the like.
- Stencil. They are used when they want to create an unusual pattern on a surface.
- Reminders. Used for making notes with a pen or pencil. Mounted in a visible place, usually at eye level, for example, on a refrigerator. Allows you not to forget about important matters.
- Glowing in the dark. Used as interior decoration.
Benefits of homemade stickers
Self-made stickers are in many ways superior to their printed counterparts:
- Versatility of use for different types of surfaces: wood, plastic, and cardboard.
- The image does not get wet. It can last a long time, is resistant to mechanical stress and sunlight.
- The cost of a homemade sticker is low compared to printing house products. It can be made from scrap materials.
- You choose the design and image yourself.
- Printing companies do not take on small orders. You can make even one sticker yourself.
Box made from tape reels: master class with photos and video in photos
Category: Repairing a box made from a tape reel: master class with photos and video in photographs.
There are many ways to make boxes on the Internet. They can be made from wood, cardboard, beads, plywood.
But this is too hackneyed, so in this article we will try to make a box from a material that is a little unusual for the average person - from a reel of adhesive tape. This method is very simple and interesting.
Therefore, let's quickly look at the process of creating a box from a reel of adhesive tape.
Simple and clear
Making this type of box is very quick and simple, as you will see after reading this master class.
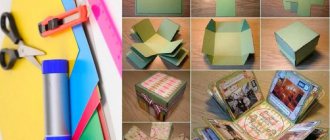
First of all, we draw a couple of circles on thick cardboard. Then you need to cut out four circles from scrap paper.
One pair of circles will serve as the bottom, and the second will serve as the lid.
We cut out a couple of long rectangles on scrap paper, the length of which is equal to the size of the outer and inner circumference of the tape reel. It is also worth making a small margin for height. You can make small cuts along the entire length of the strip.
You need to glue the scrap paper onto the tape reel on the inside, then on the front. It is best to make a box using a reel of double-sided tape.
Take one circle of white scrap paper and glue it onto one piece that was intended for the bottom. Then you need to glue the bottom to the tape reel. The cloves that remain as an allowance for height should be glued to the bottom from the outside. It is worth gluing a circle of beautiful multi-colored paper to the top.
Now it’s time to make a lid for our box. In this article we will provide you with two ideas.
Interesting ideas
Take a circle of corrugated cardboard and glue paper circles to it on both sides. One of them should be cut with a small margin. Do it as shown in the photo.
Next, you need to cut out the circumference of the lid, the height of which is equal to a couple of cm. Any of the edges must be processed with a hole punch or cut out yourself. Place the circle on the box and glue a paper strip to it.
Thanks to this method, the lid will fit tightly to the main body of the box.
For this method, the first step is to cut a strip from the reel, the height of which is 0.5 cm. It is this strip that will serve as the basis for the lid. You need to glue beautiful decorative cardboard to the top and on the sides. You can glue lace on the side parts.
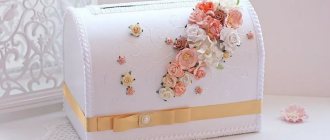
Decorating the product
In this article we offer you examples of materials that can be used to decorate the resulting box.
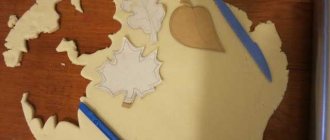
For example, paper. You can make flowers or applique from this material.
- The second material for decoration can be beads and beads.
- You can also use any type of fabric to decorate boxes made from tape reels.
- Another material for decoration can be satin or other types of ribbons.
- You can also decorate the box with twine, three-dimensional figures of various animals, flowers, polymer clay figures, or metal pendants.
- Video on the topic of the article
DIY vinyl stickers
A better option is to make vinyl stickers. To do this you will need the following tools:
- special vinyl film (most often they use Oracal products);
- ruler;
- pencil;
- required image (printed or drawn).
The process of making vinyl stickers with your own hands is very similar to the previous method of creating stickers. It includes the following steps:
- It is necessary to spread the film on a flat surface, turning it with the glossy side down.
- Armed with a ruler and pencil, transfer the desired image to Oracal.
- Trim the design along the required contour and turn the film over so that the glossy side is facing up.
- Place wide tape on top of it.
- Prepare the surface by first cleaning it from dust and dirt.
- Place the back side of the sticker on the prepared surface. If necessary, secure the sticker with a small amount of tape to prevent it from moving.
- Remove the backing from the film and gradually begin gluing the sticker.
- Try to level the sticker in time with any flat object.
- After final gluing the image, go over it again with a plastic card or other flat object to prevent air from getting under the sticker.
How to make decorative tape?
The work process consists of five steps that must be repeated for each desired decorative layer:
- Prepare the material for the decorative layer. Fabric and lace need to be ironed. If there are folds on the wrapping paper, it is also better to iron them. Separate the two bottom layers from the napkin, leaving only the one on which the design is applied.
- Unwind the required amount of tape.
- Apply decorative material to the adhesive side and smooth it out carefully.
- Cut to desired length.
- Repeat the steps as many times as necessary.
When making decorative tape from foil and wrapping paper, it is better to apply the adhesive side of the tape to the material itself, and not vice versa. This will help avoid wrinkles and air bubbles.
Printouts for decorative tape are best done on a laser printer. Such designs will be more durable and will not spread if water gets on the tape. To give such a tape durability, you can cover the decorative layer with finishing glue. It is also advisable to do this with a tape made from a napkin and thin cardboard.
Special finishing glue is replaced with ordinary transparent office tape, which is glued on top of decorative tape.
Sticker on self-adhesive paper
The easiest way to make stickers with your own hands is to print the desired image using a laser printer on self-adhesive paper. You can buy special paper at a hardware and computer store.
Carefully cut out the printed pictures using scissors. Such illustrations will delight you for a long time, because... special paper will protect them from fading and moisture.
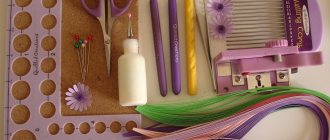
Decor ideas
To decorate the lid in any home you will probably find many suitable materials:
- paper (here is a master class on making roses using corrugated paper) - with flowers or, for example, the popular and simple paperpart technique based on ordinary napkins;
- beads and beads (it is especially convenient to use a ready-made string of beads to glue them evenly around the entire circumference);
- rhinestones and fabric (an example of a simple flower made of fabric);
- padding polyester (if several layers of padding polyester are placed on the lid and then covered with fabric, then you can make a nice pincushion out of it, which can become a wonderful independent gift for a needlewoman);
- twine (for eco-design it is glued in even layers around the entire circumference of the box on PVA, in this case the lid can be decorated with dried flowers, rowan berries, acorns),
- ribbons (satin, rep, stripes or using the kanzashi technique),
- volumetric contours (wax or glass, you can also use fabric contours),
- polymer clay figures (flowers, ladybugs, leaves, etc.);
- metal pendants and other materials.
The top box is decorated with a large gray chiffon flower with thin ribbons. The second one is decorated exclusively with scrap paper. The third box is lined with soft felt inside, and on the outside, instead of paper, there are scraps of wallpaper, a velvet ribbon, a small pendant and a large paper flower. A wonderful way to preserve small seashells as a memento of your summer trip!
The master class is completed. We made several beautiful boxes for storing various small items.