Friends, are you ready for the new year? But the holiday is just around the corner. And this is a reason to work fruitfully with your little ones. What am I offering? Today we will talk about how and what kind of New Year's crafts to make from salt dough. A prerequisite is that we will create with our kids. We involve them in as many processes as possible. In fact, the material is safe and easy to clean, so let’s allow the little ones to get their hands dirty.
Do you know what will add significance to these activities? The fact that the child will feel that all this is a very important matter! He will try hard when he finds out that his crafts will decorate the Christmas tree: as toys (we will hang some of them on the tree) or become part of the festive composition.
Let's decide. Remember? We have a main focus - New Year's themes. There is a basic material - salt dough. And in the kitchen, any housewife has the necessary tools. And our children have a good helper - us! All that remains is to get down to business.
How to make salt dough with your own hands: recipe
Probably everyone knows how to make their own salt dough. Just in case, let's remember the recipe:
- 2 cups of flour;
- 1 cup extra salt;
- a little more than half a glass of water (ordinary tap water);
- 2-3 tablespoons of vegetable oil.
NOTE
It’s hardly possible to do without oil at all – the dough will inevitably stick to your hands. However, you don’t need to add too much of it either, because then dirt can stick to the craft, and most importantly, it will dry much longer than usual.
We proceed like this:
Step 1. Take a bowl, first pour salt into it and add half of the specified amount of water.
Step 2. When the salt has dissolved, add the flour, and then the rest of the water.
Step 3. At the last stage, add vegetable oil. This is not necessary, but the dough with butter will not stick to your hands, which is good news.
Step 4. That's all - put the dough in the refrigerator, wait 2-3 hours, and our raw materials for modeling are ready. In the meantime, let's stock up on a good mood and study what New Year's figures can be made from such dough.
The technology for making toys from it is quite simple and consists of 3 main stages:
- First, the base is molded using a mold.
- Then it is painted with gouache and decorated with decorative elements (beads, buttons, shells and many others).
- After this, it is dried naturally or in an ordinary oven.
In general, it is best to dry crafts in the oven, especially since this process goes very quickly, and the heating is not very strong.
| temperature, оС | drying duration, hours |
| 50 | 2 |
| 75 | 1,5 |
| 100-130 | 1 |
| 150 | 0,5 |
It is also possible to brown toys at higher temperatures (up to 200°C). However, this is a more risky path, so it is better to constantly be near the stove.
And the total “cooking” time should take no more than 15-20 minutes. Therefore, most often they choose a comfortable range of 70-130°C. Then the models acquire the necessary strength and at the same time do not crack due to overheating.
And most importantly: any products made from salt dough are strictly prohibited from being eaten!
It is especially important to keep an eye on children who constantly put all sorts of things into their mouths - necessary and not so necessary. There are 2 threats here - the inedible “cookies” themselves and small decorative elements that decorate ready-made toys (beads, seed beads, etc.). Be careful!
Little tricks
Experienced craftsmen know that the more plastic the dough, the more elegant the crafts made from it. For this purpose, add sunflower oil or hand cream to the mixture. If the idea of a composition requires fine details, then a little starch or wallpaper glue will help to achieve this. You need to add these ingredients in the amount of 1 - 2 tablespoons per half glass of water.
Unused dough can be stored in the refrigerator for two weeks.
Toys and crafts made from salt dough: we make them with children
Kids have a genuine interest in salt dough, because creating toys from it is a unique combination of applied art and culinary skills. In addition, modeling is a great way to develop fine motor skills along with origami, creating toys from pasta, etc.
In the simplest case, almost any child can make New Year's toys from salt dough with their own hands. We take gouache, cookie cutters, and a rolling pin. We proceed like this:
Step 1. Roll out the dough into a layer up to 1 cm thick.
Step 2. Cut out several parts with a mold.
Step 3. Make a small hole in the center in advance, tighten a beautiful ribbon, with which we will then hang the toy on the Christmas tree.
Step 4. You can leave it as is and simply dry it in the oven until it turns beautifully brown. It is better to lay it out on parchment paper rather than on a bare baking sheet. Dry until the oven cools completely.
Step 5. Attach the ribbons - and you're done.
What to do if there are only 3-4 molds in stock? No problem. Let's take cardboard, draw or print any figure, and then cut out the dough with a sharp knife along the contour.
Salt dough is a very convenient material, because it is in many ways reminiscent of plasticine, which even the smallest can easily handle. And sometimes you don’t even need to use molds to work - you just need to put your palm on it, and then cut it along the contour or in a circle and color it as your imagination dictates.
How to dry salt dough?
There are two most common ways to dry salt dough. The first method: the finished craft will dry on its own. The main thing is that it should not be exposed to direct sunlight, otherwise it will crack. The craft can be placed on a flat surface and wait a few days. Second method: dry the finished craft in the oven for 3 to 6 hours (depending on the size of the craft). Drying occurs in batches with breaks. One approach is 1-2 hours. For quick drying in one go, set the oven to 75-100 degrees, and then the craft will dry in an hour. At a temperature of 120 degrees, the craft will dry in 30 minutes, but it is better to dry it naturally.
How to decorate salt dough toys
At the stage of creating the model, it can be decorated with various decorative elements. They should not be plastic, otherwise you will have to dry the toy without an oven - the beads may simply melt.
The result is an interesting, beautiful toy made from salt dough, which is easy to make with your own hands.
And here is an option with gouache.
What other elements can be used for decoration? Variety. These could be cereals, shells, buttons. Thanks to various combinations, even from one mold you can make many toys that are not similar to each other.
And another simple, but at the same time interesting way to decorate is an ordinary ribbon or thread. To tie it, you need to think in advance about the location of the holes on the workpiece.
Another simple way to decorate is with glitter. Apply a thin layer of glue to the surface of the dried workpiece (you can use a regular pencil) and glue the glitter. It turns out to be a truly festive toy for the Christmas tree.
And acrylic paints are really good.
And so that the craft pleases not only the eye, but also the sense of smell, you can decorate it with fragrant elements - cloves and cinnamon sticks. The result is an interesting combination of aromas that is reminiscent of mulled wine.
Such a toy will always attract attention. Please note that during drying it is better to choose the least high temperatures (about 50°C). You can even dry it first and then glue all the decorative elements.
And it’s really good to see everything with your own eyes – a video will help with this.
Wonderful crafts made from salt dough: New Year's crafts, Christmas tree toys
I took it from the link in Irina’s post
Irina
Salt dough is a popular and affordable material for children's creativity and making their own crafts. Just like plasticine, salt dough can be used to make products of any level of complexity, so children of any age can make crafts from salt dough. The recipe for making salted play dough is very simple; the ingredients for it can be found in every home.
Salt dough recipe. How to make salt dough
You will need:
- flour - 2 cups - salt - 1 cup - water - 250 gr.
You need regular wheat flour, without raising agents, dyes or other additives. Salt - “Extra”. The water is ordinary cold.
How to make salt dough: mix flour and salt, add water, knead the dough. The degree of readiness of the salt dough can only be determined by hand. If the dough crumbles, add water. If, on the contrary, it stretches too well and sticks to your hands, then there is too much water, and you need to add a little flour. Roll into a ball and make several indentations in it with your finger. If the dough does not spread and holds its shape, it is ready. It is recommended to add vegetable oil during the kneading process. Now the dough will not stick to your hands, dry out quickly and become crusty while working. However, it should be remembered that the best is the enemy of the good! If there is a lot of oil, the dough will get dirty, and final drying can take a very long time. For our recipe, a couple of tablespoons is enough.
Well, the dough is ready, now you can proceed directly to the process of modeling salt dough.
New Year's crafts made from salt dough. Christmas tree toys made from salt dough
In this article we will tell you how to make New Year's crafts and Christmas tree decorations from salt dough. We tried to select crafts made from salt dough that, on the one hand, are easy to make, and on the other hand, the end result is beautiful.
Salty dough. Crafts made from salt dough
To make Christmas tree decorations from salt dough, you will need shaped cookie cutters. With their help, even a child can cut out figures from a rolled out sheet of dough.
The resulting salt dough figures can be left as is, but it’s even better to decorate them. For example, like this.
You can use a cocktail tube to make many holes in the dough and then you will get openwork figures.
Or decorate crafts made from salt dough with beads. Just keep in mind that if you use beads made of plastic, etc., then you cannot dry the finished salt dough products in the oven, otherwise the beads may melt.
Instead of beads, you can use various cereals, shells, buttons and even broken dishes to decorate New Year's crafts made from salt dough.
You can give Christmas tree decorations made from salt dough a festive look with the help of beautiful ribbons and threads. Note: if you do not have a suitable mold, you can cut out a stencil from cardboard and use it to cut the salt dough for the craft.
Modeling from salt dough. Salt dough photo
Finished, already dried salt dough products can be decorated with sparkles by applying them to a layer of glue.
Crafts made from salt dough. Salt dough master class
Christmas decorations made from salt dough, painted using colored permanent markers, look beautiful.
Products made from salt dough. Salt dough modeling
You can decorate New Year's crafts made from salt dough using the decoupage technique, pasting them with beautiful pictures or decals. For decoupage, you can use pictures cut out from New Year's napkins. For New Year's decoupage, regular PVA glue diluted with water in a 1:1 ratio is suitable. Cut out pictures or patterns from New Year's napkins, separate the top layer and paste it onto the finished salt dough craft. Apply another layer of glue on top.
Figures made from salt dough. Crafts made from salt dough
Here are some more examples of decorating salt dough figures.
Christmas tree decorations made from salt dough. Salt dough modeling
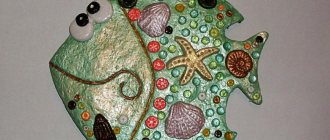
A simple and original way to decorate salt dough products is to make prints on them. Prints can be made from all sorts of objects with interesting textures that you can find around your home.
The salt dough craft “Fish” in the photo below was made using various textured items that the author of the craft found at home. For a detailed master class on making this original craft from salt dough, see the link
Natural materials are also suitable for making Christmas tree decorations with your own hands from salt dough: twigs, shells, leaves with thick veins.
When making New Year's crafts from salt dough with your children, you can use purchased stamps for children's creativity. The ink is suitable for both black and colored. The DIY Christmas tree decorations stars, house and cockerel in the photo below are also made from salt dough using patterned stamps. By the way, you can make stamps for children’s creativity yourself. Read about how to make stamps with your own hands on our website in a special article.
An interesting way to make New Year's decorations from salt dough is offered by the Ladybirds in my garden website. Using textile or paper lace, openwork prints are created on salt dough, from which figures are then cut out using shaped molds or a simple glass.
Christmas tree decorations made from salt dough with prints of children's hands or feet look touching. On the back of the salt dough craft, write the date the print was made.
From fingerprints and palm prints on salt dough you can make these memorable Christmas tree decorations with your own hands: a New Year tree and Santa Claus. Crafts made from salt dough. Salt dough figurines
Concluding our review article on the topic “New Year’s crafts from salt dough”, here are some more interesting New Year’s crafts that can be made from both salt dough and plasticine.
1. New Year's mosaic made of beads and bugles
To make this original New Year's decoration, you will need:
- plasticine or salt dough - plastic lids - beads, seed beads - gold paint (optional)
Paint the lids with gold paint, then fill them with plasticine or salt dough, and lay a mosaic of beads and bugles on top.
Even kids can make such New Year's crafts. 2. DIY New Year’s craft “New Year’s candles”
To make this New Year’s craft you will need:
- salt dough or plasticine - cardboard base from a toilet paper roll - corrugated paper in red, yellow and orange colors
Make rings from plasticine or salt dough of different colors, then put them on a cardboard roll. Make a flame from corrugated paper and insert it inside the candle.
3. New Year’s craft for children “Christmas tree”
You can make a cute Christmas tree from cardboard packaging of milk, kefir or juice and plasticine (salt dough). For a master class on making this craft from salt dough, see the photo below.
See also articles on our website:
— DIY Christmas trees — Crafts from milk cartons. Second life for unnecessary things
4. New Year's compositions made of plasticine
An interesting master class on creating New Year's compositions from plasticine by cutting has been posted on the website Country of Masters. Check out the Christmas tree below. It is assembled from individual branches, cut from one plasticine blank, and then decorated with Christmas tree decorations made of plasticine, made using the same technique.
Images of burning candles will help decorate the New Year's composition. The Country of Masters will teach you how to make original twisted candles from plasticine. This composition is complemented by a chrysanthemum flower and a small driftwood made of plasticine. For anyone interested in crafts made from plasticine for the New Year, we also recommend Roni Oren’s book “Secrets of Plasticine. New Year".
5. Salt dough candlesticks
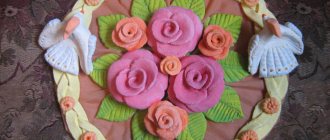
6. New Year's mosaic made from salt dough
1. Roll out the dough using a rolling pin or any other cylindrical object. Leave it to dry overnight. In the morning, when the salt dough is almost dry but still remains pliable, cut it into small pieces of different shapes. After this, let them dry completely.
2. Plan in advance what shape and size your New Year's decoration made from salt dough will be, and how the mosaic will be laid out. In our case, the New Year's decoration will be round in shape, the mosaic will be laid out in the shape of a heart. Lay out the mosaic of salt dough pieces on paper first. If necessary, you can trim the pieces to give them the desired shape.
3. Now paint the mosaic with paints. Let the paint dry completely.
4. Roll out another layer of salt dough, cut out a circle from it to the size of your mosaic. Carefully, one piece at a time, transfer the mosaic from the paper to the salt dough. Lightly press each mosaic piece into the base dough. Let your salt dough craft dry.
.
5. Now you can cover it with a layer of decoupage glue or PVA glue.
7. Salt dough basket
In our opinion, this is the most original craft made from salt dough for the New Year - a basket for gifts and sweets. How to do it, read the link >>>>
8. DIY Christmas tree decorations. Salt dough owl
9. Crafts made from salt dough.
DIY Santa Claus Santa Claus's beard is made from salt dough using a regular garlic press.
10. Figures made from salt dough.
Salt dough hedgehog Using scissors you can make a very cute salt dough hedgehog. For a detailed master class on making this craft from salt dough, see the link.
source here
Do-it-yourself voluminous toys: the best models
Three-dimensional toys can also be made from such material. You can’t hang them on the Christmas tree, but you can put them under the New Year’s tree or on the table.
Christmas tree
First you need to make a cone out of cardboard - this will be the base of the tree. And then a layer of dough is applied to it, from which branches are then fashioned. You can clearly see the whole process in the video.
Candle and candlestick
You can also make New Year's candles on a cardboard base. We roll the sheet into a tube, glue it and cover it with dough. We form a tongue of flame and decorate the candle.
You can also make candlesticks for real candles - we use the same molds for stars or hearts, only we make them plumper.
Wicker basket
And another interesting three-dimensional craft that can be used to beautifully present a gift is a wicker basket. You can do it in different ways - one of them is shown in the video.
And the second one is in the photo. It is made of several identical elements - ears, which are fastened together overlapping and attached to a base in the shape of a regular circle.
Father Frost
What would a New Year be without kind Grandfather Frost? Making it from salt dough is much easier than it might seem. The figurine consists of a semicircular base, which will then turn into a face.
Separately, we sculpt and paint a cap, which we attach to the upper third of the face. We make the beard from small sausages, and the cheeks, nose and eyes from ordinary circles painted in the appropriate colors.
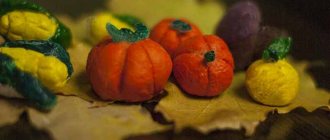
Hedgehog
A hedgehog is considered a simple three-dimensional toy that you can instruct a child to make on his own when moving from flat figures to three-dimensional ones. The sequence of actions is as follows:
- Prepare foil and roll it into a ball;
- Roll a ball of salted mass on top of the wad of foil and give it the shape of a pear;
- For the eyes and nose, use black pepper grains;
- Using nail scissors, give the upper body a jagged texture (an adult helps with this part of the work);
- After the hedgehog has dressed in a coat of needles, you can send it to dry;
- Color it.
Foil is placed inside the hedgehog's body so that it dries faster and is lighter. Instead of black peppercorns, small balls of dough, painted black after drying, are suitable. The beautiful hedgehog is ready.
Christmas tree toys with artistic painting
You can make both simple and quite complex figures from the dough. In form they are practically no different; the only difference is in the design. The material provides a good opportunity to try yourself as an artist.
The dough is white and paint adheres well to it. It is enough to use any template - and you can get real small masterpieces.
And for decoration, the technique of squeezing a certain pattern onto a workpiece is used. You can do this manually or use a template, as well as special stamps that can be purchased at a hobby store.
The result is such relief images.
You can also make a Christmas tree and make toys for it separately. Moreover, some of them do not even need to be made - just make a few depressions and paint them in different colors.
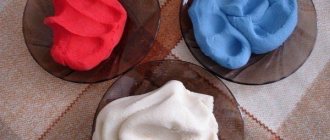
How to color salt dough?
There are two most common ways to color salt dough. The first method: after drying, paint the finished craft with acrylic paints or gouache using a brush. Second method: food coloring is diluted in water, then added while preparing the dough. When the craft is completely painted and dried, it must be coated with transparent manicure or furniture varnish in 2-3 layers. Each layer must dry before applying the next. This way the craft will last for a long time.
New Year's mosaic made of beads and bugles
If you don’t know what crafts to make from salt dough for the New Year 2022 with your own hands for festive home decor, then take advantage of our master class. It is very simple and therefore your children can freely work in this direction on their own, creating beautiful holiday decorations. This activity is perfect for labor lessons at school or the development of children in kindergarten.
To work you will need:
- salty dough;
- plastic covers;
- beads and seed beads;
- gold paint.
Progress:
- To get beautiful toys for the New Year tree, you need to take small lids. Perfect for coffee or other products.
- Then the parts you have chosen need to be decorated with gold paint or you can leave them as they are.
- After this, they need to be filled with salt dough, and a mosaic should be attached on top. If desired, you can use beads, glass beads or other interesting things.
- By attaching a thread to the product, you will get a wonderful DIY craft for the New Year 2022.
To expand your knowledge in the field of New Year's decorations from the above-mentioned material, made with your own hands, we recommend watching our video tutorial. From it you will learn about the existence of some secrets in this work.
Master class: 11 secrets when working with salt dough
Recipe for salted play dough
First of all, we need to understand the manufacturing process of our safe material. In fact, there are not so many recipes, but I will introduce you to a method that has been proven over the years.
We will need:
- Medium-sized salt - 1 tbsp;
- Flour - 1 tbsp;
- Water -125 ml;
- Vegetable oil - 5 tablespoons.
Manufacturing process:
Take a deep container and mix salt and flour in it. Next, pour in a small amount of water and vegetable oil. Mix well and refrigerate for 2 hours. The play dough is ready. You can leave it this color, and after completing the work, paint it in the desired color. Or you can immediately add natural or synthetic dyes: choose gouache or vegetable juice (carrots, beets), you can also use cocoa.
On a note!! To sculpt thin figures, add glue to the dough. And remember that when drying our mass loses color, so add more dye.
General recommendations for sculpting for beginners
Before you start creating, you need to familiarize yourself with the rules that guarantee the success of sculpting:
- If the finished product is planned to be colored, then it is better to use wheat flour in preparing the dough, but it is not prohibited to use rye or corn flour.
- It is better to use regular table salt, and under no circumstances use iodized salt - the products may begin to spread when dried.
- It is convenient to color large pieces of dough during the kneading process. This way the product will turn out better and more noble. Regular food coloring or honey watercolor are suitable for this.
- The finished dough must be stored in a bag or film to prevent air from entering the surface. Otherwise it may dry out.
- If the dough turns out unsuccessful, it can be revived. To do this, you need to add the missing ingredients (flour to liquid, water to thick) and knead thoroughly until you get a smooth, soft lump.
- If the idea involves surface coloring of the product, you should not add fat or hand cream to the dough. Otherwise, the paint may lie unevenly, which will ruin the appearance of the craft.
- Do not store the finished material for more than 2 days in the refrigerator. It will lose its properties, and it will be inconvenient to work with it.
- It is best to assemble crafts that are too large on a wire frame so that they firmly hold their shape and do not fall apart.
- It is best to paint the surface of salt dough with gouache or acrylic paints. In this case, watercolor can ruin the craft, as it tends to soak the application surface.
- The place where small parts are glued must be moistened with water using a brush. This way they will fit more firmly onto the main part.
- The finished product must be coated with colorless varnish to preserve its integrity and appearance for a long time.
Important!
You should not place the figures on the radiator so that they dry out faster. This may cause the surface to crack, causing the toy to fall apart.
More complex crafts: Santa Claus and Snow Maiden
It’s also not difficult to make Santa Claus and the Snow Maiden, but you can’t get by with the simplest forms . There are several ways:
- Palms . A good idea for playing with small children is to place your palm on the dough, cut it out along the contour, bake the resulting print, and then paint it: your fingers will become a beard, your thumb will become a hat, and small blue eyes and a drawn mustache will remain in a small free area.
A more complex craft, but anyone can do it
- A drop . It’s also not difficult - you need to cut a drop from the dough, and then a wide strip, the edge of which is cut into narrower transverse strips and applied to the drop. All that remains is to lightly curl the narrow strips, place a circle of the nose and a slightly curled mustache on top of them, and put everything in the oven. And then paint it in white, red and flesh colors.
- Mosaic . You need to find a beautiful paper sketch of Santa Claus, then cut out a figure from dough using it, and then, using it, separate parts - arms, beard, face, hat and put them on top. The result will be something like a three-dimensional coloring, the main beauty of which will be imparted with the help of colors.
Gorgeous and not at all difficult - please your children
For older children - and for adults who want to test their skills - a flat image of Santa Claus's face, which is made up of individual elements, is suitable. Do it sequentially:
- first they cut out the background - a circle, or a star, or any other beautiful shape;
- then they cut out an oval for the face and a triangle for the hat, put one on top of the other;
- they supply the hat with fur - that is, a thin strip of dough;
- they make a round red nose and pink cheeks, the mouth can be pressed in, like the eyes, or they can be made bulging;
- put a curled mustache on top - they can be made lush, or they can be made from two thin strips;
- put a beard on top - you can draw it, you can make it from thin curled strips, you can simply make it flat, with a smooth wavy edge.
Sometimes it's daunting because it's difficult to do
The result is baked and painted. And if you don’t make a beard and mustache, and instead make bangs and a braid, you’ll get the Snow Maiden - and her hat, of course, needs to be painted blue.
This will be interesting to you: REVIEW: Crafts from plastic and cork corks (130+ Photos): We make unique items with our own hands
Volumetric figures
An even more interesting way to make Father Frost and Snow Maiden from dough is to make them three-dimensional. This is, of course, more difficult than making a silhouette and coloring it, but also more fun, especially since you can experiment in the process. The basic steps look like this:
- make a frame - you can from foil, you can from a glass jar without a label, you can from an old light bulb, you can from a clay cup;
- stick the dough onto the frame, evenly and neatly - this will be a fur coat;
- make a ball, stick a nose on it, press in the eyes - a head;
- make a cone - a hat, and then two smaller cones - handles.
You can experiment as you go
The Snow Maiden needs a braid of woven flagella, and Santa Claus needs a beard that curls at the ends and a mustache to go with it. When the figures are ready, they can be baked and then added with accessories. You can make a bag for Santa Claus - it’s better to sew it, but you can also make it from dough - and a long silver staff made of foil . The Snow Maiden does not have such recognizable objects, but you can give her a bunny made of cotton wool, for example, or a large star made of foil.