Cheese Ko & Co Caciotta, semi-hard, 300 g
354 ₽ More details
Cheese Ko & Co Caciotta, semi-hard, 150 g
177 ₽ More details
Pool skimmers
We meet mentions of dugouts in childhood, listening to old Russian fairy tales. It was this type of dwelling that was very often described in them. In the modern era, dugouts have become a thing of the past, because the world does not stand still, people require improvement of their housing, comfort and life. Today, dugout is rather an extreme and exotic form of recreation. Staying overnight in such a home helps you escape from the hustle and bustle of everyday life, relax and plunge into the atmosphere of unknown antiquity.
General information about the structure of the dugout
What you need to know about the dugout:
- The most ancient type of housing created by man.
- This is not just temporary housing, it is universal housing, allowing you to live in it for up to several months.
- A classic dugout is a hole dug in compliance with basic proportions, having a roof and a small part coming out of the ground (entrance).
This is a type of housing.
The term “dugout” itself is used for the category of housing, deepened into the ground under the roof. Even a dwelling with a recessed floor and buildings half buried in the ground (the so-called semi-dugouts) are often called a dugout.
It is advisable to use a dugout as housing if you are sure that all the rules during construction have been followed. After all, its construction is quite a difficult and expensive job. Hunters, fishermen, and gamekeepers most often choose this type of overnight stay. For them, practicality lies in having a permanent place to relax, close to where they live, as well as the inconspicuousness of the house itself.
Having studied the construction technology and the basic rules of arrangement, you can build a dugout in the forest, as a hunting (fishing) lodge, in your dacha, as a landscape highlight, a storage cellar, or it could be a modern dugout with all the amenities that has become your new hobby.
This is interesting: how to prepare a cellar for storing vegetables.
In this video you will learn how to build a dugout:
In the ground
"DoroHo and BoHato" (c)
Photo from Yandex.Pictures. Underground electricity supply to the house
Underground or hidden electrical connections are a safer and more aesthetically pleasing way to connect electricity. However, it requires more money and time since it will be necessary to prepare a trench for the cable, and also from the shield on the pole, the cable should ideally be inserted underground in a metal pipe. Not corrugated!
With this type of connection, a trench is dug at the site. A special cable is laid into it. The so-called "armored". Why armored? Because one of its layers is a metal tape encircling the cable along its entire length. Thanks to this, it cannot be cut with a shovel, and any underground “evil spirits” such as moles will not bite through it)) The cable can be either aluminum or copper. For aluminum it is brand AVBbShv, for copper it is without the first letter “A”. The cable cross-section is selected depending on the power
Please note that an aluminum cable will have a larger cross-section than a copper cable for the same power
Photo from Yandex.Pictures. General view of armored cable AVBbShv
Nowadays, most often, copper is installed immediately, since the owners also install copper wiring inside the house. Nobody uses aluminum wiring anymore. However, you can also enter it with an aluminum cable, and then switch to copper through the terminal block. This is acceptable. By the way, I did exactly this for myself. Because the AVBbShv cable was brought to my house ((
I ran the cable to the ground in a 40x40 square pipe, then the cable went through a trench until it entered the house, and there three phases were already removed from the distribution box through the terminal block and sent to the internal main panel.
Rules for arranging a dugout
The work done should not only be protected and looked after, but also completed using small details. When constructing a building, you should not check everything experimentally if you already have ready-made information. Experienced users of dugouts not only give recommendations and an action plan for construction, but also share their little tricks. For example, for long-term stays, as well as for those who like comfort, you can lay the floor with tightly fitted logs or boards. This will also help insulate the home. The walls can also be finished according to your choice; using thermal insulation, you will again insulate the room. Walls sealed with clay and covered with turf will be suitable for wintering.
Construction of a doorway
When laying walls, you cannot forget about the passage. To fasten the door block, you can use so-called steel T-shaped anchors, which must be placed between the bags, 3 on each side, at an equal distance from each other. It is better to drill holes in the plates in advance for anchor bolts for attaching the door frame.
In order to build an arch over the doorway, you can use a plywood frame or, for example, an old large tire. The tire is installed on supports and bags are placed on top of it. You need to add more clay to the bags for the arch and place them as closely as possible to each other.
To install a canopy over the entrance, logs or boards soaked in antiseptic are taken. Those parts of the logs that will be between the bags can be wrapped in thick polyethylene.
Finding a place to install a dugout
Any construction project requires a serious approach from start to finish. So, having decided to build a dugout with your own hands, you first need to decide on the ideal place for its location. Such a unique home will not tolerate thoughtlessness and negligence. Follow simple rules:
- The best place is a hill, this will protect the home from transport water and melt water.
- Pay attention to the soil of the selected hill - it should be soft, crumbly, without stones and roots.
- The location of the door should be on the leeward side to retain heat.
- The roof of the dugout is pitched, at an angle of inclination of the hill, this will avoid flooding from melted snow.
- Avoid swampy and open areas.
- The best location is an inconspicuous place, but not far from water and food supplies.
- If the building is necessary for survival, then the choice of location should take into account the possibility of sending a distress signal.
Preparing bags of earth
To build a dugout with your own hands, as in the photo, you will first have to stock up on building materials. In this case, we propose to build a dugout using the most economical and environmentally friendly technology - from bags of clay or even just earth. This technology for building a house from bags of earth is called earthbag.
First, decide on the soil. You can take ordinary soil and mix a little cement into it, or you can take clay and sand. The optimal soil mixture recipe: clay + sand + gravel. Clay should be 30-40%. if you just take soil, you need to moisten it a little for convenience. This way it compacts better in bags.
Then buy polypropylene green or white bags; before work, it is better to turn them inside out so that the corners do not stick out. The mixture is poured into them in 2 doses. First you need to fill it to 30 cm, tamp it down and fill it up so that 15 cm remains to the top. Tie the bag. It is enough to prepare the bags for the bottom 2 layers, and then fill the bags directly on the walls so as not to lift them.
Preparatory work
Having chosen a place and decided on the ideal location, proceed to planning. This preparatory stage includes marking the area. The standard size is 3*4, making it much larger is impractical. The height of the dugout (the depth of the pit) is chosen according to the height of the resident, but it should not be made too high, the dugout is a place to sleep, and a high ceiling will only complicate the work and make it vulnerable to possible natural elements. Next, start preparing the logs. Wood must be available with a good supply, because rejection is inevitable. It is difficult to predict what will be needed during construction at the next moment. But the main supply of tools and materials for building a dugout should be as follows:
- shovel;
- roulette;
- screwdriver (or screwdriver and drill);
- hammer, sledgehammer, saw, crowbar, axe;
- building level;
- sandpaper;
- nails, screws and staples;
- logs and beams;
- plywood;
- insulation of your choice;
- door and window (if you planned it according to the project);
- roofing felt;
- flooring (according to your choice and desire).
Important! Preparing and checking that you have a set of tools and materials will save you time and allow you to focus on the job itself, so don't neglect this step.
Don’t forget to prepare the tools
If the construction of such housing takes place in natural conditions, in the absence of all the necessary means at hand, or you want to make the dugout as close to nature as possible, then use an alternative to some materials: the wire can be replaced with willow twigs or the roots of young trees, as insulation Pre-dried moss is suitable; roofing material can easily be replaced by branches, leaves, tree bark, and grass.
Master class of the layout “At a rest in moments of calm” about the Second World War
Nizamova Tanzilya Khalilovna
Master class of the model “At a halt in moments of calm” about the Second World War
In the upbringing of preschool children, the subject-development environment plays a significant role.
It improves the child’s experience of emotional and practical interaction with people around him, and also helps to increase the cognitive activity of all children in the group. Therefore, it is important to create the most comfortable environment in kindergarten, rich in a variety of play items and materials. In my work, I really like to use all kinds of visual and demonstration aids, pictures, educational games, laptops. But layouts . I tried to make a model for the older children for Victory Day “At a halt in moments of calm ”
.
The purpose of my layout is to create conditions for children to develop an idea of the Second World War.
I set myself the following tasks:
— generalize and expand children’s knowledge about the Great Patriotic War;
— to cultivate patriotism, a sense of pride for one’s people, respect and gratitude for WWII veterans;
- develop cognitive interest in historical events.
“Love for your native land, native culture, native speech begins small - with love for your family, for your home, for your kindergarten. Gradually expanding, this love turns into love for the Motherland, its history, past and present, for all humanity” D. S. Likhachev.
Knowledge of the history of one’s country is the main stage in the development of a child’s personality. Therefore, it is necessary to tell older children about the Great Victory. Patriotic feeling will not arise on its own. It needs to be brought up from early childhood, nurtured, cultivated. And without the help of adults, a child will not be able to identify the most important thing from the life around him, set priorities, and correctly adjust his feelings. For a boy, a story about military operations will help him form the image of a courageous and brave hero. Girls will be more interested in women's roles during the war - caring for children, wounded soldiers. Stories about military exploits help develop a sense of patriotism and pride in one’s country and people.
May 9, 1945 has forever become a great date for Russia. For the sake of this happy day, millions of people died fighting for the freedom of Russia and the whole world.
Layout "At a rest in moments of calm "
will help to clearly show all the hardships of the Second World War. Visual perception will strengthen the understanding of the heroic feat of the country and help to understand the inadmissibility of military actions in the future.
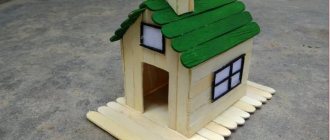
Let's start the layout with a house . For this you will need: glue, paints, white paper, a small box.
Roll a tube from a sheet of white paper, grease the edges of the paper with a glue stick so that the tube does not unfold.
Let's make a small number of tubes for the house.
On the box we will mark the window with yellow colored paper and the door with brown.
We cover the box with tubes.
Using brown cardboard we add a roof and a pipe.
We paint the resulting house with brown paint and decorate the roof with straw and cotton wool snow.
The house is ready. Now let's get to the dugout. For this I took a small flower pot.
I cut the pot in half lengthwise.
For the next work we will prepare paste, newspaper, and cotton wool.
Lubricate a sheet of newspaper with paste and form lumps. We use the lumps for a dugout and a small mound nearby.
Place cotton wool on top of the glue. We glue two tanks onto the mound.
To complete the dugout, we make a door and logs from tubes and brown cardboard.
is also important for the layout . To make a fire you will need: small pebbles, dry twigs, cardboard in three colors, a round base (lid)
and glue.
I used a regular iron lid as the base. We glue the fire into the center of the lid, and paste it around with pebbles and twigs.
We will make a tent from green fabric. We make the frame for the tent from wire.
Now we begin to form the layout . We have ready: a house, a dugout, a tent and a fire. For the base we take plywood measuring 50cm by 35cm. We use tin souvenirs of soldiers.
For reliability, we put everything on glue. Decorate with cotton wool. We get a winter version of the layout about the Second World War “At a halt in moments of calm .”
Master class on making a “Bedbed” model We came to the garden to see what was growing here. And various mysteries grow in the beds. Before we can solve the riddles, we need to assemble the garden bed. Master class on making a model “Russian Hut” Familiarizing children with the history of our homeland always remains relevant. In many preschool institutions, museum rooms are opened for introduction. Master class on making a model “Africa” Dear colleagues! I would like to share my original design, which aroused great interest among the children in our group. Purpose: To give a visual. Master class on making a “Swamp” model Dear colleagues! I would like to share my original design, which aroused great interest among the children in our group. Purpose: To provide a visual representation. Master class on making a “Holiday Cake” model. “Happy Birthday Kindergarten!” week has begun in our kindergarten! and I decided to make a model of a birthday cake for a role-playing game. Master class on making a model of the “Russian Hut” Master class on making a model of the “Russian Hut” A review competition “Patriotic Corner” was announced in our garden. We decided for him. Master class on making a model of the “Fairy Tale “Mitten”” Master class on making a model of the Fairy Tale “Mitten” The model is both the result of constructive and creative activity and very attractive.
Source
Dugout construction technology
How to build a dugout and where to start the construction itself? Having marked the area, decided on the dimensions, and collected all the necessary materials for the construction of the dugout, we move on to the main part:
- We compact the walls of the pit (from inside the dug hole). We tap and compact the walls and floor. This is necessary to provide thermal insulation and avoid soil shedding.
- We install supports around the perimeter (as reinforcement).
- Having determined which wall will have the entrance, we install two support pillars with a diameter of 15-20 cm there.
- We lay the rafters on the prepared supports (for the roof). Round logs with a diameter of about 10 cm are suitable for rafters. The rafters are attached to supports, dug into the ground, their ends should go under the slope of the roof, at an angle. Roofing felt can be laid along the walls as thermal and waterproofing. At the same stage, consider and provide for the presence of windows in the home.
- At the stage of laying the rafters, a stove should be installed. The most acceptable and budget option in this situation is a potbelly stove. Its pipe should be brought out at this stage.
- We cover the rafters with frequent lathing. To install it, you can use both nails and natural materials - branches, rhizomes.
- We cover the walls with lathing according to the same principle as the roof. We arrange the entrance to the home from the side of the supports, hanging prepared doors on them.
- The entire sheathing, the ends of the rafters and supports must be thoroughly coated with clay. The final thickness of the clay installation should be at least (or preferably more) 15 cm. Each new layer of clay should be smeared only when the previous one has dried.
- The last stage is the roof. We lay roofing material in several layers, covering it with dry branches, leaves, and grass. We insulate cracks and holes with moss or any other insulating agent.
An important point is safety precautions during construction. Its main components should be reliable fixation of all fasteners, a flat surface of the construction site, adherence to all rules for the use of electrical appliances and protective equipment, and high-quality tools. Do not forget about the mandatory presence of a first aid kit. Burns, scratches, cuts are an integral attribute of any construction site. Therefore, your work first aid kit must certainly include bandages, ointment for burns, bruises, disinfectants, and adhesive tape.
Construction will most likely take a lot of time; during this time it is best to arrange an overnight stay at this place. This will allow you not to delay the process and complete construction as soon as possible.
How to build a dugout in the forest with your own hands: step-by-step instructions
Selecting a location
Construction site. Location plays a key role in the construction of a home. If you choose a place on a slope, this will reduce the labor intensity of the process and also avoid floods. If you build on flat ground, then digging a hole is much more difficult and you will have to do this after thinking through the plan of the dugout in advance. Plus, more building material will be needed.
Therefore, it is advisable to choose a small hill to build a dugout. This will allow rainwater to drain in summer and melted snow in winter. Excessively flat areas and swampy areas should be avoided. Take care of the proximity of vital resources - water and food.
Tools for building a dugout
Tools for construction. Under normal conditions, you will need tools such as:
- roofing felt;
- poles (120 pieces, 5.5 m each);
- wire (about 8 kg);
- iron (about 2 tin sheets);
- timber (about 5 cubes);
- window;
- bake;
- drive.
Step-by-step instruction:
- You need to prepare a drawing of the dugout and think about where the door, windows will be located, and what the layout will be. It is necessary to clear the construction site of branches, leaves and other debris. Next you need to dig a hole of 6-7 meters, the width should be about 50 cm.
- Then along one of the walls you need to dig another recess about 50 cm long. It is needed for the future floor. It is necessary to make a shallow depression of about a meter from the entrance and equip it with steps. The steps should be about 4-5, about 30 cm wide. To avoid falling from them in the dark, you can create a railing from leftover materials. The steps should also be insulated and made durable.
- Next you will need bars and poles. The bars must be placed around the perimeter of the dugout to create support for the future roof. The bars need to be dug into the ground and it is advisable to treat the area where the bar and the ground come into contact with antiseptic or anti-corrosion substances. When the roof support is ready, you need to lay the poles on it as close to each other as possible. To fasten the roof and beams you need to use wire and nails.
- Next, you need to insulate the roof and make sure that it does not leak. For this you can use moss, spruce branches, branches and foliage, grass. The walls and roof need to be treated with roofing felt. All these manipulations will retain heat, and also prevent leaks, flooding of the dugout and sprinkling of soil.
- It is better to install doors and windows at the stage of installing the frame and bars. If it is not possible to use good doors and windows, you can make any shutter, the main thing is to ensure a tight fit. The insulation of the roof and walls does not end there. The roof and walls on both sides need to be covered with several layers of clay, allowing each layer to dry.
- It is necessary to take care of drainage. A drainage channel needs to be built along the perimeter of the dugout. You can use clay for this. If possible, insulation of the roof and walls can be done using polystyrene foam. For the floor you can use wooden boards, chipboard sheets, plywood. All this needs to be placed tightly on the floor and also treated with roofing felt.
- The main manipulations end here and then you need to take care of heating the dugout. An oven will be used for this. So, how to build a dugout with a stove with your own hands. Due to the fact that the dugout retains heat well, when the stove goes out, the heat will remain for a long time. Provided the roof and walls are well insulated and sealed.
Finishing
For the stove, you need to plan a place in the room in advance and provide a place for the pipe in the roof. In general, there should be two pipes:
- pipe for ventilation;
- chimney pipe.
It is better to provide gaps in the roof immediately and seal them well after installation. The stove can be covered with bricks or a camp potbelly stove can be used instead of a full-fledged stove. You can make a stove yourself from a large barrel. Place a large iron barrel, load it with stones and keep the fire going inside. If the stove is not covered with bricks, then it is more advisable to place it below the floor level. This will allow heating not only the dugout itself, but also the floor will remain warm.
Dugout to hide
Interior decoration
For a comfortable stay, you should pay a lot of attention to the internal arrangement of the dugout. The home should be clean, comfortable, easy to use and equipped with everything necessary for living.
The first attribute is the oven. Its main purpose is to warm the room, but the presence of a stove will also give the home a homely feel. Before building a dugout with a stove, consider what type of stove will be acceptable and convenient for you. A potbelly stove would be an excellent option. In this case, you are only responsible for choosing a good place to place it. Other ovens require heat-resistant bricks or stones. The area around the stove itself should be separated with a sheet of iron or brickwork.
Also think about how to make the dugout comfortable and practical. It is better to place the lounger (bed) away from the exit and the stove. Usually the lowest area in the dugout is chosen. For a comfortable stay, do not forget about such types of furniture as chairs, a table, and a storage rack. Housing lighting also needs to be considered. There are several options for this: a classic candle is the most budget option, but it is enough to illuminate a small space, and supplies of candles should be made in advance.
A solar lamp replaces 2-3 candles, the lamp is charged to maximum within one day (provided it is sunny), this charge lasts for 10-12 hours. The rechargeable lamp takes 14 hours to charge from the mains; its charge lasts for 6 hours. As we can see, these options are practical, but not always reliable. In the summer, any of the lighting sources will be enough, but in the winter there will be little such lighting. Consider all options for lighting devices and stock up on various lighting sources, so you won’t be left without light.
How to build an underground house?
In order for the dugout to serve you for many years, you should choose only moisture-resistant materials for its construction: impregnated wood, ceramics, reinforced concrete. High-quality waterproofing is no less important, but the options for its design depend on the following factors described in the table.
| Factor | Description | Waterproofing method |
| Material for walls and roofing | Stone | Coating, plastering, roll |
| Concrete | Penetrating | |
| Type of soil | Dry | 2 layers of hot bitumen |
| Wet | Roll materials in several layers | |
| Mechanical force | Inclined surface | The use of bitumen or synthetic based materials is not recommended |
| Seismic load, compressive, shear or tensile stress | Plastering |
Features of building a house depend on the type of dugout, therefore, when choosing an above-ground structure, be prepared to bring your own soil onto the site for embankment. All other buildings are covered with soil that was taken from the pit. The main thing when digging a pit is that its depth and shape exceed the dimensions of the house by at least 1 m.
A shallow foundation is constructed along the perimeter of the walls. A dugout can be made from a variety of materials. So, the walls can be brick, wood, concrete (block or monolithic). An underground house consists of a roof, which is sometimes not visible through the layer of earth, but it is there. The supporting structure will take the form you need, for example, in the form of a rafter system, where the rafters are placed privately, with a plank run-up.
Waterproofing of the floor and outer part of the walls of the dugout is carried out continuously. There are several thermal insulation options, depending on the thickness of the soil layer:
- There is no need to thermally insulate an underground house in case of embankment with a significant soil layer (more than 1 m) - the earth will protect the building.
- Basically, they try to lay a small layer of soil on the roofing surface, so laying thermal insulation material is necessary. As indicated earlier, extruded polystyrene foam is better suited for this.
Minimum maintenance costs
No matter how modern you make your dugout, the cost of maintaining it will be small. Mainly due to its small size. Heating, arrangement, and maintaining order require a minimum set of resources.
Important! All the advantages of a dugout are associated with its proper construction. Neglect and non-compliance with any rule will lead to unpleasant consequences.
The disadvantage of a dugout is the humid microclimate, as well as the problem of ventilation. Undoubtedly, these problems can be eliminated by using expensive and modern materials for construction, but then the financial cost can easily be called a disadvantage of housing.
Building a dugout with your own hands is quite possible. To do this, you will need the ability to plan everything well, organize and finish what you start. The forest and wild color of the dugout will allow you to plunge into the atmosphere of nature and solitude, and such a vacation will benefit your soul and body. Today, dugouts are used not only for their intended purpose. You can build a similar structure both in the country and in the vastness of the forest, use it both for housing and for storage. Children will certainly be interested in such an unusual structure, because it is such a flight of fancy for new games.
Put your soul and love into your project, embody the most unusual ideas and desires, and your dugout will become your favorite place to stay.
hobbit house
Simon Dale from Great Britain has always dreamed of having his own home. But with modern real estate prices I couldn’t afford it. He did not take out a mortgage, but built a summer residence for his wife and two children with his own hands on a small plot of land in Wales.
Simon had no previous experience in construction. He was helped by relatives and friends, the whole process took 4 months. It was decided to build the house on a hillside. For this purpose, a pit was dug at the site; the soil and stone extracted from it were used for the foundation and supporting walls.
Both wood waste and wood from the nearby forest were used. The roof, floor and walls were covered with thatch, which provided thermal insulation, after which the walls were covered with lime plaster, allowing the house to “breathe”.
Insulation was also laid on the roof, with turf and grass on top. The original roof design with a hatch at the top provided natural light during the day.
The house is heated by a fireplace; the chimney passes through a stone, which retains heat for a long time.
The frame was made of oak; During construction, the simplest tools were used. As Simon himself says, they found some materials (for example, windows, plumbing, sockets, wires) in landfills. The house uses solar energy and uses a cellar instead of a refrigerator.
Such a house is not only simple, cheap and environmentally friendly - it is a reflection of individuality, the opportunity to live in harmony with nature, freedom from the cliches of the modern construction industry.
Dome
2-3 layers of black 5mm film are placed on top of the dome and covered with earth. It is better to take the soil of such a consistency that it retains its fertility and contains clay. The top of the ground is covered with turf. The buttresses are covered with plastic mesh and plastered on top, because plastic bags can be destroyed by ultraviolet radiation. The dugout house was built with my own hands.
We also recommend watching a video on how to make a dugout yourself and make sure that it is not difficult and does not require special skills.
"Foxy burrow"
It is also worth remembering
). Such a house can be slightly recessed, be completely above ground, or combine above-ground and bunded parts.
Such a structure is suitable for any terrain and any relief, adapting to it, repeating its contours. Such houses interact perfectly with the environment, and the earth seems to cover them with a blanket, protecting them from cold and wind.
Unlike a dugout, a bunded house should rather be called an earthen hill (it can even be attached to a hill, which will serve as a natural fence). Actually, it’s logical to consider “the hobbit’s house” a variation on this theme.
A diked house does not take up much space, and the land nearby and on it can be used for planting strawberries, raspberries and flowers, turning your home into a real flowering bed.
Buttresses
At the same time, buttresses are also built with reinforcement. The bags for them are placed offset so that you can climb along the buttress to the top of the dugout (see photo). Buttresses can be additionally reinforced with vertical reinforcements to add strength.
A row of barbed wire is laid on each row. If you are planning a large dome, you can put 2 rows. It provides strong adhesion between bags.