Nitography is a drawing technique for children where woolen threads are used to embody an artistic image. The design can be made in several ways: by soaking the threads with paint and sliding it over the paper, laying out the appliqué according to the pattern, and also using stamps. In kindergarten, classes on non-traditional drawing techniques are held in the middle and senior groups, that is, with children 4–6 years old.
What is nitcography
Thread painting is the technique of drawing with threads. It makes it possible to create unusual drawings and even entire paintings without the help of brushes and paints. For this activity you need wool threads and glue.
There are several ways to create this type of drawing. Threads soaked in paint are passed over paper, they are used to fill various parts of the appliqué, or they are used to make stamps.
The technique of thread printing came to us from Mexico. Masters created real masterpieces using only thick woolen threads. They impregnated them with a special mixture made from pine resin and wax.
Creating paintings using thread that has been dipped in paint (usually gouache) is called thread painting. This is one of the types of nitcography. It differs in that it does not require the use of glue.
This kind of “drawing” promotes the development of motor skills in children, so it is practiced in kindergarten in middle and senior groups among pupils 4-6 years old. According to experts, nitography helps develop abstract thinking and helps achieve beautiful handwriting when studying at school.
How is String Art useful?
If you decide to make a picture from nails and threads with your own hands, then you will need a lot of patience, attentiveness and perseverance. But the results are worth it: decor using the String Art technique looks very stylish!
Various panels and paintings made in this style will decorate any interior, be it a cozy cafe, kitchen or other room.
Author - Yulia Sorokina (Coton Art)
A cup of coffee
And some more coffee!
Such a homemade gift will surprise and delight anyone, since you definitely cannot buy such a product in a souvenir shop.
Each of us is exposed to various stresses every day: at work, at home, in the family. Weaving from threads and nails has a calming effect on the psyche; this type of art is included in the list of art therapy techniques.
Therefore, as a result of doing crafts in this style, you will not only receive enormous aesthetic pleasure, but will also have a beneficial effect on your emotional health!
Goals and objectives of using nitcography
So, what are the benefits of thread printing and thread writing techniques?
- Children get acquainted with new drawing methods that are just gaining popularity.
- Babies develop visual perception. They constantly have to look at individual objects and think about how to assemble them into a single picture or diagram. In addition, they improve the eye. They have to select those threads that are ideal in size for their design.
- Preschool children develop fine motor skills. This is very important especially in our time, when parents are trying to simplify their child’s life in any way, for example, buying clothes with zippers and shoes with Velcro instead of laces.
- Thanks to nitcography, creative thinking and imagination improves. For some children, a blank sheet of paper is an insurmountable barrier. They are unsure of themselves and are afraid to start something new. Nitography helps them to relax.
Plus, such techniques teach children perseverance and concentration both on the lesson as a whole and on individual details of the drawing.
Pictures with threads. Examples
Master classes for children should be simple and interesting, as in the pictures above.
A complex version of nitcography is accessible to an adult. A simple drawing of a flower for an activity with a child.
Cat - thread painting.
Materials for practicing nitcography
Nitography combines the use of rather unusual combinations of materials and tools. You will need:
- Working surface. This is the basis. It is desirable that it be rough. There are no restrictions when it comes to color. Choose what you like. You can take cardboard or any other thick paper, fiberboard, a piece of flannel fabric, a piece of plain carpet, etc. An A5 size base is sufficient. For variety, make templates for future drawings in advance.
- Wool, acrylic or cotton thread with a diameter of at least 2 mm. For kids in the middle group of kindergarten, you can take a nylon cord with a thickness of about 4 mm. The main thing is that it should not slide. Pre-cut the threads into pieces of the required length. Older preschoolers can do this on their own.
- PVA glue with a brush.
- Napkins, oilcloth, scissors.
- For thread printing, you will also need toothpicks or thin sticks, with which the child will align the drawing.
If necessary, you can take pencils, markers and other additional devices.
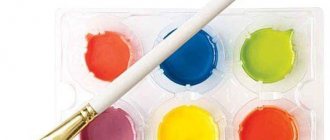
If you decide to start thread painting, prepare an A5 landscape sheet, threads about 45 cm long, multi-colored gouache, brushes and jars in which you will dilute paints with water.
Animalism in String Art
Very often, using the technique of weaving from threads and nails, various animals and birds are depicted. Animalism, as a decorative trend, never goes out of fashion, so such products are always relevant.
It won’t be too difficult to make such an elegant deer yourself, especially since you will need one or two colors of thread, nails, and a contrasting base.
Flower horns
Noble deer
You can make an original picture in the form of a horse's profile using thick threads. Studs and a piece of leather will complement the image of the horse.
A stripe is black, a stripe is white – and a spectacular zebra is ready! For this you will need a white base, carnations and black threads, it looks very stylish!
These small birds of different colors can decorate the interior of a nursery!)
The elephant in many nations means wisdom, strength and prudence. A serious, big-nosed friend with tusks is a wonderful present for a serious man’s office!)
A thoughtful monkey and cute roe deer - these works were made by true masters of their craft!
She's up to something
Roe deer with cub
“Fish looks for where it’s deeper, man looks for where it’s better” - with these words you can give a panel like this with a fish!)
The theme of Africa is still relevant and colorful. What do you think of the triptych idea?
A wolf against the backdrop of the mesmerizing Moon will not go unnoticed if it “settles”, for example, in the living room of an avid bachelor:
Nitography techniques
Most often, thread painting, drawing with stamps and appliqué are used in classes. Let's look at each technique in more detail.
Drawing with threads
The thread plays the role of a brush. The process looks like this:
- Dip the thread into paint of the chosen color.
- Once it is well soaked, place it between two sheets of paper. Can be laid in a zigzag. This will make the picture unusual.
- Lightly squeezing the paper and pull the thread out.
An interesting mark will remain on the sheets. It is either supplemented with details, or cut out and used as appliqué.
To make multi-colored prints, you need to take several different paints. Pour them in strips into a flat, low container. Saturate all the threads at the same time.
Drawing with stamps
First you need to make the stamp itself. To do this, you will need a base made of wood, foam plastic, thick cardboard or, for example, plasticine. Also take thick woolen threads, PVA glue, brushes and paints.
Apply glue to the base so as to repeat the intended pattern. It could be anything: a star, a flower, an animal, etc. Then carefully lay out the thread. Let the stamp dry. Then saturate the thread with dye. Attach it to a piece of paper and leave an imprint.
There is no need to make a stamp. If you wish, you can make do with a regular ball of yarn. Also saturate it with paint and leave an imprint on the paper.
Applications
In order to make an applique using thread printing, multi-colored threads need to be glued onto paper with pre-prepared contours. Perform a series of actions sequentially:
- Download and print the diagram from the Internet or draw it yourself using a simple pencil.
- Apply glue along the drawn contours.
- Carefully glue the threads. If there is excess, trim it off with scissors.
- Fill the middle of the design with threads. To do this, apply glue to the paper again. Lay the threads from the edge to the center along the perimeter. Another option is to chop up the threads and just sprinkle them on top.
For more information about this technique of thread printing, see the video below. There is a master class on creating the “Cherry” applique.
String Art for children
The art of weaving is very useful to practice with your child. Weaving with threads will instill in him attentiveness and perseverance, give him an idea of complex geometric shapes and develop fine motor skills, and simply introduce him to beauty!)
Start weaving using foam as a base. It has a soft texture that will easily allow your child to insert carnations into it.
Do not pull the threads on the foam base too tightly, as the nails may pop out and the entire composition will collapse.
With your help, a child can wind very simple, but at the same time cute things:
Black cat (on the left - author - Veronica Zapsha (@veronitta))
Dolphin (author - Veronica Zapsha (@veronittta))
Fish
Tuchka
Please note that nail heads can be painted to match the thread color. You can use, for example, nail polish.
Elephants with balloons
Teddy bear with a big heart
You won’t find such a piggy bank like this!)
Boys can make a picture with their favorite hero, for example, Spider-Man or Stormtrooper. Art String Art keeps up with the times!
Spider-Man...
...and an Imperial stormtrooper
Tips for Beginners
Even for beginners, there is nothing difficult in thread printing. Just follow a few simple tips:
- Choose thicker glue. The liquid will be absorbed into the base of the drawing.
- Apply glue only to a piece of paper (or other material), not to threads.
- Even scraps of thread or parts of unraveled knitted items are suitable for the job. Just straighten them.
- Use threads of different thicknesses and you will create a three-dimensional image.
- If you are a beginner, do not use curly or shaggy threads. It will be difficult for you to work with them. Give preference to smooth ones.
- It is recommended to draw the outlines of the future picture with a simple pencil. But some needlewomen do this with acrylic paints. They also sketch the middle of the picture. This helps avoid the appearance of gaps.
- You need to fill in the parts only after the thread has been glued along the entire contour.
- Try to keep the coils as evenly as possible and as close to each other as possible. If necessary, straighten them with a toothpick or a thin knitting needle.
- If you need to fill a round element, move in a spiral, and if you need to fill a long element, move from right to left.
- Once the painting is ready, iron it with a hot iron through wet gauze or cloth. This will help align the image and make it smooth.
And, perhaps, the main advice is to start with simple drawings. Move on to more complex images only when you learn how to form coils.
Recommendations before starting work
It is important not to spoil the drawing by smearing. An upset child will not want to experiment later. Tips for parents before starting work:
- Selecting the color of the base material. The priority is white tonality. It makes it easier to control color changes. A wider palette is not forbidden.
- Material thickness. The ideal figure is 40-60 mm. Otherwise, the drawing will definitely be blurred.
- Thread length. The stated parameters should not exceed 35 cm. Children are uncomfortable working with such material. After all, it will be difficult to pull it out. If the thread is shorter than 30 cm, it will not be possible to lay it.
- Texture of the material. The floss adds elegance to the image. Acrylic and wool help create volume. It all depends on the age of the children. Some parents complain that wool reduces the quality of the pattern. It’s hard for kids to work with it at first.
- Possibility of replacing paint. You can use ink or ink. They will not harm the child.
- Buying paper. It all depends on the expected end result. The pattern appears more clearly on a smooth sheet. The rough surface allows you to create particularly unique images.
- Purchasing dishes. A one-time option will not work. The bottom of the container should maintain a flat surface. Otherwise, you can’t expect a clear application. Disposable products quickly become deformed. Some parents make do with a regular soap dish.
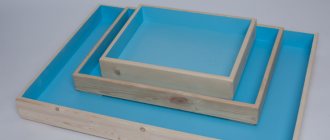
- Use of additional items. It wouldn't hurt to make a thread box for your child to keep his desk tidy. You will need felt-tip pens and pencils to draw the outlines.
- Application of frameworks. From childhood we need to instill the desire to create beautiful things. Without a frame, the drawings lose significantly. Baguettes are popular if there is no wooden frame. Its weight is insignificant, as is its price.
There is nothing complicated in the recommendations. They will simply help you create a unique image. There is no need to stop children if they want to show their maximum imagination. Prohibitions provoke a refusal of any kind of creativity in the future.