Jigsaw machine from a compressor from a refrigerator (with an oil bath)
Materials and tools used by the author:
List of materials:
— compressor from the refrigerator; - plexiglass; — profile pipes; - Sheet steel; - long nuts and threaded rod; — bearings; - dye; — automobile motor oil; - plugs for pipes
Homemade manufacturing process:
Step one. Preparing the motor
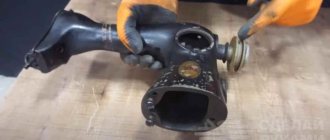
First of all, we arm ourselves with a grinder and carefully cut the compressor housing. Inside, in an oil bath, there is an electric motor with a compressor. Carefully drain the oil so as not to spill. We cut off the extra tubes and also remove the valve from the compressor, which will eventually give us access to the piston. Please note that dirt will reduce the service life of the motor, so we try not to litter too much when disassembling and reassembling.
Step five. Emphasis
You need to place a stop under the cutting blade of the jigsaw; the author used a corner as a base. Drill holes and tap threads for screws. The author used three bearings as stops; we fasten the bearings with screws. The stop must be adjustable; we make a slot hole, which will allow the stop to be moved.
When everything is ready, the frame and other steel parts can be painted.
Source
How to use a compressor from a domestic refrigerator
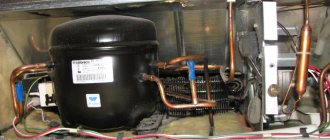
Home craftsmen find use for an outdated refrigerator, in particular, a compressor made from it. An easy-to-use spare part with low power is suitable for inventing an engine, a completely working homemade one. A refrigerator compressor is a structure placed in a housing that does not have a storage tank. The electrical circuit is connected, so there is no need to change it. This way you can make a silent and inexpensive motor up to 6-7 atm, which is sure to be suitable for use in a garage for inflating tires, painting spare parts, and airbrushing.
How to use a refrigerator compressor
Having some technical knowledge and knowing how to use diagrams and instructions, you can transform the motor from a non-working refrigerator into anything you want, upgrading and adding sensors, relays, pressure gauges, and a receiver. Possible options:
- An old rusty part will displace air, so just connect it to a tire, plug it in and start using it to inflate bicycle or car tires.
- If you unscrew the oil filter from the car tank, the compressor will be used to pump out excess oil. The main thing is to constantly monitor the fluid level and voltage in the network, and do not neglect safety precautions even in the garage.
Reference! The compressor works quite slowly, so it will not inflate more than 2 tires in a row. Overvoltage in the network is also possible, causing the unit to fail.
Compressor for inflating tires from a refrigerator
To obtain a unit for quickly inflating wheels with an output operating pressure of up to 3 atm, you will need:
- compressor;
- connection cable with plug;
- car air filter;
- oxygen hose for pipes;
- spiral hose with removable adapters;
- air gun for inflating wheels;
- wires and clamps;
- screwdriver, pliers, knife.
Jigsaw from a compressor from a refrigerator
Materials and tools used by the author:
List of materials:
— compressor from the refrigerator; — profile pipes; - Sheet steel; - corner; — bolts with nuts; - steel rod; - hacksaw blade; - dye.
List of tools:
- Bulgarian; - drill; - welding machine; — wrenches, screwdrivers, etc.; - tape measure, marker.
Jigsaw manufacturing process:
Step one. Preparing the engine
First of all, we take the motor out of the compressor and cut the housing with a grinder. When cutting, do not forget that there is oil inside; it is recommended to drain it first. We cut the tubes and take out the engine.
First of all, we disassemble the assembly with the piston system and remove the valve. We need to get a steel piston, we need to weld a steel rod with an ear to it. After that everything comes back together. That's all, now we have a device with a rod, which, when the engine is running, forms a reciprocating movement.
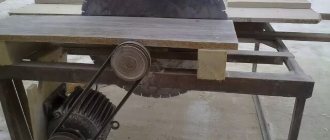
Step three. Table
We weld 4 legs made of profile pipes of the required length to the base. Next, we attach a “tabletop” made of sheet steel on top of these legs. The author’s “table top” is removable, it is attached using corners and bolts, the corners are welded to the “table top”.
In the end, all that remains is to make a slot hole so that the hacksaw blade can pass through. It will be useful to place a stop on the table for the hacksaw blade to reduce the load on the engine piston system.
Step four. Rack
We weld the stand to the table and weld a horizontal piece of pipe to the stand, in which we drill a hole. This will be the top support for the hacksaw blade. The hacksaw blade itself is attached to the rod at the bottom with a bolt and nut, and at the top with a special clamp to which a pin is welded. This pin goes into the hole in the upper stop and this is the design of the machine.
The machine is ready, you can start and test it. The travel of the blade is small, so half of the blade or even less is enough for installation, which is quite economical. The machine easily cuts the board, which was what needed to be proven.
Step five. Painting
We disassemble the machine and paint it well. Now the car looks beautiful and will not rust. It is recommended to make a protective dust cover for the engine and lubricate the friction units with thick lubricant so that they last longer.
The homemade product is ready, the machine works normally, although the productivity, of course, is not very high, but it is quite enough for domestic needs. That's all, the project is over, good luck and creative inspiration if you decide to repeat this. Don't forget to share your ideas and crafts with us.
Source
DIY jigsaw
A homemade jigsaw made by a craftsman with his own hands from a refrigerator compressor engine: detailed step-by-step photos of production with a description of the homemade product.
From a compressor from an old refrigerator, you can make many different useful homemade products, for example, a compressor for inflating car tires or a jigsaw, the manufacture of which we will discuss in detail in this material.
For his homemade product, the author took this compressor from a refrigerator.
I disassembled the housing and took out the electric motor with the piston group.
A hole was drilled in the piston to then make a mount for a jigsaw. The piston makes translational movements during engine operation, which is what is needed for the jigsaw to operate.
An eyelet is welded to the piston for attaching a jigsaw saw.
Additionally, the author strengthened the eccentric of the mechanism.
A warp for a jigsaw will be made from a piece of channel wood.
The following shows the manufacturing process of mounting the engine to the base.
The fastening of the saw mechanism will be made from profile pipes.
Supports for the table are welded to the base.
A return mechanism for a saw is made from a spring and a long bolt.
The photo shows how the saw is secured in the jigsaw.
The electric motor itself is placed in a housing made from a plastic bottle.
Next, the author installed a support table for the workpieces.
The tests of the homemade jigsaw were successful; it can be used to cut plywood, wood and plastic.
Quite a useful homemade product from a compressor from an old refrigerator!
We recommend watching this video, where the author showed in detail the process of making a jigsaw with his own hands.
DIY jigsaw: 6 budget ideas for the workshop
Where a jigsaw fails, a jigsaw can always help out. For example, if you need to cut small figures from wood or plywood, or cut aluminum strip into small pieces.
Of course, it doesn’t make much sense to buy it for home use - it’s expensive. But doing it yourself is always welcome.
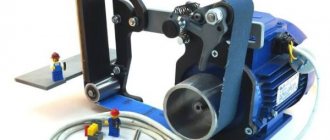
If you have a jigsaw, then all you need to do is make a stand for the jigsaw and a work table with a lever. You can also use an electric motor with a crank assembly as a drive.
In this article, we will share with you the best DIY jigsaw ideas on a budget. We advise you to read it.
Homemade electric jigsaw from an old refrigeration compressor.
Hello! My friends! Subscribers and guests of my channel! In the previous article, we talked about building an air compressor from refrigeration equipment. In this article we will talk about another electrical appliance that can be built on the basis of a refrigeration compressor, namely a jigsaw. To build it, an electric motor with a crank device will be used, which is located inside the housing of the refrigeration compressor.
— compressor from the refrigerator;
— wrenches, screwdrivers, etc.;
Jigsaw manufacturing process:
First, you need to drain the oil from the compressor through a brass tube installed in the housing. Using a grinder, the compressor housing is cut, and the electric motor with the crank mechanism is removed. Then the discharge valve is removed and the crank mechanism is disassembled. A rod with a driver is welded onto the metal piston to secure the jigsaw blade. The piston is installed in its place, the crank mechanism is assembled in the reverse order. A frame is welded from a corner and sheet iron, an electric motor is installed and secured, and a technological hole is cut in the frame to install the saw blade on the piston driver. Upper fastener for the blade: an L-shaped rocker arm with a spring-loaded rod for a jigsaw is mounted on the frame. The jigsaw assembly is complete, the assembled structure needs to be painted.
For long-term operation of such a machine, it is necessary to modify the lubrication system of the crank mechanism. But if you don’t have time to think long and hard about the lubrication system for rubbing parts, you can use the LITOL-24 lubricant available to us, but at the same time install dust protection on the electric motor and crank mechanism.
Source
Jigsaw machine from a washing machine engine
In a homemade design, the drive can be different - at the discretion of the master. Let's consider the option of using a standard motor from an automatic washing machine.
Let's get to work. First you need to make a jigsaw machine bed.
You can use different materials - whatever is available. In this case, the author welded a frame from a strip of metal and a profile pipe.
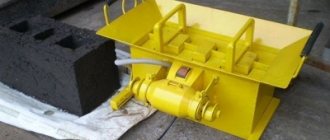
The design is very simple: you need to make legs from a profile pipe, and from a strip you need to make a frame and an upper frame for attaching the desktop. At the bottom, a bracket is welded from a strip of metal to which the crank mechanism will be attached.
The first version of the tabletop jigsaw used a factory mechanism from a sewing machine. In this case, we will make this unit with our own hands.
Refrigerator compressor for inflating tires
The operating pressure of the compressor installed in the refrigerator is from 2 to 4 atmospheres. This is enough to inflate car tires. The operation of the device is short-lived, so during its operation you do not need to use a pneumatic accumulator. To make a device for inflating tires, in addition to the compressor, you need to prepare:
- Electrical cable with plug.
- Oxygen hose.
- Clamps.
- Automotive fuel filter – 2 pcs.
- Air pistol with pressure gauge.
- Spiral air hose.
In addition, to complete the work you will need a screwdriver, a knife, pliers and a hacksaw.
A do-it-yourself compressor for inflating tires from a refrigerator is made in the following sequence:
- Remove the compressor from the refrigerator.
- Connect the electrical wires to the electronic unit.
- Install fuel filters on the inlet and outlet pipes.
- Connect a spiral hose to the outlet filter.
- Connect the air gun.
Universal jigsaw machine
The ability to install different saw blades - for example, standard ones from a manual jigsaw and thin ones (from a jigsaw machine) allows you to significantly expand the range of work performed.
We bring to your attention a universal homemade wood cutting machine, which is designed for cutting both straight and shaped cuts due to the fact that you can install different files.
Moreover, it is very simple to make it - without any drawings. You don't even need a welding machine. We will use boards and wooden blocks as the main material.
Step one: making a desktop.
From boards 20-25 mm thick we glue a shield measuring 40x60 cm (as an option, you can use a sheet of plywood). Then we saw off four wooden blocks of 30x30 mm, 30-35 cm long.
We screw the prepared wooden blocks to the shield. We reinforce the joint with gussets made of plywood or wood. As a result, we got a desktop with legs.
For greater rigidity, we make a strapping of wooden blocks in the lower part of the legs.
Step two: making the stand.
At the next stage, we saw off two wooden blocks and connect them at an angle of 90 degrees. We strengthen the junction with scarves.
As a result, we got an L-shaped stand that needs to be screwed to the desktop. Then we make markings and drill a hole in the table for the saw blade.
Step three: installing the jigsaw.
The jigsaw is mounted under the work support table. The sole of the tool is fixed with metal clamps with a bolted connection.
Step four: assembly of the entire structure.
So we have come to the final stage of work on assembling a homemade jigsaw machine from an electric jigsaw.
After installing the L-shaped stand and the jigsaw with the saw blade, it is necessary to make a mount with a block of bearings that will hold the saw in the desired position.
Please note: the mount must be removable and therefore must be able to be quickly secured using wing bolts.
For a thin saw blade for figured cutting, a mount of a slightly different design will be used - see photo below.
You can watch step-by-step instructions for making a jigsaw from an electric jigsaw with your own hands in the video below. The idea was shared by the author of Hobi Market.
This homemade design has a lot of advantages.
Firstly, it is versatility and practicality. Secondly, ease of manufacture and assembly. Thirdly, there is no need to use welding and an electric motor. Fourthly, the jigsaw, which is used as a drive, can be removed at any time and used for other work.
How to make a jigsaw with your own hands?
Every self-respecting man's home should have a large number of tools for all occasions. One of the most popular and versatile of them would be a jigsaw. This tool is intended for sawing various materials, and it is difficult for people who often have to work with materials such as wood to imagine their lives without it.
Peculiarities
Despite the fact that the structure of an electrical mini jigsaw can hardly be called complex, its mechanism still has a number of certain features that should be understood. First, you need to understand what exactly causes the saw blade to perform reciprocating movements.
The main components of any such device that has an electric drive are:
- gearbox;
- electric motor;
- rod with saw clamp.
If we talk about components of a secondary type, we should name:
- button to start;
- support roller;
- sole;
- cooling Fan.
More precisely, the movements of the saw blade begin with the receipt of energy from the engine, which appears after pressing the start button. Rotation is transmitted along the shaft to a special gearbox that interacts with the rod. It is in its mount that the file is installed, which will be responsible for cutting the material. In order to reduce the load on the rod, the rear edge of the saw blade rests against a support-type roller.
This allows you to use all the components of the device and cut all kinds of materials at home.
Tools and materials
To make a jigsaw with your own hands, be it belt, table, manual or foot-operated, we will need:
- block of wood;
- metal plates of elongated and rectangular shape;
- saw with a U-shaped shank;
- electric motor;
- circuit closing key;
- gas stove nozzle;
- bicycle spoke;
- circle made of plastic;
- a piece of plywood;
- bolts, nuts and screws.
If we talk about tools, we will need to have on hand:
- hacksaw for working with metal;
- triangular file;
- a pair of pliers;
- scissors for cutting metal;
- pencil;
- a screwdriver or drill, complete with drill bits.
Naturally, we will also need a diagram and drawings of the future device. And without them, work should under no circumstances begin.
Please note that in different cases the list of materials and tools may differ slightly. This list can be taken as a guide, but depending on the model being assembled, it may be supplemented.
How to do it yourself?
Now let's talk directly about how to assemble a jigsaw for wood with your own hands. We will look at various options for creating it.
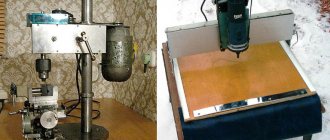
Making from a sewing machine
This is the simplest option for making an electric jigsaw. It is almost completely ready due to the fact that the sewing machine has a similar operating principle and already has a table, which is the basis of the device.
A jigsaw from a sewing machine will have a saw stroke regulator, which will have a mode switch on the equipment. To make such a device, you literally need to slightly modernize your sewing machine. It is necessary to remove the part responsible for weaving the threads. It is usually located at the bottom of the device.
You should unscrew the bolts, knock out the cotter pin, and then dismantle the drive shaft, which hides the thread weaving unit.
Now all that remains is to open the panel on top, which serves as protection, and expand the groove along which the needle moved to the size of the width of the file itself.
Also, in this case, you will need to slightly modify the saws for the device. They must be cut according to the dimensions of the longest needle that could be mounted in the device. In order to avoid the need to create an adapter for fixing the cutting element into place for landing, you should grind off the cutters from above, which sharpen the lower area of the blade.
The last step is to install the cutter in the needle holder. After this, you can begin testing the device and subsequent creation of blanks.
From a refrigerator compressor
Another option that can be implemented even by a person who is not very versed in electrical engineering is from a refrigerator compressor. To create it, you will need a not too large compressor motor, which is found in every refrigerator, as well as a crank-type system.
It’s even better if we are talking about a motor-compressor, where the motor rotor is mounted directly on the compressor shaft, and the stator is attached to the compressor housing. Before disassembling the compressor, the oil must be drained from it. You can make a couple of not too large holes in its end for this. On the opposite side from where the wires are connected, you need to cut the body around the circumference with a grinder.
We dismantle the cylindrical head by unscrewing the four bolts securing it to the compressor housing. We drill a couple of holes in the piston end to a depth of about one centimeter using a drill with a diameter of three and a half millimeters, after which an M4 thread is made.
We attach a specially made head to the piston end with bolts so that the jigsaw file can be secured. The simplest version of such a head will be a metal cylinder, the diameter of which will be slightly smaller than the diameter of the piston. Its height will be about two centimeters. In such a cylinder, you should drill a pair of vertical holes with a diameter of about 4 millimeters and one hole with a diameter of 6 millimeters and a depth of about 15 millimeters. It will also be necessary to make a through hole with a diameter of about five millimeters, where there should be an M5 thread. You will need to screw a couple of bolts into it on both sides of the head, which will clamp the file into the hole in the center.
Now we attach the table to the compressor housing using four screws, where it is necessary to cut a hole for the file. You can easily purchase the latter in a store or make it yourself by cutting a circular saw blade from a blade or cutting teeth using a cutting disc on an angle grinder.
The compressor must be mounted on a wooden platform, which is made from a two-centimeter thick board, or from a chipboard using two corners, as well as a clamp made from a galvanized metal strip. A switch should be attached to the platform, as well as an electromagnetic type starter.
The result should be a device that will have all the features of a stationary electric jigsaw. This will eliminate the need to hold it while guiding the file along the contour. Here you will need to hold the workpiece and guide it under the saw, which will move up and down, and turn it so that the cut is carried out along the contour drawn earlier. It will be much more convenient.
Speaking of power, let's say that this indicator of a single-phase motor from a refrigerator will be enough to cut a birch board 3.5 centimeters thick. If the wood is less dense, then you can even cut options with a thickness of 5 centimeters.
The only thing worth mentioning is that the engine should not run for long, as it tends to heat up quickly.
From a drill
Another option for making a jigsaw is from a drill. The body of such a device will be made of channel steel, and the lid will be made of sheet steel. The adapter will be a bushing, which on one side will be bored out to the diameter of the outer bearing race, and on the other side - along the outer diameter of the drill body. Also, a kind of ditch should be made under the locking ring.
The adapter should be secured to the body itself by welding, then M5 type threads should be marked and made for the machine handles, bolts securing the racks, and so on.
A through-type hole is made along the gear axis, and grooves are selected at the end of its element in the form of a cylinder in order to obtain protrusions that will ensure its joining with the coupling, which will connect the shaft to the gear.
Jigsaw machine for cutting metal
We bring to your attention another homemade budget design that every home craftsman can make.
The idea of this design belongs to the author George Kosilov.
The first step is to make a work table on which the workpieces will be cut.
A sheet of metal 5-6 mm thick is perfect for making a tabletop. Cut out a circle of the required diameter.
Next, we cut off three blanks from the corrugated pipe. We cut one side of each workpiece at an angle.
We weld the profile pipes to the bottom of the round tabletop, placing them at the same distance from each other. As a result, we got a table with supporting legs.
The next step is to make a U-shaped lever, at the end of which a bearing block and a rail from the presser foot will be attached.
A square profile is used to make the lever. However, it makes sense to make a reinforced lever welded from two sections of profile.
We cut out a hole in the work table for the file, and also drill a few more mounting holes for attaching the jigsaw. You also need to drill holes in the base of the jigsaw.
We install the jigsaw under the tabletop. There we also attach the speed controller, placed in a homemade metal case.
We weld steel round timbers (“thrust bearings”) to the base of the support legs for better stability. It would be a good idea to glue some more rubber on them so that the machine does not slide on the table during operation.
The on/off button is installed in one of the legs.
Details on how to make a convenient and compact desktop machine from a jigsaw with your own hands are shown in the video. The design turned out just right - take note.
JIGSAW
Next, you need to try to start the electric motor. If the compressor is not jammed, the electric motor will turn on if the windings are working properly. Otherwise, it is easy to wedge the compressor as follows. An M8 thread is cut from the end of the crankshaft, a bolt is screwed in and the crankshaft is turned by hand. Having ensured the free movement of the piston, you can start the electric motor using a standard start-up relay according to the diagram in the figure.
Modification of the motor-compressor housing.
Schematic diagram of starting an electric motor.
Modification of the lubrication system of the crank-slider mechanism:
1 – oiler; 2 - tube; 3 - gasket; 4 - flange
Jigsaw mechanism:
1 - body; 2 - piston; 3 — cartridge (steel); 4 — M8 nut; 5 – cartridge washer, spring; 6 — cracker (steel, 2 pcs.); 7 — M6x10 installation screw (3 pcs.); 8,9 - angles (steel, sheet s2); 10 — roller (steel); 11 - plate; 12 — bolt M6x50 (4 pcs.); 13 — spring washer (4 pcs.); 14 — bushing (steel, 4 pcs.); 15 — file; 16 case (leather, fabric)
Appearance of a jigsaw with a saw blade guard (two options):
1 — table (plywood); 2 - body; 3 - stand; 4 - hinge; 5 — emphasis; 6 — box (plexiglass); 7.9 - rocker arms; 8 — screen (plexiglass); 10 screw
The manufacture of parts begins with turning a chuck to secure the file. An M8 thread is cut into the end of the compressor piston, into which a cartridge with a spring washer and a lock nut is screwed. The support-guide roller for the file is also machined, and mirror-symmetrical angles are made for its installation. Then four bushings are sawn off from the tube, which serve as a support when installing the angles on the slab. The plate is easily obtained from the compressor cylinder head—a hole with a diameter of 10 mm is drilled in the center of it. Assembly is carried out using four standard holes in the compressor housing using M6 bolts 50 mm long.
The file can be made from a hacksaw blade or use a standard one (for jigsaws). It is clamped in the chuck between the crackers with three M6 set screws, one of which (located perpendicularly) rests against the saw slot, ensuring greater reliability of its fastening. The end of this screw must be machined to a 90 degree cone. To protect the moving parts of the jigsaw from sawdust, leather or thick fabric is placed under the angles.
Changing the lubrication system for the bearings of the electric motor and compressor comes down to replacing the oil intake with a simple oiler, shown in the figure, for which you need to make a flange. The muffler from the compressor (not shown in the diagram) can be used as a container for oil. The flange and oiler are connected by a tube by soldering; during assembly, a gasket is placed under the flange. The mechanism is lubricated as follows; The oil is sucked by a rotary pump (not shown in the diagram) from the oiler through a tube into the inlet channels in the housing and distributed to individual components according to the standard lubrication system.
As safety measures, two options for guarding the saw are offered. The first option is a rocker arm, which hinges on a hinge and rises after loosening the tightening screw. The second option is a screen made of organic glass, mounted on a rocker arm made of a tube with a diameter of 15 mm. The guard can be moved to the sides and raised by also loosening the tightening screw.
What are the advantages of a homemade air conditioner?
The most important advantage is the creation of a comfortable atmosphere in the house. The summer heat can quickly tire a person. Therefore, with high-quality air cooling, performance increases. A person feels more energetic, more alert.
Secondly , the family budget remains untouched.
Thirdly , if the room is small, it makes no sense to install a bulky, fancy air conditioner. For country houses, a new unique solution becomes the only possible one. With the onset of cold weather, they are left without owners and are sweet prey for thieves.
Fourthly , satisfaction from the result of your own work. Seeing the successful completion of the remodeling process, the craftsman experiences incredible positive emotions.
Fifthly , self-development is the path to prosperity. Gaining new experience and knowledge always has a beneficial effect on a person.
Sixthly , the resulting air conditioner will not need to be taken for maintenance or call specialists for expensive maintenance.
And finally, there is no need to buy filters and replace them. New technology simply does not provide these accessories.