Brave sailors have always excited the imagination of girls and teenagers. And no wonder, because they smell of romance: distant countries, incredible adventures, menacing storms, salty sea spray on their lips.
And if we add here a beautiful sea uniform, which makes the already fit sea wolves even more slender, then these guys would probably take one of the first places in the popularity chart (if something like this happened). Your boy can also play the role of the same brave sailor at a fun children's party if you sew a simple sailor suit for him. Of course, it is quite possible to purchase it in a store, but a completely reasonable question arises - why pay more? If you sit down at the sewing machine yourself, then such a costume will cost you a few rubles, and the child’s joy, meanwhile, will simply have no limits.
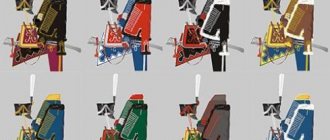
White cap, striped collar
Boys like to feel like heroes. Therefore, all festive costumes that imitate a soldier’s uniform will be greeted with delight. We will try to sew a sailor suit for a boy with our own hands. Let's remember what are the main attributes of a naval uniform?
This is a cap, a striped collar, a belt with an anchor, and a vest. A do-it-yourself guy and a cap, made for a boy’s sailor suit, are shown in the photo above. Let's start creating the image with a headdress.
How to sew a sailor suit for a boy with your own hands?
As a rule, any kindergarten needs to sew a themed costume for the child for the holiday. And there are many holidays in the year! These are not only Christmas and New Year's matinees, but also February 23, March 8, etc. The choice of characters for boys, as a rule, is not as rich as for girls. Therefore, children's costumes on a military theme, sewn at home, will come in handy more than once, and will probably be inherited by friends later.
We cut it ourselves
Materials:
- paper;
- doublerin;
- thick blue and white fabric;
- silk ribbon, dark blue or black, 2 cm wide;
- decorative element - anchor.
We begin creating a sailor suit for a boy with our own hands by measuring the circumference of the head with a centimeter tape. On a thick sheet of paper we set aside the resulting length (value A). We measure 5 cm and cut off a strip - this is a blank for the band. For the top you need to cut a ring out of paper. We calculate its internal and external diameters as follows:
- D1= A/2*3.14.
- D2= A/2*3.14 +7 (cm).
From the thickest dublerin we cut out two parts along it - the upper one in a solid circle and the lower one - repeating the shape of a paper ring. Next, fold the dublerin in half, apply the previously prepared paper strip to it and cut it off.
As a result, we got three parts - the top of the visor, the crown and the band.
We sew ourselves
We lay out the dublerin blank on the blue fabric, leaving seam allowances of 1.5 cm at the edges, and iron it with a hot iron. Let's cut it off. Fold the work in half with the blue side facing out and iron it again. In the same way, we iron the remaining dublerin blanks to the white fabric, not forgetting about the allowances. We cut out, baste both parts from the wrong side along the outer circle, sew on a machine and cut out teeth along the entire edge so that the finished cap looks even. Turn it inside out and steam it with an iron.
On the inner cutout, retreating 1.5 cm, we mark the markings for sewing the band in the form of a circle. We make small cuts along the entire edge of the cutout with scissors. If this is not done, the seams will tighten the fabric, and our DIY sailor suit for a boy will not be very presentable.
We baste the blue blank - we hem both allowances on the long side inward, bending along the edge of the doubler. Carefully hand sew the white top into the blue stripe. We start from the outer part of the band, then turn the work over and repeat the operation on the back side. You need to try to sew the parts as evenly as possible, without distortions. As a result, the notched round neckline should be sewn inside the blue part. We sweep the side edges of the band so that the doublerin inside is butted. We sew the basting on the machine. We cut 2 pieces of 35 cm from the ribbon, we treat the edges with a lighter so that they do not unravel. We sew them manually with a hidden seam from the back inside the band exactly at the junction. Stitches should not be visible on the outside. On the opposite side, exactly in the middle, we also carefully sew on an anchor by hand - the main attribute of a carnival sailor costume for a boy, made with his own hands. The cap is ready!
How to sew a sailor's cap with your own hands
The band should be very tight - fold the rectangle in half and iron it.
You can use an insert from another dense fabric, or add a few more layers - but remember that you will still have to stitch it, so don’t overdo it. You can make a cardboard insert, slightly smaller in size, so that you don’t have to pierce the seal when applying seams. Both circles should be pinned or basted - the main thing is that it comes out smooth - the centers should coincide. As we remember, the upper part is several centimeters larger - bending it, sew two parts along the outer edge. You can cut so that there are no folds, otherwise there will be tubercles along the edge. The beauty of the seam is not critical - it will end up inside. Turn the resulting product inside out and iron it thoroughly.
Now it’s the turn of the band - it is sewn to the inner hole. Don’t rush to sew it on right away - use pins or basting to achieve the correct position, let’s say right away - this is the most difficult stage.
All parts must fit without folds or distortions, check everything carefully before the final firmware.
We are left with the obligatory and simplest action - decoration. Two blue satin ribbons (shoulder-length, according to maritime custom) need to be sewn on the back (where the seam is on the band), and the anchor should be glued on the front. Instead of an anchor, you can use other maritime symbols, we leave this to your discretion; even an inscription, for example, “Morflot” or “Aurora” would be appropriate.
Sailor's beret
Materials:
- Thick white fabric.
- Rubber.
- Acrylic yarn, dark blue.
To pattern the top, cut out of thick paper a circle corresponding to the diameter of the child's head. To do this, you can use the calculation from the cap pattern. For the lower part, cut out a strip of paper 7 cm high and width equal to the circumference of the upper part of the product. We lay out the patterns on the fabric, not forgetting about the seam allowances - 1.5 cm. For the bottom, fold the fabric in half lengthwise. We cut out the blanks.
Next, we grind the lower part of the beret on the machine with the sides. Turn it inside out, fold it in half lengthwise and steam thoroughly with an iron. Stepping back 1.5 cm from the folded edge, we sew a stitch on the machine to insert the elastic into the cap. It can be made decorative and done with blue thread, if your sewing machine has such a function. This decorative element will be an additional decoration for a boy’s sailor suit, made from fabric with his own hands.
We carefully baste the bottom of the beret to the free edge of the inner side of the lower part. We stitch by machine. We sweep the outer layer in the same way, evenly tucking the allowances inside the work. Let's put it off. Insert the rubber band.
Materials and tools
To sew you need to prepare the following:
- White fabric for a beret or the top of a visor.
- Blue material for the collar (collar) and the base of the cap.
- White narrow satin ribbon for decorating the perimeter of the butt.
- Blue ribbon to decorate a visor or yarn to make a pompom for a beret.
- Dublerin for sealing fabric elements so that products retain the desired shape.
- Threads in matching shades.
- Paper, pencil, ruler, compass for creating a pattern.
- Pins and tailor's chalk.
- Needle and thread.
- Sewing machine.
As you can see, nothing exceptional is needed. You can also decorate the product with a patch or decoration in the form of an anchor.
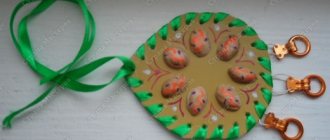
Pompon
To make it, cut out two identical circles with a diameter of 8 cm from thick paper and make a hole in the middle. We wind the yarn on the folded rings in a thick layer to make the pompom voluminous.
Very carefully cut the yarn along the outer diameter, and between the layers of paper we pull the thread tightly and tie a knot. Remove the paper and cut off the ends of the thread evenly. Sew the pompom exactly into the center of the beret.
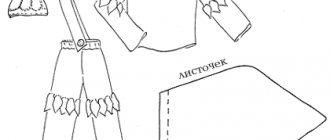
Jack
It should be noted that real guises are made from fabric that is most similar to ordinary satin in a very dark shade of blue. Three thin white stripes around the perimeter are applied with paint, like a print. So, let’s start making our own patterns for a sailor’s suit for a boy, or rather its important detail.
Materials:
- The fabric is dark blue.
- White paint or thin white satin ribbon.
We need to make sure that the collar is the right size for our sailor. To do this, take measurements of the child’s neck circumference L, the distance from neck to shoulder P and the desired length of the back D.
After that, take a sheet of paper, preferably in a box, and start drawing a pattern. Place point H in the upper left corner and from it draw a horizontal line to the right and a vertical line down. On the vertical line we put aside distance D and put point T. We measure down another 1.5 cm and put T1. We connect both points with a smooth line. From T1 to the right we draw a horizontal line and lay the segment T1K on it. We calculate its length using the formula T1K= L/3+0.5 (cm). From point K1 further to the right we measure measure P and place point K1. We draw two lines from it - up, to the intersection with straight line H, where we place point H1; and down, setting aside a piece 30-33 cm long, depending on the boy’s height. Here we put point M2 and from it to the left we draw a horizontal line, on which we lay off a segment of 5 cm and put point M1. Now we connect points M1 and T1 with a smooth line.
The do-it-yourself guy pattern for a boy’s sailor suit is ready. We lay it out on a cloth folded in half lengthwise. We align the fold with line HT1, outline it with chalk and cut it out, not forgetting to take into account seam allowances of 1.5 cm. We cut the inner semicircular part slightly with scissors so that the fabric does not tighten later.
We bend the edges around the perimeter and overcast them by hand, after which we stitch them on a machine. Iron the seams thoroughly.
and make a pattern
To sew a sailor suit for a boy with your own hands, you need to correctly make templates of the parts and correctly determine their size. For a headdress, you should measure the circumference of your head in the place where the lower part of the cap will be. It should sit comfortably on your head, not fall in or squeeze. For a beret, it is more convenient to sew in an elastic band and determine the desired size when trying on the finished product.
The pattern of the guy is also built according to the individual dimensions of the child. Since you are sewing a costume for a holiday, and not an actual uniform, it is enough to roughly follow the proportions and make a beautiful thing. The collar should not look like a cape. You should not make it too narrow and small. Of course, take into account the amount of fabric you have. The optimal length at the back is to the bottom of the shoulder blades, and at the front when tied, the item should end in the middle of the chest.
Decorating the guy
On the naval collar, according to tradition, there is a triple white stripe. As noted above, you can go in two ways to design it.
- Carefully apply the lines with white acrylic paint if you have the appropriate skills. It is better to take a flat brush, about 0.5 cm wide. First draw lines along a ruler on the fabric, but not with chalk, but with a felt-tip pen, otherwise the paint may lie unevenly. Lay the fabric on a flat surface, draw stripes and leave until completely dry.
This collar can be washed later, but only by hand. - Sew strips of thin satin ribbon. To do this, lay out the tape on the front side, estimate by eye the optimal distance from the edge, and mark it with chalk. Next, according to the markings, we draw three parallel lines. We baste each strip of tape, then sew it on the machine and remove the excess threads. Iron the finished product from the inside out. This detail of a sailor costume for a boy is made by hand. Now you can try on our guy.
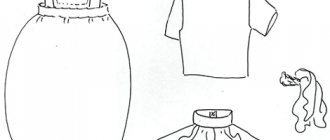
The main thing is that the suit fits
You don't have to have all the nautical accessories to create this look. You can choose casual trousers, as long as they are very dark or black and wide enough. Upstairs, it is best, of course, to buy a small vest, but you can replace it with a loose-fitting white shirt. It will also fit seamlessly into a DIY New Year's sailor costume for a boy. Perhaps the second version of the headdress would be more suitable for her - a beret with a pompom. Of course, the highlight of the outfit will be a belt with an anchor on a metal buckle.