If the blender fails, it is not at all necessary to immediately throw it in the trash. It can be used to make an excellent dremel with a speed controller. This repurposing of broken equipment allows you to save money, get a good router for home projects, and also reduce the amount of waste in the environment. With the help of such a homemade Dremel, you can perform a variety of engraving, grinding and drilling work.
Making a Dremel from an immersion blender with your own hands is simple and anyone can do it. It is enough to purchase all the necessary materials and tools, as well as follow a simple algorithm of actions.
How I found the right repair option
The cause of the blender breakdown was a worn-out coupling on the motor shaft. Over time it was broken. As a result, the nozzle itself (the working part) was gouged.
It's easier with a clutch. The service asks for 400 rubles for it. It's more difficult with the nozzle. It’s difficult to find it on sale, and the price tag starts from 2,000. Repairs lose all meaning. It's easier to buy a new blender. Out of curiosity, I looked at the bulletin board and was stunned.
The site was simply littered with blenders. Working and non-working, spare parts and complete sets. Prices range from “I’ll give it away for free” to store prices. I also found my blender model there (a complete set) with a diagnosis of “burnt out motor”. Price 300 rubles.
Bought. In a couple of minutes I changed the clutch. The working attachment was already included. As a result, we ended up with two blenders. One worker with two sets of replacement equipment (except one nozzle). The second is “the engine has burned out.” But my hands are itching)))
How to make a Dremel out of a blender
We had a fairly powerful motor on hand - 700 W. The simplest thing that is often made from it is a Dremel. But in the future I would like to make a router out of it. Simple, for processing the edges of wooden crafts, for example, built into a table. The modification is mega-simple. But there are a couple of nuances.
The direction of rotation of the blender motor does not match the direction of rotation of the Dremel. The solution to the problem is simple: disassemble it, swap the wires on the motor, and you’re done.
How to attach the equipment? I chose a collet chuck (the chuck itself is 240 rubles and the collet is 83 rubles). It reliably fixes the cutter (cutter) even at high speeds, accurately centers it, which means vibrations are eliminated. Has a small offset - less lateral load on the motor shaft. I explained why I refused other options in the gallery - scroll through the photos.
How to make a mini engraver from an old blender
Reading time: 4 minutes No time?
Electrical appliances cannot work forever. For example, the weakest part of a hand blender is the attachments. They often fail. It turns out that the handle with the motor is still quite suitable for work, but without attachments it is useless. It’s a pity, because in this situation the whole device goes straight to the trash bin. But don't rush to a conclusion. It is possible to use the engine of this device in a new form. A master class on this subject was shown by the author of the YouTube channel Evgeniy Budilov. Perhaps this experience will be useful to you, especially since it is not at all difficult to repeat it.
Read in the article
Blender engraver IDEEN WELT 350W
The love for art has been present for as long as I can remember. Drawing is certainly good, but I wanted something more. And one day, at work, I had the chance to meet a person who was engaged in engraving and wood carving, after talking with him and observing the process of work, I realized that I had a “mad desire” to join this type of art. After searching for a similar engraving tool, I discovered that either finances did not match the desire, or the characteristics of the presented tool left much to be desired. After moving the gears and analyzing the question of what to do, an old broken blender caught my eye and the idea arose to breathe a second life into it, so began the adventures of this unit and my quests with this unit in the field of engraving art)).
The machine turned out to be quite powerful, has a 350W motor on board, and copes with its duties with a bang. This unit consists of a manual “electric cutter” (as technicians often call a drill in our country) from a blender, and a homemade cartridge itself in which the tool is fixed, so to speak, a minimum of parts))
Final assembly of the engraver from a blender
All necessary changes to the design have been completed. There are not many new parts, and they do not take up extra space.
Now all the parts of the future engraver are in place, you can assemble the body. There won’t be anything unnecessary that gets in the way; you can put rubber pads on the buttons on your own recesses. The buttons themselves will no longer work, but at least the case will look neat
Externally, the handle has changed little: only a switch lever on the back side and an attachment have been added, which does not change the appearance of the device in any way
Since now you have the most important thing - the driving mechanism, you can buy a set of attachments for the engraver. These can be various grinding devices, drills and even a tiny circular saw
The power of the device can be called impressive. A drill mounted on it easily passes through centimeter-thick plywood, and a circular saw cuts an aluminum profile. This tool can be useful in various repair and creative work around the house.
This is a very simple alteration that does not require any fundamental changes to the design. Of all the additional parts, you only need a nozzle that clamps the drills and a simple switch. The plastic-sheathed blender body fits comfortably in your hand and weighs relatively little. The power cord remains standard. So, if you prepare in advance, all the work will take you an hour and a half, and, instead of the device that you were ready to send to the landfill, you will have a useful and practical thing that will definitely come in handy in the household. It must be said that this modification is one of the most popular and widespread among video channel authors. Here is another example of such a reconstruction:
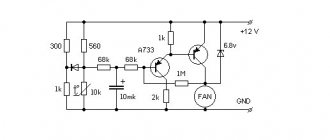
In this option, you can get an engraver with speed control, which is sometimes very convenient.
How did you like this idea of converting an old blender into a hand engraver? Did you understand everything in the master class? Could you replicate it yourself? If you have already done something similar, share your impressions of the device’s power in the comments! And if you have come up with another way to use an old blender, send us your photos of the process with a description, we will be happy to publish your master class.
PHOTO: YouTube channel “Evgeniy Budilov”
Mobile circular saw with a router - Do It Yourself
Portable sawing table with router, tabletop dimensions 900mm by 600mm.
Height 850mm, assembled 300mm.
Makita circular saw, Diold router.
The sawing table frame is welded from profile pipes 60×30 and 30×30.
The tabletop of the circular table is made of 12mm laminated plywood and covered with laminate.
The parallel stop moves on SBR20 cylindrical rails and SBR20 module carriages
Made clamps and clamps
How to bring beauty
Correct complaints and pleasant cash bonuses for low-quality goods
In this article I want to talk about how I resolved the issue of low-quality goods with MVM LLC (M.Video).
1. In what cases is it beneficial for the buyer to take out a loan (installment plan) to purchase equipment in a store using a specific example?
2. Why is it important to keep communication with the seller in writing?
3. How to encourage a quick resolution of the issue with sanctions?
My family decided to purchase a Samsung washing machine with drying function and get rid of clothes dryers in the bathroom. After a long study of data in YandexMarket, the choice fell on the Samsung WD80K52E0ZW model worth 64,000 rubles.
Being regular customers in the MVM network, we decided to buy from them.
On the sales floor there was a price tag for the machine in the amount of 64,000 rubles. In this case, it was possible to obtain a loan (the so-called installment plan) for the goods, the essence of which is as follows. The store determines the price of the goods sold in an amount equal to the body of the credit minus the interest on the credit. In our case, the loan amount was 57,591 rubles, the remaining amount was interest for using the loan.
We got a loan without any problems and bought a car for 57,591 rubles. A couple of days later, the loan was repaid ahead of schedule without overpayments of interest, applying the provisions of the Law:
“In the event of early repayment of the loan amount provided at interest, the lender has the right to receive from the borrower interest under the loan agreement, accrued up to and including the day of repayment of the loan amount in full or part thereof” (clause 4 of Article 809 of the Civil Code of the Russian Federation).
Thus, we purchased the goods through a bank loan at a price lower than the market price by 6,409 rubles. We examined competitors' offers for a similar model and clearly understood that the real price on the date of purchase was higher than the credit price. Now the price has dropped a little.
Thus, in the case under consideration, the loan was beneficial subject to its early repayment.
Reincarnation of a blender into a Dremel. DIY step by step.
This review is dedicated to those who do not like to throw away things that are still working. It seems that some nonsense has broken, but the thing has become partially functional and can no longer perform its main function. A new thing is bought, and the broken one is put away until better times (the desire to repair, or come up with something)... This review is about how to turn a blender into almost a Dremel. History: my mother-in-law had a Ufesa blender. Something like this. It served faithfully for several years, until one day she decided to make mashed potatoes with it. But this was impossible to do for this model of blender, since the adapter coupling from the motor to the blade shaft is made of plastic. Due to the temperature, this clutch simply turned and stopped transmitting rotation. The motor works, but the knives do not rotate. The nozzle is non-separable.
The coupling was removed from the shaft and I went to repair shops looking for a replacement. As it turned out, they don’t make such spare parts, they don’t repair such faults, and in general they advised me to buy a new one, since this model is no longer produced. So a new blender appeared... And the broken one went to the bins to await its fate, where it could be adapted...
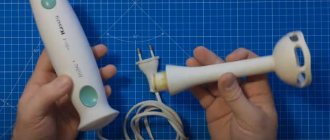
And then one day, wandering through the expanses of Aliexpress in the DIY sections, I came across these motor cartridges. This chuck allows you to clamp drills from 0.3 to 4 mm.
Adapters for different shaft diameters were also sold there. Bingo! The diameter of the motor shaft was measured and a cartridge with an adapter for a 5mm shaft was ordered. After some time, I received an envelope with a cartridge, a key, a hexagon and an adapter.
Now it was the patient's turn. There is no fastening visible from the outside, so I had to start with the button.
The button is held on by latches. In attempts to remove the button, the push rod of the button itself was broken. However, we will not need it in the future.
Under the button there was a single fastening screw for Torx.
The screw was unscrewed with a regular flat-head screwdriver and the cover was removed. Upon removal, it turned out that there were still two plastic loops at the outlet...
The inclusion was carried out in this way. The button rod pressed on the spring-loaded contact, when closed, 220V was supplied to the control circuit and the motor turned on.
This button is not very convenient when working with a Dremel; you need to keep it pressed constantly. Therefore, we will replace the button with a key switch. Let's mark a hole for it.
A hole is cut and the edges are processed.
The button is desoldered from the board.
and solder a switch on the wires.
The final trigger mechanism.
The motor itself can be pulled out of the clamping contacts without any problems.
IMPORTANT
Remember which side the motor is installed on. If you install the motor on the other side (rotating the motor 180 degrees around the axis of rotation), the contacts will change and the motor will rotate in the other direction. If anyone needs such functionality, then it is enough to install a switching toggle switch that changes these contacts.
Close-up of the output shaft.
All that remains is to attach the adapter to the shaft.
insert the sleeve with buttons. You don’t have to return this sleeve with the buttons to its place, then through the holes for the buttons there will be access to the screws securing the adapter to the shaft. But I thought it looked more aesthetically pleasing with closed holes.
and place the cartridge itself on the adapter. We close the case.
Due to the shape of the body, such a Dremel cannot be mounted on a table, only held in your hands. However, I also have a regular Dremel with a clamp.
Runout test according to the method from the comments.
Let me end the story here.