The beauty of owning a motorcycle doesn't stop at the ride. It's also the hours spent in the garage tinkering with parts, drinking ice-cold beer, listening to your favorite music, and getting your hands dirty.
The increase in demand for motorcycles has forced many to build garages, which obviously means better preservation of the equipment, as well as having space in the garage to work on the motorcycle.
Motorcycle garages (aka DIY motorcycle repair shops) are starting to pop up in cities around the world, and they have a bright future.
The concept is simple. At these motorcycle workshops you can come and work on your bike. Obviously the smaller parts vary from parts store to garage. Each such garage has almost the entire set of necessary tools needed to configure and maintain your motorcycle.
Why do you need a garage for a motorcycle?
Many owners leave their motorcycle near the house and believe that it does not need a separate room. But that's not true. Cold air and precipitation cause the parts to become corroded, resulting in a shortened service life of the mechanisms.
Reasons why you should think about a garage for motor vehicles:
- the ability to install the structure anywhere;
- protection from the actions of intruders;
- shelter from adverse weather conditions, it is especially important to remove vehicles for winter storage (rain, snow contribute to the development of corrosion on all parts);
- it is convenient to carry out repair work in the garage;
- All spare parts and tools can be stored in the garage.
If you make the garage at the dacha spacious, warm and decorate each zone, then the place will become ideal not only for storing motorcycles, but also for spending free time.
Advantages and disadvantages
The advantages of a motorcycle garage include:
- ease of assembly;
- the purchase of material does not require a lot of financial costs;
- You can make any shape;
- transport will be protected from sunlight, rays, rain, snow;
- the ability to store tools and spare parts in a separate place.
Article on the topic: How to lease a plot of land under a garage.
The disadvantages depend on the type of structure.
- Shells, pencil cases, and tents are not very suitable for storing a motorcycle. The buildings are suitable for temporary shelter from precipitation. They are not suitable for permanent storage. There is little space in them, so there is no opportunity to carry out repair work and store spare parts and tools. The burglary resistance of structures is low.
- Buildings made of wood or chipboard are considered unsafe. The material absorbs gasoline vapors, therefore it has a high level of flammability.
- There is no point in building a large foam block garage for a motorcycle. Much less space is required to park and maintain the bike.
Having studied the detailed characteristics of suitable materials and types of structures, you will be able to choose an acceptable and affordable option.
Paid parking
A convenient and reliable way to store your own motorcycle is paid parking. If you use this method regularly, it will not entail large expenses. There are garage cooperatives that provide individual sheds, under which you can leave your vehicle. Here it will be protected from unexpected precipitation, sunlight, and paint damage. The main factor in this type of storage is the presence of a security guard.
Vandals, who take particular pleasure in damaging someone's property, are also a danger. Even if the pests were under the influence of potent substances, it wouldn’t be any easier for the bike owner.
In conditions of paid parking, the owner will be confident in the safety of his own property - this is due to the presence of security and video surveillance. If suddenly a case of theft occurs, there is a high probability of compensation for damage due to improper performance of security functions.
Determining the size and type of the future garage
There is no need to build a room that is too large for a motorcycle. A drawing is first made in which the dimensions and design features are specified. Then they determine the material and calculate its quantity.
The following types of structures can be built for motor vehicles:
- an ordinary, spacious foam block garage;
- steel frame pencil case;
- building made of sandwich panels;
- garage-shell.
It is best to build a spacious room so that you can approach the transport from any side. A workshop area should be planned for carrying out repair work. You also need to allocate space for storing necessary things and tools.
Even if you plan to build a mini-garage, you need to take the dimensions with some margin. This is done so that if the bike is replaced with a new model, the dimensions match.
For motorcycle
The approximate dimensions of a garage for a motorcycle are: the height of the building is at least 1.5 meters (it is better to focus on the height of the owner), the length is 3 meters, and the width is 2 meters.
For scooter
Standard dimensions of a covering structure for a scooter: length from 1.3 to 5 meters, width from 1.2 to 2.5 meters, height 2 meters.
For ATV
The width and height of the ATV is 1.2 meters, length - 2.3 meters. Based on these parameters, the dimensions of the structure itself are calculated.
For a convenient approach, leave 60 cm on each side of the ATV. On the side opposite from the door, it is advisable to leave a larger distance, about 2.5 meters, for repair work.
So, a garage for an ATV should be 4.5 meters long, 2.5 meters high and wide.
What to choose for your best friend
If you set a goal and find an inexpensive and convenient option for a garage for a motorcycle, then in most cases construction experts will offer approximately the following list of designs:
- A complete version of a foam block motorcycle garage, warm, spacious and comfortable;
- A room made of vulture panels or a pencil case in the form of a steel frame covered with thin sheet metal;
- Frame version of a garage for storing a motorcycle made of sandwich panels;
- Shell garage.
We do not consider other types of shelters in the form of plastic, concrete, wood concrete or cinder block buildings due to their absolute unsuitability for use for servicing and storing a motorcycle.
Scrupulous comparison and practice show that from the above list, the most suitable option for a motorcycle is a lightweight frame structure made from sandwich panels.
Selection of materials for construction
To build a foundation, you need to prepare crushed stone, sand and cement. Beams or metal panels for the base and frame will be useful.
The construction of the building is possible from the following materials:
- Metal structures are distinguished by their strength and reliability.
- A brick building is strong, reliable and durable, but building brick walls requires skills.
- Foam blocks are less expensive than bricks. The foam block structure retains heat well and is resistant to moisture. The design is not difficult to assemble.
- An economical option is a garage made of wood. Wooden buildings look beautiful, retain heat well, are strong and durable. The material must first be treated with antiseptics and impregnated with fire retardants. These compounds disinfect the surface and increase the fire resistance level.
- It is possible to easily and quickly build a garage from sandwich panels or corrugated sheets.
Article on the topic: How to install a wooden window sill in a wooden house
To work quickly and easily, you will need tools: a shovel, a drill, screws, anchors, a screwdriver, a welding machine, an angle grinder.
Stages of construction work
- Preparing the base. The garage is installed on any flat surface - concreted or filled with gravel.
- Frame assembly. Steel profile beams are connected with fasteners according to the design.
- Sheathing. Wall panels are attached to the frame using self-tapping screws (from bottom to top). The locks between the slabs are filled with sealant. The first row of roofing panels is fixed to the upper ridge and then, as on the walls.
- Finishing work. After assembling the box, all that remains is to install swing or sliding gates and arrange the interior space of the garage according to your preferences.
To complete the design and calculation of garage construction, use the WebSteel system. To order the production of an object or get expert advice, call the numbers listed on the website, request a call back or fill out the feedback form.
Main office
300028, Tula, Russia, st. Torkhovsky proezd, 6 (4872) 701-777 - prefabricated buildings, sandwich panels, gates, doors Office in Moscow
115054, Russia, Moscow, Dubininskaya st., 57, building 1, room I, room 7b prefabricated buildings, sandwich panels contacts
Building a garage with your own hands
The construction of a structure for storing a motorcycle begins with the construction of a foundation and a ramp for easy entry into the premises. Then they begin to build the frame, walls and roof.
Foundation
The place where construction is planned is cleared of dust and debris. In the future, you should perform a number of actions:
- A trench 18 cm deep is dug along the entire perimeter of the proposed building.
- A layer of crushed stone and sand is laid at the bottom of the trench.
- Two bars with a cross section of 10 by 16 cm are installed along the perimeter so that after pouring the solution, half of the bars remain in the concrete.
- Vertical beams with a section of 50 by 50 cm are driven into the corners of the structure. They will serve as a frame.
- Mix the cement. The resulting solution is poured onto the floor surface.
Construction of the frame
As soon as the concrete screed has dried, construction of the frame begins. It is made of wood or metal. The wooden structure is pre-treated with antiseptic compounds.
Additional bars measuring 50 by 50 cm are installed along the perimeter of the future structure at a slight slope. They will serve as support for the roof. Self-tapping screws and metal corners are used for fastening.
It is recommended to make a ventilation hole in the lower half of the frame to allow fresh air to enter the room. The window is covered with a metal mesh with small cells.
Walls and roof
Profiled sheets or chipboard sheets are attached to the installed frame using self-tapping screws. The result is three solid walls and one wall with a recess for a door. For strength, additional crossbars and racks are attached to the two main vertical bars that will hold the door. Hinges are installed on them.
The roof should protrude about 25 cm above the wall to prevent precipitation from getting inside the garage. It is advisable to make the roof pitched so that water and snow do not linger on its surface. To do this, one of the beams is made short.
For the roof, first lay out the transverse beams, then a layer of boards, only after that they begin to cover it with roofing felt. The covering layer can be made of slate, corrugated board or tiles.
Assembly of the structure
After the foundation has been erected, the assembly of the structure begins:
- Support beams made of wooden beams or metal are attached to the frozen foundation. It is advisable to put waterproofing under the material. Anchors are used to secure the support.
- To install the frame, vertical supports are attached to the corners, which are connected to each other by horizontal jumpers.
- After the frame is erected, the roofing begins. A beam is attached between two opposite sides. One side is made smaller so that the roof is sloped.
- Then they begin to cover the garage, for example, with sheets of plywood or corrugated sheets. At this stage, if necessary, an insulating layer is installed, for example, from mineral wool.
Article on the topic: What can you use to fill a garage floor?
At the last stage, the roof is formed, the door is installed and the entrance to the building is organized.
Spray painting
Do-it-yourself repairs are not a quick and painstaking task. Even to spray paint, you need to prepare the surface. I want the paint not to peel off and the new shiny sides not to be dotted with painted scratches.
Spray painting parts
In order for the paint to lay evenly and last as long as possible, actions are required as in the usual repair of a damaged surface: leveling, putty, primer and sometimes intermediate procedures. But which parts exactly require special attention?
Painting the main details
So, let's begin. The moped doesn't have many parts that need painting. First of all, these are the tank, sides and tail. Wings. The tank is made of steel and can be painted using automotive technology. If the dents are shallow, then they can be sanded and puttied along with the rest of the scratches. Then go over it with sandpaper, cover it with a primer and after drying apply paint. Both primer, paint, and varnish can be applied with a spray can. It will be necessary to give several layers after the previous coating has completely dried. You can apply stickers before applying the varnish. Under varnish they look richer and cannot be washed off with a high pressure washer.
Scooter decorated with stickers
Moped sides and fenders are usually made of thick ABS plastic. Putty and primer must be purchased specifically for this material. The sidewalls do not suffer much from use. Maybe they don't need to be painted? Only if the painting does not change the concept.
How to solder cracks correctly
The front part of the wing will most likely undergo extensive repairs. The cracks need to be soldered with a soldering iron and then with the same soldering iron, press in the wire mesh, which can be bought at a hardware store. This is a mesh for plaster. The cell size is two millimeters. The mesh will strengthen the fault. The scar from the soldering iron must be cleaned with coarse sandpaper and then puttied. Further painting operations are the same as with the tank. But there must be primer for plastic. Otherwise the paint will bubble.
Sealing a crack on a scooter
We restore plastic
The plastic of the scooter, although it is also made of ABS, is thinner. And there is a chance, if you start painting a scooter, you will ruin everything with your own hands. First, it is necessary to determine how many elements of plastic are lost irretrievably. Is the repair justified, or is it easier to find another part, a new one? A careful scooter owner never leaves plastic fragments at the crash site.
Even a piece crushed to smithereens can be folded like a puzzle and soldered on the wire mesh, which has already been discussed. Although for many scooters the Chinese have established the production of cladding parts. The new plastic is already painted and if the color does not match, it can be changed. Simply spray paint without additional preparation. Just matte it a little with sandpaper (to matte means to make the surface matte).
Severely damaged part after sealing
The entire process of restoring the plastic will take much longer than the rest of the scooter's painting. Repairing plastic with a soldering iron is quite a harmful task. All work must be carried out in well-ventilated areas.
Preparing for painting
Before painting, the area where the paint will be sprayed must be free of dust. Because electrified dust will stick to the paint and then no amount of sanding will remove this grain. If you are desperate to achieve the result you expected with a spray can, and still decide to take the plastic to professional painters, persistently warn them that there is no need to dry plastic in the drying chamber. Let him stay with them longer. In the drying chamber, the parts will simply shrink, like a pure wool sweater in boiling water. Afterwards, all this “beauty” can simply be thrown away. The facings will not stretch over the fastening points.
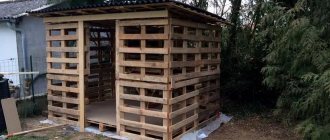
DIY motorcycle garage
The beauty of owning a motorcycle doesn't stop at the ride. It's also the hours spent in the garage tinkering with parts, drinking ice-cold beer, listening to your favorite music, and getting your hands dirty.
The increase in demand for motorcycles has forced many to build garages, which obviously means better preservation of the equipment, as well as having space in the garage to work on the motorcycle.
Motorcycle garages (aka DIY motorcycle repair shops) are starting to pop up in cities around the world, and they have a bright future.
The concept is simple. At these motorcycle workshops you can come and work on your bike. Obviously the smaller parts vary from parts store to garage. Each such garage has almost the entire set of necessary tools needed to configure and maintain your motorcycle.
In short, it's a wrench lover's paradise.
When you walk in, you'll first notice the walls covered with a variety of (mostly vintage) motorcycles. From classic BMWs and Hondas to Scramblers and adventure Harleys.
Once you stop staring at the pictures, you'll see toolboxes, oily rags, spare parts, and special compartments for working on your bike in the garage.
Reasons why you should think about a garage for motor vehicles:
- the ability to install the structure anywhere;
- protection from the actions of intruders;
- shelter from adverse weather conditions, it is especially important to remove vehicles for winter storage (rain, snow contribute to the development of corrosion on all parts);
- it is convenient to carry out repair work in the garage;
- All spare parts and tools can be stored in the garage.
If you make the garage at the dacha spacious, warm and decorate each zone, then the place will become ideal not only for storing motorcycles, but also for spending free time.
Design is needed everywhere
The structure intended for parking a motorcycle can be different: small, large, already built or just being designed. In any case, it is necessary to provide:
- Insulation, ventilation.
- Finished with materials of increased wear resistance.
- Good lighting.
- Availability of racks, shelves, furniture.
- Division into target zones.
- Determining the location of a motorcycle mothballed for the winter. The main criterion is a convenient, unhindered approach.
Thanks to the design, you can spend a long time in the garage, enjoying comfort, even in the coldest periods of the year.
Advantages and disadvantages
The advantages of a motorcycle garage include:
- ease of assembly;
- the purchase of material does not require a lot of financial costs;
- You can make any shape;
- transport will be protected from sunlight, rays, rain, snow;
- the ability to store tools and spare parts in a separate place.
Disadvantages depend on the type of design.
- Shells, pencil cases, and tents are not very suitable for storing a motorcycle. The buildings are suitable for temporary shelter from precipitation. They are not suitable for permanent storage. There is little space in them, so there is no opportunity to carry out repair work and store spare parts and tools. The burglary resistance of structures is low.
- Buildings made of wood or chipboard are considered unsafe. The material absorbs gasoline vapors, therefore it has a high level of flammability.
- There is no point in building a large foam block garage for a motorcycle. Much less space is required to park and maintain the bike.
Having studied the detailed characteristics of suitable materials and types of structures, you will be able to choose an acceptable and affordable option.
Determining the size and type of the future garage
There is no need to build a room that is too large for a motorcycle. A drawing is first made in which the dimensions and design features are specified. Then they determine the material and calculate its quantity.
Article on the topic: How to build a polycarbonate fence yourself
The following types of structures can be built for motor vehicles:
- an ordinary, spacious foam block garage;
- steel frame pencil case;
- building made of sandwich panels;
- garage-shell.
It is best to build a spacious room so that you can approach the transport from any side. A workshop area should be planned for carrying out repair work. You also need to allocate space for storing necessary things and tools.
Even if you plan to build a mini-garage, you need to take the dimensions with some margin. This is done so that if the bike is replaced with a new model, the dimensions match.
For motorcycle
The approximate dimensions of a garage for a motorcycle are: the height of the building is at least 1.5 meters (it is better to focus on the height of the owner), the length is 3 meters, and the width is 2 meters.
For scooter
Standard dimensions of a covering structure for a scooter: length from 1.3 to 5 meters, width from 1.2 to 2.5 meters, height 2 meters.
For ATV
The width and height of the ATV is 1.2 meters, length - 2.3 meters. Based on these parameters, the dimensions of the structure itself are calculated.
For a convenient approach, leave 60 cm on each side of the ATV. On the side opposite from the door, it is advisable to leave a larger distance, about 2.5 meters, for repair work.
So, a garage for an ATV should be 4.5 meters long, 2.5 meters high and wide.
Manufacturing
So, we took a PVC pipe with tees and pipes. We make five U-shaped frames. We cut off the upper pieces of the pipe, starting from 90 cm, then adding 5 cm for each additional element.
In general, we follow a simple scheme:
We cut off the side elements starting from 1.5 m, adding 3.8 cm each
It turns out that two elements are 1.5 m each, two are 1.54 m each, etc.
The essence of this step is to trim the tees and connect the elements.
We cut the tee connections so that they fit flush to each other on the connecting element (trailer mount or long bolt). Then we string all the tees with the tubes already attached to them onto the connecting element.
At this stage of our project, we begin cutting and sewing the tarpaulin roof, which will be attached to the already prepared tubular frame.
When cutting the tarpaulin, consider the length of each U-shaped element, i.e. Based on the dimensions of the smallest U-shaped piece, the length of the piece of tarpaulin should be 1.5 m plus 1.5 m plus 90 cm plus additional space for pipe and seam. The height can be measured by placing all tubes up, the middle one at 90 degrees, and the side tubes at 45 degrees. The height of the tarpaulin will be equal to the distance between the two elements. In the central part of the awning, measure 90 cm and begin to gradually lower the length to the ends of the tarpaulin piece. Sew 7.5 cm along the edge of the awning in the places where the tubes are supposed to pass.
So, we stitched the tarpaulin in those places where the pipes need to be inserted, leave a small space in the connection area so that this place can be easily reached when it is necessary to glue the pipes.
Put everything together, glue the joints so that all the elements are straightened.
Well, our homemade motorcycle garage is ready! As you can see, it didn’t take you much time to build such an original shelter, and your “iron horse” is now reliably protected from any weather!
Selection of materials for construction
To build a foundation, you need to prepare crushed stone, sand and cement. Beams or metal panels for the base and frame will be useful.
The construction of the building is possible from the following materials:
- Metal structures are distinguished by their strength and reliability.
- A brick building is strong, reliable and durable, but building brick walls requires skills.
- Foam blocks are less expensive than bricks. The foam block structure retains heat well and is resistant to moisture. The design is not difficult to assemble.
- An economical option is a garage made of wood. Wooden buildings look beautiful, retain heat well, are strong and durable. The material must first be treated with antiseptics and impregnated with fire retardants. These compounds disinfect the surface and increase the fire resistance level.
- It is possible to easily and quickly build a garage from sandwich panels or corrugated sheets.
To work quickly and easily, you will need tools: a shovel, a drill, screws, anchors, a screwdriver, a welding machine, an angle grinder.
Building a garage with your own hands
The construction of a structure for storing a motorcycle begins with the construction of a foundation and a ramp for easy entry into the premises. Then they begin to build the frame, walls and roof.
Foundation
The place where construction is planned is cleared of dust and debris. In the future, you should perform a number of actions:
- A trench 18 cm deep is dug along the entire perimeter of the proposed building.
- A layer of crushed stone and sand is laid at the bottom of the trench.
- Two bars with a cross section of 10 by 16 cm are installed along the perimeter so that after pouring the solution, half of the bars remain in the concrete.
- Vertical beams with a section of 50 by 50 cm are driven into the corners of the structure. They will serve as a frame.
- Mix the cement. The resulting solution is poured onto the floor surface.
Article on the topic: How to insulate a panel house from the inside
Construction of the frame
As soon as the concrete screed has dried, construction of the frame begins. It is made of wood or metal. The wooden structure is pre-treated with antiseptic compounds.
Additional bars measuring 50 by 50 cm are installed along the perimeter of the future structure at a slight slope. They will serve as support for the roof. Self-tapping screws and metal corners are used for fastening.
It is recommended to make a ventilation hole in the lower half of the frame to allow fresh air to enter the room. The window is covered with a metal mesh with small cells.
Walls and roof
Profiled sheets or chipboard sheets are attached to the installed frame using self-tapping screws. The result is three solid walls and one wall with a recess for a door. For strength, additional crossbars and racks are attached to the two main vertical bars that will hold the door. Hinges are installed on them.
The roof should protrude about 25 cm above the wall to prevent precipitation from getting inside the garage. It is advisable to make the roof pitched so that water and snow do not linger on its surface. To do this, one of the beams is made short.
For the roof, first lay out the transverse beams, then a layer of boards, only after that they begin to cover it with roofing felt. The covering layer can be made of slate, corrugated board or tiles.
Assembly of the structure
After the foundation has been erected, the assembly of the structure begins:
- Support beams made of wooden beams or metal are attached to the frozen foundation. It is advisable to put waterproofing under the material. Anchors are used to secure the support.
- To install the frame, vertical supports are attached to the corners, which are connected to each other by horizontal jumpers.
- After the frame is erected, the roofing begins. A beam is attached between two opposite sides. One side is made smaller so that the roof is sloped.
- Then they begin to cover the garage, for example, with sheets of plywood or corrugated sheets. At this stage, if necessary, an insulating layer is installed, for example, from mineral wool.
At the last stage, the roof is formed, the door is installed and the entrance to the building is organized.
Base
First, you need to prepare the site, apply markings and remove a layer of soil. Afterwards, you need to install the foundation and deepen it - 30-40 centimeters will be enough. The poured concrete will harden for almost a month, so it can be replaced with ready-made blocks.
When everything is ready, you need to lay a waterproofing material, preferably bitumen. This will reduce the chances of your garage floor flooding.
Then you can begin installing the wooden frame. First, the frame is laid along the foundation, then the racks are placed in the corners. They need to be strengthened with struts. The upper part of the racks also needs to be tied with strapping. Racks are also placed along each wall, an approximate step of 60 centimeters.
Before covering the walls, fill the empty space with insulation. Vapor barrier film will also be useful in this job.
Setting up a garage for a motorcycle with your own hands
If you want to ride your motorcycle for a long time and without problems, do not forget to pick up the tool from time to time.
The easiest place to tinker with a motorcycle is where it is permanently stored. The best option is a good garage. However, very few people own it. And in the countryside, where most of the motorcycles are “registered,” they are usually kept anywhere - in a barn next to chickens and goats, or just in the yard (it’s good, if at least with a canopy).
No matter how the motorcycle is stored, in any case it is necessary to clear and somehow allocate space sufficient to ensure that there is access to the standing “iron horse” from all sides.
Article on the topic: How to calculate the tax on land under a garage
Selecting a locksmith tool
Let's assume there is such a place (garage, barn, or even a corner on the terrace). Now it needs to be equipped accordingly. You will need a garage tool. These are screwdrivers, wrenches, pliers, pullers, drifts.
- You need several screwdrivers of different sizes - small, medium, power (to “halve” the engine).
- You will need at least a dozen wrenches - for all sizes from “5.5” to “36”. It is advisable to select such a number of keys that there are at least two keys of the same size. This set should be supplemented with adjustable wrenches.
- Double-sided wrenches are very convenient, having a open-end jaw on one side and a socket on the other.
- Wherever possible, try to use socket wrenches - by grabbing all 6 edges, they will cope with tight nuts. Just be careful - you can buy tools designed for inch-sized fasteners (for Harleys or Nortons).
Also, don’t go cheap – often shiny tools from Asian-made sets break like matches.
The working tool must be in order. Open-end wrenches with worn jaw jaws should be disposed of without regret. They jam the edges of the nuts and ruin them.
We are starting to arrange the garage
In addition to keys and screwdrivers you will need:
- Bench and vice;
- Metal hacksaw and electric drill (with a set of drills);
- A set of taps and dies with collars and die holders;
- Scrapers, metal ruler, caliper;
- Files, needle files, bits, chisels;
- Several hammers of different sizes, a soldering iron.
All this can be placed on a shield mounted on the wall in front of the workbench - everything is in sight and always at hand.
Of course, it will be difficult for a motorcyclist without special devices - for example, various types of pullers. They are not needed often, so it is better to keep them away.
On shelves located at medium height (within reach when standing on the floor), you can place fasteners, small spare parts, and operating materials. Try to group items of the same purpose together. For example:
- On the 1st shelf - everything related to the power system (carburetor parts, gas taps);
- On the 2nd and 3rd shelves - “electrics” (switches, lights, wires, candles);
- On the 4th - “rubber equipment” (pipes, “corrugations”, chain covers, tire repair kits).
Shelves in the garage can be of any length and height, and their width should be limited to 20 centimeters, since installing objects in two rows is not very convenient.
The back wall is the perfect place for a wardrobe. Above it you can place mezzanines for storing, for example, luggage racks and camping equipment.
We place spare parts for motorcycles
Be sure to sort the fasteners by size or at least by purpose: bolts - separately, nuts - separately. Believe me, if they are stored in bulk, it sometimes takes more time to find the necessary screws or washers than to assemble a particular unit.
- Store all “tongue screws” in glass jars. It’s very convenient - the nuts and washers are always visible and don’t take up much space.
- Large fasteners (M12 and larger) are best kept in plastic jars.
- Local lighting lamps should be mounted above the workbench, and sockets for power tools should be installed on the wall in front of it.
- Large items (wheels, tires, pipes, mufflers, old frames, forks) are best placed on the wall opposite the workbench or under the ceiling, securing them securely.
Article on the topic: Sharar words for which you are banned
Grounding the power tool
The workbench must be properly grounded. In any case, a wooden grate should be placed on the floor in front of it. Some people think that it is enough to stick a screwdriver into the ground, tie a wire to it - and the grounding is ready. To create a good “ground” you need to tinker thoroughly.
The easiest way is to drive a steel pipe with a diameter of up to 5 cm and a length of about 3 m into the ground so that its upper end is at a distance of 0.5...1 m from the surface. Another option: to a depth of 3 m, bury some unnecessary “piece of hardware” of a fairly large size - an old bucket, a leaky gas tank, a canister.
To increase conductivity, it is recommended to sprinkle ash, charcoal, coke or similar hygroscopic substances, including ordinary table salt, around the grounding.
It is best to connect the grounding to the grounded device with steel rods with a diameter of 6...10 mm using welding.
If the room is damp, then it is allowed to use electrical equipment with a voltage of no more than 36V, and complete isolation from the electrical network must be provided. That is, to lower the voltage it is allowed to use only transformers, and not autotransformers!
It is better to have two soldering irons. Use one with a power of 40–60 W when working with electrical equipment, and the other, 90 W, for soldering cables, tinning and other “large” tasks. Accordingly, you will need two different fluxes.
Don't forget about the hood in the garage
Be careful - the vapors of hydrochloric acid released during soldering can seriously damage the tool located above the workbench. The same applies to the sulfuric acid vapor released when charging the battery. Therefore, either do this work outside the garage, or provide a good exhaust hood.
The hood will also come in handy when you “drive” the engine. In this case, the exhaust hoses must be placed on the ends of the mufflers. But no matter how confident you are in the exhaust system and exhaust hood, never start the engine in a closed garage! This is deadly!
We simplify motorcycle repairs
Most of the serviceable components are located in the lower part of the motorcycle, and working with them while kneeling or bending over is very tiring.
A special overpass 40 cm high will help here. If you roll a motorcycle onto it, then sitting next to it on a stool, you can safely install the ignition and adjust the valves. You just need to make sure that the overpass is wide enough, strong, level, and stable.
Experienced motorcyclists can find additional equipment in their garage:
- Welding machine and various machines;
- A drill with a set of cutters for finishing two-stroke engines;
- Compressor for inflating tires and for spray painting.
Article on the topic: How high can you build a garage?
Of course, all this is not essential equipment. What you will need from the very beginning is a sharpener, preferably double-sided, with circles of different grain sizes.
We take care of the garage, tools, motorcycle
Don't forget about fire safety measures. Place a box of sand and a fire extinguisher near the entrance. Cover any oil spilled on the floor with sand or sawdust, then collect it and throw it away. Do not store rags in a lump - it may spontaneously ignite! Do all work with open fire only outside the garage.
A thrifty owner will never waste anything. Even the waste drained from the engine can be carefully poured into a tank with a wide neck, tightly closed with a lid and set aside. When it settles, dirt, ash, and other nasty things will precipitate. All that remains is to scoop out the “clean product” and burn all bottom sediments.
This product can be used to lubricate the hinges of gates (in the garage), doors, wheels of luggage, garden carts, lead screws of vices, jacks. Here you can harden tools, soak rusty, preserved or overly dirty parts.
It is better to wash the motorcycle outside the garage. And to wash yourself, attach a washstand to one of the gate leaves.
A broom, dustpan and dustbin will help you clean up your garage. Don’t be like those would-be mechanics whose workshop turns into a branch of a landfill. Throw away your trash in a timely manner - it will be nice for you!
One comment on “Building a motorcycle garage with your own hands”
I think that many of the recommendations described in the article are suitable not only for motorcyclists, but also for car owners who have their own garage.
DIY motorcycle garage
Nowadays motorcycles, scooters and ATVs are becoming increasingly popular. Of course, every owner wants to maintain all the technical characteristics and performance qualities of their motorcycle for as long as possible. And here it is important to have a decent storage space. An excellent solution is to build a motorcycle garage yourself, personally draw up a plan and provide for all the nuances when arranging the premises. Someone is building large enough buildings, capital ones, so that they can organize a workshop there and have space for a warehouse. Other bike enthusiasts limit themselves to building a compact box. Such buildings can be quite small, but they still allow you to protect your motorcycle from intruders and negative atmospheric and mechanical influences.
Today we will look in more detail at how to build a garage for a motorcycle with your own hands, what nuances and important factors need to be taken into account. We will learn how to build such boxes, their pros and cons, features of arrangement and design. The main task is to make the design of the motorcycle garage high-quality, reliable, and durable.
How to store a scooter or heavy ATV
A miniature scooter can easily be placed under a canopy or covered with a PVC fabric cover; often the car can be stored in the most unexpected places, from a basement to a barn. An ATV, given its dimensions, requires a full-fledged garage, albeit small, but properly arranged, where you can store spare parts, fuel, and, if necessary, perform maintenance and repair of units.
To properly build a garage, you need to take into account several basic requirements for the storage conditions of an ATV or scooter:
In addition, the garage should occupy a minimum of space and perform the main functions of reliably protecting equipment from rain and annoying birds.
Design features, choice of material
Please note: even a small box must be a full-fledged frame structure. It is necessary to determine a place for the motorcycle, for its delivery, to provide the necessary minimum space for possible work with the equipment.
Determining the size of the future garage
First of all, you will need to accurately determine all the parameters of your motorcycle garage. Before starting construction, you should already have a drawing in your hands, a plan in which you will indicate the specific dimensions and design features of the structure.
Article on the topic: How to choose a garage for a car
Experts note an interesting point: even if you are focused on building a compact box, you still need to calculate its dimensions with a certain margin. After all, then you can use this garage for your new motorcycle. Let's say you now have a small bike, and then you want to buy a model with a long wheelbase or a large road bike. Of course, it is irrational to build a new box every time.
Here are the dimensions of a garage. The required room area is 2 by 3 meters. Some make the height one and a half meters, but it is still more convenient to focus on your height. Then you can move freely inside the box. You can also make the minimum dimensions when the height is only 1.3 meters. In this case, it is necessary to provide two opening sections: the top cover of the box, as well as one narrow wall.
Selecting materials
Now there are a lot of materials on the construction market at quite affordable prices. There are all the possibilities to make the construction of a motorcycle garage quick and economical. You will need the following materials for work.
- Cement, crushed stone and sand are needed for arranging the entrance area, as well as for building the foundation.
- The timber is used in the construction of the foundation. The parameters of the beam should be 100 by 150 mm, and the length is already determined in accordance with the specified dimensions of the box.
- A timber is also needed for the frame of the box. Here it is quite possible to get by with material with a smaller cross-section, for example, 50 to 50.
- Remember that you have to make doors for the room, as well as a canopy.
- Finishing is carried out using paints and varnishes, as well as fire retardants.
- A roofing felt coating will protect you from moisture and precipitation.
- You also need a set of tools: a drill and a shovel, anchors and screws, a container for diluting the concrete mixture.
Remember that you will also have to install a secure lock on the motorcycle box. It is advisable to use two locks: one padlock and the other internal, for example, a deadbolt.
Lighting
For comfortable lighting, you need to take into account the size of the room, the number of work areas, and the color of the walls. The best option for a garage is a multi-level lighting system. This is when a central lamp and spot lighting for work areas are installed.
To calculate the power of ceiling lighting, we use the formula P = S x W/N, where P is the total required power, W/m2; W – power of one lamp, W; N – number of lamps, pcs.; S – garage area, m2.
The optimal indicator for LED and halogen lamps is 16–20 W/m2, if the ceiling height in the room is up to 2.5 m. If the ceilings are higher, we multiply the indicator by 1.5. LED lamps are the most economical, their working life can be 50 thousand hours, and they are 50% more profitable than fluorescent lamps.
Boxing construction
At the first stage, the foundation is laid. It is also necessary to make a high-quality access ramp. An important point: the craftsmen note that it is advisable to arrange the entrance for a motorcycle on the side where the door is located, that is, on a narrow wall. Then the other two walls can be left blank in the garage. It will be necessary to protect the box from sewage getting inside. To do this, the ground level must be below the level of the solid foundation.
Now let's look at the work process in more detail.
- First of all, a trench is dug along the entire perimeter of the future box. The protrusion from the edges is 20 cm. The depth of the trench should be 10-20 cm.
- Then a cushion is made at the bottom of the pit. Two layers of 5 cm of crushed stone and sand are laid out; they compact well.
- For high-quality pouring of the foundation, it is advisable to make formwork from wooden boards with a small width.
- Now take two beams. They will be the foundation of boxing. Reinforcement with a length of approximately 45 cm is driven into them. They must go into the ground. Be extremely careful: the beams are positioned so that half of them is above the foundation, and the other half is directly in the foundation.
- Then you need to hammer two 50 by 50 mm beams into the ground. They should be on both sides of the beam, which is located at the base of the garage wall.
- To make the fastening more reliable, some garage workers drive pegs into the timber with nails.
- Mix the cement mortar. Carefully pour the foundation. The area under the foundation beams is completely filled with the solution. You should then be left with two timbers that are halfway into the foundation, as well as a couple of posts for the frame of the box.
- Make a convenient slope for entering the garage.
- Carefully level the floor inside the box.
- Make a frame for your motorcycle garage. You will need a beam 50 by 50 mm.
Article on the topic: What is a rebirth bath
Another significant point. To make your motorcycle garage last longer, you need to take care of waterproofing and prevent moisture accumulation. Make the longitudinal beam 8 cm higher than the front wall of the box. This will allow sediment to flow freely from the surface.
We are finishing the work
The frame can be covered with chipboard. The sheets are screwed with self-tapping screws. The lid must be secured so that it opens towards the wall of the main garage. The door is mounted with awnings, and locking brackets are also attached to the outside.
It is advisable to cover the lid with rolled material, for example, roofing felt, to protect it from precipitation. Wooden elements are coated with drying oil to provide wear resistance. At the final stage, you can also take care of the design of the box: decorate it with a sign or inscription.
Advantages and disadvantages
Let's determine the main disadvantages and advantages of such a compact motorcycle box made from chipboard sheets. Of course, the main advantages here are cost-effectiveness and greater efficiency of work. The level of comfort in such a building is also quite high, and it is more pleasant to stay in than a metal building.
Unfortunately, there are also some disadvantages. The most significant is the low resistance of the structure to burglary. Of course, experienced attackers will be able to cope with the structures and open such a garage. You can additionally cover it with clapboard, or reinforce it with metal sheets, make linings in the area of locks and awnings.
Another negative factor is the material’s instability to fire. It must be treated with fire retardants several times. The optimal solution is to choose a non-combustible building material, but this will require large expenses.
Experts advise making the box from metal and using chipboard for finishing. Then the structure will be more reliable, safe and durable.