photo from the site sexy tattoo.
Tattoos are a great way to stand out from the crowd and express your individuality. Even in ancient times, tribal leaders decorated their skin with colorful images to show their greatness. In the modern world, drawings on the body have long ceased to be something wild. Millions of people put meaning into every pattern on their skin and wear it with pride. Bright drawings have long become a kind of calling card of stylish and courageous people.
However, not every one of us, for some reason, can afford to get a real tattoo. Some people think that this is too important a step, which they may have to regret, some people are not allowed by their position, while others really dream of having a drawing on their body, but are terrified of the pain, the sight of the couch and the gloved hands of the master. Of course, in this case, you can ask a friend with a homemade machine to get a real tattoo, but everyone has long known that the quality of such “art” leaves much to be desired. Removing this work is quite a painful and expensive process, so it is better not to risk it. This is where a variety of temporary tattoos come to the rescue: from mehendi to simple decals, which even in childhood seemed like fun to us, but have now become a real trend.
But what to do when you want to bring your temporary tattoo closer to the real one, without resorting to risks and without exposing yourself to unnecessary pain?
The answer is simple: make a tattoo at home using a simple gel pen and needle. This technology differs from the real depth of ink application. Don't be alarmed, the epidermal punctures are so thin that the pattern will disappear from your skin in a few weeks. This is because the top layer of our skin is renewed quite often, which allows us to make similar drawings several times, constantly experimenting and changing our appearance and style.
photo from the site otatuirovkah.ru
Emphasize your individuality
Many young people strive to get an original and unique tattoo. Unfortunately, not everyone understands that a tattoo is not a temporary design, but that the coloring substance goes deep into the skin. Consequently, such a graphic image will accompany you throughout your life. But if you still want to express your individuality and uniqueness, then you can get a temporary tattoo.
Of course, it is better to trust the application of long-term tattoos to proven, experienced and qualified artists. But temporary decoration is easy to make yourself. As you already understand, today we will talk about how you can get a tattoo at home.
Before we look at the instructions for applying images to the skin, let's find out what types of temporary tattoos exist in nature. These include:
- mehendi - images applied with henna;
- airbrush drawings;
- biotattoo;
- translations;
- flickering designs;
- crystal images.
If you have always dreamed of becoming the owner of a sophisticated and symbolic tattoo, but are not yet ready to put such a mark on your body for life, try applying a temporary design. As practice shows, this type of tattoo is washed off after 10-14 days.
The answer to the question of how to make a temporary tattoo at home lies directly in the chosen type of image applied to the skin. The easiest way to work independently is with transfer materials, rhinestones, pens, pencils, and permanent markers. If you have even the slightest drawing skills, then you will master airbrush drawings. Otherwise, leave this task to a professional.
Before we study the basic methods of applying temporary tattoos, let's draw up a set of rules:
- It is imperative to disinfect your skin and hands, especially if you work with a needle;
- first apply the outline of the design to the skin, and then just start working with the dye;
- To make the tattoo last longer, you need to sprinkle it with talcum powder on top;
- Observe all safety precautions when working with a homemade tattoo machine;
- If you want to see the tattoo for longer than two weeks, then in the first two days do not treat its surface with soap or other detergents and a washcloth.
How to wash it off?
Removing a temporary tattoo is very easy. There are several common methods:
- Cleaning. You will need baby oil and alcohol. Apply baby oil to the temporary tattoo and wait a few minutes. After this, you should moisten a swab or paper towel in alcohol and begin to vigorously rub the drawing with it. When the tattoo is completely gone, wash the skin with soap and water.
- Exfoliation. Removal occurs using tape. It is necessary to glue a piece of tape to the drawing, press it firmly, and then sharply tear it off. If necessary, the procedure is repeated several times.
- Cold cream. Any hand or face cream will do, but it is important that it is cold.
The cream is applied to the tattoo in an even layer. You need to wait until it is absorbed. Then the tattoo can be easily erased with a regular washcloth. Attention. Remaining cream can be removed with soap and water. - Makeup remover. Nail polish remover will also work. You need to saturate a cotton swab with it and start rubbing the tattoo until the result appears. Then the skin should be rinsed thoroughly in warm water.
Let's set up a tattoo parlor at home
Often on various forums, and even in everyday conversations, you can hear that people are interested in how to make a tattoo machine at home. This is mainly of interest to representatives of the stronger half of humanity. Of course, it is possible to build such a device from scrap materials, but keep in mind that you do not need to use it to apply tattoos to other people. If you decide to work with such a tool, then only endanger yourself. Still, permanent images must be applied to the skin in specialized salons.
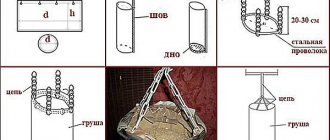
Before you learn how to make a tattoo machine at home, I would like to pay attention to the necessary consumables. First of all, you will need a motor. The base of the machine will be an ordinary pen, and the piston for supplying the dye will be a guitar string. The needle must be connected to the string and rotate. This is necessary to introduce the dye into the thickness of the skin. A homemade tattoo machine looks like this.
Cosmetic pencil options
There is, of course, more variety here than among pens. Guys will have to get into mom's makeup bag or stand blushing in the cosmetics department. It’s much easier for girls to navigate, but for guys, let’s figure it out.
An eyeliner (eyeliner), eyebrow or lip pencil will suit our purpose.
These are the so-called liners. If you want a high-quality drawing, take waterproof pencils from well-known brands:
- Avon;
- Maybelline;
- loreal.
Well, if you don’t have much money saved from dinners, take what you can afford.
Making a tattoo in the style of Stick 'n' pokes
If you decide to apply a tattoo with a needle yourself, then you do not need to use a special device for this. You just need to arm yourself with thread, a needle, dye and patience. Now you will learn how to make a tattoo at home with a needle. Just be sure to follow all disinfection rules.
Necessary materials:
- razor;
- disinfectant;
- pencil or permanent marker;
- cotton pads;
- coloring matter;
- needle;
- saucer;
- cotton thread;
- candle;
- lighter.
Step-by-step description of the process:
- We start by preparing the skin. Be sure to remove hairs with a razor.
- We treat the surface of the skin with a disinfectant.
- Next, draw the drawing using a permanent marker or pencil. Be sure to clearly draw the contour lines.
- Next, carefully sterilize the tip of the needle. To do this, bring it to the candle flame and hold it until it reaches maximum heat.
- Having stepped back approximately 0.3 mm from the tip of the needle, we begin to wind the cotton thread, forming a ball.
- Pour the coloring matter of the desired shade into a saucer or shallow bowl.
- Next, we dip the needle into the paint to the level of the thread and begin to apply the tattoo using point movements along the contour lines.
- This imaging technique involves shallow puncture of the skin.
- We continue to apply the tattoo, removing excess paint with a cotton pad or a piece of fabric.
- Upon completion of work, all materials and devices used must be disposed of.
- Finally, rinse the tattoo site thoroughly with lukewarm water.
Homemade tattoo, sacrificing the ideal for the individual
Home tattooing is not just experiments by non-professionals, but a full-fledged style that has clear criteria and features. This type of art has many fans.
Of course, there are also plenty of those who say that such drawings look ridiculous and stupid, especially for professional tattoo artists.
If the idea of getting a tattoo at home has occurred to you, you will be interested in this article dedicated to homemade tattoos.
Features of home tattoos
As a rule, home tattoos are done spontaneously and sketches are not selected for months.
But they are always unique and you are unlikely to see another exactly the same from a passerby, which cannot be said about the now popular images of owls and deer on various parts of the body.
The idea of making a home tattoo often comes at parties with the presence of alcohol, and the garage becomes a home “tattoo parlor”.
Tattooing at home has the following features:
- The drawings are made in the style of minimalism. Often these are only outlines, simple inscriptions and elementary figures.
- Most often, such tattoos use one color; colored pigments are used extremely rarely.
- The images are flat, no complex technical techniques are used, and fans of this style, as a rule, do not know them.
- The result is always unpredictable, which makes the process of getting tattoos exciting. That is why those who try to make a tattoo at home once often become ardent fans of this style.
- The tattoos are far from ideal. But they become a way of true self-expression. Usually tattoos made to oneself have a really deep meaning and are dear to its owner.
However, home tattoos have one thing in common with professional tattoos - getting such a tattoo will be just as painful.
We make tattoos ourselves
One of the alternatives to such an independent experiment is henna tattoos at home. They remain on the skin for a month, but the process of creating them is painless and safe. If you still decide that a temporary tattoo at home is not your option and you want to get a real tattoo, we will try to guide you in your next steps.
What you need to create a tattoo at home
In order for a home-made-tattoo to appear on your body, you will need:
- Talent. First of all, you need to have at least the most minimal artistic skills or a friend who has them. Otherwise, you risk getting a portac devoid of any aesthetic value.
- Courage. Another important condition is the firmness of the hand. Often, in order to achieve this firmness and determination, a tattoo at home is done after a dose of alcohol, so to speak “for courage.” But this is wrong and can lead to undesirable consequences. First of all, drinking alcohol increases blood pressure, as a result, when the skin is pierced, you will bleed profusely, whereas with normal blood pressure, only the appearance of ichor is possible. And the pigment may be less well accepted by the skin and the design will not be aesthetically pleasing.
- Equipment. “According to the classics,” a homemade rotary machine with a motor from household appliances is used. Below is a diagram of its manufacture. But you can also buy an inexpensive machine; there are many manufacturers.
- Pigment. The paint used is usually paste from gel pens or soot. But if you do not want the tattoo to become similar to those that adorn the bodies of former prison inmates after a short time, it is better to take care of high-quality pigments specifically designed for these purposes.
- Antiseptics. Remember sterility. Before applying the design, you must disassemble the machine and sterilize its parts! Failure to follow these rules can result in infection, inflammation, or prolonged healing.
Scheme for creating a tattoo at home
The following instructions will tell you how to make a tattoo at home:
- Decide on the location of the tattoo.
- The selected area of skin is treated with an antiseptic.
- Typically, a sketch in a homemade tattoo is not created in advance, but the design is immediately reproduced on the body. If you approach the issue responsibly, and this is most likely the case if you are reading this article, draw a sketch on paper or print out the picture you like, and then simply trace it with a pen along the outline.
- There is a simple way to transfer a sketch to the skin: take a solid deodorant and smear the picture with it, apply the paper to the skin and press firmly for a couple of minutes. Remove the paper, the sketch will be printed on the body.
- After this, the tattooing process begins.
- To prevent splashes of paint from interfering with the process of creating tattoos, arm yourself with a napkin with an antiseptic and wipe the skin from the accumulation of pigment.
- When the work is finished, clean the leather from any paint on its surface.
Source: https://womanmirror.ru/kosmetologiya/domashnee-tatu-zhertvuem-idealnym-radi-individualnogo.html
We decorate the body with a temporary tattoo
Let's say you want to decorate your body with an exquisite tattoo for a while. Many girls and boys prefer to apply images to open areas of the body during the beach season. Why not use a pen or permanent marker? Now you will learn how to make a tattoo at home with a pen. For these purposes, it is better to choose a writing object with a gel filler, and draw the outline with a thickened rod.
Necessary materials:
- gel-filled pens;
- permanent marker of the appropriate color;
- Polish for hair;
- talc;
- translation.
Step-by-step description of the process:
- We start with treating and disinfecting the skin.
- Next, using a transfer, we apply the image with a pen with a thin rod.
- We draw the contour lines with a marker, and color the inside of the tattoo with a pen of the desired color.
- Sprinkle the finished image with talcum powder.
- We remove the remaining talc with a piece of fabric and apply a fixing varnish on top.
- This is the kind of original tattoo that will appear on your body.
Mehendi - oriental decoration
Many representatives of the fairer sex look with admiration at the beautiful ethnic patterns applied to various parts of the body by Eastern women. You can create such an image, called mehndi or mehendi in practice, yourself. To do this, you should know how to make a henna tattoo at home.
In order for such a tattoo to last longer, you need to properly dilute the dye. Henna will give your skin a reddish or brownish tint. If you want the picture to be darker, add a little basma. Also note that it is better to dilute henna with freshly squeezed lemon juice rather than water.
Necessary materials:
- henna powder;
- granulated sugar;
- freshly squeezed lemon juice – ¼ tbsp.;
- syringe or cone-shaped bag;
- stencil blank.
Step-by-step description of the process:
- When creating mehendi, the majority of the time is spent preparing the dye.
- So, let's prepare all the necessary materials.
- Sift 1 tbsp into a separate bowl. l. henna and dilute with freshly squeezed lemon juice.
- The consistency of the mixture should resemble puree.
- We pack the dye in a plastic bag and leave it in a warm place for 12 hours.
- Then add granulated sugar and, if desired, 1 tsp. any essential oil extract.
- Gradually add more freshly squeezed lemon juice. The finished coloring matter should resemble toothpaste in texture.
- Now let's draw a stencil. You can also use a ready-made translation.
- We transfer the stencil to the selected area of the skin and fix it with adhesive tape so that the paint does not flow.
- We put the paint in a cone-shaped bag or syringe and apply it to the holes of the stencil.
- Carefully remove the stencil from your hand.
- Drying time for mehendi takes from 2 to 6 hours.
- Periodically, the drawing can be moistened with a mixture of lemon juice and essential oil extract.
- At first the mehendi will have a bright shade, but as it dries it will darken.
How to transfer a tattoo from paper to skin?
Transfer paper
can be replaced with regular tracing paper: trace the image on it so that the drawing is imprinted on the tracing paper.
Apply transfer gel to the disinfected skin and apply the tracing paper to the skin. Now you can remove it, the design will remain on the body
.
Interesting materials:
How to tie a stole to a coat? How to tie a stole on a jacket with a hood? How to tie a stole on a coat step by step? How to tie a stole on a coat with a hood? How to tie a stole on a down jacket with a hood? How to tie a stole around the neck of a coat? How to tie a stole around your neck? How to tie a stole over a jacket? How to tie scarves? How to tie a scarf on a coat with a hood?