How to make musical instruments at home with your own hands?
The beauty of homemade musical instruments is that they cost pennies, and the process of making them will appeal not only to adults, but also to children. Just imagine how much delight a child will have when he independently makes maracas, a Chinese drum, castanets or a pipe! Of course, homemade instruments do not produce perfect sound, but that is not the main point. Such an experience cannot be compared with anything. Classes on making homemade musical instruments are very useful in that the child learns to distinguish between their types, understands the operating principle of each of them, and knows what parts they consist of. And most importantly, joint work brings people together, and this is useful for both parents and their children. So what musical instruments can you make with your own hands? Let's look at the most interesting and simple options.
Maracas
This is, perhaps, one of the tools that the baby gets acquainted with while still in diapers. Maracas are a noise instrument. Rattles and other noise toys for babies are the prototype of maracas. Making them at home is as easy as shelling pears, and there are countless options. So, maracas can be made from:
- plastic bottles;
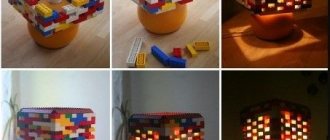
- pumpkins;
- coffee cans;
- Kinder Surprise eggs;
- cardboard cylinders from parchment or paper towels, etc.
The scheme for making maracas is quite simple: you need to pour a small amount of filler in the form of beads, peas, buttons, beads, small pebbles, sand or shot into the prepared container. All holes in the container must be securely closed (if it is a cardboard cylinder, cover it on both sides with thick cardboard) so that the filler does not spill out and the tool makes a loud noise. The maracas themselves can be decorated by painting bright patterns on them with acrylic paints or by sticking cute stickers. Handles can be attached to round containers for convenient use of the tool. For example, if you used Kinder eggs for your maracas, place them between two plastic spoons and secure them with twine.
Use everything new as a stress barrier to your first steps
Of course, for a beginner, the path will be associated with mistakes and stress, which you will want to avoid. Everything new is inevitable stress and headache. Stress and pain will be worse for only one reason: if you put off new things for later.
Overcoming the barrier to something new is quite difficult. The solution is as clear as mountain water: start doing something new right here and now.
It sounds simple, but it is very important to learn to take the initiative. By putting it off, you only increase stress. You can be afraid for several days, weeks and months, and still not begin to do anything. But do you definitely want to start?
No one knows how soon the stress will stop and the pain will go away. It all depends on your persistence. You may have to struggle for a couple of weeks to get started. It may take more time. You will be frustrated by the results and the fact that some things don’t work out, and at some point your brain will simply say: “Forget it! Here, look at what's interesting on Twitter and Instagram. Watch this movie, eat some ice cream and forget about it.”
All this can wait
All these distractions will bring pleasure, but only in the short term. The pleasure will go away as quickly as it came. Therefore, you need to try and not stop there, since achieving the desired result will bring satisfaction in the long term. The satisfaction from the work done will not go away for several more months.
Yes, it's hard, but it's worth it. Who knows, maybe the stress will last a week, or maybe a month? How can this period be reduced?
Remember that the more often you try new things, the easier it is to overcome the stress barrier.
So, you’ve learned something, you’re starting to succeed, the stress goes away, your head becomes lighter, and dopamine begins to be produced from progress and results. This is great, but there is always something left to try in order to go further and learn more.
And here we are again faced with stress, pain again and everything in a circle. Will it ever end? Yes, because stress and problems become less every time you get into something new without fear. After some time, this new thing will feel like an interesting adventure, which gives much more dopamine than stress. And you won't be afraid of anything anymore. All that remains is to speed up the learning process and bring the skills to automaticity.
Neurons and synapses
Along with this, you will face another problem. Questions will appear in your head: “Why am I doing this?” and “Why do I need it?” You most likely did not try to look for answers to them.
The fewer answers you have to these two questions, the weaker your motivation and purpose. Which means everything will fall apart like a house of cards, because you don’t know why you’re doing music.
Other difficult questions will follow: “Why do I forget what I’ve learned?”, “Who am I?”, “What am I doing here?”, “Why can’t I just give up creativity?”
Our brain is just a bunch of neurons inside our skull. These neurons have some of the information, but not all of the data. To build a complete picture, you need to connect neurons together to form synapses. The latter are constantly generated by the brain when we learn something. Neurons are generated during rest, communication with people and physical exercise.
We must remember that the brain is not able to constantly create synapses; it needs rest. Therefore, if you have learned something new, you should consolidate it with practice, and then relax for a while until the brain glues new connections during rest. Over time, the brain will learn to create synapses automatically, there will be less stress - this is why it is worth getting involved in something new more often, and this is why stress becomes less.
Repeat the old things in practice to strengthen the synapses, because “repetition is the mother of learning.”
Forgetting something will become more difficult if you constantly repeat it. And if you do forget something, then most likely you didn’t really need it. It's okay: there's always a reference book you can look into.
All you have to do is decide why you write music. Maybe you just like it? Or do you want to become a popular composer? Maybe you want to please someone with your creativity? You have to find the answers within a year of making music. A year is a sufficient period of time to find answers to these questions.
If you don’t find the answer, then there is a huge risk of abandoning everything, because you don’t understand why you need it. It’s very difficult to get answers before the start, since you don’t have results yet, which means you have no idea why you might be doing this. When you don't have an explanation, it's very difficult to start something new or continue something old. You will have to go through a wall of stress to find answers.
Dopamine reward mechanisms
It is equally important to relieve stress and enjoy the process and results. So you need to find ways to get dopamine.
We have already figured out how neurons and synapses work, now we need to talk about neuroplasticity. This is a thing that makes it possible to restore lost synapses much faster.
There are two ways to trigger neuroplasticity: focus (conscious reinforcement) and a sense of urgency. We've already seen why urgency and focus are so important in writing music, so we won't go over that again.
One way or another, both points do not work without dopamine. The brain must produce it, receiving dopamine from your success in music. As a result, achieving a goal forces you to dig further, because there is less stress and more pleasure.
Dopamine
There are two types of dopamine reward mechanisms—extrinsic and intrinsic. The first ones appear when someone else praises you. The second - when independently assessing your results.
Attention needs to be concentrated on internal mechanisms, since external ones will not always be with you. The more internal reward mechanisms you use, the easier the process goes, and the less stress becomes, gradually disappearing altogether. In general, the more internal rewards, the easier it is to show will and learn something new at high speed.
Dopamine requires resources: money, normal living conditions, adequate society with which you hang out. If these resources are not there, the amount of dopamine drops, because progress is too slow, you almost don’t see it. But what if there are no necessary resources?
Learn to delegate if doing it alone is too difficult and the process is slowing down. Don’t despair if you simply don’t have some resources - they will be compensated by dopamine, which you will earn in the process of learning and practice.
Remember that the “I achieved it myself, anyone can” method is either a lie or the courage of a madman. This is a very dangerous practice that can drain all your strength and all your time, which is why you risk breaking your psyche.
Should I do something alone for everyone? Decide for yourself, but agree to this only if you are ready for it.
Tambourine
To make this tool you will need a wooden embroidery hoop, 10 metal lemonade caps, 5 metal rods 2-2.5 cm long, electrical tape and 5 plates of thick cardboard, wood or metal 2-5 mm thick and measuring 1.5x1.5 cm. Between the hoops we place the plates at the same distance and fix them with electrical tape - they will hold the circles of the hoop. We connect the lids two at a time with the flat part and pierce them in the center with metal rods. As a result, we should have 5 elements, which must be securely attached using electrical tape between the plates at the same distance. Once the last element is attached, the tool can be used for its intended purpose.
Sheet music for children piano
Sheet music and diagrams for children xylophone
Music notation and musical development of children
Instructions for making kalimbu
This is already a more or less serious tool. It should be done for teenagers who have a desire not only to make noise, but also to create a semblance of melodies on their own.
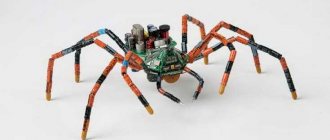
Kalimba is a very interesting instrument that you can make yourself
To make the tool you will need:
- slats 0.5 mm thick, 40 mm and 20 mm wide. The length of the slats is approximately 50 cm each;
- two ordinary smooth nails 80 mm long. They are used to make stops;
- two screws with mortise nuts; if there are no special ones, then ordinary ones can be used. Only when twisting there will be slight difficulties;
- anchor - the section without thread must have a length of at least 70 mm;
- fishing flag for the girder. This is the most important element of the tool. The sound quality of the instrument largely depends on it.
Materials required to create the tool
In addition to these accessories, you need to prepare clamps, carpentry glue, a hacksaw, pliers and measuring tools.
Case manufacturing
Step 1. Saw off four pieces, each 105 mm long, from a wide strip. Keep the length exactly, these dimensions affect the ability to create resonance of sounds, which is very important for any musical instrument.
4 identical pieces are cut from a wide strip
Step 2. Glue two parts together, generously coat the side edges with PVA glue and tighten them tightly with clamps. The elements must be left for at least a day to dry completely. Remains of glue are removed with a slightly damp cloth, do not let them dry.
Glue together 2 blanks with side edges
Step 3. Cut the blanks for the frame from the narrow slats. You need two parts of 105 mm and two of 70 mm. Observe the dimensions exactly, this is very important. Smooth the ends with sandpaper.
Cutting out parts from a narrow strip
Step 4. Glue the side frame and clamp it with clamps. Place a flat, heavy weight on top - it will prevent the planks from swelling while the glue dries.
Glue the frame
Step 5. In the top covers, drill holes for the nuts at a distance of 7 cm, insert the bolts through a wooden spacer on one side, and the cutting nuts on the other side. Screw in the bolts, they rest against the gasket and firmly press the nuts. The latter, with sharp burrs, enter the slats and are fixed in this position. Due to this, the hardware does not fall out, which allows you to adjust the tool during assembly of the closed case. A wooden gasket is used to protect the front part of the case from mechanical damage.
Holes are drilled in the cover and bolts are screwed in.
Step 6. Glue the body together.
Glue the product
Practical advice. First you need to assemble the parts dry and check the fit. If there is any wobble, then the edges and surfaces must be perfectly leveled with sanding paper. Constantly check the tightness of the connection, do not overdo it, and do not grind down the tool parts too much.
Step 7. Glue the blanks into one structure, tighten it with clamps. Leave for a day to dry.
The box is tightened with clamps and left until the glue dries
Step 8. After gluing, sand the surfaces with sandpaper. First larger, then smaller. The result should be a perfectly smooth and even surface.
The surface of the product must be sanded smooth
Step 9. Use a special drill to make a large hole in the lid. The diameter is the same as for furniture hinges, use a forstner drill bit. Such a drill can go astray from the center; to prevent this from happening, it is recommended to first make holes with a diameter of about one millimeter and then use it to center the tool.
A hole is cut in the lid
Practical advice. At this stage of production, you can decorate the instrument a little. It is recommended to make a kind of inlay on the sides.
To do this, mark the position of the holes on the sides of the body, drill small holes for the diameter of the wire. In our case, copper wire Ø 0.9 mm is used. Place a wire on the glue in each hole and carefully cut off the end; it should be about 1 mm above the surface of the tool. At first, the appearance of the inlay does not cause delight. Take a large file and file off the ends of the wire a little, then carefully sand the surface with fine sandpaper. The copper will shine, the appearance of the surfaces will become very attractive.
One of the simplest ways to decorate a product
Step 10. Carefully cut off the corners with a sharp knife or plane and round them with #80 sandpaper. There is no need to rush, all edges must be symmetrical.
All edges are neatly rounded
Step 11. Clamp the anchor in a vice and saw off a 70 mm long piece from it, this is just the part without threads. Go over the sandpaper several times until you get a longitudinal line on the edge; it is needed when placing metal plates.
Cut off the threaded part on the anchor
Step 12. In a vice, straighten the nails a little and cut off the excess pieces. Having retreated 52 mm, punch the holes and drill first small and then large holes in the anchor.
Drill two holes in the anchor
Step 13. Secure the tube in a screwdriver and remove sharp corners at low speed. The same operations must be repeated with nails.
Grind workpieces using a screwdriver
Step 14. Cut pieces from the girder of a given length from 47 mm to 57 mm, the size step is indicated in the picture. A total of eight are required. The metal must first be cleaned of technical oil and rust. Collect them in a stack, align the ends and firmly clamp with tape. Now you can process all the segments at the same time with a file, giving the ends a semicircular shape. Using the same algorithm, align the front part of the metal tongues. Using three types of sandpaper with different grains, carefully polish the surfaces of the reeds. To improve the appearance, you can further polish the metal parts with a felt pad and car polish. All elements must have a mirror shine.
Metal plates are prepared according to the diagram
Now all that remains is to assemble the tool.
Assembling the kalimba
Step 1. Using a mounting knife, cut two grooves approximately 0.2 mm deep on the top surface of the case; they will hold pieces of nails.
Cut parallel grooves
Step 2. Add a few drops of printer ink to the stain, it will darken. Saturate the body of the instrument with the prepared mixture. After drying, rub it with wax and polish.
The body is covered with stain, then wax, polished
Step 3. Glue nails in the grooves and assemble the kalimba.
Tool assembly process
Customize it by changing the length of the metal strips. Tighten the bolts and you can play the completed instrument.
Video - DIY musical instruments
It is better to make musical instruments for children together with them, this not only accustoms them to work, but also increases the time of communication with their parents. They really miss this, especially in our time. There are different types of tools, some take a whole day to make, while others can be made in just a few hours. After the tools, you can move on to more complex crafts. On the pages of our website there is a very interesting article on making a wardrobe for a nursery.
Pan flute (pan flute)
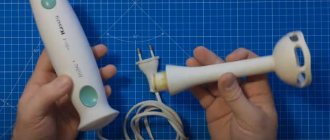
This musical instrument is very easy to make. For it you will need adhesive tape, 7 cocktail straws and 2 pieces of thick cardboard 3 cm wide, and the length will depend on the width of the tubes folded together.
Each of the tubes needs to be cut a little so that they produce a sound of different tones. The difference between them can be 1-1.5 cm. Let the longest tube be 15.5 cm, then the shortest - 5.5-6 cm. When the tubes are cut, lay them out on a strip of tape so that on one side they the ends remained at the same level. We fix this position of the tubes with tape, wrapping the row in 2 layers. Next, we attach cardboard to this tape to make the panflute look more presentable. The ends of the instrument must be sealed with plasticine so that it can make sounds while playing.
Video 2 for children: what is rhythm?
— how to make maracas from a jar?
- How did people come up with percussion instruments?
- What can maracas be made from?
— what types of drums are there?
— playing percussion instruments with children
This video will introduce kids to the concept of “rhythm” and tell you how you can play rhythm games with your children.
In this video, your children will learn about noise musical instruments and how to use percussion instruments as noise instruments. And they will arrange a real orchestra with noise and percussion instruments (maracas, rattle, castanets).
Chinese drum
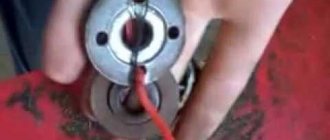
For this musical instrument you will need a tin can (about 5 cm in height) without a lid or bottom. Instead, you can put plastic lids on the jar that fit tightly to its walls. Next, you need to take a ribbon or strong rope about 20 cm long. The walls of the jar need to be pierced between the lids at the same distance so that the imaginary line of diameter runs clearly through the center of the jar. Through the resulting two opposite holes you need to stretch the rope, leaving the ends of the same length on both sides, tying knots at the walls of the jar and stepping back a couple of centimeters from the edge of the rope. Thread a wooden bead onto the edges of the rope and secure them with a strong knot. The tool is ready.
DIY musical toys
Zemfira Zaripova
DIY musical toys
It's no secret that children love musical toys. These are rattles, maracas, wooden sticks, drums, etc. They can be made from waste material. Children really like these toys.
"Merry rattle."
This toy is intended for young children (2 - 3 years old), therefore it is made of safe materials.
I took a jar of used cream and washed it. I put washed and dried pine nuts (10 - 15 pieces) inside. She closed the jar with a lid. From colored self-adhesive I cut out the necessary details in the shape of a nose, cheeks, eyebrows and glued them to the jar. I attached a wooden handle from a jump rope.
"Funny maracas."
This toy will be of interest to children from 3 years old.
I used a plastic perfume bottle as a basis. Having carefully unscrewed the lid and washed out the remaining perfume, she poured clean rice into the inside of the case for the special sound of maracas. I screwed the lid tightly and decorated the outside of the case with colored self-adhesive. The toy turned out to be loud, bright and safe.
"Ringer".
I filled an empty bottle of soap bubbles with peas (or buckwheat).
I closed the lid and decorated the bottle using multi-colored self-adhesive tape.
Due to the different content, each bell has a unique sound. This helps children better understand the world of sounds and be more attentive to sound differences.
"Rattler."
This toy is made from scrap material. Children really like it. Easily fits in a child's palm, the sound is loud enough.
For the base I took a kitchen wooden spatula. I made a hole in the wide part and inserted wire with soap bubble caps. The covers move freely along the wire, making peculiar sounds.
Wind chime bells
If you have an old Chinese “wind chime” pendant lying around somewhere, it’s time to give it a new life. To do this, disassemble it into its component parts - for the bells we only need tubes. Attach these tubes to a piece of stick with a diameter of 0.5-1 cm, using a strong rope. Place the tubes at equal distances in order from the longest tube to the shortest. Now this instrument can be used as orchestral bells.
Drums of different heights and diameters
To make drums you will need several tin cans, for example, tea or biscuits. Instead of a lid, use strong paper, secured with rubber bands, foil or leather. It is better to play music on such an instrument with pencils, at one end of which there is an eraser. Keep in mind that the sound of the instrument depends on the size of the homemade drum. Therefore, with a little work together with your child, you can create an entire drum set.
Progress MASTER CLASS.
We take the top part of the matchbox and cover it with self-adhesive film. (4 matchboxes)
Then we glue the halves of walnut shells onto the pasted boxes.
To make the connection strong enough, you need to press the shell tightly against the resonator. To play, the first castanet must be placed on the thumb, and the second on the middle and index fingers. (for one hand)
The created musical instruments are homemade and can be used on walks for independent activities, in dramatizations and dances.
Master class on making an aquarium In February, our group had a theme “Pets”; the guys and I went on an excursion to our living corner. The kids really liked it. Master class on making an angel Step 1 Take a sheet of cardboard and fold it to form a cone, then fix the resulting figure using a stapler or glue. Master class on making an angel Step 1 Take a sheet of cardboard and fold it to form a cone , then fix the resulting figure using a stapler or glue.. Master class on making a flannelgraph Making a flannelgraph. Master Class. Lushnikova M.V. – teacher. I have long wanted to have a flannelgraph in my group, but I had to get plywood. Master class on making a gramophone Late autumn has arrived. The earth was covered with an autumn carpet. This inspired me to create an autumn gramophone and write a poem Poem. Master class on making board games We all face the fragility of cardboard. I bring to your attention my idea of creating DURABLE board games. You will need: 1. Master class on making a sunflower For work you will need: scissors, colored crepe paper, a glue brush, glue, black cardboard, cardboard for a template, a board, a stick. Master class on making snowflakes As a child, we were taught to cut out snowflakes from paper folded several times. But personally, no matter how much I cut out, I end up with snowflakes.
Source
Bells on a cardboard tube or beater
For this tool you will need:
- cardboard tube (for example, from foil or parchment);
- 12 bells (you can buy them at a craft store or tear them off from old toys);
- thick needle;
- dense threads.
In the paper roll, you need to pierce holes at one end according to the number of bells. It is important that these holes are at the same distance from each other, located in two rows along the entire diameter of the tube. We carefully but securely attach the bells to the tube using thread. As a result, the tool should look like this:
Nothing will work out because I have no education
Firstly, you are too old to enroll in a children's music school, and secondly, they most likely will not teach you anything good there. Statistically, the majority of people who graduated from music school threw the instrument out the window immediately after the graduation concert and remember all these endless exercises with hatred and heavy sighs.
Of course, the theoretical part is extremely useful, but you can move on to it later, when you understand that the degree of your interest implies a corresponding immersion in the question.
Flute of Rain
For this tool you will need a long cardboard tube (for example, from food foil, but it is a bit short; it is better to look for a similar tube about 70 cm long in a hardware store). Inside this tube you need to insert a spiral made of foil. The spiral must match the length of the tube - this is important. Having tightly sealed one end of the tube, you need to pour a handful of beads, cereal or sand inside the structure. Next, you need to securely seal the second end of the tube. That's it, the rain flute is ready. Now, when you turn it over, you can hear the filler slowly descending through the tube, making the sound of rain.
With a little imagination, you can make guitars, whistles, bells, shakers, water xylophones, tambourines, cymbals and other musical instruments at home with your children. Such items will be especially loved by children, because they are made with their own hands. But the main benefit is that the child becomes several steps closer to the world of music.
Comments ()
DIY castanets for children's dances.
We invite you to make castanets for children's dances with your own hands. Compact paired percussion musical instruments, similar to the Spanish castanets, were used throughout the world in ancient times. In Russia, for example, they have long played on wooden spoons. In Ancient Greece, compact paired percussion instruments made from seashells were used.
On Greek frescoes created before our era, you can find images of dancers with crotalos - long wooden sticks connected by a cord. In Ancient Egypt, special ritual dances were accompanied by beating a rhythm on small metal discs that were held in the hand. Similar instruments were used in Japan. Tools similar to castanets, made of ivory, were found during archaeological excavations in Ukraine. In Asia, similar kairaks, made of flat stones, have long been used.
Typically, such instruments are used in dance to create rhythmic accompaniment.
A fairly melodic musical instrument for beating rhythm can be made together with children from walnut shells and matchboxes.
For the simplest option, you will only need glue. If you make a more elegant tool, you will need self-adhesive film or colored paper, a pencil and scissors.
On the back of the self-adhesive film, draw a wrapper template. Place the matchbox with the wide side and circle it. Turn the box to the narrow side and trace again. Draw the wide and narrow sides again. Draw the valves for sealing.
Cut out the wrapper and peel off the adhesive layer. Place the wide side of the box over the appropriate area of the wrapper. Fold the flaps inward and press.
Gradually turn the box and glue its sides in the same way.
Glue halves of shells from the same walnut onto the finished resonators. If you glue shells from different nuts, the sound of the instrument will be inexpressive.
To make the connection strong enough, you need to press the shell tightly against the resonator. Place the resonator on your middle and index fingers pressed together. Use your thumb to press the shell against the resonator for a couple of minutes.
Leave the finished castanets for several hours so that the glue dries thoroughly.
To play, place the first castanet on your thumb, and the second on your middle and index fingers.
Traditional Spanish castanets come in two types - male (macho) and female (hembra) and differ in size and pitch. Women's castanets with a higher and brighter sound are held in the right hand; they beat out a melodic pattern. Men's castanets are held in the left hand and the rhythm is beaten with them.
Homemade castanets for children's dances can also be made in two types. The pitch of the sound will depend on the size of the shells. The larger the shells, the lower the sound. For sounds to differ noticeably in pitch, a large nut must be approximately one and a half to two times larger than a small one.
Source