In this master class, we will learn how to make an original and at the same time quite simple to make “tree of love” in a fairly short time. This wonderful fake will fit perfectly and refresh any interior and bring a ray of joy and sunshine even on the cloudiest day.
For work we will need: - Wire - Brown tape - Scissors - Pliers - Wire cutters - Cardboard - Pot or any other container - White thread or twine - Plaster - Pink paper - White beads - Pencil - Hot glue - Decorative flowers white and pink – Decorative leaves – White sisal
To begin with, we take the wire, in this case 15 pieces, and tape.
We cover the wire with tape, leaving the ends of the wire that are not taped off, approximately 5-7 cm long.
Then, using pliers, bend the un-glued ends approximately 90°.
We form a trunk from the finished sections.
We dilute the plaster with water so that the solution has a consistency no less than liquid sour cream.
While the plaster hardens, we move on to the hearts.
We cut out hearts of the required size from cardboard, 30 (to ensure that the hearts are even and the same size, you can use a template).
The next step is to decorate the tree.
We take decorative leaves and flowers and decorate the trunk and branches.
For Valentine's Day, a wedding anniversary or a birthday, it's nice to give a handmade gift. Such crafts emit special warmth and bring comfort to the interior. Today's master class will be useful for those who want to make an original gift for their other half with their own hands - a tree of love.
Necessary materials
To create a unique composition - a tree of love - you will need the following materials:
- red felt in different shades;
- PVA glue;
- heart templates of different sizes;
- gypsum;
- varnish;
- wire;
- brown gouache;
- regular disposable bag;
- lid.
Top tips from beadwork masters:
- If you decide to weave strictly according to the pattern, at first it is possible that you will get lost in reading as you work. To prevent this from happening, use a bright felt-tip pen to cross out those rows in the diagram that are already woven.
- If the thread you're using instead of wire or fishing line doesn't seem strong enough, pull it through a piece of soft beeswax.
- If you have an extra bead in your weaving, insert a needle into its hole and crush the bead with wire cutters.
- When working, beads need to be collected with a needle.
- When starting work, take a thread that will not be more than 1 m long.
- For greater reliability, the knots can be treated with clear nail polish.
- Work only in good, preferably two-sided, lighting.
To ensure that your flowering tree (or any other product) is a finished work and not a burden of handicrafts, organize a comfortable workplace and a convenient storage system for materials and tools.
And also get a mood board on which inspiring pictures with beadwork masterpieces will hang.
Creating a love tree composition
Let's prepare three hearts of different sizes in advance. It is more convenient to make such blank templates from thick cardboard or plastic. Cut out hearts. We trace each heart seven times on felt of different colors.
We arm ourselves with sharp scissors and cut out felt hearts.
We arrange the cut out hearts in the following order: the largest hearts will act as the base, place smaller hearts on top of them, and secure them with PVA glue.
Alternate the hearts by color to end up with a beautiful tree of love.
Turn the blanks over and glue the smallest hearts on the reverse side. Still make sure the colors don't match.
We pierce the resulting hearts with a large needle and pull a thin wire through the resulting hole. The wire should be of different lengths and it’s good if you twist it nicely first. Make sure that the ends of the wire are neatly bent, then the recipient will not get hurt on your tree of love, and it will look neater.
We collect the resulting blanks - hearts on a wire - into a bouquet and twist the wires all together.
How to make a Christmas tree from beads
Material:
- green beads (80 g);
- white beads (20 g);
- 3 coils of wire (0.3);
- insulating tape;
- gypsum solution;
- container for installation.
Process description:
- String 2 white beads and 7 green beads onto the wire.
- Pull the end of the wire through the second white and all green beads.
- The top part is like a “lock”.
- String 2 white beads and 9 green beads again and repeat steps 2.
- Repeat all 7 times.
- Wrap the resulting Christmas tree branch at the bottom with electrical tape to make it stronger.
- Make the required number of branches in the same way.
- Connect the branches together and twist.
- Strengthen them in a container with gypsum solution and dry.
Ideas for creating a love tree
We conducted a master class on creating a love tree from felt with your own hands. But there are a huge number of options for making such a cute craft. More experienced craftsmen who have mastered various needlework techniques can create more interesting and original crafts. For example, you can make a love tree from beads.
So, you can apply original ideas by making an interweaving of the trunk of the tree of love of an unusual shape. It can have slight bends, which will give the tree realism and a special charm. You can also make leaves from hearts of different shapes and sizes. For example, against the background of a large heart, make several very small hearts. By giving such a tree of love to your husband or loved one, you can indicate that with it you feel completely safe, as if behind a stone wall. Surely the man will appreciate it.
In addition to hearts, the tree of love can also have leaves and flowers. It all depends on the imagination of the giver and the skill of the needlewoman who puts her ideas and thoughts into the tree of love.
Weaving patterns
Beading is not the only technique used in the manufacture of such crafts. Therefore, the “Love from Beads” tree diagrams used to make trees are useful only for individual elements. Working on such a complex piece is easy and fun - it really is the best way to represent love with beadwork.
The following diagrams will be useful:
- Petals
Hearts.
Tree of love in the form of a postcard
If you have already given crafts or you just need a card to accompany the main gift for your loved one, you can try making a card with your own hands. A tree of love using the quilling technique will surprise your loved one, and besides, such a card will certainly become an interior decoration in the future.
More about quilling
Linear quilling is the simplest form of this art. Using this technique, you can even create paintings using only straight paper strips. It will take at least a few hours to create a love tree in the form of a postcard, but the result will amaze you.
Materials for the postcard tree
The following materials and tools will be required:
- card base (white or light pink);
- paper intended for quilling (pink, raspberry and black or dark blue) 3 mm wide;
- a special quilling tool or a regular toothpick;
- PVA glue;
- brush;
- scissors.
Preliminary work
To get a beautiful tree of love, first visually determine the general diagram of the future tree of love, its branches, think about how to arrange it on the postcard, and whether there will be a signature on it. Mark the main points with a pencil.
Let's move on to the creative process
We place strips of paper on the drawing imagined in our minds or on paper. Glue is applied to the side of the paper strips so as not to spoil the appearance of the wood. With paper we outline the outline of the future tree of love and its trunk. Then we move on to working out its internal structure. Add pretty swirls of paper ribbon to the center and then move on to decorating the rest of the tree. Using pink and raspberry paper, make beautiful hearts and place them in the crown of the tree. Hearts are easily made from two slightly bent spirals connected into the desired shape. Thus, fill the entire tree and sign the card for your other half to make the gift memorable and the warmest.
Master class: Beaded birch
To make a birch tree you need:
- 3 different shades of beads;
- wire of various thicknesses;
- for wrapping branches and trunk - masking tape;
- acrylic varnish and paint;
- PVA;
- building gypsum.
Manufacturing:
- Initially, you need to make approximately 150 small branches.
- Place the beads on a thin wire.
- After 1 cm, make small loops in any quantity. It all depends on how long the branches are needed.
- Fold the wire in half and twist it
- Make short branches for the tops.
- When enough branches have been twisted, you need to make lush branches out of them, combining 2-3 pieces into one.
- Take a thicker wire and tie twigs to it using threads.
- Wrap all the made lush branches in this way.
- Next you need to make larger branches. You need to use 1.5 mm wire for this. Take a branch and tie another one to it.
- After retreating about 2 cm, tie another one. You should get a large fluffy branch. Also do the rest.
- From these branches, collect the top of a birch tree. Next, add another 2 to 4 branches in a circular manner.
- Now you need to increase the thickness of the barrel by using a piece of thicker (5 mm) wire. Wrap it with threads (“iris”) or masking tape.
- Slowly we create the tree itself, alternately winding branches to the trunk every 5 cm.
- The remaining ends of the wire at the bottom are the roots of the tree. They need to be fixed in the container with plaster. Be sure to wait until the plaster hardens.
- Make a mixture of plaster and glue to the consistency of sour cream. Cover all branches with it in two layers. Allow each layer to dry.
- After the first layer of coating has dried, apply a second one and form peculiar grooves. This creates the effect of tree bark.
- You can leave it overnight so that everything dries well and adheres.
- Then cover all branches and trunk with white paint. And when the paint dries, use black paint to create a pattern reminiscent of birch bark.
The Birch bead tree, created by yourself, is ready.
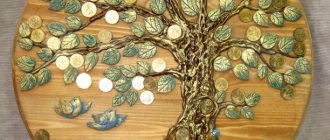
Green sculpture
First you need to understand - what is it? A medium-sized figurine resembling a plant or shrub is called topiary. This art has come down to us since the times of the Roman Empire.
It was then that the fashion for decorating houses with objects created by nature began. The tops of the bushes were pruned in a certain way, embodying geometric and artistic images.
Nowadays, this art appears in the form of a small tree in a pot, designed to enliven modern homes. It is “grown” from the most accessible things, what is always at hand - change from a wallet, sweets, colored cardboard, satin ribbons - all this can be useful for a future creation.
The process of realizing such beauty is quite painstaking, but it will take no more than 2 hours. But the result will exceed all expectations. Such a homemade product contains a piece of the master’s soul, which he puts into working on it. This makes it attractive and unique and makes it possible as a gift for loved ones.
Having answered the question, what is the name of a craft in the form of a tree in a pot, and what are its functions, it is worth thinking about its use in everyday life.
In what rooms is the presence of such an accent acceptable? Is it appropriate to use it in workplace decoration? What decor style does it go with? What can you make such an exclusive thing from so that it fits well into your living space?