First option
A tree with photographs on the wall can be an interesting way to decorate your home.
When creating such a tree, you can use ready-made tree templates or vinyl stickers. Or you can draw a tree yourself.
For the tree you will need: sticker, frames, photographs, nails, hammer.
To begin with, select the location where the tree will be located. Good quality photographs are then selected and printed. If the store does not have the desired sticker, you can order it.
We glue the sticker to the wall and mark the places for the frames on the finished tree. We nail the frames with photographs and admire how the finished family tree fits perfectly into the interior!
Clown
Step-by-step technology for creating a bright clown:
- Lay out your palms on colored sheets, trace along the outline, then cut out. You should get about 15 blanks.
- From loose cardboard, prepare parts in the form of hair, boots, a hat and a butterfly. Color in appropriate colors.
- Coat the parts with glue and fix them in the right places.
- The next step involves shaping the colored palms into a suit and arms, then attaching them to the base with adhesive.
- Finally, use felt-tip pens to draw facial features and glue on a butterfly.
- If desired, decorate the clown costume with sparkles and ribbons.
Option No. 2
This method can easily create a beautiful family tree. In addition, weaving from newspapers is a very exciting activity.
Below is a small master class on crafts made from newspaper tubes.
To make wood you need: newspaper (about seven large format sheets), glue, paints, brush, varnish and thread.
First, roll the newspaper into tubes. For the base you will need 13-15 pieces. They need to be connected together with thread and paper.
We gradually wrap the taped tube around the trunk to the desired height.
Next, we form the main branches of the tree; to do this, we divide the tubes into different parts and again wrap them in newspaper.
Related article: Kusudama for beginners: diagrams for assembling lilies and carnations with video and photos
Then, for the length of the branch, new tubes are added and wrapped in the same way until there are no more of them left.
Then the tubes are cut to different sizes and the ends are curled.
Now we paint the formed product with a mixture of white paint and glue.
After drying, coat the top with varnish.
Photos are attached to the curlicues. This is how easy it is to make a tree out of paper.
Chick
A charming craft in the shape of a chicken is made in the following sequence:
- On a white sheet of paper, draw a template in the shape of an egg, cut it out and transfer it to bright yellow cardboard, then trace and prepare an egg-shaped blank.
- From golden corrugated paper, cut into squares measuring 1x1 or 2x2, depending on the age of the child.
- Roll each square tightly into a ball.
- Apply PVA glue to the prepared cardboard form and attach corrugated twisted balls to it.
- For the wings, take yellow cardboard and trace children's hands on it.
- Next, glue them to the formed egg-shaped part.
- Make a beak in the shape of a triangle and paws from red paper.
- For the eyes, cut out 2 circles from white paper material, and 2 circles of smaller diameter from a black sheet. Glue the dark elements on top of the light blanks.
Glue the manufactured components onto the chicken so that a face is formed.
Third way
If there are young children in the family, then you can make a wonderful tree of handprints with them.
To create it you will need: paper, paints, brushes and the palms of the whole family. First we draw the tree trunk, then, starting with the oldest members, we put prints. The smallest hands are at the top of the tree. We sign the prints and the tree is done!
You can make prints using color or black and white paint.
This easy craft can be done even in kindergarten.
Penguin
Necessary materials to make a penguin:
| Name | Quantity |
| Cardboard | 1 blue and 1 white piece |
| Cotton pads | 2 pcs. |
| Self-adhesive plastic eyes | Two pairs |
| Decor | Optional bows, stars, sparkles |
Step-by-step creation technology:
- Glue snowdrifts cut in waves from white material onto blue cardboard.
- Outline the child's hands twice on black paper with a pencil, cut them out along the lines and place them on the snowdrifts, fingers down.
- Attach cotton pads with glue in the middle of the palms, this will be the stomach.
- Next, glue on the eyes, a red mouth made in the shape of a red diamond.
- Decorate one penguin with a bow.
- If desired, decorate the blue background with stars and sparkles.
- You can make a New Year theme, decorate the craft with snowflakes and small Christmas trees.
Fourth tree
Family tree using quilling technique.
Materials needed: cardboard, quilling paper, colored paper and background paper (you can use wallpaper), scissors, cake lid for the base, glue, paints and photographs.
Draw a circle on cardboard and draw a tree inside it.
We paint the tree and cut it out.
Cover the base with paper or wallpaper and glue the wood onto it.
We make leaves from green quilling paper by rolling it.
We attach the finished leaves to the tree. We cut out grass from green paper and glue it at the roots.
From strips of yellow, red and blue paper we roll up blanks for flowers and butterflies.
Use your fingers to give the red circles a drop shape and glue them together.
The blue blanks will make a flower, so we give them the shape of eyes and glue them together.
We glue the butterfly from yellow circles in the shape of a crescent.
We glue flowers, butterflies and photos to the product.
Related article: DIY felt angel for a Christmas tree: master class with patterns
Satin ribbons
Let's try to make topiary from satin ribbons. If you know how to make flowers from satin ribbons, then it will be very easy for you, but even if this is your first time taking up topiary from ribbons, you will succeed. So, I’ll tell you about the experience of making topiary from satin ribbons with your own hands.
Required:
- about six meters of satin ribbon (no narrower than 5 cm, it’s better to take several colors);
- threads, beads, and ribbon for decoration;
- glue gun or regular superglue;
- a stick or a piece of plastic tube for the barrel;
- pot or bucket;
- material for the middle - a fabric bag, crumpled newspaper or a foil ball;
- earth, pebbles, crushed stone (I used colorful glass for an aquarium).
To make this topiary, a master class on making flowers will also come in handy - look at the video on how to make a simple rose from a satin ribbon.
We make 12-15 roses from satin ribbon. You can use several shades of ribbon (for example, three or four), or you can get by with just one shade - when I made a topiary for my younger sister to decorate the wedding photo booth, I used a beautiful ivory satin ribbon.
We make the middle - for example, we crumple up foil or old newspaper, wrap it with threads to make a dense shape. You can wrap it with ribbon, but there is no need - satin roses turn out quite lush.
The trunk can be made from a branch, a plastic pipe or any suitable stick. In extreme cases, dense wire, folded in several layers and wrapped with tape, is suitable. Wrap your trunk with tape, and then glue the trunk to the crown of the tree on one side and to the pot or bucket on the other.
We string a couple of beads onto a thread and “sew” the beads and a satin rose to the topiary. It should be sewn or glued firmly. When the entire ball is covered with roses, you need to prepare the trunk and pot.
You need to pour a weighting agent into the bucket, straighten all the flowers, and, if necessary, decorate with a decorative ribbon.
Fifth option
A family tree made of beads looks very beautiful. It will decorate any home.
This tree would be a great wedding gift. Or you can make it a themed 30th anniversary gift by adding pearls.
For production you will need:
- pearl beads;
- white beads;
- wire of different thicknesses;
- leaves - sequins;
- scissors, wire cutters and pliers;
- coins;
- stone for the base of the tree;
- floral tape and masking tape;
- acrylic paints: bronze, brown, varnish;
- gold glitter;
- wood slices;
- photos.
First, we decide on the location of the photographs on the tree. Then we create its detailed diagram.
For the future tree we make branches from thin wire and pearl beads, as shown in the pictures.
After 1-2 cm, we put a loop of white beads on one end of the wire.
We also repeat from both ends of the wire.
Add a leaf and form a branch.
We connect three such branches into one thick branch and weave the number of branches required for the volume.
We braid the branches with thick wire and floral tape.
We form a tree trunk from very thick wire that does not bend easily and attach it to the stone.
Add branches to the base.
For thickness, we wrap the tree with even thicker wire and masking tape, and paint it.
You can use a glue gun to add roots to the tree.
We glue photographs onto wooden sections of birch and make small holes.
We paint the trunk, roots and branches with bronze paint, and coat the top with varnish.
We decorate the finished tree with coins, gold sand, rhinestones and swan figurines.
Beauty is ready!
Swan
Making a craft in the shape of a swan is quite simple, the main thing is to follow the instructions.
It is as follows:
- Place the child’s palm on a white sheet of paper, outline it, and then cut it out.
- To create a bird you will need approximately 15 such blanks, the number of which will determine the splendor of the plumage.
- Using the same raw materials, form the head and neck of a swan, and then glue them onto a cardboard base.
- The beak is made white and then painted or made from yellow paper.
- Draw the eye with a marker.
- Next, feather palms are attached, they are placed so that the fingers point in the opposite direction from the direction of the head.
2nd manufacturing option:
- The bird is also performed with only 1 palm.
- To do this, you need to cut a blank from a white sheet so that the thumb is slightly protruding - this will be the head.
- Glue the part onto blue cardboard.
- Make some blue paper waves, make the crown yellow and the beak red. Glue the elements to the swan.
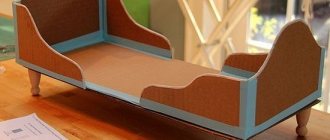
Cube
To make an educational cube with the seasons, you need to prepare four applications with thematic pictures and the base - a cube template.
It is better to make applications together with the children, so that as you work, you can talk about each season in detail. We also draw and cut out the details of the appliqués together with the kids.
The base of the cube must be made strong. The best option is a corrugated cardboard box from a store. The size of the appliqués must correspond to the dimensions of one side of the geometric figure.
We paste the finished pictures onto the cube template, assemble it and fix it with glue.
How to make topiary with your own hands: the best step-by-step master classes
Topiary (or “tree of happiness”) is a small decorative tree that acts as an interior decoration and is often used as an element of festive table setting. You can make it yourself from any artificial or natural materials, and it will take very little time. From this material you will learn how to make topiary with your own hands in several variations, and step-by-step photos and videos at the end of the article will help simplify the task.
Materials and tools for work
Appliques and various crafts made from outlined palms are a separate technique. To create them you will need the following materials:
- colored paper, it is better to take thicker paper, intended for printing;
- multi-colored cardboard;
- PVA glue;
- scissors and a simple pencil;
- oilcloth to protect the table surface;
- markers;
- corrugated paper;
- decorative elements;
- wooden sticks.
Octopus
This simple octopus craft is fun and cute.
Step-by-step production:
- To make a picture from several mollusks, you will need a cardboard blank of A5 or A4 format.
- Place a child's brush on a colored paper sheet, trace it and cut out the resulting shape.
- Glue your palm onto the cardboard blank so that your fingers point down; these will be the tentacles of an octopus.
- Create eyes from a white sheet, and pupils from a black sheet.
- A pinkish or red paper strip will serve as a smile.
- If desired, decorate the animal with a bow, beads or hat.