Crocheting lace allows you to create exquisite, sophisticated products, including exclusive items of clothing. Such original things always remain fashionable and expensive.
Can you crochet? Publish your work on kru4ok.ru
Crochet lace: types, what they are used for
There are different types of lace that can be created using a crochet hook. Here are the main types of lace:
- Irish;
- Bruges;
- tape;
- sirloin.
Irish crocheted lace presents relief motifs, most often with a floral theme, the space between which is woven with a mesh. The most delicate openwork fabric is used for knitting women's clothing from blouses to wedding dresses. The Irish technique is used to crochet not only dresses, tunics, boleros, cardigans, blouses, etc., but even skirts.
Crochet secrets - false double crochet. The perfect edge of the canvas!
The video should load here, please wait or refresh the page.
Knitting in the round without a seam is an easy way. Invisible crochet connection - useful for everyone!
The video should load here, please wait or refresh the page.
Bruges lace is nothing more than an openwork crochet weave made on the basis of a thin braid, laid in a certain way and connected at the side loops. This type of openwork belongs to Flemish lace, the exquisite curves of which make it possible to obtain unusual patterns in the form of snakes, rings, and other elements. Bruges crochet lace is used to make openwork clothing, as well as original interior decoration items.
Crochet creates openwork fabrics also of the ribbon type, when openwork ribbons are knitted and connected to each other. A simple knitted fabric framed with openwork ribbons looks good. Most often, crocheted ribbon lace is used for knitting scarves, skirts, cardigans, blouses, vests, etc.
Fillet lace is a mesh, some of the cells of which are filled with columns and form a pattern. Filet openwork knitting is a flat weave, most often used for crocheting napkins, tablecloths, bedspreads, curtains, stitching for towels and pillowcases, etc., although blouses and dresses are also successfully knitted with fillet openwork.
Openwork crochet: what is the secret of popularity
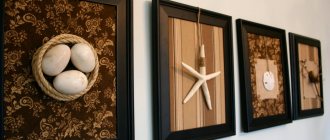
Hand-crocheted lace makes each item unique. A fashionable silhouette or piece of furniture, tastefully and skillfully executed, looks chic, and what is even more valuable – has an exclusive look when the item is associated with the use of lace.
Openwork lace is appropriate both in the summer heat and in winter weather.
A warm cardigan or skirt, crocheted from thick yarn, can both warm you up and give its owner an elegant look. Shawls, headscarves, scarves and other accessories with lace are trendy this fall.
The yarn can be any - thin or thick, cotton or wool, artificial, any color. But if a knitted garment or piece of furniture is made skillfully, then it becomes clear to everyone that delicate, beautiful lace will never go out of fashion.
What you need to know about bead art?
Of the several varieties of material for jewelry: “rivoli”, “cutting”, “bugle beads”, “delica”, “twin”, “bicone” - the most popular are “rocaille” beads from Japanese manufacturers. The barrel shape, large hole in the center allows you to stretch the fishing line or thread several times.
It is convenient to string the fragments onto homemade “tweezers” made of wire. To avoid mixing colors, the beads are placed in different small containers.
Create your own lace
Crafts made from threads are divided into several varieties: needle, knot, club and satin stitch.
Mesh is the basis of needle lace. Craftswomen lay out the pattern on corrugated paper or tracing paper, and then use small stitches to fill the space inside the outline. Depending on the tension of the thread and the thickness of the needle, the density of the pattern is obtained. The work is done with reinforced threads or floss.
Macrame, weaving with knots, is strong and durable (when washed). They are used to edge parts of the product and weave accessories.
White satin stitch, thanks to the different depths of stitches, looks voluminous and multi-colored.
The bobbin decoration is done on the pillow using bobbins and pins. The labor-intensive process can be mastered in a short time.
Products made from lace with woven beads, bugles or sequins will look much more impressive.
Note!
- Wood burning for beginners: tips and secrets for burning pictures
- Plasticineography - interesting options for creating pictures from plasticine on cardboard for children
DIY scrapbooking for beginners: what it is and how to do it. What you need to create a beautiful album or notebook (photo + video)
Pattern No4
For a lace product, a full or half motif can be used.
Full motive
A chain of 8 chains. We connect the items into a ring. Further:
- 1st row: 3 VP, 23 stlb with 1n.;
- 2 rows: 6 VP, *skipping 1 CCH of the 1st row, 1 CCH, 3 VP* – from * to * do 11 times;
- 3p.: 6 VP, 3 tbsp with 2n. with a common top, 6 VP, * 4 stlb with 2n. with a common top, 6 VP* marked *-* do 11 times;
- 4p.: 1 air. p., under. each chain of 6 VP – 8 StB/N
- 5p.: 4 VP, * passes 3 StB/N previous. r., 1 StS2N, 3 air. p. in the same loop 1 tbsp with 2n.* - marked *-* we will do it until the end of the p.;
- 6r.: 1 VP under. each arch of 3 VP - 3 StB/N, 3 VP, 3 single stitch.
Half motive
- We crochet a chain of 4 air. n. Then:
- 1st: 3 air. p., 14 column with 1n.;
- 2p.: 4 air. p., *1 StS1N, 3 air. p.* – marked *-* we will do 6 times, 1 column with 1n.;
- 3R: 7 VP, * 4 StS2H with a common top, 6 VP* – between *-* we knit 7 times, 1 stitch with 2N;
- 4p.: 1 VP, under. each chain of 6 VP – 8 StB/N;
- 5p.: 6 VP, * passes 3 StBN previous. r., 1 StS2N, 3 air. p., 1 StS2N in the same p.* – marked *-* we will do it until the end of the p.;
- 6 rubles: 1 air. p., under. each arch of 3 air. p. – 3 StBN, 3 VP, 3 StBN.
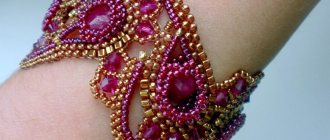
DIY guipure flowers
Beads are an excellent material for creating unusual flowers. Beginning craftswomen can practice on simple jewelry. For example. Make a lace bracelet. Flowers made from tiny bicones and beads are delicate and elegant. We start the canvas from the first flower:
- take a double folded thread of 25 - 30 cm of medium thickness;
- put five to seven beads on the needle and bring the needle out in the middle from the bicone and the bead on the opposite side from the beginning of the petal;
- Using this technique, we “embroider” six circles and bring the needle under the bicone for the next flower.
Once the chain is ready, the product can be sewn to the fabric. Or you can “don’t make it heavier” and finish it with a lock.
A lace bracelet using a cross pattern is easy to make. Take two-color beads, thin fishing line and two needles. This will make it easier to string the “pebbles”.
- Move four beads to the center of the fishing line (so that one end meets the other). When you have a cross, tie it with a knot;
- add one more bead to each end, and through the third, pull both ends of the thread and also tighten.
The diagram shows the stages of further work.
You can improve the design by adding one more bead from each edge.
Note!
- How to make a craft with your own hands: what you can do with your own hands at home
- DIY foam crafts: snowman, Christmas tree, sculptures, original figures with instructions (photo + video)
Papier mache from egg trays, boxes, cassettes: the best ideas on what can be made from egg packaging
For clarity, watch the master class “Lace Jewelry”.
Delicate cutwork
Let's make delicate cutwork lace. A master class on how to make it with step-by-step photos will help with this.
Silk or viscose threads are suitable for embroidery. The fabric selected is cotton or thin linen.
Before starting work, the fabric must be washed, dried and ironed. This is done so that in the future after washing the fabric does not shrink and the embroidery remains smooth and neat.
We apply the desired design to the fabric. You can draw with a pencil or transfer the finished drawing using carbon paper.
We clamp the fabric into the hoop.
We embroider the design using simple stitches. The thicker the thread, the more voluminous the embroidery will be.
We embroider the drawing.
The finished fabric needs to be starched and ironed.
Now we begin to cut out the fabric inside the embroidered parts with sharp scissors. You should leave about a millimeter from the edge of the embroidery so as not to damage the embroidery threads with scissors.
This creates a lace edge of the fabric.
DIY lace flowers
An original decoration for a dress or hat can be made using a combination of fabric, multi-colored beads and lace. You can sew a rose “quickly”, without a sewing machine
Take satin, chiffon, guipure, rep and beads for decoration.
- download or make your own inflorescence pattern;
- from chiffon (3 pcs.) and guipure (1) we cut out parts with a diameter of 8 - 10 cm;
- From satin we make rose petals of six pieces in two or three sizes (this will make the rose more magnificent;
- twist small satin petals into a bud;
- alternately sew rep and satin petals to the finished blank;
- cut out leaves from guipure and chiffon and give them a round shape;
- we collect the leaves so that they look like shuttlecocks;
- We form a core of beads.
If the edges are decorated with beads, we will get a luxurious rose with drops of dew. The product will look good as a hairpin. Just glue the inflorescence to the mechanism.
Master class “Lace decor” watch the video
Note!
DIY vase: step-by-step photo instructions, master class for a beautiful and unusual craft
- Paintings from buttons, panels, appliques and compositions with your own hands: how to make flowers, a butterfly, a fish or a tree craft from buttons
- Flowers made of wool (85 photos) - how to felt a flower from felt or a wool brooch. Step-by-step instructions for beginners
Pico
Another common piece in unusual weaving is picot. It is used to connect motifs together and attach beads.
Let's look at the step-by-step instructions. We collect four remote controls on a needle.
We knit the next complete one, but do not bring it closer to the knitted loops.
We fix the knot at a distance of six millimeters.
Use your finger to move the miniature buttonhole towards the completed knots.
All decorations woven using the technique described above, in addition to the full U and P, also have rings.
On the eve of summer
The nautical theme never goes out of style. Therefore, it's time to prepare for the summer season. Even if the trip to the coast is still far away, a DIY lace and bead necklace will definitely create a “vacation” mood.
Take Japanese Tono and Toho beads, sequins, Swarovski pearls, threads in color, separators and caps for beads, felt in golden tones, needles, transparent “Moment”, wire cutters Brown sequins 4-5 mm. The choice of colors is a matter of taste for the craftswoman.
- draw two halves of a sea shell on sheet A 4. Then cut out and separate the grooves (the pattern will look like a palm leaf);
- transfer the pattern to the fabric and make a blank;
- we fasten a piece of wire with thread, sew the shell along the grooves together with the metal, including the outline;
- form a shell;
- if you embroider the grooves with gimp, this will give the product an expensive look;
- We attach the beads using a seam “over the needle”. Moreover, we decorate the edges and top with languid shades, turning to a light tone towards the center;
- We first sew “Swarovski” to the dark sequins, and then “wings” on each piece;
- rhinestones go in size, from large to small, and the decor is completed by dense filling of beads between the gimp;
- We place a mother-of-pearl pearl on the lower part of the workpiece. To make the inside look aesthetically pleasing, it can be covered with pearlescent leather or leatherette.
Now let's move on to the flagellum. You can buy it and decorate it with 3 – 5 pearls. Or you can weave it yourself.
If you attach a shell to an elastic band, you get an original hairband.
Double knot (DU)
It is present in all guipure compositions created with one’s own hand.
| Illustration | Step-by-step instruction |
| Thread the thread into the needle, leaving an end of thirty-five centimeters. | |
| We take it in our right hand, and stretch the thread on the two fingers of our left hand, securing it with our little finger and ring fingers. | |
| We pry up the lower thread, located on the thumb of the left hand, with a needle, rise, grabbing the upper fiber, pull it up and twist it. | |
| Thus, we received the first half-knot. | |
| The working thread (the one that comes from the ball) is thrown onto the index finger, the needle, pointing towards itself, picks up the fiber and tightens. | |
| We got the second one. | |
| Two half knots form one double knot. |
To achieve automaticity in weaving, you need to practice a little - and everything will work out.
Charming cascade
To work you will need Japanese beads No. 10 (50 - 60 grams), an oval bowl, nylon threads, needles of two sizes, jewelry cable (lanka), clamps - crypts, pins, wire cutters, "Moment" and a lock. Corrugated cardboard for the template. A “waterfall” of beads is achieved with different long threads.
Let’s “knit” the first thread of the beaded lace product.
- We lay out the flagella on the template and secure them with pins;
- string the beads along the stencil with a large needle;
- according to the “herringbone” structure, we will combine the finished strips into “piles”;
- we string the second and subsequent blanks;
- close the product with a padlock.
How to make lace from beads step by step can be seen in the video at the end of the article.
History of origin
There are many versions of the origin of this decoration. According to one of them, the Indians also wore items made of straps, beads and animal claws around their necks. They believed in the mystical protective power of these decorations.
Europe was also conquered by this accessory. Thus, French women of the 16th-18th centuries also preferred chokers; they were worn by both ladies from high society and courtesans. By wearing a red ribbon around their necks, women expressed their grief to those who died during the revolution.
In the 19th century, the English princess Alexandra of Wales hid a scar on her neck using a choker. Imitating the princess, many ladies of that century began to wear similar jewelry.
Queen Elizabeth I of England also adored this decoration.
Princess Diana also loved this pearl accessory and more.
The inimitable Coco Channel preferred choker necklaces in her collections. Her jewelry consisted of ribbons made of velvet, leather, silk and pearls. An innovation was the tablet insert.
In the 90s, a choker often expressed belonging to a certain subculture (punks, rockers, hippies).
The fashion trend of “choker mania” has survived to this day. You can make a choker with your own hands with minimal time, effort and money! The materials from which a choker can be made are simply amazing in their diversity.
Cornflower fantasy
The summer theme will continue with a necklace made of lace using the Oglala technique. It is simple, requires little skill and is not expensive.
Take dark blue, light blue and white Czech beads, fishing line and a beading needle.
- First we string dark blue jewelry (80 cm). In the first row we secure the bead with a double pass of the fishing line. We weave two rows;
- in the third row we add blue pebbles (2 dark blue, X 1 blue, X 2 dark blue);
- in the fourth row we add white color to the thread (3 blue, X 1 white. X 3 blue)
- We braid the base with white beads.
At the final stage, we attach the fastener to the fishing line and arrange the fabric in a zigzag pattern. We fix the drawing in the upper corners of the sinusoid.
What else can be made from lace?
There are many options for making head decorations. For example, light earrings. This “jewelry” is unique and affordable.
You will need a lavsan or reinforced thread, thin but highly durable, Japanese beads No. 11 and No. 15, cut glass beads (18 pieces), beads with a diameter of 5 - 6 mm, and two drop-shaped pendants, earrings, and wire for the “hairpin.”
The decoration is made using the Ankars technique, which requires tightly tightening the elements. This gives a rigid frame. And uniform shapes depend on nodes of the same size.
- wind the thread on the shuttles in two folds;
- string the beads onto the thread using a pin. To prevent the stones from mixing, separate the required amount on a pin.
We weave the base of the earrings according to the pattern, and then embroider them with beads.
Crocheting technique for lace ribbons
Crochet ribbon lace, patterns and descriptions of its knitting have a long history. Even ancient Egyptian slaves wove long ribbons of their aprons from straw using sticks, which then did not have heads, like modern hooks. The knitting tool gradually acquired a convenient shape, which made it possible to combine simple loops and stitches into complex combinations.
Even the invention of knitting machines did not force needlewomen to abandon crocheting. Over time, the achievements and standards of masters, made in the same style, received their own specific names.
Rectangular connections of openwork motifs and patterns of a certain length, forming lace ribbons with embossed edges and assembled into flat geometric shapes, began to be called ribbon lace. The technique of knitting ribbons incorporates techniques characteristic of patterns made by Bruges, Irish, Brussels and other methods of crochet.
Most often, oval half-motifs of Irish lace are used for side patterns.
Photo step by step “DIY lace earrings”
We attach the earrings to the decor. The earrings are ready!
Hairpin for girls
The little fashionista will be happy to decorate her hair with a lace headband. The coquette needs several options for “rubber bands”: running around in the yard or going to visit. We offer holiday decoration. This decor on the head will look very elegant. Moreover, the needlewoman herself will be able to choose the color of the accessory to match the dress.
Important! To ensure that the elastic fits, measure the child's head from ear to ear and multiply the resulting figure by 4.
Find the implementation diagram on our website.
Pattern No4
For a lace product, a full or half motif can be used.
Full motive
A chain of 8 chains. We connect the items into a ring. Further:
- 1st row: 3 VP, 23 stlb with 1n.;
- 2 rows: 6 VP, *skipping 1 CCH of the 1st row, 1 CCH, 3 VP* – from * to * do 11 times;
- 3p.: 6 VP, 3 tbsp with 2n. with a common top, 6 VP, * 4 stlb with 2n. with a common top, 6 VP* marked *-* do 11 times;
- 4p.: 1 air. p., under. each chain of 6 VP – 8 StB/N
- 5p.: 4 VP, * passes 3 StB/N previous. r., 1 StS2N, 3 air. p. in the same loop 1 tbsp with 2n.* - marked *-* we will do it until the end of the p.;
- 6r.: 1 VP under. each arch of 3 VP - 3 StB/N, 3 VP, 3 single stitch.
Half motive
- We crochet a chain of 4 air. n. Then:
- 1st: 3 air. p., 14 column with 1n.;
- 2p.: 4 air. p., *1 StS1N, 3 air. p.* – marked *-* we will do 6 times, 1 column with 1n.;
- 3R: 7 VP, * 4 StS2H with a common top, 6 VP* – between *-* we knit 7 times, 1 stitch with 2N;
- 4p.: 1 VP, under. each chain of 6 VP – 8 StB/N;
- 5p.: 6 VP, * passes 3 StBN previous. r., 1 StS2N, 3 air. p., 1 StS2N in the same p.* – marked *-* we will do it until the end of the p.;
- 6 rubles: 1 air. p., under. each arch of 3 air. p. – 3 StBN, 3 VP, 3 StBN.
Lace on the eyes
To look intriguing and elegant at a party, take into account the experience of your great-grandmothers, who covered their eyes with half masks at balls.
This accessory can be made entirely with your own hands, or you can complement the purchased lace with beads and rhinestones.
- make a pattern of glasses on paper;
- transfer the pattern to the openwork fabric and cut it out;
- Make the same shape from cardboard and cover it with guipure;
- decorate the mask;
- attach ribbons for fastening around the head.
To prevent the edging from damaging the delicate skin, pay attention to the contour of the “glasses”. Perform the work using a backstitch stitch from high-quality material without chipping. Black color always emphasizes the sophistication of the image. The bracelet and headband will harmoniously complement the Madame Noir look.
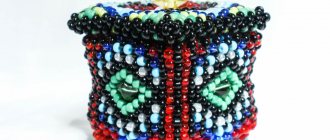
Beaded lace is a labor-intensive process and requires perseverance. But the result will exceed expectations and, most likely, will make ancient art your hobby. On the Internet, experienced craftswomen are happy to share their experience and provide diagrams for products.
Arc
Another one used in weaving is an arc. To create an arch connecting, for example, trefoils, you need to weave sixteen DUs.
Without connecting the loops into a circle, we lower them from the needle. The end is fixed with a regular knotted formation.
We press the knot of the woven arch tightly with a needle, and dial 4 remote control.
We make a connection via P using a technique already familiar to us.
Next, two times 4 remote control between them P, closing the circle. We knitted another leaf of the next shamrock. Using this method we can weave further, and we will get an unusual necklace.
Having mastered the described art of weaving, novice needlewomen will be able to create unique jewelry: earrings, necklaces, bracelets. If you decorate them with stones, they will look much richer and more attractive. From the studied fragments you can create collars that will decorate any, even the most inconspicuous, dress. And having gained more experience, you will be able to knit charming lace clothes that will attract the attention of others who will admire the delicate, meticulous work of an already experienced craftswoman.
Photo examples of beaded lace
Please repost
0