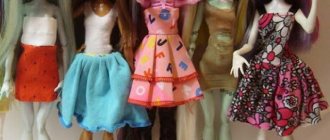
Dolls have been man's faithful companions since ancient times. There are many techniques for creating dolls using various materials and tools. Today we invite you to sew a textile doll: this article contains the best 15 master classes on creating toys in different styles.
Some of the lessons can be repeated even by a beginner, while others will require a certain level of preparation. You can find a detailed description of each master class by clicking on the link or photo, and at the end you will find a bonus lesson on painting a doll’s face.
Happy creativity!
BONUS: How to draw a face for a textile doll
Where does a doll start? Of course, with a cute doll face! Step-by-step lesson from sketching to placing highlights. More details >
What can be made from old jeans: 8 master classes + 3 inspiring selections > How to sew a skirt with your own hands: 10 master classes + BONUS on modeling > How to sew a pillow: 12 master classes for every taste >
Subscribe to the Masters Fair on social networks: Yandex.Zen, Instagram, Facebook, VKontakte
Overalls model, technical drawing
Before sewing any product, it is necessary to carefully consider each element so that during the process there are no unpleasant moments with the absence of some fabric or accessories. A ski overall is a multifunctional item that is designed to provide comfort while skiing. The advantage of individual tailoring is that you can think through all the necessary details that are so lacking in ready-made “store versions”. Let's consider the main elements that should be present in an insulated overalls:
Pockets
It is preferable to make pockets with a zipper or patch with a closing flap (most often on the legs), since there is a risk of losing things from there while riding.
In no case should you forget about the internal pockets , since there is the safest place for especially important things - you can also put your phone there so that it does not freeze, or make a loop for headphones.
Patch pockets in overalls are usually on the side of the legs. Buttons are most often used as a fastener for the valve, but reliable Velcro can also be sewn on.
Zippered pockets are:
- pocket in the seam (including in the side). They are placed in different places: on the sleeve (most often a pocket for a ski pass), in a raised or side seam on the shelf (for any things), on the chest (sometimes just for beauty), on the upper part of the trouser legs;
- welt pocket (framed, with leaf).
Central zipper
It is usually located in the middle of the overalls, but there are also options with offset and diagonal tilt. Then, on the other side of the collar, a small zipper is also installed. It is definitely worth making an internal wind flap with anti-pinch protection at the end.
Most often, snowboard and ski overalls have a zipper in a contrasting color - it looks stylish and bright against a snow-white background. For additional protection from wind and water, you can also make an external strip.
Central zipper with outer and inner wind flaps
Sleeves
Inside the sleeves you can most often find knitted cuffs with a hole for the thumb. In terms of composition, it is recommended to take synthetics, as they dry quickly. Cotton knitwear is more pleasant to the touch, but this effect, alas, only lasts until you start skating - during the process, the cuffs become wet and covered with ice.
Synthetic knit cuffs with thumb hole
There is also the option of making cuffs from the main raincoat fabric with elastic inside. But such cuffs do not fit well on the wrist, and can also form ice around the edge, which will cause discomfort.
You can also find adjustment of the sleeve width using a button on the button.
Adjustable sleeve width and knitted cuff
Ventilation in the armpits and inseam of trousers
This function of the overalls allows you to cool down if it becomes very hot. This was extremely important at a ski resort like Rosa Khutor. Temperature differences in the upper and lower parts of the resort can reach 15 degrees! It is not uncommon for it to snow above and rain below. In addition, you also don’t want to get wet in the ski lifts and in cafes. In this case, ventilation does its job perfectly, don’t be lazy to do it!
Ventilation in the armpits and inseam of trousers
Pants legs
To make the trouser legs easy to put on over large snowboard or ski boots, a zipper is sewn into the side seam, with which you can adjust the width of the trouser leg at the bottom. You can then zip it back up for extra snow protection.
Expansion at the bottom of the legs
A snow skirt is also often inserted inside the trouser leg - additional fabric with an elastic band that tightly fits the top of the boot and prevents snow from getting inside.
You can also make a patch on the back of the overalls, which will adjust the length of the leg at the back. The fact is that usually the legs in overalls are made quite long. Therefore, after changing into regular shoes, the bottom of the legs at the back dangles a lot and flutters on the ground. It is precisely in order to raise the leg at the back that this pata is needed.
Snow skirt and length adjustable skirt
Bomb hatch (sanitary valve)
A bomb hatch is a zipper sewn in at the seat level so that you can go to the toilet without removing the entire overalls. This is a rather difficult element to perform, but it is definitely worth the effort, especially when it comes to women's overalls. There are different types of zippers for it, but a waterproof one is best, as it is easy to unfasten and does not allow water to pass through. The bomb bay must be equipped with external and internal strips for protection from wind and snow.
Bomb hatch (sanitary valve)
Hood
Often in ready-made versions of snowboard overalls you can find hoods so small that they can hardly be put on a hat, let alone a helmet. On the women's overalls, I made the hood according to my own measurements. I made a patch at the back to pull the hood down when I don't need to put it on the helmet.
My husband had a request, on the contrary, not to make a hood under any circumstances, as it bothered him. Just in case, I installed a zipper there, in case he changes his mind. But I made a wide collar.
wide collar
Where to find a snowboard suit pattern
Patterns for women's overalls, sizes 48-54
Patterns, as a rule, are made for typical figures with certain girths of the chest, hips, length of arms and legs. The course on sewing overalls has patterns for all sizes: women’s from 40 to 54, men’s from 44 to 58 . I also developed my own technique for adjusting patterns to any figure, which takes into account all the nuances. Choosing the right size is key to a good fit, which is why I don't sell patterns individually.
Final stage
To ensure that the fabric sticks to the base as reliably as possible, use an iron heated to a certain temperature and iron the surface with it.
Using step-by-step instructions, you can avoid a lot of awkward situations; such manuals should be studied in advance, and the diagrams should be placed in front of you while working.
It is necessary to cut out the lining material according to the sample, all layers of the decorative element are assembled into one masterpiece, and stitched on a sewing machine.
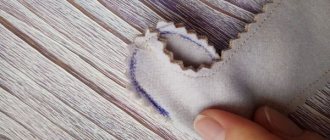
It is important to remember that specimens with a rounded shape must have notches, otherwise the canvas will begin to form unplanned folds. This technique is performed from the inside of the device, which performs a decorative function.
Sewing overalls
The correct sewing order is the main condition for the successful creation of any product. I follow this algorithm:
- Cut out the lining and insulation parts.
- Lining assembly and fitting. If necessary, I make adjustments to the pattern and lining. Only after this I start cutting out the raincoat fabric!
- Open the raincoats.
- Assembling the entire overalls according to a clear algorithm.
Let's look at these stages in more detail.
Cutting out the main parts of the lining
"Seven times measure cut once!" - this saying perfectly reflects the importance of this stage. When starting cutting, you need to be sure of the following points:
- the pattern is adjusted for height and volume;
- you have decided exactly what parts and fabrics the jumpsuit consists of;
- the seam allowances will be the same on the joining pieces (make sure the seam allowances are not already included in the pattern, etc.). For convenience, you can leave the same width everywhere, so as not to get confused later.
Don't forget to label the parts! To do this, you can make small cuts on the seam allowances.
What marks can be on the overalls pattern:
- the waist line is on the details of the sides of the back and the shelf, the central part of the back and on the shelves.
- the top of the edge, the shelf mark, the middle of the bottom - on the sleeves.
- knee mark, middle of the bottom - on the legs.
- Don’t forget also about the grain thread, indicate its direction and follow it when cutting.
When cutting you will get the following parts:
Front of the jumpsuit
Front lining
Shelf
The middle part is made of fleece, just like the side part (relief here).
For the convenience of sewing in and decorating the central zipper, a lining is used - this is a part made of the main fabric (raincoat fabric), which does not allow the lining to peek out, creating a beautiful appearance. The hem extends onto the shoulder seam (on the back it connects to the neck facing). Width - 4-5 cm, length - at the top “rests” on the shoulder seam, at the bottom - 3 cm below the end of the zipper.
In this case, a small small part of the lining will be located just below the bomb bay seam, since the central zipper will be lower than the bomb bay slit.
Front half of trousers (PP)
The entire upper part of the trouser leg is made of foil fabric. This fabric is dense and creates the slip necessary for comfortable putting on.
The knee darts in this model are repeated on the lining, as non-elastic fabric is used here. If you use stretch material, you can cut out the lining without darts, but then it should be shorter by the amount of these darts. You can also cut out the trouser legs entirely from fleece and sew taffeta directly on top - it will not add any thickness, it just glides well on its own and the trouser legs are easy to put on.
At the bottom, 20-25 centimeters must be left for the snow protection insert. It should be cut out at the very end, when the overalls are completely made and you can accurately determine the length of the trouser leg. This insert may need to be lengthened.
Back of the jumpsuit
Back of the jumpsuit
Back
The back also consists of three parts - the central part on the fold and two side parts are cut out of fleece. On top of the pattern you need to cut off the facing from the neckline. Please note that at the shoulder seam the facing is connected to the hem, so they should be equal in width (in this jumpsuit - 4 cm). This detail is cut out on the fold, just like the back.
Rear half of trousers (RR)
The leg here consists of fleece at the top, omnikhite in the middle and an insert for snow protection made of a membrane, which also needs to be put aside for now.
Sleeve
Lined sleeve with cuff
The sleeve consists of three materials. The top is made of foil fabric, as it is slippery, so the sleeve will be comfortable to put on.
We put the lower part, as well as the snow-protective insert, aside - we will return to it at the very end, after the length of the sleeve is specified. This insert will consist of fleece and a membrane facing. The length of this insert is 15-20 cm.
List of resulting lining parts:
- Shelf:
- middle part - fleece - 2 parts;
- side part - fleece - 2 parts;
- selection - Turquoise membrane - 2 parts.
- Back:
- middle part - fleece - 1 piece on the fold;
- side part - fleece - 2 parts;
- neck facing - Turquoise membrane - 1 piece on the fold.
- Front half of trousers:
- upper part – foil fabric – 2 parts with darts;
- Cut a piece from the bort and glue it to the bort.
- Back half of trousers:
- upper part - fleece - 2 parts;
- middle part - foil fabric - 2 parts.
- Sleeve:
- main part – 2 parts.
Connection of lining with insulation
It is recommended to first assemble the lining and try it on in order to clarify the lengths of the sleeves and legs, assess how well the overalls fit in terms of volume, and then begin cutting out the raincoat fabric.
In this model of overalls, the insulation is attached to the lining. It is better to cut the insulation directly along the cut out parts of the lining with a small margin, since the insulation tends to “shrink” during attachment.
In order to minimize the thickness of the seams, some parts of the lining must first be joined together.
In this model of overalls you need to sew the following details:
- Back piping and back neckline.
- On the back half of the legs there is an upper part and a middle part (made of foil fabric).
- There are darts on the front half.
Please note that in this case the hem is connected to the insulation separately (it is longer than the front, so it will be stitched to it at the very end - after connecting to the legs).
If the overalls do not have a division into top and bottom (for example, there is no bomb bay), then first you need to sew the front part of the overalls with the lining, and then with the insulation!
If the overalls have raised seams, then they can also be connected to each other, and then insulation can be cut out along a large part, which will stretch well in the “convex” places.
The procedure for connecting the lining to the insulation:
- First of all, we cut out the insulation according to the resulting parts, which should protrude beyond the contours by about 0.5-1 cm.
- Next will be the manufacture of internal pockets in the lining, if any are planned.
- The third step is to connect the insulation with the lining parts, laying a line at a distance of 0.5 cm from the cut.
Lining assembly
We assemble the lining with normal tension of the upper thread in the following order:
- Middle seam along the back halves of the legs (completely).
- Side seams of the trousers.
- Middle seam (not reaching the top 2-3 cm, where the hem joins).
- Collar and shelf. We leave 2-3 cm uncovered along the bottom of the shelf. We don’t do any stitching!
- Shoulder seams.
- Armhole sleeves.
- Side seams:
- if there is ventilation in the armpits, close only 2-3 cm at the bottom;
- if there is no ventilation, close the side seam completely.
- We connect the trouser legs with the upper part from the hem:
- if you have a bomb bay, then close it 5-6 cm;
- if you don’t have a bomb bay, close the seam completely.
- We connect the bead until the end.
- We stitch along the front from the shoulder seam.
Next, for fitting, we lay a basting line (on a typewriter or by hand) in the following places:
- Side seams all the way (if there is ventilation).
- Bomb bay.
- Step seam.
After fitting, these seams will need to be undone!
Trying on the lining
You should try on the protection you are going to wear, with the insulation inside, to feel the volume. If you want to make any changes, it is recommended to first do this on the pattern, then attach it to the details and make adjustments. This way you will definitely not forget what you cut and where, and in the future you will be able to use the pattern as a basis for other products.
Trying on the lining
Cutting the upper fabric
Before you start cutting raincoat fabric, you need to go through two important steps: determine how many seams you will need (you need to leave allowances for them) and how many parts you will end up with (especially if the jumpsuit consists of different colors).
Defining seams
First of all, we look carefully at your model again, now is the moment when you need to finally decide on it and the elements that you want to make.
Pockets:
- pocket in the side seam. This type of pocket is placed in a separate category, since although it requires a seam, it already exists, since side seams are present in any type of overalls. Such pockets can also be on pants, but this is not the most convenient option;
- pocket in the seam. These pockets require additional stitching. For example, this could be a raised seam, a seam on the sleeve (in this overalls this will be a pocket for a ski pass), and so on. It is better to make a pocket in the seam where parts of two colors or raised seams are connected, so as not to make additional seams. If the part consists of one color and initially does not have seams, then it is better to make a welt or patch pocket;
- welt pockets. Let's consider three main types: a welt pocket with a leaf; a zippered pocket with a frame, and a welt pocket with a zippered leaflet. The advantage of a pocket is that it can be made anywhere, as long as there is enough space for the burlap. The original model of this overalls had such a pocket on the chest, but then, when cutting it out, it turned out that there was no longer enough space for a full-fledged large burlap;
- patch pockets also do not require any seams and can be made anywhere they will fit.
Other elements for which the basic seams are enough, that is, there is no need to cut anything additional:
- expansion along the bottom of the pants (located in the side seams of the legs);
- ventilation both in the armpits and on the legs.
Elements that require additional seams:
- reflective piping;
- bomb bay.
Elements made without seams, slotted or overhead:
- second zipper on the collar. If you are making a second zipper on the collar, then it can be made like a welt pocket, that is, we will make the cut directly when sewing in such a zipper;
- belt loops;
- regulating patches on the sleeve;
- external windproof strip;
- hood adjustment;
- regulation at the bottom of the trousers.
Determining the details of the overalls
This overalls uses two membrane colors - fuchsia and turquoise. The overalls are divided by a seam for the bomb bay into two parts - top and bottom. I have the same seam on the lining. The sleeve is a separate part. Cutting should be done in several stages, first cut out the main parts, and then additional ones, for which you need to leave space on the fabric. Don't forget to indicate the direction of the grain thread and put marks on the seam allowances!
Jumpsuit details:
- Jumpsuit top. Consists of a shelf and a back.
Shelf
Main details of the shelf:
- turquoise membrane: a central part that is divided into two parts, since a reflective edging is sewn between them;
- fuchsia membrane: shelf side.
Additional shelf details:
- fuchsia membrane: external windproof strip, bomb bay strip, pockets in the side seams, which require 4 burlap.
Back
Main back parts:
- turquoise membrane: the central part, which is divided into an upper and lower part, since the edging runs there. The back is cut out on the fold, so there is one piece each for the yoke and the central part.
- fuchsia membrane: two side parts.
Additional back parts:
There are no additional parts on the back.
- Sleeve.
Sleeve
Main details of the sleeve:
- turquoise membrane: the central part, which is divided into upper and lower parts, since the edging should have passed there;
- fuchsia membrane: two side parts, one to the back, the other to the shelf.
In the process of assembling such a sleeve, we had to abandon the edging, since it tightens the fabric a little, and here is exactly the area that needs to be adjusted. Plus, it was necessary to make as many as four alignments with the shelf and back along the edging and along the fuchsia membrane inserts. If you want a piping on the sleeve, then it is better to insert it along the sleeve in a straight section.
It is better to leave a margin of 4-5 cm at the bottom so that the sleeve does not end up being short.
Additional sleeve details:
- turquoise membrane: on the left sleeve in this model there is a pocket for a ski pass. It will be located in the seam between inserts of two colors;
- fuchsia membrane: at the bottom there will be sleeve patches to adjust the width.
- The bottom of the overalls.
Bottom of overalls (pants legs)
Main details of the front half of the trouser leg (PP):
- turquoise membrane: inserts on the sides to visually reduce the hips;
- fuchsia membrane: central part of the PP.
It’s also better to leave some extra length at the bottom so that the trouser legs don’t end up being too short.
Additional PP details:
- turquoise membrane: expansion at the bottom of the legs;
- fuchsia membrane: leaflet.
Main parts of the rear half (RP):
- turquoise membrane: inserts on the sides to visually reduce the hips;
- fuchsia membrane: central part of the ZP.
There are already two combinations to be made on the back half. The first is with the side of the back. And the second - with the front half! A very important point - this part must be measured from the top. There is no need to be guided by the distance from the knee insert . If there are darts on the front half, then the knee line will move down to the distance of the upper dart .
Additional PO details:
There are no additional parts on the back half.
Complete assembly of overalls according to the algorithm
After assembling the lining and cutting out the parts of the raincoat fabric, the stage of sewing the overalls begins. It is necessary to write a clear action plan, since the implementation of some elements (bomb bay, ventilation, etc.) will take place in several stages, in a clear sequence!
If you disturb the order, you may encounter an unpleasant situation when one element interferes with the execution of another. In the best case, you will have to rip up some small area, in the worst case, you will have to redo the whole part.
I used this algorithm to assemble my women's overalls:
- Assembly of main parts.
- Welt and patch pockets, leg length adjusters, codura or oxford reinforcements, belt loops (if you want to make them).
- Pockets in the seams, ventilation in the armpits, sleeve patties, expansion at the bottom of the legs, drawstring at the waist (if provided).
- Sewing a zipper into the bomb bay section on a raincoat fabric.
- Cutting, assembling and sewing in the hood (if it is set-in) or collar (if you have a detachable hood).
- Central zipper (top fabric).
- External wind flap (if equipped).
- Side seam. If there is ventilation in the crotch seam, then do not close the side seam completely.
- Connecting the lining to the hood (or collar) lining.
- Central zipper (lining).
- Ventilation in the armpits (lining).
- Bomb bay upper part (lining).
- Collar (or hood) - close and stitch.
- Bomb bay lower part (lining).
- Ventilation at the crotch seam of the pants, connected to the lining. Close the side seam.
- Knitted cuffs on the sleeves, close the hole in the sleeve.
- Snow protection insert, close the hole in the crotch seam.
What you need to sew overalls at home
Some of the most important stages in creating a jumpsuit are choosing fabric and insulation, selecting the necessary accessories, and having a sewing machine and other additional equipment at home.
Fabrics and insulation
Outerwear for active winter recreation usually consists of 3 layers:
- Upper fabric. This is the outer layer that determines the design of the overalls (its color, print). Its main functions are protection from wind, moisture and dirt. For snowboarding or alpine skiing, it is very important that the fabrics you choose wick away moisture well. Membrane fabrics are best suited for this purpose. For walks, small children with low activity, a raincoat fabric with water-repellent impregnation (dyuspo, taslan) is sufficient. For reinforcement in the area of the knees, seat, elbows, and along the bottom of the legs, Oxford or Cordura is most often used.
- Insulation. An intermediate layer, the main function of which is thermal insulation, that is, heat preservation. Currently, many types of insulation materials have been developed. The main task of manufacturers is to maintain thermal insulation, but reduce the thickness and weight of the material. Calendering technology, when the top layer of insulation is subjected to thermomechanical treatment and forms a “crust”, also allows the insulation not to roll up inside when washed and not to migrate through the fabric. The most common types of insulation that can be purchased in fabric stores: alpolux, isosoft, holofiber.
- Lining. The inner layer, which is responsible for thermal insulation, moisture removal and air conductivity. Most often, different materials are combined in overalls - “sliding” fabrics are placed on the sleeves and the front part of the legs for ease of putting on (taffeta, omnihit), and fleece or carisma is used on the back, front and back of the legs.
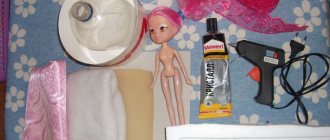
small toy
A small size fabric pig craft is made from dense pastel colored material.
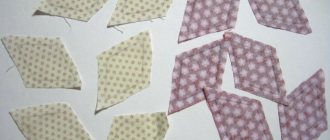
- Cut out 2 squares and round the corners.
- Measure the length of the side.
- Multiply by 4 and cut off a strip of the calculated length. The width of this strip is equal to the length of one side of the square.
- Sew the strip, the seam is located on the wrong side.
- Sew one square to the end, stuff the toy with cotton wool, foam rubber, and pieces of fabric. If you fill it with dry grass, the product will smell pleasant.
- The second end is connected to the last square.
- The eyes are made from small buttons or beads. To make a snout, 2 oval pieces of scrap are connected, the nostrils are made with two stitches of black thread. The ears are sewn on the sides of the head, round in shape, and not stuffed. For the ponytail, fold a thin strip, stitch along the edge and pull the thread, causing it to curl into a circle. Legs don't do it.
Pillow
The scraps are used to make comfortable pillows. From the photo of fabric crafts you can see how easy it is to create a product in the shape of a dog:
They make patterns using paper templates. Choose soft fabric.
For the head, cut out 2 squares and round one side.
For the body, cut small squares from colored shreds. Sew them from the wrong side. The resulting fabric is folded in half and joined with seams.
Sew on the head. Fill the pillow with filler. You can replace it with dry buckwheat or beads.
4 long blanks for ears are cut out of material of different colors. Sew from the inside out, turn right side out, no need to stuff.
Connected to the head with seams on the sides. Cut out 3 black circles. Mark the position of the eyes. In place of the right one, a large patch of colored fabric is sewn, with a black circle on top. The left eye is attached.
The nose is sewn below the eyes. Embroider a smile with thread.
They make paws. Cut out 8 parts. Sew two at a time. They are not stuffed tightly.
Sew the hind legs to the bottom edge of the pillow.
Cut out bright details: 2 ovals and 6 circles. Sew to the front paws.
The legs are connected to the body with sutures.