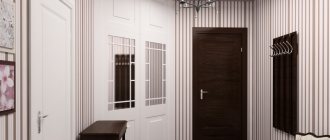
How to Make Kitchen Shaker Cabinets Using Kreg Jigs and Jigs. Experience of the young master Bill (Bill). Kreg accessories make miter screw connections easy and accessible. Let's show your imagination, make your choice and implement your professional or DIY woodworking projects using a variety of Kreg Jig devices. Connecting and repairing with KREG is so easy! Drill holes in the right places, screw in the screws and you're done. So simple! it really is that simple!
A small device that solves a big problem. Conductor for furniture
Precise drilling. Even without markings. Even with the wrong drill. And even a drill with chuck beating. And all this quickly. I drilled about 200 holes, and not one of them turned out to be a hole. How is this possible? I'll tell you now.
I once bought a cabinet from Ikea. As the Swedes love, it was sold in a cardboard box, in the form of a stack of boards and a bag of accessories. Having quickly assembled it, I decided that these boards were not much different from furniture panels from Leroy Merlin, only they were cut to the required size and holes were drilled for fasteners - and the price was several times higher. At the same time, you can cut sheet material in the same Leroy, almost thank you.
Then we made repairs and for a long time could not decide where to install the washing machine. She didn’t have enough space in the bathroom, she wanted to free up the kitchen for more important things, she didn’t look right in the hallway... Now, if I hid it in a cabinet, that would solve the problem. But where can I get a cabinet with an internal size of 60 cm? It’s not sold ready-made anywhere, so I decided to make it myself. That first experience was not entirely successful. The cabinet was assembled using eccentric ties and confirmats (these are screws for chipboard). For an eccentric coupler, you need to drill two holes in perpendicular planes with intersecting axes. I missed the drilling a couple of times, the holes had to be drilled out so that everything would line up, and therefore there were backlashes. One hole came out completely through, almost drilling through the floor. Of course, I assembled the cabinet, but I realized that not everything is so simple. And when the machine spins, the cabinet bounces and rattles.
And then a new renovation broke out. This time it was necessary to build a mega-cabinet. It should be wide (more than 2 m), deep (76 cm deep), made of 21mm birch plywood, and most importantly, the lower part should not have a base. The idea is to roll cabinets on wheels into the bottom section of the cabinet. This greatly simplifies loading things into such a deep closet. Allows you to quickly roll out, say, a cabinet with tools and roll it to the repair site. Or a cabinet with books for a desk. And don’t run to the closet for every little thing. This is roughly what it should look like:
(doors and drawers/shelves are not drawn, but they will be there)
Of course, such legs will instantly move apart without being attached to a single base, and the cabinet will collapse. To prevent this from happening, the cabinet is mounted on the load-bearing wall of the house, and it bears the entire load. This removes the issue of the back wall. This will allow you to replace the flooring if necessary without removing the cabinet from the room. We simply roll out the cabinets, remove the lower part of the partitions, and the rest of the cabinet continues to hang on the wall.
All these wishes of mine, all together and each separately, scared off potential cabinet manufacturers. There are plenty of companies that make furniture, but almost all of them make cabinets from 16 mm chipboard, 600 deep, all according to more or less standard drawings, and the customer is only allowed to choose the color of the chipboard and the pattern on the door. So it became clear that I had to do all the work myself. But the old injury with the washing machine was making itself felt, and this time I decided not to leave myself any chance of making a mistake. The basic fastening elements of the entire structure are a double eccentric coupler and a screw with a barrel-shaped nut. This means that you will have to drill a lot and you need to drill accurately. Therefore, the hero of my review was purchased: a jig for drilling for an eccentric coupler.
There are many jigs for drilling the end of a board. There is a parallelogram type, there is a slingshot type (it takes a long time to explain, I don’t have my own photo, and they don’t allow someone else to attach it to the review, so you can find it on the Internet if necessary), in general there is a large choice. But I found only this jig that would allow me to drill two holes at once specifically for the screed. Let's see what they sent me:
Hard plastic case, foam lining inside and tools in bags.
Two wood drills for 8 and 10 mm, one forstner drill for 15 mm, limit sleeves for them, several dowels, a wrench for nuts, a hex key for fixing the limit sleeves, and the device itself.
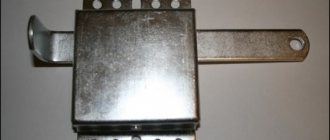
Here he is. The thing is quite weighty, made of cast metal, most likely cast iron. Fixed on the board with a screw clamp. With cheap clamps, the plate is held in place by the flaring of the screw; over time, it falls off or is pressed through, and the screw begins to scratch the board. That won't happen here. The plate is made of thick steel, it is smooth and even, and is fixed with a screw. Time has shown that it can even clamp a painted soft wood board without leaving any marks.
The maximum thickness of the clamped board is about 50 mm.
Two bushings are moved in the slots of the housing and secured with nuts. One for drilling 8 mm, from the end of the board.
The minimum distance between the axis of the drilled hole and the surface of the board is 5 mm.
Maximum - 37 mm.
The scale on the frame is engraved, i.e. will not be erased over time.
The end of the bushings is slightly recessed into the conductor body, literally by a fraction of a millimeter. This makes it possible to move the sleeve even when the clamp is clamping the board. Of course, to do this you need to loosen the fixing nut.
On the other plane of the jig there is exactly the same slot for a bushing for drilling 15 mm.
The minimum distance from the end of the board to the drilling axis is 21 mm. You can do less by simply installing the clamp not close to the edge of the board.
The maximum distance is 39 mm.
Well, let's start testing the device. First of all, let's try installing a double eccentric coupler. It allows you to join plywood almost imperceptibly. In addition, you can use them to make cross-shaped joints of plywood sheets. This is what the screed looks like:
We insert the eccentrics into the holes on the surface of the board, insert the pin into the hole at the end, connect end to end, turn the eccentrics so that they capture the ends of the pins, tighten, done!
Barrel screws - for T-joints. We drill 10 mm on one board, 7 mm from its end and on the surface of the other, insert a barrel into one hole, a screw into the other, connect, tighten, that’s all.
Yes, but how to drill 7mm? The sleeve fits perfectly with the 8mm drill, the 7mm drill hangs in it. I had an adapter for cutters from 1/4 inch to 8 mm on hand. And 1/4 inch is 6.35 mm. Already something. This is the adapter.
Adapter 6.35 - 8 mm for Ali.
Costs 100-something rubles.
It is made of hardened steel, fits tightly into an 8 mm sleeve and a 6.45 mm drill fits into it with virtually no gap. This is a drill bit for drilling holes for M8 threads.
Well, then drilling out 6.45 to 7 is a matter of technique. If you don’t lean on the drill at all, the hole will be drilled exactly along the axis of the previous one.
This is the combination I started using. Of course, it would have been easier to drill at 8. But I didn’t want to add extra play. For the sake of ease of partial disassembly of the cabinet, I had to abandon the dowels, and these pins, which, generally speaking, should only work in tension, will also be loaded with shear.
To get the hang of it, I started with scraps of plywood. I tried to connect three pieces with the letter T.
First, we drill with a forstner drill from the surface, so that later it is easier to remove chips from the deeper end hole.
Then we drill from the end.
We repeat the same thing with the second plank.
Here's what happened:
Quite coaxial.
Finally, we drill through the central plank. We collect:
As you can see, I only succeeded the second time. From the first I made a mistake with the size and drilled the holes for the eccentrics too close. Even when tightened the tightest, they did not provide sufficient compression of the boards.
The edges of all holes are neat. Now I have already made more than 60 holes with this forstner drill.
The drill is worn out, of course, but even now it doesn’t tear the wood fibers.
Here is one of the last holes:
I also drilled into already painted plywood, the edges were smooth.
The holes at the end are also excellent. Here you can see the installed eccentric in the depths.
The most important thing is that the holes are always coaxial. I inserted the drill and attached the GOST corner:
On another plane:
And this is what happened as a result:
I think this is the most critical jig for cabinet making. It will help not only make holes for eccentric fasteners, but also for barrels, confirmations, dowels, i.e. all the work for which, generally speaking, a self-centering jig is intended. But this one has more functionality due to drilling a second hole. So if you are not a professional and do not work in production line, this conductor is for you. Everything else that I need - cutting out holes for hinges and handles - can, in principle, be done without a jig at all.
Link to conductor
Now it costs something like 2000.
Preparing parts
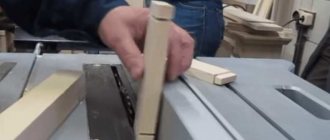
Dimensional accuracy, squareness control. If the product or part of it has right angles (for example, a body or façade frame), right-angle cuts ensure the squareness of the assembly. Before sawing the blade to its final length, set the saw blade exactly 90° to the table and make sure the crosscut fence is also set to 90° to the blade. Even a slight deviation will lead to gaps at the joints or distortions. If you are using a miter saw, it should also be finely tuned.
Plan your work carefully and work according to the plan. When all the parts are cut, but there are no holes in them yet, arrange them in the required order, and then put marks on the back side, as shown in the photo below. Be sure to also make other marks, such as to align the middle rails with the posts. Then you can start drilling oblique holes on the marked edges so as not to accidentally make them on the front side.
Consider the direction of the grain. To ensure maximum strength, position the holes in the pieces so that the screws enter the adjacent piece across the grain. Avoid screwing them into the end, as shown in the photo below.
Screws screwed into the end will not make the connection strong. Drill slanted holes in the studs to drive screws into the edges of the studs across the grain.
Scope of use
Furniture jigs are devices that no furniture maker can do without while working. Such devices allow you to avoid the main problem in furniture production, namely the drill entering at the wrong angle. If you make such a mistake, it is very difficult or even impossible to correct it later. Such a device not only makes it possible to correctly direct the drill during operation, but also allows the tool to constantly maintain the desired trajectory (flat, perpendicular or at an angle).
Such devices are used both in the design and production of furniture, and during assembly, when there is a need to make holes for fastening elements together. Often, for such actions, conductors are used for firmmats or dowels, without which it is impossible to make straight holes. Also, you cannot do without this device if you need to make holes at an angle or in the end of a thin slab (it is especially important to use the device when working with chipboards).
When drilling holes using this design, the process itself is quick and simple. The fastener allows you to do work at any distance from the edge of the slab, as well as regardless of its width.
In the furniture industry, dowels are often used as fasteners. But at the same time, this option has already existed for a long time, and their use requires the presence of a drilling jig when working. The only condition and at the same time a problem is the fact that the parts being connected to each other must have a right angle during operation. Therefore, such elements must be located exactly perpendicular to each other. When making holes for dowels and adding parts, it will be very difficult to do without a jig.
Furniture production is not the only area of application for such devices. They can often be used to make holes in pipes and other round-shaped parts. Special devices allow you to make high-quality holes even in the smallest tubes.
The principle of their operation and dimensions may be different. Some narrow-profile models are better to buy than to produce yourself. But, on the other hand, the price of such devices is not small, so this is a disadvantage when compared with home-made models.
Features of self-production
When designing a conductor for confirmation, it is necessary to correctly calculate what functions it will have to perform in the future. It should be done for the most commonly used fasteners in the house. If such a device is required by furniture makers for constant work, then it is better to buy a factory model, which is distinguished by great precision. In addition, manufacturers often include additional fasteners, stops and templates in the kit.
Assembling connections
Correct choice of screws. Screws with large threads are best used for soft wood, such as pine or poplar, as well as for softwood plywood; fine thread is intended for hard wood and birch plywood. The length of the screw is determined by the thickness of the parts (see table).
When connecting the drawers to the lid, provide some freedom for the screws so that they can move slightly in the guide holes when the lid changes its size due to fluctuations in humidity. To do this, drill an oblique pocket hole as usual, then screw the screw into the frame until the end. Turn it out and drill a pilot hole to increase its diameter by 2-3 mm. Finally attach the leg and drawer assembly to the lid.
Most miter hole screws have a wide head with a so-called press washer to increase the contact area with the bottom of the hole. But screws with a small cylindrical head are also available, suitable for shallow holes from which the head with a wide press washer will protrude above the surface. For garden furniture and buildings, choose stainless or galvanized screws. Never use regular drywall screws in angled holes—they break easily when screwed in, and their tapered heads can split the bottom of the hole.
Don't forget the glue. The joints will be quite strong even if the parts are held together only with screws, but additional gluing helps prevent the joints from opening due to seasonal humidity fluctuations.
Secure the parts before screwing in the screws. The connections are assembled on a flat plane. If possible, tighten the bolts tightly across the joint so that they do not move when screwing in the screws. Press them onto the work surface to align the front sides. If one of the parts should have an indentation (plate), place a lining of the appropriate thickness underneath. When connecting parts edge to face, as when assembling a table , always securely fix them with clamps before screwing in the screws.
Adjust the tightening force of the screws. Although the impact driver is very convenient for working with regular screws, avoid using it when assembling connections with angled holes. Since you cannot see the head of the screw in the depths, the high torque can easily destroy the bottom of the pocket hole. Use a regular cordless screwdriver with a friction clutch, adjusting the force so that the joint closes tightly and parts are not damaged.