New Year's decorations made by yourself bring special energy to your home. And if this is a DIY tree made of shells, then it also contains the sound of the sea, the romance of summer, and, in general, the atmosphere of a real holiday!
New Year is a family celebration that cannot be imagined without a Christmas tree. But in the modern world, living green beauties are increasingly being replaced by Christmas trees made from artificial materials. Buying (or even more so cutting down) a Christmas tree so that after standing for a week it goes to the trash heap is barbarism and a wasteful attitude towards the forest resources of the planet.
But I don’t want to buy a plastic tree either. The solution is to make a Christmas tree with your own hands. To do this, carefully study our master class.
To make a Christmas tree from shells you will need some materials and tools. Let's list them.
- Seashells.
- Thick cardboard.
- Thin rope or twine.
- Super glue.
- Spray paint or acrylic.
- Tassels.
- Scissors.
- Tweezers.
- Sanding paper.
- Imitation pearl beads or other jewelry.
- Final coat varnish.
How to make paintings from natural materials
Using shells, you can create unusual paintings or decorations. Doing this is not as difficult as you might think at first glance. You just need to approach the work from a creative side, using your imagination. The main material is shells, which can be bought or collected on the coast. Then they need to be sorted depending on type and size. To create a masterpiece, you will also need the following materials at hand:
- base, you can use plywood, board or thick cardboard;
- frame;
- glue;
- paints;
- beads, twigs, blades of grass, sand, beads and other decorative elements.
The process of creating a picture from shells consists of the following steps:
- Sketch design. If you are not very skilled with a pencil, find a picture on the Internet, scan it and make an image along the outline.
- Preparing the base. Thick plywood or a cutting board, such as a cutting board, is best. It is recommended to sand the base and then repaint it. The background can be made with a stain of a suitable color or potassium permanganate.
- Drawing. If you are working with a sketch, it is better to use a carbon copy to transfer the picture onto the base, or simply create the future picture directly on the board, like a mosaic. You need to paint the material before you start gluing it. It is advisable to use bright acrylic paints. If you are making a flower, it is better to take white or multi-colored paints, but for a panel with a seascape, green and blue shades are suitable, which convey the color of the waves well.
- Gluing the material. Shells and other decorative elements are well fixed with PVA glue.
- Framing the painting. Homemade baguettes can transform paintings, but making them will require a lot of patience and skill.
Decorating shells with decoupage
We take:
- Huge rapan shells.
- Good acrylic paints.
- Napkins.
- Glue.
- Water based varnish.
- Nice brushes.
Decoration
We work:
- Prepare the shells for work. Wipe them with alcohol.
- Prepare a drawing from napkins and cut out the necessary elements.
- Glue the surface and carefully glue the napkin, straightening out all the folds with a brush. Cover the top with glue again.
- Open the inside with varnish 2-3 times so that it acquires a beautiful shine.
- To get a smooth transition, use acrylic paints and a small sponge.
- Let them dry.
Beautiful jewelry and jewelry
Step-by-step technology for making earrings:
- Select the desired shell shape for the product.
- Use a thick needle to make a hole in the upper part of the workpiece using rotational movements.
- If necessary, paint the earrings in the desired color and let them dry.
- Cover the surface of the jewelry with varnish.
- Finally, attach the earrings.
Design of a simple necklace:
- Choose suitable shells. They can be medium in size with an unusual shade or small in size.
- It is recommended to decorate the beads with other decorative elements - beads, stones, inflorescences.
- As a thread, you should use a silver chain, thin wire, nylon thread, linen cord or twine.
- Place a mark on each solid surface of the mollusk, and in this place drill the part from the inside with a drill or make a through recess using a nail and hammer.
- Attach a connecting ring to each shell shell. To do this, you need to move the ends of the ring apart with pointed pliers, thread it into the drilled hole and move the metal edges again.
- For variety, you can attach beads and several shells to each ring. Then you need to string the blanks onto the cord in the desired order (symmetrically or create asymmetry).
- The ends of the necklace are simply tied or fastened with special latches.
Christmas tree made of garland
Obviously, the simplest, but no less interesting way is to build a “wall-mounted” New Year tree from an electric garland. The essence of this homemade product is simple: lay out a long garland on a wall plane, repeating the outlines of the forest beauty with the required degree of detail. At key points (places of bends) we fix them in any suitable way: with push pins, tape, etc.
Of course, the Christmas tree looks much more impressive if you add shiny tinsel and other familiar decorations of a traditional tree to the overall composition.
Read also Do-it-yourself sleigh: ideas, photos and drawings
Paper Christmas tree on the wall
The next option is a real field for imagination: we are talking about a flat Christmas tree made of paper! After all, colored paper is a universal and favorite material for various kinds of crafts; you can cut out an outline image of a Christmas tree from it and make decorative elements. Paper trees assembled from individual elements and sections look original. The use of beautiful wrapping paper when creating decorations and even entire sections of the future Christmas tree is strongly encouraged.
Or you can do the following: create a permanent photographic exhibition from many family photographs of different sizes in frames - a kind of “family tree”, only in the form of a Christmas tree, which is decorated accordingly for the New Year and Christmas holidays. It’s good to install neat pins between the photographs at key points for attaching garlands and tinsel, which in normal times can be used for small memorable souvenirs, etc.
The described five ways to create flat Christmas trees on the wall are just the most common methods that will help you if you suddenly get the idea of creating such a creative decoration in your room or living room, as well as in your favorite office, if you manage to captivate your colleagues and bosses . Next, we offer a few more photographic examples of already created “wall” Christmas trees, the structure of which will now not be difficult for you to understand, but each of them can serve as a source of inspiration and copying of your favorite solutions. Happy creativity to you and Happy New Year!
Read also Crafts from grapes: interesting models, tips, photos
Paintings and panels
It is known that children love to make crafts from a variety of materials. One of them is shells.
We recommend reading:
- Crafts flowers - 125 photos of the best ideas from craftswomen. Instructions on how to make it yourself from A to Z. Simple and complex options for crafts + video tutorial
- DIY crafts: TOP-200 photos of the best ideas. Schemes, master classes, modern design, new products, instructions with descriptions
- Crafts from plaster - 120 photos of the best ideas for creating original crafts with your own hands. Master class for beginners with examples and video lessons
One of the most common shell crafts for children are wall panels. They can be decorated not only with shells, but also with sea pebbles.
To make a painting in a marine style you will need attention and perseverance, as well as the following materials:
- White dense paintings,
- Paints,
- Pencils,
- Shells and pebbles.
We recommend:
DIY Christmas tree made of shells
Christmas tree. Master class with step-by-step description and photographic material
New Year tree made of shells “Memories of the Sea”. Master class THE WORK WAS DONE by additional education teacher TAMARA ALEKSANDROVNA NOVICHKOVA of the municipal budgetary educational institution of additional education for children Lesnovsky House of Children's Creativity of the municipal formation - Shilovsky municipal district of the Ryazan region. GOAL: Creating a festive mood. OBJECTIVES: • Learn to make a Christmas tree from shells with your own hands. • Learn to work with a glue gun. • Develop thinking, imagination, hard work. • Cultivate patience, perseverance, accuracy, respect for the traditions of the Russian people. PURPOSE OF THE PROJECT: interior decoration Man has two worlds, One - which created us, The other - which we have been creating for centuries to the best of our ability. N. Zabolotsky.
For a long time, spruce has been considered the main symbol of the New Year holidays.
Without a Christmas tree, a holiday is not a holiday, and the mood is bad. For several years in a row, I and the children of the Needlewoman association have been decorating an artificial Christmas tree with handmade toys. How much joy she brings to the girls! One day during class we started talking about summer and shared our impressions. And I remembered the warm sea, the sun, the sound of the oncoming wave. And the shells that I brought from the sea. Looking at their diversity and beauty, I wanted to create miracles. For the New Year, I decided to teach my kids how to make a Christmas tree out of shells and bring a little unusual joyful mood into the interior for myself and my girls. In order to get a beautiful Christmas tree, you need to be patient, because “Patience and work will grind everything down,” and “Skillful hands know no boredom,” says popular wisdom. So, let's get to work.
To make a Christmas tree from shells we will need: - whatman paper or thick cardboard; - PVA glue, glue gun; - scissors; - seashells of different sizes; - a roll of paper towels; - gold and silver beads; - stand for the Christmas tree. Step 1. Making the base of the Christmas tree. Roll the Whatman paper into a cone and glue it with PVA glue. The height of the cone was 45 cm. You can make a Christmas tree of the height you need.
Step 2. Making a leg for our Christmas tree. To do this, take a roll of paper towels. It is long and durable. We insert it into the cone, having first applied a lot of glue using a gun. To stabilize our Christmas tree, I took a round stand from an old globe. Attach the tree leg to the stand with hot glue. The base is ready
You need to pay attention to safety precautions when working with a glue gun. 1
Check its serviceability. 2. You cannot plug it into a power outlet without an adult. 3. Do not handle the fork with wet hands. Be careful!
Step 3. Start gluing the shells. For convenience, we first sort the shells: large, medium, small. Using a gun, apply glue to the shells and glue them around the cone, using large ones first, then medium ones. We glue smaller ones at the top. In my work I used sea scallops. Our Christmas tree is almost ready! You touch it with your hands and feel a surge of energy and strength. Step 4. Decorate the Christmas tree. And now the most pleasant moment. We need to decorate the Christmas tree! Here you can use your imagination and use what you have on hand for decoration. I took gold and silver beads and glued them between the shells. I glued the largest shells onto the round stand. Step 5. Attach the star. And finally, I placed a red starfish on the top of the tree! Here she is, what a New Year's beauty! It sparkled with golden lights from all sides! Step 6. Making crafts from other materials using this technology. My work was appreciated by all the girls and teachers of our Children's Art House. The Christmas tree took the most honorable place in the office. Other New Year trees were also made using this technology. The students showed skill and creativity. In their work they used tinsel, banknotes, pasta, plastic spoons, forks and other materials. This is what they did. I wish you success too. Create, go for it! Beautiful things made with your own hands bring great satisfaction and joy.
We recommend watching:
DIY Christmas tree using cutting technique DIY Christmas tree made from napkins DIY Christmas trees made from natural material DIY felt Christmas tree
Christmas tree made of colored paper. Master class with step-by-step photos
Christmas tree made from palms
Herringbone thread applique. Master class with step-by-step photos
DIY Christmas tree
DIY Christmas tree
These crafts made from seashells will help preserve your impressions of your holiday at sea.
Shell crafts
After a vacation at the seaside, there are a lot of empty shells in the house, and you don’t know what to do with them? Don’t even think about throwing them away, because shells are a wonderful material for children’s (and not only) creativity, and crafts made from seashells will decorate the most sophisticated interior and give it a slight touch of mystery.
The simplest thing is a “beach” in a bottle. Pour sand, small pebbles and shells into a beautiful glass or plastic bottle in layers, screw in the cap, and the seashore is at home again! And if you also put a piece of paper rolled up into a bottle, it will turn into a message! By the way, making a “beach” perfectly develops fine motor skills of children’s fingers, which helps the development of speech.
It is very easy and quick to make a decorative candle from a large shell. Melt some wax or paraffin in a water bath and pour it into the shell. A wick made of linen or cotton thread must be inserted in advance. And if you add dye to the melted wax, it will give the candle even more charm. On the back of the candle you can glue a small flat bottom to stabilize the shell.
Photo frames decorated with seashells are very popular. To make them you need very little: sand, shells, PVA glue, the cheapest photo frames and your imagination.
These frames are all made from shells.
This photo frame is decorated with shells and sand.
You can add beads or rhinestones to the shells.
A mirror can also be decorated with shells, even the oldest one.
Even a wall clock will show the time differently if you decorate it with shells.
The shells can even be painted. And then the most unimaginable combinations of colors will return you to a carefree summer holiday. You can make flowers from shells.
Or even whole bouquets - the magic never ends.
A panel of shells will decorate your wall.
A box for trinkets and jewelry decorated with shells will be transformed into a precious treasure chest.
Candlesticks made of shells will add chic to your holiday table.
If you fashion a jug from clay or salt dough, then, decorated with shells, it will turn into an original pencil holder.
Even the most unsightly flower pots will find a second life after decorating with shells.
Children can even make a Christmas tree out of shells.
Shells make funny little animals - bears, mice and eagle owls.
A turtle made from shells will remind you of the sea.
And the crab will not let you forget about the warm waves and sandy shore.
Funny monkeys will turn us into children again.
Shells make very stylish jewelry. For example, this red necklace.
Or these white pearl earrings.
Flowers made from shells amaze with their diversity.
You can also make complex compositions from shells. For example, a lot of shells were used in the making of this menagerie.
And this swan in the bathroom will take us into a fairy tale.
A plate decorated with seashells will remind you of the sea breeze.
A bouquet of “live” flowers made from shells will never wither.
Even a chandelier can be decorated with shells.
A night light made of shells will make your bedroom look like a sea grotto.
A table inlaid with shells is a decoration for a princess’s interior!
There are no limits to human imagination. And even if you make something completely different from shells, this will not at all darken your impression of what you made with your own hands. Making crafts from seashells with our children, we ourselves return to childhood. While sorting through the shells, we remember all the precious moments of summer vacation, every moment of which was beautiful and will remain in our memory forever. Or at least until the next family trip to the sea.
Sea crafts from shells and stones for kindergarten: fast and beautiful
Summer will fly by, the time for fun holidays will end, the kids will go to kindergarten, cheerful and tanned. The teachers will ask the children, how did you rest? “Okay,” the children will answer. Well done! This means that it’s time to work hard and bring into the garden crafts made by children’s hands, but not without the help of parents.
Note to moms and dads a few simple ideas for working with children.
River shell caterpillar
The caterpillar will be very flexible if you use soft pompoms. Look carefully at the photo to see how to assemble the funny wriggling caterpillar step by step.
How to make a crab, fountain, owl: photo, video
In the next easy master class, you and your child will learn how to make sea animals from large shells. The activity is exciting and will appeal to boys and girls.
In the third lesson, I want to give parents detailed instructions on how to make a small tabletop waterfall from pebbles and shells. For this craft you will need a lot of hot glue. The viscous mass from the heat gun will become a solid base, bonding the material with streams of flowing water.
On Visual Day, I would like to invite young readers to watch a short video. The master will tell you in detail how to make a wise owl from shells. The video presents a variety of diagrams, detailed explanations and useful tips.
The most beautiful shells on the beach: video
Before moving on to the master classes, I hasten to introduce you, my dear readers, to one interesting person. This is a video blogger, an American from Florida, known online under the nickname “i Love Shelling”. Since her virginity, this sunny lady has been friends with the sea surf and collects various shells.
A lover of nature's gifts invites guests from all over the world to walk along the wild beach together in search of the rarest shells. The most beautiful specimens are found immediately after a strong storm. Here you can find very rare fiery red, malachite and tiger shells.
To warm up before work, watch this short video made by a Florida collector for fans of ocean treasures.
Jar and shells - MK on creating a pencil holder
To create a beautiful and useful thing, it is not at all necessary to have a lot of expensive materials on hand. This craft requires only shells, a jar and flour, and the result of creativity with children can be used for many years.
For the stand you will need:
Knead the salted dough in the following proportions: 2 cups flour; 1 glass of salt; 2/3 glass of water. The result should be a mixture that does not stick to your hands and is soft enough for modeling. Roll out a wide layer 1 cm thick.
Carefully distribute the dough throughout the jar, removing excess pieces. We form a thin sausage from the mass and close the neck of the jar with it.
While the dough has not hardened, decorate the jar with shells. To fix them, press shells of any size into the dough. The pattern, size and color of the shells does not matter - here the child himself can imagine to his heart’s content. Using a brush we can create additional patterns on the jar.
The craft is almost ready. Now the dough should harden; to do this, place the jar in a dry and warm place for 2-3 days.
Recent Entries
- DIY papier-mâché crafts: history of appearance, creation techniques
- Order in the basics for embroidery: and you can easily handle it!
- Impeccable storage and accounting of floss threads using the example of the Gamma palette
- Notebook “Floss Threads”: what’s inside, how to fill it, what is it for?
- Handmade happiness. Hits and bestsellers on handicrafts from EKSMO Publishing House. Season: autumn-winter 2019-2020
- Basics of dry and wet felting from wool for beginners
- “Golden embroidery collection. Charming miniatures. 60 small masterpieces from Sony Line"
- 401 DIY mice and rats: you will squeal with delight!
- Compositions and bouquets of dried flowers (herbs, flowers, cereals, leaves and fruits)
- Heart with embroidery: decorating a pendant in the Shabby Chic style
Popular articles Brooch made of satin and satin ribbons
DIY Christmas tree made from bottles
Very often, a lot of extra plastic bottles accumulate in the house, from which you can make a wonderful DIY Christmas tree. The plastic from which the container is made can take almost any shape under the influence of mechanical force or heat.
You will need one clear plastic bottle for the base - the taller it is, the taller your tree will be. The needles need to be made from two green bottles the same size as the white one.
Cut off the bottom and neck of the green bottle, and cut the rest into circles.
Each ring needs to be cut into several parts. The fewer parts, the shorter the length of the pine needles.
On each of the resulting rectangles, make many cuts that do not reach the edge - the more cuts, the narrower the spruce needles.
Start gluing the pine needles in rows to the base bottle from the bottom using double-sided tape. Secure the parts on top with regular tape to hold them more firmly.
Cut off the threaded part from the neck and cut it into 2 parts lengthwise.
The lower part of the neck must also be cut, forming a part with needles.
Secure the resulting part around the top part, and tuck the protruding tape inside the product.
Also cut the very top part into many needles.
Roll the resulting top into a tight bun and insert it into the hole at the top of the future tree.
Your Christmas tree is ready!
The beauty of this method is that you do not need to use any special techniques for twisting the plastic - due to the fact that the parts from which the needles are made are cut from the circumference of the bottle, the Christmas tree with your own hands turns out to be curly on its own.
The craft turns out to be quite voluminous - a large plastic forest beauty can be placed on the table and decorated with light homemade Christmas tree decorations. If you want a small, souvenir toy, it is better to take a half-liter bottle as a base.
Creation
Having selected the tools, you can begin making the picture; to do this, perform the following manipulations:
- The picture template is secured to the canvas with tape.
- The picture is transferred to the canvas by tracing the template with a pencil. The shells are glued strictly along the contour of the design. Sea gifts must be attached tightly to each other so that voids do not form.
- If there are still voids between the shells, then they can be filled with different beads.
Thus, you can create absolutely any picture, both easy and complex.
A variety of products can be made from these sea gifts; beginners can try to develop their experience by collecting toads from shells, and professionals can create a real ship.
Such products can be installed in the house and garden as decorative elements that will surely win the heart of more than one guest.
In addition, this product can be an excellent way to make money, because many people dream of receiving something made by human hands for their birthday or other holiday, and products made from shells will also remind you of happy times with friends or loved ones on the seaside.
Creating such crafts is worth the time spent.
Mirror frame decor
A mirror decorated with shells will complement your interior if it is made in a marine theme and will constantly remind you of sunny summer days spent by the sea.
Materials for the product:
- Medium-sized shells, seahorses, stars.
- Glue gun.
- Unnecessary paper to cover the mirror.
- Scotch.
For the mirror
Let's get down to business:
- Use paper to cover the mirror, securing it with tape. If you are not happy with the color of the frame, paint it before decorating.
- Sort the shells by size.
- Make the inner edge of the frame from small or medium shells.
- Make the central part from large shells, and also decorate the outer edge of the frame with small ones.
- If during the work you have holes between the shells, fill them with decorative elements or shells of the required diameter.
- Remove the papers.
By showing your imagination, you will give shells a second life. Decorate your home with original panels and make unusual gifts for your friends and family.
Making candles for mini-candlesticks made from shells
Shells are almost ready-made miniature candlesticks that are just waiting to be supplemented with paraffin and wick.
Materials:
- Sea or large river shells;
- Small round candles in tin molds;
- Water and a saucepan for a water bath;
- PVA glue or double-sided tape.
Instructions:
Step 1. Remove the candle itself from the tin container, and then remove the wick from it by pulling the metal base at the bottom of the candle (see photo). Set the wicks aside and return the candles to the molds.
- Step 2. Glue each wick with double-sided tape or PVA glue in the center of the shell.
- Step 3. Now we need to melt the paraffin until it is completely liquid. You can do this in three ways:
- Bring the water in the pan to a boil, then reduce the heat until the water stops boiling and lower the ramekins into it.
- Place the candles on the stove over low heat, and make sure that the paraffin does not burn.
- Warm up the paraffin using a hairdryer.
Step 4. Once the paraffin has melted, remove the molds from the heat and begin filling the shells. It is best to use some kind of tongs or a pair of Chinese chopsticks for this. Don't forget to protect the table surface with newspaper first.
If the shells are too unstable and you are afraid that the paraffin will harden unevenly, then it is better to arrange the candles in the cells of the egg packaging or fix, for example, with soft plasticine that does not leave marks.
Idea 6. Making a flower candlestick
If you have enough bivalve shells, you can use them to make beautiful flower-shaped candle holders.
Today we propose to make such a craft from mussel shells.
Materials:
- Bivalve shells;
- Any round base of small diameter;
- Glue gun;
- PVA glue (optional);
- Glitter (optional).
Instructions:
Step 1. Prepare the shells - wash them with soap, remove any remaining organic matter and, if desired, bleach them using chlorine-containing products (see instructions at the beginning of the article).
Step 2: Paint the round base of the candle holder a neutral color such as white.
Step 3: While the base is drying, sort your sink set by size.
Step 4: Start gluing 1 row of shells to the sides of the base using hot glue.
Step 5. Once the first row is slightly dry, begin creating the second row, placing each new shell overlapping the previous one so that it is located between the two shells of the first row. As a result, you will have a checkerboard layout of shells in two rows as shown in the photo.
Step 6. Glue the third and all subsequent rows using the same principle, but not on the base, but on the joints of the shells of the previous row (the place is highlighted by the arrow in the photo below).
Step 7. Once you have glued the last row, look around the candle holder and add another row or two where you think it is needed.
Step 8. Hooray, the shell candle holder is ready! If you wish, you can additionally decorate it with sparkles. To do this you need to do the following:
- Treat the shells with PVA glue on the inside or just around the edges.
- Sprinkle glitter generously onto your craft, let the glue dry, and then shake off any excess.
Ship made of shells
You will need: 2 rapan shells of different sizes, a small stone, large round shells, small spiral-shaped shells, a glue gun, toothpicks, wooden skewers, varnish, thick cotton thread.
Master Class
- Apply glue to the stone and glue a larger rapana shell. The shell should not wobble, it should be firmly attached to the stone.
- Glue a wooden skewer inside a smaller rapana shell. This will be the bow of the ship.
- Glue the skewer with the nose onto the base of the sailboat.
- Glue 3 wooden skewers perpendicular to the base of the ship.
- Trim the first and third skewers so that they are just below the middle skewer.
- Glue large shells as sails on the front side of the mast, and on the back side glue toothpicks that will serve as yards. There should be 3 shells on each mast.
- Make ropes from cotton thread in this way: tie the thread to the back of the ship, then pull it along the top of the masts all the way to the bow, then stretch the thread from bottom to top, winding it onto the yards on each mast, and if the thread slips in some places, fix it with glue.
- Glue spiral shells to the tops of the masts.
- Cover the craft with varnish.
The shell ship is ready! I recommend viewing a photo gallery of ideas for creating a boat from shells!
You can make letters and numbers from shells for a special event, and see how in this video!
Shell letter | Interior decoration | DIY Seashell Letter Room Decoration
Coloring shells
The tree can be painted after it is completely made. But it is better to paint the shells before gluing. You can use acrylic paints. An aerosol can of paint is more convenient and faster to use.
You are free to choose any color: traditional “Christmas tree” green, red, white, etc. But a shell tree looks richer and more interesting if it is gold or silver.
Select shells according to size. You will stick them in rows. At the bottom - large ones, the further to the top, the smaller, at the top - the smallest. For one row of a small DIY shell tree you will need about 12-15 shells. As the cone narrows, their number will decrease, gradually reducing to three and one.
Our master class showed that a Christmas tree 20 centimeters high took about 200 shells of medium, small and very small sizes.
Place the shells in rows by size on a flat surface covered with paper. Spray gold paint on one side. Let dry, turn over, paint the other side. Leave to dry.
Preparing the shells
Among the shells, you should choose those that do not contain living organisms. The organism may also be attached to the surface of the shell.
If there is a dead organism in the sink, choose a specific cleaning method.
Cleansing
There are different ways to clean sinks:
- Boiling. Place a shell with the remains of organic matter in a pan and fill it with water at room temperature so that its level is 5 centimeters above the sink. Bring the water to a boil over low heat. Small shells are boiled for 5 minutes, medium and large ones for 7 minutes. If more than one shell is processed at a time, the time will also be increased. The shells are taken out with tongs, laid out on a soft surface and the remains of organic matter are removed with tweezers.
- Bury the shells in a hole 40-60 centimeters deep. Ants and other animals will eat any leftovers. The shells are stored underground for several months.
- The shells are placed in a ziplock bag, filled with water and frozen for several days. Then the bag is removed, the contents are completely thawed, and then the organic matter is removed.
- Use a solution of water and bleach in which the sinks are placed. After peeling off the top layer, the shells are removed and thoroughly wiped with a toothbrush. To restore shine, use baby oil.
- Apply toothpaste to a toothbrush, apply it to the surface of the sink and polish it, then rinse off the paste.
- The shellfish are removed using a toothbrush or other brush with metal bristles.
The oil is applied to the surface, left for a day and another layer is applied. Polyurethane or clear nail polish is applied to each side, drying for one day. Sanding will help get rid of natural cracks.
Drilling holes
First, use a marker to mark the location for the hole. The shell will break if the hole is too close to the edge.
Use nail scissors or a knife to make a small dent.
- Use the sharp end to make a hole using circular movements and pressure until a full hole is formed.
- To get rid of dust, blow into the hole and wash it.
Holes in thick shells are made with a drill at low speeds with a diameter of 1 millimeter. In this case, it is recommended to choose a drill with a diamond coating and wet the place for the hole during the process of creating it, then chips will not form.
A wide hole is made using a screw. First, make a small hole and then enlarge it with a screw.
Wax and plasticine will also help. Roll two small balls and attach them to both sides of the shell.
sailboat
When we often come from the sea, we bring souvenirs, but why spend money? If you collect a large number of shells, you can make the craft yourself at home. A popular souvenir made from a shell is a sailboat, which is exactly what we will make now.
To start constructing the floor, prepare:
- rapan (better to take a larger size);
- wooden skewers (can be replaced with sushi tools);
- matches;
- a large shell for delivery, and shells for covering the sails;
- a thread;
- knife and superglue.
Instructions for making this craft from shells for children with your own hands:
(Step 1)
- We measure the length of the masts and cut the sticks to this length. Sharpen the tops of the sticks. Now you need to attach the shells to the mast. It is advisable to place small ones at the top and large ones below. We wait until the glue dries.
The craft is ready to sail. To add shine to our craft, it is recommended to treat it with varnish. Spray varnish is ideal.
Advice! If you don’t want the threads to unwind, you need to add a drop of glue to each attached area.
Making a bouquet of seashells
- colored pebbles;
- shells;
- ribbon;
- plastic tube;
- wire;
- glue gun;
- floral ball.
- Choosing a form
If the bouquet is round, use a floral ball. It can be made from paper or thread yourself. You don't have to limit yourself to a round composition. You can cut out any other shape from a floral sponge. The basis of the composition is recorded on a floral microphone.
Holes for the wire are drilled in the washed shells. If you use a glue gun, you can simply glue the shells to the wire loops. The same is done with beads, pebbles and other elements used in creating a sea bouquet.
The wire with shells is inserted into a base made of floral sponge or other material. If beads, brooches, stones and other decor are used, they are also fixed to the base.
- Making a handle
A floral microphone is wrapped in a ribbon matched to the bouquet's color and decorated with decor. These can be ribbons, beads and much more.
It is best to preserve shells as a reminder of carefree days at the beach in the form of interior items, decorations and souvenirs. After all, they are such a beautiful, completely free, natural and durable material. In this material you will find 50 inspiring photos, 8 ideas and the same number of step-by-step master classes on making crafts from shells with your own hands for beginners.
Step-by-step master class with photos - shell tree with roses
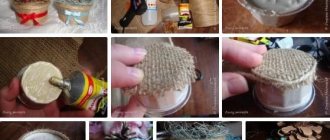
Stage I. Pot decor
Any sturdy container will do for the pot. The edge can be wrapped with satin ribbon or fabric. We glue the rope from the top to the middle of the flowerpot, and decorate the bottom with shells. We paint the pot with acrylic, spray paint or gouache + PVA (lavender, gold, mother-of-pearl). If the paint is not thick, paint in 2 layers.
Stage II. Making flowers from ceramic plasticine
We make roses from ceramic plasticine. This versatile material dries quickly, does not require heat treatment, is easy to mold and is sold individually in a wide range of colors. We make a gradation of 3 shades of the same color - from dark to light. We sculpt according to the “cabbage” principle: we build up layer by layer. We work with all shades at the same time: from the dark core of the rose to the light edges.
Stage III. Making a ball and decorating the crown
The “Lavender Sea” topiary ball is made of newspapers and wrapped with twine. You can also use sisal or knitting threads under the shells. As a trunk, 2 curved branches of corilus (salex) were used, fixed in a ball with glue.
We seal the entire surface of the ball, alternate shells (choose approximately the same weight) and sisal balls. After the main decoration, we glue the mother-of-pearl shells on the reverse side, and inside each we glue a lilac berry - a pearl. Next, we glue buttons, roses and gold beads, and alternate the decor by color.
Stage IV. Pouring and filling the pot
Mix the solution of gypsum and water 1:1 until the consistency of thick sour cream. The fill sets in 1 hour, but it is better to leave it overnight until the plaster dries completely and the moisture evaporates.
We lay sisal in a “nest” over the dried gypsum fill and fix it with glue. We glue decor from the crown onto this backing to balance the top and bottom of the tree: shells, purple berries, gold beads. In addition, we use a perfume bottle, pre-painted in the same color as the pot and shells. Any small glass bottles are also suitable: for medicines, samples, etc.
Stage V. Finishing decor
We decorate the crown of the tree from “Lavender Sea” shells: we glue gold beads from New Year’s decorations, satin bows with half beads, roses.
Shells for handicrafts: preparation rules
Before you start working with such an unusual natural material as shells, you will have to spend a little time preparing them for making your own masterpieces. Crafts made from fragile materials are always made from shiny and clean shells. But, alas, such material cannot be found in nature. In order for the sinks to acquire the desired shine and attractiveness, it is worth making a minimum of effort.
Many handicraftsmen believe that in order for shells to remain durable for a long time, not crumble at the edges and not change color in the finished work, it is worth freezing them first. To do this, dry shells need to be wrapped in white paper (never in newspaper!) and place the bundle in the freezer for several hours. Once they are well frozen, all that remains is to take them out of the freezer and clean them with a sharp knife.
If there are excess particles left inside, you can boil the fragile material for several minutes in water with the addition of soda. To get rid of white plaque, blanks for future crafts should be bleached (filled with regular bleach for several hours) or brushed with a toothbrush and whitening paste.
To get rid of minor chips and cracks and give the material a more presentable appearance, you need to sand the shells using sandpaper or a sanding block. Sometimes they even use nail files and pumice stones for the heels. To make the shells shine and shimmer, cover them with a thin layer of clear varnish (even nail polish will do) or regular furniture stain. The coating product will not only add attractiveness and shine, but will also help hide minor cracks and unevenness in color and structure.
After the natural material has been prepared, you can begin directly to work on creating various crafts. Most often, shells are used to decorate photo frames or to cover vases. We suggest not following the usual path, but making flowers and entire flower arrangements from seashells.
Using a detailed master class and step-by-step instructions for making first simple options and then more complicated ones, you can create entire flower bouquets yourself that will perfectly decorate the interior and serve as an original gift for friends and family.
How to properly glue shells
You can attach shells to each other and to other materials using different types of glue. First of all, we recommend a hot glue gun. If it is not there, then a glue stick, which is used in such a gun, will do. You can simply melt it over a candle. Using silicone glue is the safest and easiest option. This glue dries very quickly, so you don’t have to wait for this or that piece of work to dry. Also, the failed part can be peeled off quite easily. In addition, this glue is transparent and does not leave unsightly marks on the craft. Be careful when working with a hot silicone gun, because it heats up to 200 degrees. Do not use it when doing creative activities with children, otherwise there is a risk that the little ones will get burned.
Another fairly good option is Moment glue.
But you need to work with it carefully. Better to use gloves
You should also not use this glue when creating with children. The same goes for hot silicone glue. For kids, it is best to hold shells together using salt dough or plasticine. I especially recommend the first method, since it is environmentally friendly and accessible to everyone.
Sometimes when working with natural materials such as shells, you need to make a hole in them. For these purposes, use a drill or sharp nail scissors (it all depends on the thickness of the shell). You can also use an awl. To prevent the sink from cracking, cover it with tape before you start drilling. This rule applies to both large and small shells.
Preparing shells for crafts
For further work, they should be prepared:
- There may be dead shellfish in the shells and if not cleaned out, they will give off an unpleasant odor. To do this, they should be placed in water with a product that contains chlorine in a 1:1 ratio for about 1 hour. Use rubber gloves, as chlorine can damage your hands. Remove dirt in a timely manner and rinse in a bowl of water.
- If you find chips, they need to be sanded with fine sandpaper. If there are large fragments, but you don’t want to throw away the shell, you can glue it together, but first treat the gluing surface with alcohol.
- To make the shells shine, they can be treated with clear manicure polish or nail oil.
If you find live shellfish in the shells, place them in boiling water for a couple of minutes and then remove them using tweezers. You can also use the microwave by placing them there for just 30 seconds. And also remove any leftovers. After we got rid of the particles, we need to carry out the procedure indicated in the first paragraph.
Drilling holes
This is also an important stage for the manufacture of such products as beads, bracelets, garlands, etc. This step is a little tricky because very small shells are fragile and can break.
Cooking
There are two ways to make a hole:
- Prepare a drill of the required diameter (depending on the size of the required hole). Wrap the shell with tape and attach it to a wooden surface and carefully drill a hole through the tape. The tape will help the shell not get damaged.
- Not every home has a screwdriver, then a nail and a hammer will come to your aid. The shell should also be covered with tape and, placing a nail on the shell, gently tap it with a hammer. The hole can be made of different diameters by moving the nail back and forth.
Source
Preparatory stage
First, prepare all the materials. Shells, especially if you collected them yourself in the warm salty waves, must be washed, dried and degreased.
This is done in order to remove sand, fats and sea salt from their surface. If there are build-ups or other roughness left somewhere, you need to clean them with sandpaper.
A master class on making a decorative Christmas tree with your own hands involves a step-by-step and detailed examination of all stages. Let's start with preparing the material.
Rinse the shells thoroughly in running warm water. If they are very dirty, with traces of dried algae, boil them for a few minutes in a weak soda solution. At the same time they will lose fat. Then rinse in cold water and dry.