Airplane
You can also make a toy airplane from computer mice.
One of them will play the role of the body, and the others will have to be disassembled and made into wings. But what about those who do not have such abilities? There is an exit. Try to make things useful in everyday life out of unnecessary mice:
- After removing the keys and the insides of the mouse, attach it to the wall and you will have an original toothbrush holder.
- In a similar way, you can make an original wall decoration by painting the mouse body with paint and placing artificial flowers in it.
Take a look at the photo of a scorpion craft made from a computer mouse. It is also not difficult to do without special skills.
Small crocodiles can act as insect claws and a holder for business cards and notes. Its legs are made from large paper clips, and its body is made from the body of a mouse.
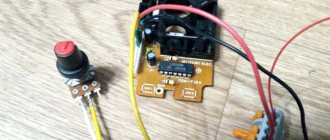
Flashlight
The idea is to create a lantern that can be convenient and attractive at the same time. You can switch it with the left mouse button (optional) and it can use two different power sources: a lithium battery and a USB port (in case the lithium battery runs out or there is no time to buy a new one).
The details are simple, so to make this project you need minimal investment:
- Broken computer mouse.
- Lithium battery 3.0V.
- Resistor 1/4 W 100 Ohm.
- White LED (other color will work too).
- USB cable (you can pull it out of the mouse).
- Small SPDT switch.
The idea is to have an alternative energy source instead of a conventional battery. For example, charge the battery using a USB cable:
- First you need to clean the outer layer of the USB cable. There are four wires: red, black, white and green.
- The white and green wire are used to transmit information, it is not needed, so you need to cut it.
- For lithium battery, you need to put it in the battery holder. If it is not there, you can solder it.
- The power from the USB hub is approximately 5V, and the power from the lithium battery is 3V, so you need to connect the USB (+/- wire) with a 100 Ohm resistor and using the L1 SPDT switch.
- The same can be done with a lithium battery by connecting it to L2 of the SPDT switch.
- Connect the two (+) wires together.
- Solder a piece of wire.
- Press the switch and you can change the power source.
First you need to disassemble the mouse. Inside you can see a circuit board with three buttons on top: left mouse button, right mouse button and scroll button. Only one is needed, so the bottom one is cut off. You can't cut it too short or you'll end up with a button that's no good for anything. Don't cut it too long
It is important to ensure that there is enough space for the power supply
Now everything is easy, you need to connect the wires to the button. Whatever is chosen is fine. The left mouse button is taken. You need to solder one wire to the power supply and the other to the LED.
First you need to drill two holes in the front and back of the mouse. Now you need to put everything together and get a flashlight that looks like a mouse.
The advantage of a wired mouse
Having carefully studied all the characteristics of a wired mouse, we can highlight a number of advantages that encourage users to make such a difficult modification. The advantages of this device include:
- price;
- durability of use;
- speed of response to user commands;
- versatility.
As you can see, the main advantages of a wired mouse over a wireless one will be price and durability of use. A mouse powered by a computer costs even less than a wireless mouse of the same class. Moreover, for remote control you will also have to spend money to purchase power supplies. Moreover, given that this mouse is scrapped twice as fast, we can conclude that a much cheaper option is a wired mouse.
More than once, users have encountered the problem that mouse drivers do not fit their home PC or laptop. A wired mouse does not require the installation of special drivers. To start using it, you just need to plug it into the USB output and get to work.
Is it worth making a wired mouse out of a wired mouse?
It is unlikely that this question can be answered less ambiguously - no, it’s not worth it. If you have skillful hands, you can make something with them, and you do it only out of scientific interest, then personal enthusiasm can lead to good results. However, if you are an Internet self-taught person and are doing this only because you feel sorry for the money to buy a new mouse, then you should not take on this disastrous task, because in the end you will lose more than you gain.
The asking price is three hundred rubles, which is quite a bit, considering that when assembling the mouse you will spend a lot of nerves and, possibly, an entire wireless mouse. Moreover, such a modification will not last long. A homemade cord will fray much sooner than a purchased one, and the structure itself will become loose and impractical.
What is the difference between a wireless mouse and a wired one?
Many may think that the difference between one of these devices and the other is that a wired mouse has a wire, while a wireless one receives power using batteries or an accumulator.
In general, this is true, but if you delve a little deeper into the question, you can find many other important differences:
- Firstly, there is a difference in size. Wired mice are always a little larger in size, as their equipment is somewhat more complex. The same applies to weight, although both weigh insignificantly.
- Secondly, wired mice respond much better and faster than wireless ones. That is why they are more often chosen by gamers and computer users, for whom seconds of braking can be a huge hindrance. Yes, wireless mice work exactly the same as wired ones at the beginning of use, but as the battery or accumulator is discharged, characteristic stutters and slowdowns appear, and choppy controls may begin to interfere.
- The third difference follows from the first. The lifespan of an average wired mouse is 10 years, while a wireless one is only 3.4 years. This is a significant difference, and if you do a little math, even the difference in cost does not cover the costs.
Rope mouse - without a pattern and quickly
A good New Year's idea for spending time together with children. This toy will take a little time, about 20-30 minutes.
If you don't have knitting threads or twine, you can use a thin satin ribbon.
Prepare for the craft:
- foil
- jute
- black and pink nail polish
- glue "Moment"
- scissors.
Cut a piece of foil and crumple it with your hands. Give it an oblong shape.
Next, we immediately make ears from the rope: we tighten a loop from it according to the diagram - first one ear and next to it the other.
Lubricate the thread with glue and attach it to the squeak and the pest))).
Now we wrap the entire foil with a tourniquet.
Do this work carefully so that there are no gaps between the twine.
Draw the eyes and nose.
Let's figure out how to turn a wireless mouse into a wired one
The instructions we will provide will outline the remodeling process in the form of the necessary steps:
- So, let's start by looking at the wireless mouse itself. To do this, you need to unscrew two screws using a screwdriver and remove the cover.
- Next, we separate the motherboard from the bottom of the mouse, first unsoldering two wires - red (+) and black (-) - from the batteries.
- Now we need to solder a resistor to reduce the voltage from 5 volts to 3. How to do this? It will not be possible to explain this in simple language, but in short, you need to connect 2-3 diodes in series in a direct connection.
- Drill a hole in the cover to allow wires to come out in the future. This must be done carefully so that a crack does not appear in the device body.
- Place the board with the changed voltage in the case and insert the resulting wire into the drilled hole.
- Connect the ends of the wire to the USB.
The device can already be used, but such fraud will only replace the power source in the mouse. It will also be controlled “over the air” using a USB connection to a computer or laptop, since the signal transmission schemes for wireless and wired mice are still different.
We have described in detail how to turn a wireless mouse into a wired one with your own hands, but you might still have questions about the practicality of this modification.
What can be replaced
Of course, in emergency situations, when you need to continue working at the computer, and the table surface is too slippery, the sensitivity of the mouse is reduced because of this. In this case, a quick temporary replacement will do. And even if it doesn’t turn out to be very designer-looking, it will save you for the first time.
When choosing a replacement mouse pad, you need to look at what type of mouse it is - it can be laser, optical or mechanical with a ball. To determine the device type, you need to carefully turn the mouse over and look at the bottom:
- If you see a rubberized ball on the bottom of the mouse inserted into a hole and spinning in it, then the mouse is mechanical. Such device models were popular earlier, but now they are practically not used, unless you have changed your computer since time immemorial.
A rubberized ball is visible in the hole
- An optical mouse has a hole at the bottom with a red light (LED). Be careful not to shine it in your eyes. This mouse uses a small viewfinder that takes pictures of the surface. In the center of the bottom there is a red LED
- A laser mouse is similar to an optical mouse, but you won’t see a light in the hole.
Its work is based on the action of a semiconductor laser, the beam of which is repelled from the surface and returns the result in the form of coordinates. There is a hole in the center of the bottom surface of the mouse through which the laser shines onto the sliding surface
The difference in mouse types and the principle of their functioning leads to the fact that they need different surfaces for smooth gliding, and even the speed of the mouse depends on the surface. For the average document user, speed may not be a critical factor. But for a gamer, on whose prompt actions victory in a game round depends, and the count can even go by seconds, the surface is very important.
- Any surface is suitable for laser mice; their design is such that they can move with equal success on a rug, a table, or even glass. The trajectory of their movement is not distorted. The operating speed remains the same. This is why gamers prefer them.
- An optical mouse can also move on slippery and smooth surfaces, but this will significantly affect its sensitivity. When the cursor moves across the screen, jerks, “slipping” of some areas, and shaking of the mouse pointer will be noticeable. Therefore, in this case, for replacement it is better to choose a surface with a matte or not too glossy finish. It is worth noting that a fleecy surface is also not the best option here, since it consists of tiny hairs, and the mouse’s LED beam will “fall” between these hairs when moving, which will also make it difficult to recognize coordinates. To replace the mat, you can use a book (not too thick so that it is comfortable to hold your hand), a piece of linoleum, a magazine with a matte cover, a box lid, an untreated wooden plate, or a piece of corrugated cardboard. Test different options and settle on the most convenient one. Often, if your rug has become worn out, turning it over with the foam side facing up will be enough to give it a second life.
- Matte surfaces are also suitable for a mechanical mouse. The main thing here is to ensure an even hard surface. There is another problem with ball mice - it is not the mouse pad that wears out, but the rubberized ball itself. Then only replacing the mouse or ball will help.
To improve the glide of the mouse, it is also necessary to clean it. On the bottom surface of the device there are special smooth shaped inserts (usually located around the perimeter of the bottom of the mouse), which help smooth movement along the surface. Over the years of use, lumps of dirt accumulate on these inserts; they can be removed with a special cleaning agent for personal computers or any composition containing alcohol.
Wipe the bottom of the mouse with special wet wipes for equipment or a cotton swab dipped in an alcohol-containing solution
New Year's toys
Moving on from fairly everyday things, one cannot fail to mention the possibility of making New Year's toys. Their surface shimmering with bright colors just begs to be made into a New Year's toy.
Cutting any figure from a disk is not difficult. It is best to decorate the resulting garland with something. For example, draw something or glue a decoration.
You can glue disks pre-cut into small pieces, like fragments, onto New Year's balls.
Such crafts should be treated with varnish - such small fragments can pose a high danger to others if they come off the toy for one reason or another.
Using a large number of unnecessary disks and a glue gun, you can always make a Christmas tree that can attract attention no less than a real and decorated Christmas tree
Tailed firefly. How to make a fashionable mouse with your own hands
Today we decided to talk about what we always have at hand, without which a modern computer is unthinkable - we’ll talk about mice. There are an insane number of models on the market, including wireless options, but to one degree or another they are quite standard, the most that can be original about them is a slightly illuminated wheel...
Mouse modders have much more luck - their wheel glows with a bright blue or green light, and the body glows with all the colors of the rainbow. It’s not so difficult to do all this yourself, and the effect will simply amaze you - especially at night!
So, let's begin our experiment on a computer mouse. The guinea pig will be the modest supermodel A4Tech SWOP-35PU
.
It’s quite easy to make something original out of a simple mouse. For our cute mod you will need a mouse, a soldering iron, solder, a few 3
mm of unpackaged LEDs (color and brightness of your choice), resistors for LEDs to connect to
5
V, wires, heat-shrinkable tubes (or insulating tubes) and glue.
In our case, we took three LEDs - a pair of blue ones (brightness 2,5
candelas) and one white (
5
candelas brightness).
In addition, they found ultra-thin stranded wires and transparent heat shrink. It is worthwhile to bite off half the length of the legs of the resistors in advance and find thin wires (for example, pull them out of LPT
cable). If you don’t have packaged LEDs at hand, you can get by with regular LEDs, you just have to file them down to the minimum size. This needs to be done for one simple reason: there is very little space in the mouse body and you have to save it. Due to the same compactness, soldering must be done very carefully.
| A4Tech SWOP-35PU is the hero of our novel. |
After all the preparations, disconnect the mouse from the computer. First, remove the Teflon pads, if any, and unscrew all the screws. Next, you need to lift the mouse cover and carefully separate it from the main part. Be careful, as the plastic latches that additionally secure the mouse are fragile and easy to break.
After a successful operation, we see the printed circuit board, the attached LED and the sensor. Fits the board 5
-contact connector: two black, red, white and green wires.
Now we cut the red and one of the black wires to choose from. At the same time, we solder our wires, and to them - resistors and LEDs. The plus goes to the red wire and the minus goes to the black wire. Don’t forget to put cambrics on them; they also need to be put on the legs of the LEDs. To connect resistors and LEDs, wires
3–5
cm long
.
When everything is soldered, take the glue in your hands, drop a small drop onto the board and press the legs to it, having first bent them (just don’t glue your fingers to the printed circuit board). The glue will dry after 5
—
7
seconds
Now is the time to connect the connector back to the board, and the USB cable of the mouse into the corresponding connector on the computer and check if everything works.
If everything is done correctly, the connected LEDs should light up. After this, you can assemble the mouse, but don’t rush to do it - our mod is not finished yet!
| Soldering diodes and resistors must be done very carefully. | All exposed wires and resistors must be hidden under cambrics. |
| One two Three! Shine Christmas tree! |
Our mouse experiment didn't end there. Now we will work on its nose - the scroll wheel. We will need a piece of plexiglass no thinner than the width of the wheel (we took a large piece of thick, four-centimeter plexiglass and sawed off the necessary part). In addition, we will need a Dremel, cutting and grinding wheels for it, files and drills.
And again we disassemble the mouse, separate the plastic part on which the wheel is attached. Underneath there is a small spring, which you should not lose - it is responsible for the elasticity of pressure.
Remove the rubber wheel from the plastic support. Now let’s take it and trace an approximate outline on the plexiglass - we need to trace it with a small margin.
Using a cutting wheel and a Dremel, we cut out a piece of glass along the contour, after which we take the grinding attachment and round the corners of the workpiece. Now we drill a hole in the center of the future wheel.
We take a Dremel attachment with an elastic band for attaching the sandpaper and put our workpiece on it. The main thing is not to drill a hole larger than that of the nozzle itself. If you don’t have an attachment, then take a thick, blunt drill and wrap electrical tape around it to the required volume to secure the wheel blank.
We insert the resulting attachment into the Dremel, put a file and begin grinding the future wheel at medium speed. After this we got a perfectly round ring. Don't forget to give it a convex shape, otherwise it will be awkward to use. Using a sanding attachment, we bring the inner hole to the desired size.
| First, let's disassemble the wheel and its support. | It's time to cut out the plexiglass blank. |
Now all that remains is to assemble our scroll wheel. If the new ring does not fit, you need to sharpen it. It is important that the new ring does not touch the inside of the mouse, so if necessary, simply grind it down further. After fitting and all the torment, we finally assemble our wheel and install it in the mouse.
There is no need to backlight; we dealt with this issue at the beginning of the article - you just need to unfold the LEDs onto the wheel and put everything back together.
We connect the long-suffering manipulator to the computer and admire our work. This time that's all, but there's always more you can do, which means mouse modding doesn't stop there. We wish you successful mods and original ideas!
| Let's create the perfect wheel with our own hands. | Now our mod is finished - champagne to the studio! |
www.allcmg.net for their assistance in preparing this article.
* * *
Obviously, not everyone has such opportunities for experimentation: while a drill, soldering iron and a sheet of sandpaper can still be obtained, laser welding and an induction furnace are unlikely. However, there would be a desire. Almost every Russian city has large and small factories with modern and not so modern machines. Specially trained people work at these machines, so if you find an approach to them...
In general, it is not at all necessary to create a steel mouse. You can make a beautiful window in the system unit, repaint the monitor, or at least change the standard LEDs on the keyboard. Again, there would be a desire.
Mouse device
Mechanical and optomechanical mice with a ball inside are a thing of the past; all modern mice are optical - their sensors “photograph” an area of the substrate at a high frequency, and the DSP processor of the sensor, analyzing changes in the photographs, calculates the direction and distance of the pointer displacement. To obtain a contrast photograph, the area under the sensor is illuminated with an LED or infrared laser.
Mice using wool felting technique
Wool can not only be knitted, but also felted. These mice are especially cute:
Author - Tatyana Golubina
Helen Priem shares a tutorial on felting a mouse peeking out of a hole.
Open the link in Google, it immediately offers to translate the page
Katerina Salomatina presents to our attention a master class on felting a gorgeous mouse, sheltered from the rain under an autumn leaf:
Natalya Lvova shows how to make a mouse that looks so much like a real one)
And Elena Fedoryak prepared a master class on felting a mouse from wool:
You can take a simpler route and roll only the cheese) Idea from @lyntoys:
Barabolka TV makes very tiny mice from wool (from 2 to 7 cm), get inspired and try to repeat it or order ready-made mice:
For inspiration - immaculately dressed rats:
Author — Alina Senechko
Mouse families are not only good in pictures, enjoy looking at the details!
Author's toys by Natalia Fadeeva
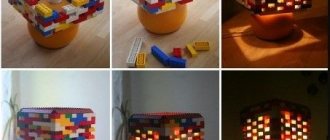
What can you make from a computer mouse?
Let's start with useful crafts made from computer mice.
I would like to note the idea of making stereo speakers for a computer, where old mice are used as cases. For this craft you will need a pair of mice, a pair of speakers, a jack plug and a piece of wire of the required length. You'll have to solder a little. It will take about two hours to do everything and you will be the owner of a cool homemade thing.
Here are some photos of homemade speakers made from mice.
Did you know that you can make an original belt buckle out of a mouse case? As much as possible! The result is a stylish IT thing (see photo).
Another useful thing in the household is also based on the housing of an old, used computer mouse. This is a case for a razor and toothbrushes that is mounted on the wall in the bathroom. It looks really cool.
If you apply a little imagination and creativity, you can make an original jewelry out of a small computer mouse that you can wear around your neck. One of the options is shown in the photo.
I won't go into detail, but I will mention that old mouse cases can be used as cases for your crafts. For example, a housing for a control panel for a toy or robot, a housing for a homemade flashlight, a housing for various kinds of adapters, speakers, lamps, headphones, and so on.
We now move on to less useful, but no less interesting crafts. These are all kinds of robots and insects, based on bodies and parts from old mice. Everything comes into play, from buttons to wires, LEDs and plugs. The photographs show models of robots, scorpions and beetles. There are really interesting models equipped with backlighting. You can also provide the crafts with sound effects or even organize a connection to a computer via USB. It will be really cool!
Now, knowing that you can make a bunch of useful and simply interesting things from a computer mouse, do not throw them away, but rather save them and create from them. If you come up with any other interesting ideas, write to us, we will be happy to post them on our website.
In conclusion, I want to share with you a video about a real robot, which was made by foreign craftsmen from an old mouse. This robot can drive along a drawn path without deviating from it.
Source
sam.mirtesen.ru
Columns
Speakers are popular output devices used with computer systems. They receive audio input from the computer's sound card and produce audio output in the form of sound waves. Most computer speakers are active speakers, meaning they have an internal amplifier that allows you to increase the volume or amplitude of the sound.
In this case, everything is much simpler. You need speakers and the mouse itself. Everything unnecessary is thrown out of it. The speaker is inserted, the housing is put on, and the wires are stripped. You can also install a variable resistor to adjust the volume when you rotate the mouse. To complete it, you can attach legs and attach a decorative mesh.
So don’t throw away your old mouse; you can do many fun projects with it and even assemble the right thing.
How to make a mouse pad with your own hands: instructions
Linoleum rug
A piece of flooring will help you create another alternative at home.
First, cut out a square from linoleum.
We cut out a stand measuring 24x20 cm. We make the edges slightly rounded to make it easier to work with such an accessory.
Attach a round glass and carefully cut them along the contour with a stationery knife.
Let’s complicate the task and make a truly exclusive thing. Let's try to make decoupage on the surface of linoleum. We will need napkins with an interesting pattern.
Whitening the surface in decoupage is done to make the picture brighter
We cut out the fragments and glue them onto the linoleum. Carefully coat with glue. When the surface is dry, apply several layers of special decoupage varnish.
Now we repeat the procedure of painting the background with a sponge once again, only with blue paint.
Cardboard mat
That's true, a rug made from scrap materials. For work, you can use corrugated cardboard or part of a regular shoe box. To prevent the accessory from “driving” on the surface of the table, we use a special anti-slip layer for furniture. To prevent the cardboard surface from looking dull, use craft paper or wrapping paper with an interesting print.
This will give you a great working surface for your rug.
To best secure the fabric decorative layer, use regular or aerosol textile adhesive.
We glue the wrapping paper onto the cardboard surface with glue. And we fix it on top with self-adhesive film. As you work, smooth the film well so that there are no folds or bubbles. Thanks to this surface, the mouse will glide better, and the service life of the accessory will noticeably increase.
A transparent self-adhesive film will protect the decorative layer and allow the mouse to easily move around the mat.
Exclusive DIY mouse modding
I looked at my genius mouse for about 2 years, probably, then I looked at a couple of sites about modding and decided to try it. To begin with, I bought a Dremel, a soldering iron, silicone, hot-melt glue with a special gun, zero-grade sandpaper, cans of paint, a marker, bright blue LEDs, solder and special soldering acid. I picked up a Dremel for the first time in my life, so first I experimented on the body of a dead mouse.
First, you need to disassemble the mouse, separate the buttons, then apply a drawing on the surface of the case with a marker, drill through the drawing with a dental drill (you just need to be careful, as the plastic begins to melt and the drill begins to pull, which has a bad effect on the accuracy of the drawing), then close it from the outside cut out the pattern (I covered it with white plasticine and film), fill it with hot glue, remove the plasticine, prepare the hot glue completely - fill the remaining voids with glue (only carefully!), process it with a stationery knife, then with a soldering iron at a distance of 3-4 mm. we begin to move over the filled-in design (hot-melt adhesive smoothes out under the temperature), then we cover the design with soaked soap with a cream-like consistency (applied with a cotton swab on a match), prepare for painting (prime, degrease), paint in several layers, then carefully remove the applied soap with the same cotton swab from the picture (movements are directed from the edge of the picture to the center), rinse under water. This is the end of the lid.
Let's get to the buttons, because... we cut the drawing in order to highlight it. And the button fastenings interfere with our lighting, so we cut them off, but not at the root! We glue them together with a strip of plastic (I took a piece of the lid from a blank), then we bend the letter “Z” from the same strip, the lower end of which is glued to the body from the inside, and we paint the upper lower side to the strip that connects the buttons.
The diodes came to me at 3 volts, so I did not use resistors. I placed two pieces in the middle part of the mouse and one at the back (this was done for uniform illumination); I glued the diodes themselves with hot glue. We assemble it and plug it into the computer.
If something doesn’t work, check the serviceability of the device, correctly follow the instructions, where your hands come from.
Creative success to you!!! Best regards, Grolf.
Anything to add? We discuss the articles in the “do-it-yourself” series in a special forum thread.
GROLF grolf (at) yandex.ru 08/14/2007
Tags
Edible mice on the festive New Year's table
And for a snack - snacks from products in the form of mice to decorate the festive table.
Looking at these photos, you understand that everything here is so elementary simple that any housewife can handle it.
You can use any products: cucumbers, radishes, eggs, cheese, sausage, lemons and others - whatever your imagination allows.
We cut out the parts of the desired shape, make small slits in the “body” and insert “ears” into them. You can probably also secure it with toothpicks.
So, choose your favorite mouse from any material and make a craft for the New Year!
- How to decorate your house for the New Year with your own hands
- How to beautifully and originally decorate a Christmas tree for the New Year
- DIY snowmen for the New Year from different materials: ideas, photos, master classes
- What to give men on February 23: ideas for original gifts
DIY computer modding inside and out
Instead of an introduction
Many users are concerned about what their workspaces look like. And if a person is not indifferent to computer hardware, then he is also concerned about the appearance of his iron friend. I'm one of the lucky group of users whose cases have a clear side window. You can see the actual description of the case here.
In this article, I will look at several interesting ways that helped me decorate the appearance of my workplace, the computer itself, and also tell you how I preserved the beauty of the inner “world” of the computer case. Let's start with the workplace.
Part one. Workplace or place where I spend a third of my life.
Maybe, of course, I spend not a third of my life at my computer desk, but I think that on average it’s no less, and maybe more (like all avid computer geeks ;)). In this part I will consider just one point - wires. Connecting cables are an integral part of any computer.
In a primitive example, only a monitor, keyboard, and mouse are present. As a result, there are very few wires and they don’t really spoil the look. But these devices are not enough for advanced computer scientists. Let's add to this list: speakers, headphones, scanner, printer, joystick, cable to the TV (or antenna cable for TV-tuner), all kinds of USB cables for connecting external devices. We end up with a whole bunch of wires that not only prevent the system unit from moving to another location, but also terribly spoil the appearance of the workplace. This is what my workplace looks like.
(A place to work at a computer)
No need to look at the table :). Look under the table - beauty. The wires are not visible at all (that is, they are visible, but they are right behind the body). I used the design of my table and glued all the connecting wires with ordinary tape to the back of the vertical part of the table.
(All wires, so as not to spoil the view, are located strictly behind the body)
(The wires are held on top with tape)
Behind the bedside table I placed a splitter that powers the peripherals and hid the long wires that got in the way. The result is the following picture: the wires from the case rise up, stretch to the left to the bedside table (held on with tape), and there they are directed in all directions. Long wires hang right behind the nightstand. It's a pity that I didn't take photos before I laid the wires, but I'll be honest with you - nothing pretty. A pile of these wires simply spoils the pleasant impressions created by the case.
This is how, with the help of a simple and easily accessible material (adhesive tape), you can get rid of the terrible picture - a pile of wires. Now let's move on to the keyboard and mouse.
Part two. Mouse and keyboard mini-modding
I currently have a Genius NetScroll Superior Wireless mouse, and previously I used an A4 Tech WWW-11 mouse.
(Good old mouse)
This mouse is about 4 years old. So far it is working properly. At that time, the mouse was very cool - 4 buttons (excellent software - you can assign absolutely any function to each button) and 2 scrolls (for vertical and horizontal scrolling) coupled with a handy shape were just an atomic bomb for me and my friends. True, the price at that time (400 rubles) was the only barrier to purchase. Having strained and saved up for the mouse, my happiness knew no bounds. No one had such a mouse :). Even now, several friends tried to beg me for this mouse, but I won’t give it to anyone, because not only is the mouse super awesome, but I also modded it a little. It was a lyrical digression. Let's get down to business.
After reading articles about mouse modding, I really wanted to do something with my mouse. It was practical to install a fan, but the design did not allow this. After carefully studying the internal world of the mouse, I realized that the internal lighting would be very effective at night due to the small gaps between the buttons. No sooner said than done. Two super-bright LEDs (green and blue) were purchased. Having measured where my mouse had +5 and the ground, I soldered LEDs in parallel so that they would shine directly through those same gaps.
(Soldered LEDs)
The effect was gorgeous - at night the mouse glows very nicely, which adds some pretentiousness to a night session at the computer.
(Mouse in the darkness of the night)
Then I purchased a multimedia keyboard from Sven. It fell apart as soon as the warranty ran out. It's a shame, the software was good. I decided to take a keyboard that was more expensive and of better quality; the choice fell on the Genius KB-21e scroll. After the purchase, the idea immediately came to my mind - to illuminate the left and top “sockets” from the inside. But after opening the keyboard, it turned out that the top panel is overhead and there is no way to highlight it (except by drilling the keyboard body). And the left panel turned out to be transparent, and there was enough space to install two LEDs. This time I chose two blue ones. Similarly to the mouse, I soldered them to +5 and ground, assembled them, checked them - they work.
(And now the keyboard is in the darkness of the night)
The effect is even stronger than from a mouse. At night I just want to look at the keyboard :). The workplace is decorated, it’s pleasant to sit at the computer at night. It's time to go directly to the heart of the computer - the case :).
Part three. A little about coolers
The side window of my building is transparent. This feature (like everything in this world) has positive and negative sides. Positive - you can admire the insides of the computer, the effect is enhanced by the presence of well-organized backlighting. Negative - it will be disgusting to admire the insides if there is a mountain of dust in the case.
My case came with a four-color fan on the side wall, as well as blue neon lighting. I am also the proud owner of a GlacialTech Turbine 4500 cooler, which has two transparent fans (it’s a pity without backlighting). But here’s the thing: they have the labels of the manufacturing companies on them. I don’t know about you, but personally I don’t like this picture at all. A transparent fan should not be partially transparent, but completely transparent. Otherwise it turns out to be pornography.
(Compare: one fan has already lost its sticker, but the other two have not yet)
But this point can be easily corrected - the stickers can be torn off. There is even a special “Mean for removing stickers” for this (the original has a slightly different name, but the meaning is clear). It is a spray (like air fresheners, mosquito repellents :)). Here's a mini guide on how to get rid of the sticker:
- We tear off the sticker itself and carefully scrape off the pieces
- Take the above product in your hands and sprinkle a little onto the sticky surface
- After 5-7 seconds, wipe with some napkin (preferably cotton)
- Repeat steps 2), 3) until the stickiness goes away completely
I had to struggle with the GlacialTech fans, but the glowing cooler sticker came off easily. It was on a metal base, and the GlacialTech Carlsons had paper stickers. After spending a couple of minutes we have completely transparent fans.
(Now here's the full transparency effect)
Personally, I like it much better. Moreover, the glowing fan now looks much more impressive and illuminates a little better (the light reaches the floor). We've sorted out the coolers, it's time to move on to solving the resulting problem.
Part four. Dust control
Dust is the evil that spoils both the internal appearance of the computer and its components (for example, fans). In an opaque computer everything is simple. Once every three to four months I opened it, vacuumed it, and closed it. But with transparent everything is much more complicated. Even a small amount of dust catches the eye, let alone the mountains. Now let's imagine this situation. In my case, three fans work for intake and three for exhaust (plus a power supply fan for exhaust), add a processor cooler and the result is wild air flow inside the case. This, of course, has a very good effect on cooling. But we must not forget about the amount of dust that will end up in the case after some time with such an air flow. And this dust will remain there if you don’t remove it yourself. But as one good saying goes - “clean is not where they clean, but where they don’t litter,” it is better to take care that dust does not get into the case. All you need for this is a filter. But this is only at first glance an elementary matter. In reality, coming up with a good filter is very difficult.
With front fans it will be easy - the filter can be installed in any color and from any material, because... You still won’t see it behind the front panel. But with a side cooler it will be more difficult - no matter what you put the filter in, it will ruin the look. Therefore, to solve this problem, my good friend was called to help. After some discussion, the answer came naturally. The fact is that my friend’s case is very primitive and there is not even room in the front for an intake fan. He did this: he cut out rectangular holes in the plugs for one CD-Rom and one disk drive and glued a small metal grill on the inside. The work takes half an hour, but it kills three birds with one stone: outside air penetrates into the body, dust does not pass through, and the view is 100% (very reminiscent of a car radiator grille).
I decided to buy myself the same grille, but smaller. There was no such thing on the market, so I borrowed a small piece from a friend.
(Mesh, scissors and fan)
I don’t have metal scissors, so I decided to sacrifice simple scissors. But the scissors turned out to be extremely good: they cut the mesh confidently, although the sharp edges were damaged a little, but that’s okay, beauty requires sacrifice. First of all, let’s deal with the side fan. We measure out the required dimensions.
(Apply a fan and leave 3-4 mm on each edge)
I cut out the desired piece and folded two opposite edges. I made cuts in four places to make it easier to bend the edges. It turns out to be a square like this.
(By folding the edges we get the grid square we need)
The last step left to prepare the filter is to make holes for mounting. To do this, I once again used the “All in One” folding equipment. By the way, it was a gift from my girlfriend on February 23rd :) When folded, it looks like a folding knife. It has everything, pliers, 2 screwdrivers, a wood knife, a bottle opener, and a few more retractable parts. The purpose of one of these was a mystery to me until I needed to make a hole, where this part came in handy :).
(With the help of my device, the grille got holes)
Now we put the filter on the side fan and screw it into place
(Fan with grill in place)
Now let's look at the result.
(Fan on)
I don’t know about you, but for me it’s very cool. Still, there is something mesmerizing in the combination of a fine mesh with a silver body and backlight. Let's move on to the front fans. I have them located horizontally at the bottom of the case. Measure the required piece of mesh and cut it out. I needed a rectangle measuring 18x10 cm.
(The piece fits just right)
Again we make holes for fastening. I decided to test in advance whether the screws fit into these holes. We try on the mesh and screw it into place. Although he looks beautiful, I won’t see him soon, because... the front panel will hide it from viewers. But there is always the opportunity to admire the side fan filter. Beauty, and that's all. Although no, there is also a benefit - dust will no longer penetrate into the case, at least coarse dust. As for the small ones, they are not so noticeable, and they will always get out of the case with the help of exhaust fans. After such work, it's time to move on to conclusions.
Conclusion and conclusions
In previous parts, I talked about how to improve the appearance of the workplace, keyboard and mouse, as well as the interior of the case. With minimal investment of time and money, I achieved very important results:
- Firstly, the huge number of wires does not spoil the appearance of my workplace.
- Secondly, mini-modding of the keyboard and mouse creates some pleasant atmosphere when sitting at the computer at night.
- Thirdly, I got rid of dust inside the case, and the transparent fans and mesh filter gave the case a fascinating look.
As a result, even avid computer scientists and modders are not ashamed to show off their workplace and the computer itself.
Lutovinov Maxim (aka. Kok) 05/26/2005
DIY tags body modding
Tachometer
A tachometer is any device that produces a signal proportional to the speed of rotation of the connection. There are many different types of tachometers, some of which rely on measuring the frequency or time between pulses generated by a rotating shaft. Tachometers resemble miniature engines. The faster the shaft turns, the more voltage develops (i.e., the amplitude of the signal is directly proportional to the speed). The output voltage shows polarity (+ or -), which depends on the direction of rotation.
The disadvantage of a tachometer is its cost. The cost of the tachometer itself is significant, as is the cost of installing the device and laying cables to it.
You can save money and try to make a tachometer based on a board from an old computer mouse. This is a more complex task and difficult to handle.
New Year's rat (symbol of 2022) made of felt + diagrams and templates
The topic of our article is felt crafts. But! You can easily replace felt with any thick fabric, such as drape or jeans. Just remember that, unlike felt, fabric crumbles. Therefore, take care of processing the edges of the product.
Look how simple the templates are! A triangle with rounded edges, on top of which there are ears in a semicircle and 2 more small details: an oval and a rectangle with 2 rounded corners.
We cut out all the parts according to the templates. Large item in duplicate.
A small rectangle, if you are working with loose fabric, you need to treat it with PVA glue using your finger or brush. To make the edge beautiful, you can use curly scissors.
We attach a “rectangle” to the front part of one large part. We make it like a pocket.
We connect 2 large parts. We put a cord or ribbon between them and sew them to each other.
Leave a small hole and push the filler into it. Sew 2 parts together until the end.
We press the craft, distributing the filler evenly throughout the entire space of the workpiece.
We sew the top of the workpiece so as to “separate” the ears from the body of the mouse. The edge can also be made with a zigzag.
Sew or glue beady eyes.
Glue the antennae, and on them in the middle is the nose. Straighten the antennae.
Glue a ribbon tail and a small bow to the back.
We also glue the bow onto the ear.
We will decorate the Christmas tree with these rodents this year.
Decorating a computer mouse in steampunk style
I want to talk about how I decorate various items in the steampunk style. For example, I chose a wireless computer mouse; in my opinion, this decor suits it very well.
The work will take one day, taking into account the decor (an hour or two) and drying of the layers, plus the final varnish should dry for as long as indicated on the varnish packaging.
The materials are listed above, but I will clarify the list and at the same time tell you which ones I use:
1. Computer mouse. It can be anything, wired or wireless, it doesn’t matter. Before work, it must be degreased with alcohol.
2. Primer for plastic. I have Tikkurila, but you can use any that is suitable for plastic surfaces.
3. Black artistic primer. My favorite is Tair soil.
4. Cutting gears from cardstock (textured design cardboard). I do the cutting myself using a big shot, and I used to buy it here at the Fair, there are many stores with such materials.
5. PVA glue. The best option is Moment Joiner. It sets quickly and sticks well.
6. Brushes. One thin one is for applying glue to the cutting, and one thick one is for decorating with a dry brush. Each master has his own preferences for these tools, I like to work with synthetic brushes, they don’t stick out and hold their shape well when painting.
7. Sponge for washing dishes. For convenience, I always cut the sponge into three parts.
8. Acrylic paints - any. You can see mine in the photo, I really love working with the Tair company.
9. Acrylic varnish. Any will do, too, I have a glossy Tair.
10. Good mood and some free time. This should have been written down as the first point. 
For decoration, I also use “negatives” from cutting: I cut out various details from them.
So let's get started:
Apply a thin layer of primer for plastic onto the degreased surface of the mouse with a brush. I apply it in sections: I start from the side, apply primer, and remove the excess with a sponge. Also, a sponge is needed for a more beautiful surface texture - there will be no streaks from the brush, the soil will lie uniformly.
There is no need to apply primer to the wheel. Many people are afraid that the mouse will not work after such manipulations, but this is a misconception. I've made quite a few of them already, and they all work. There is no need to fill all the cracks with soil, apply it carefully and little by little, then everything will be fine.
Dry the primer layer and apply black artistic acrylic primer on top of it. Also in a thin layer and with a sponge.
Cover the entire surface and let it dry thoroughly again.
The white primer shows through a little, but there is nothing wrong with that - after gluing the gears, we will once again cover the entire surface with black.
Time to select the necessary details for the decor: select gears, cutting pieces, circles, rectangles and other figures. I never throw anything away when using a die cutter. I put all the little things in jars and use them in decoration.
In this case, I decided to cut the light bulb and chain from a large cutting. I attached them to the mouse, everything fits in size - you can glue it.
Using a thin synthetic brush, apply glue to the back side of the cutting. This is a painstaking task, but it's worth it! Carefully glue the part onto the mouse, pressing lightly with your fingers and a clean cotton cloth. Immediately look to see if there are any lint, they like to stick to the glue. If you suddenly see it, you need to remove it with tweezers or tweezers.
Then everything is the same: take the figure, apply it, if necessary, cut it and glue it according to the plan. I liked a small rectangle, let’s make a metal-look patch out of it.
This orange gear contains just the “waste” we need: I will glue four tiny dots onto the rectangle, these will be “nail heads”.
I continue to glue over the entire surface except the sides. Usually I decorate them too, but with this mouse they are textured and beautiful in themselves.
Done, now we cover the mouse again with black artistic primer. Remember to be careful, use a sponge and a thin layer. At this stage, it is important to paint all the gears and parts, completely covering their color. Dry again properly.
If, after drying, a different color appears somewhere, then you need to apply primer spot by painting over these places.
Next are my favorite activities - painting and varnishing. Using a sponge, apply the first layer of dark brown paint over the entire surface. Before applying the paint with a sponge, you need to go over the paper, removing the excess. There is no need to press hard on the mouse, just apply a little brown color, without the goal of covering up the black primer.
Let it dry, then apply a second layer: add orange paint to the brown paint and also apply it to the mouse with a sponge.
You can leave it like that now.
But let's add metallic - I have a wonderful orange paint with this effect. We apply it using the dry brush technique. The glitter isn't very visible in the photo, but it's there!
By the way, this paint is orange only in appearance in bulk; when used with a dry brush, it simply highlights the volume with shine, without an orange color.
You can use any metallic: acrylic paint in gold, silver, bronze or copper.
After that, I highlight the volume a little with Ivory paint. Just a little bit, also with a dry brush.
Don't forget to dry each layer of paint. Acrylic paints dry quickly and are a pleasure to work with.
Next we coat it with varnish. Gently apply a thin layer with a brush and blot with a sponge. I love varnishing my work - it spreads and absorbs the colors in an interesting way, creating a beautiful, uniform surface.
After drying the first layer of varnish, look at what you are missing. If there is enough of everything, then apply another thin layer and wait for the finished mouse.
I didn't have enough brightness, so I applied a little orange paint with a dry brush. As one of my friends says, this is gingerbread steampunk! And many more people mistake these mice for chocolate ones.
After the painting is completely satisfactory, we fix it with varnish and dry it.
We definitely check the mouse - carefully executed decoration does not affect its working abilities.
The surface is textured and pleasant to the touch.
You can decorate almost anything using the same method! Eyeglass cases, bottles, cubes, notepads, boxes and so on, it all depends on your imagination. The color can be any, I just showed an example for decoration in my favorite color scheme.
Thank you for your attention to this process! If you have any questions, I will be happy to answer them in the comments.
Olga Fertova.
How to sew a felt rat with patterns for beginners
Very cute and neat crafts are made from felt. This is an excellent material for creativity, in this case for sewing the symbol of the year. The result will please everyone around you.
This is a list of materials and tools you will need to create these cuties.
Now we follow the descriptions and focus on the provided images. Patterns! This is perhaps the most important attribute. Everything else depends on the accuracy and precision of the cutting.
In total you will need: four parts for the ears, two parts for the body and one blank for the tummy.
Now sew 2 identical parts together.
We sew rat ears: gray with pink felt.
Cut the tail separately from felt or crochet it into a pigtail, or weave thick threads together. Sew in the ponytail as shown. Don't forget to sew on the tummy detail.
Turn out the ears and body.
Fill with filling and sew the blanks to the end with a hidden seam.
Make an attractive face and your New Year's mouse is ready.
What can be made from many computer mice
If you have a lot of computer mice, you can use them by making:
Columns
By disassembling the plastic case and placing a small speaker there, you can get audio speakers. To do this, you need to unscrew the screw with a screwdriver and divide the device into two parts. Place a custom-sized speaker inside. The wiring must be cleaned, the contacts and their compatibility with the color of the wire must be checked with a tester. Then use hot glue to firmly secure the speaker disk inside and connect both parts of the housing. This portable speaker is suitable for a phone, tablet, player and even a computer.
Robot RoboCop
This idea will work if you have a lot of broken computer mice at home. From them you can assemble the body and limbs of a complex robot. The role of such a craft can only be decorative, but if you equip the robot with an electrical mechanism, you can get an interesting toy that can move and emit light.
Cars for games
Using multiple devices, you can create a collection of toy cars. To do this you will need wheels from old children's cars. You will need a drilled through hole in the side of the case into which you need to insert a pin with wheels.
Toy plane
You can make a plane out of three mice. One of them will serve as a body, and the other two need to be disassembled and the wings of the aircraft will be designed from two parts of the body.
You can make truly original fakes out of a computer mouse. And if you show a little imagination and knowledge, you can make a radio-controlled car or airplane.
Subscribe to our Social networks
Airplane
You can also make a toy airplane from computer mice. One of them will play the role of the body, and the others will have to be disassembled and made into wings.
But what about those who do not have such abilities? There is an exit. Try to make things useful in everyday life out of unnecessary mice:
- After removing the keys and the insides of the mouse, attach it to the wall and you will have an original toothbrush holder.
- In a similar way, you can make an original wall decoration by painting the mouse body with paint and placing artificial flowers in it.
Take a look at the photo of a scorpion craft made from a computer mouse. It is also not difficult to do without special skills.
Small crocodiles can act as insect claws and a holder for business cards and notes. Its legs are made from large paper clips, and its body is made from the body of a mouse.
Christmas rat made of polymer clay
For craftsmen and lovers of handicrafts made from polymer clay, here is such a wonderful cute rat (or is it more like a big mouse, I don’t know?).
We have a master class, I must say, it’s the only one floating around on the Internet, at least I haven’t come across any others.
Materials:
- polymer clay of different colors
- special knife or thick needle
- wooden or plastic skewer
- rolling pin
- beads for eyes.
Sequence of work
- We first form a ball from a piece of gray clay, and then give it an elongated shape.
- We make the basis for future legs - use a skewer to draw two vertical stripes on both sides of the workpiece.
- Roll out a small layer of white clay 2-3 mm thick, apply it to the base, straighten it: you get a breast.
- For the paws, you need to roll small balls, and then use a needle to flatten them and make 4 fingers (front paws).
- We make the hind legs in a similar way, forming three fingers, while stretching them a little.
- A thin long tail can also be made from white clay.
- We attach the resulting parts to the body.
- We form a head from a ball of clay by stretching it out. Use a skewer to make a mouth and attach the head to the body.
- Our ears will be made from two circles: a larger gray one, a smaller white one.
- The eyes can be made in three layers: first a white layer, then on it we put a smaller blue piece and a small black pupil.
- Finally, make the eyebrows and attach the nose.
- And the last step is to bake the resulting mouse toy in the oven according to the instructions for the material.
How to make a mouse? TOP simple ideas for children
Read more: DIY paper mouse
Sleeve mouse
Crafts made from bushings are very popular in children's art and more. If it is not possible to use a sleeve, you can make a small roll of cardboard. This is a ready-made mouse body. Then, using small details characteristic of this character, we turn the sleeve into a funny mouse.
Read more: Mouse made from toilet paper roll
Mouse made from paper strips
As in the case of bushings, the technique of creating crafts from paper strips is also in great demand. The mouse consists of several intersecting stripes and a head and ears characteristic of a mouse. You can also make a head from strips, and glue the ears, muzzle, and eyes separately. The review presents two options - a regular mouse and a winter (New Year's) mouse.
Read more: Mouse made from strips of paper
Quilling mouse
This mouse is also made from strips of paper, but using an interesting quilling technique. All parts of the mouse are rolled into rolls, and then into droplets and other simple shapes. They are glued together to form the silhouette of a funny mouse.
Read more: Quilling mouse
How to make a mouse in the easiest way?
It probably couldn’t be simpler: cut out a not very thin strip of paper, fold it in half and glue it at the ends. Then add ears, eyes, nose, mustache. And the mouse is ready. Ideal option for children.
Read more: A very simple paper mouse
Mouse and cheese
An interesting composition that can decorate a table or other surface. The craft consists of a simple mouse made from a cardboard triangle, cheese, and a triangular piece of yellow paper on which small holes should be cut.
Read more: Mouse on paper cheese
Read more: Origami mouse for children
Origami mouse (2nd method)
The option of creating such a mouse is also suitable for children. The mouse consists of two parts: the head and the body. But they are easy and quick to put together.
Read more: origami mouse
Mouse made of paper hearts
A classic craft for Valentine's Day. But you can also make it in gray, for example, for any event. The mouse consists of several paper hearts of different sizes. Plus a mustache and a tail. Very simple and fast.
Read more: Paper mouse in love for Valentine's Day
paper rat
As a rule, in crafts for children the line between rats and mice is blurred. Therefore, such a paper rat may well be a mouse. And its main advantage is the ease of creation, since you only need a triangular piece of cardboard to make the body. Plus small details in the form of ears, tail, eyes, nose and whiskers.
Read more: A simple paper rat for children
How to make a PC mouse with your own hands
If you have an old mouse case and a few available tools, you can assemble it yourself.
As a wheel, use any gear that will scroll. You also need to find parts that will be used as buttons. These parts must be connected to each other using a cut of copper wire.
Then find two air cylinders that will rest on the rest of the body. Place a metal plate on top - it can be removed from the watch. The cylinders must be soldered. The next step is to build a strong lower body.
IMPORTANT! Do not remove the optics from the bottom under any circumstances. Without it, the mouse will not be able to work.
Now you know how to repair a computer mouse yourself and how to disassemble it. In addition, now you have information on how to make a device yourself based on the old one. This way you can save a lot on purchasing a new mouse and use your computer comfortably.
What one has a cursor, another has a mouse, and another has an arrow (c) Sonikelf
What am I talking about... Oh, yes, good day, dear friends, acquaintances, readers, admirers and other individuals.
A short note on the blog, caused, to put it mildly, by bewilderment after another (this is important) request to purchase (issue, change) a new mouse due to the fact that the current one is too fast, too slow, not entirely accurate, “I can’t poke it correctly "(c) and so on and so forth.
I explain once and for all a simple, banal, extremely elementary thing that many people for some reason forget about, don’t remember, don’t want to know, and/or anything else.
The speed of the long-suffering mouse/cursor/arrow is regulated not only and not so much by a button on its body (conditionally by hardware), but also by settings (conditionally by software). And this very “software” thing has existed in the system, perhaps since Windows 95.
I'm telling you.
Tail decoration
The mouse is ready. All that's left to do is work on the USB cable - the beautiful mouse can't have a regular gray tail, can it? In the jewelry tent, I bought a metal fingertip in the shape of a dragon claw and similar-looking fairings from children's transforming toys. The latter were slightly modified with wax, cast from metal and “woven” together. To ensure that everything moves freely and the wire does not rub or break anywhere, we supplemented the loops with springs from fountain pens.
After the black insulation was cut off from the USB cable, the copper braid was exposed, which also had to be removed (it showed through the red braid through the new braid). When we put a new silver braid on the cord, we got the most natural steel tail.
At the last stage, the casing for the USB plug was cast and processed. The processing and polishing itself took about two hours of working time. It turned out well.