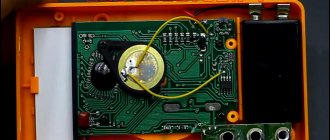
Schematic diagram of the memory for 6F22
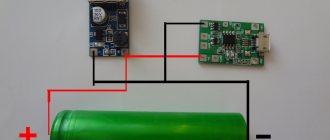
The second version of the circuit on the same MAX712
Stabilization of the charging current is linear, there is no temperature measurement. The following assumptions were made when designing the charger:
- Powered by an unstable power source with a maximum voltage of 15 V.
- The charging current is 80 mA, that is, 0.5 C for batteries with a capacity of 160 mAh and 0.3 C for batteries with a capacity of 250 mAh.
- Charging batteries from 7 cells - that is, a total voltage of 9 volts.
Why 7 cans? The disposable battery has 6 cells of 1.5 V each. And the rechargeable battery has 7 with a nominal voltage of 1.2 V, which gives 8.4 V. Once fully charged, the voltage can be 10.5 V.
From the above data, the values obtained are R1 = 1.3 kOhm and Rsense = 3 Ohm. The power source must provide a voltage in any situation of at least 12 V (at least 1.5 V more than the voltage of fully charged cells). Heat dissipation per transistor: 0.7 W. Due to the accepted charging current, the fast charging time was limited to 3 hours. Instead of 2N6109, BD244C was used.
Useful: Cyclic timer for 220 V
Crown adapter
A similar terminal can be made independently. But if you don’t have time to do this, then you can order it in any online store. Or go to the nearest radio point. So the answer to the question of where to get an adapter for the crown was given.
The crown connector is made of tin, plastic or leather and black and red wires. In some cases, a cylinder-shaped plug may be connected to them.
List of 9V charger elements
- R1 – 1.3 kOhm
- R2 – 150 Ohm
- R3 – 68 kOhm
- R4 – 22 kOhm
- R5 – 560 Ohm
- Rsense – 3 Ohm
- C1 – 1 µF
- C2, C4 – 10 nF
- C3, C5 – 10 µF
- T1 – BD244C
- D1 – 1N4007
- D2 – LED
- U1–MAX712
As it turns out, the LED connected between FASTCHG and the 470 ohm V+ resistor barely lights up. Ultimately, we connected the 560 Ohm resistor not to V+ (where it is less than 5 V), but only to the + power supply.
When the battery was charged for the first time, the fast charging process lasted only 2 hours and 8 minutes, and the actual charging current was 75 mA. Therefore, a 250 mAh battery cannot be fully charged. It follows that either the battery was partially charged, or the charger detected a state of charge at an early stage - the latter was so high that the power supply that was being used was producing 11.7 volts instead of the required 12 volts.
In principle, the voltage of the internal cells after charging can be even more than 1.5 volts, which further increases the power requirements. Part of the surface of the printed circuit board serves as a heat sink for the transistor.
During operation, the elements did not heat up enough to be perceived as hot. This is probably due to the relatively low charging current and relatively low supply voltage. Naturally, if desired, this charger can also be powered from the car's cigarette lighter.
How to make a crown charger
Among the many schemes for assembling chargers for Krona batteries, I found one that was relatively simple and affordable. By the way, the 9-volt battery, known in Russia and the CIS countries as “Krona,” has a 6F22 standard.
The battery consists of 7 4A nickel-metal hydride batteries connected in series. The recommended charging current is no more than 20-30 mA.
The charger is manufactured by redesigning a Chinese-made mobile phone charger.
There are 2 types of inexpensive chargers originating from China. They are pulsed, and both are based on self-oscillator circuits capable of delivering 5 V output.
The first type is the most common. It does not have control of the output voltage, but by selecting a zener diode, which is located in such circuits in the input circuit near the 1N4148 diode, you can obtain the desired voltage. Usually there are two types - 4.7 and 5.1 V.
To charge the Krona you need a voltage of about 10-11 V. This can be achieved by replacing the zener diode with one that has the appropriate voltage. It is also recommended to change the capacitor, which is located at the charging output. As a rule, it is 10 V. You need to install a 16-25 V capacitor with a capacity of 47-220 μF.
The second type of such circuits has control of the output voltage, implemented by installing an optocoupler and a zener diode.
Take a look at the principle of redesigning the second circuit.
It is necessary to remove all components located after the transformer, and leave only the unit that controls the output voltage. This unit consists of an optocoupler, a pair of resistors and a zener diode.
It is necessary to replace the diode rectifier, since manufacturers claim a charging current of 500 mA, and the maximum diode current is no more than 200 mA, although the peak current is about 450 mA. It's dangerous! In general, you need to install the FR107 diode. Thus, charging will produce the required voltage.
The next thing to do is to assemble a current stabilization unit, using the LM317 microcircuit as a basis. In general, you can get by with one quenching resistor instead of assembling a stabilization unit.
But in this example, preference is given to reliable stabilization, because the Krona battery is not the cheapest.
Resistor R1 affects the stabilization current. The calculation program can be downloaded in the Attached files at the end of the article.
The operating principle of this circuit is as follows:
When the Krona is connected, the LED lights up.
A voltage drop is created across resistor R2. Gradually, the current in the circuit decreases, and the voltage that allows the LED to light suddenly becomes insufficient. It simply goes out.
This occurs at the end of the charging process, when the battery voltage becomes equal to the charger voltage. The charging process stops and the current drops to almost zero.
The LM317 chip does not need to be installed on a radiator, unlike a charger for lithium batteries, because the charge current is very tiny.
All that remains is to attach the battery connector to the case, which can be made from a non-working battery.
battery connector
If you use a DC-DC converter, you will get a charger for the Krona via a USB port. like this charger for Ni-Mh batteries.
DC-DC converter
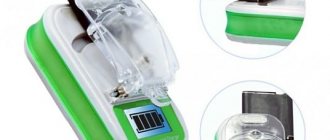
Finished device
Attached files: .
Author: Alexey Alekseevich.
We recommend:
DIY charger for Krona
In general, there are a lot of circuits for such chargers.
This article presents a simple and affordable option that will help you make a charger for Krona while saving money and effort. The proposed circuit based on charging for a mobile phone allows you to make a device with your own hands. The author of the video is blogger Aka Kasyan. By the way, a 9-volt battery is called Krona only in Russia and other countries that came from the USSR. In the world it is known as standard 6 f 22. Krona owes its name to a simple battery of the same standard, which was produced in the USSR.
Everything you need to assemble the device can be found in this Chinese store. Please note products with free shipping.
The battery crown is an assembly of series-connected batteries, a rather rare 4a standard. In general, there are 7 of them. Typically this is a nickel metal hydride type.
Charging schemes for battery Krona
It is recommended to charge the battery crown with a current of no more than 20 - 30 milliamps. It is recommended not to increase the current above 40 milliamps under any circumstances. The charger circuit is relatively simple and is based on a Chinese mobile phone charger. Cheap Chinese chargers come in two main types. Both, as a rule, are pulsed and implemented using self-oscillator circuits. The output provides a voltage of about 5 volts.
First type of charger
The first variety is the most popular. There is no control of the output voltage, but it can be changed by selecting a zener diode, which, as a rule, in such circuits are located in the input circuit. The zener diode is most often 4.7 - 5.1 volts. To charge the crown we need to have a voltage of about 10 volts. Therefore, we replace the zener diode with another one with the required voltage. It is also recommended to replace the electrolytic capacitor at the charger output. We replace it with 16 - 25 volts. Capacity from 47 to 220 microfarads.
Second type of charging
The second type - the circuit for charging mobile phones is a self-oscillator circuit, but with control of the output voltage through an optocoupler and a zener diode. In such circuits, either a regular zener diode or an adjustable one, like tl431, can be used as a controlling element. In this case, the most common zener diode is 4.7 volts.
The video shows a modification method based on circuit 2. First we remove everything that is after the transformer, except for the output voltage control unit. This is an optocoupler, a zener diode and two resistors. We also replace the diode rectifier. We replace the existing diode with fr107 (an excellent budget option).
We also replace the output electrolyte with high voltage. We select a 10 volt zener diode. As a result, charging began to output the voltage required for our purposes.
After remaking the charger, we assemble a current stabilization unit based on the lm317 microcircuit.
In principle, for such insignificant currents you can do without a microcircuit. Instead, install one quenching resistor, but preferably good stabilization. Still, the battery crown is not a cheap type of battery. The stabilization current will depend on the resistance of resistor r1; the calculation program for this microcircuit can be found on the Internet.
This scheme works very simply. The LED will light up when the output is loaded. In this case, Krona, since there is a voltage drop across resistor r2. As the battery charges, the current in the circuit will drop and at one point the voltage drop across each resistor will be insufficient. The LED will simply go out. This will be at the end of the charging process, when the voltage on the Krona is equal to the voltage at the output of the charger. Consequently, further charging process will become impossible. In other words, an almost automatic principle.
How many batteries will it take to fully charge your phone?
A typical 9-volt Krona battery has a charge capacity of 500 milliamp hours (mAh)
. Compare it to your phone's battery capacity. Here are some examples:
To fully charge a phone with a 3000 mAh battery capacity, you will need approximately 6 batteries. So, this hack is not ideal if you want to charge your phone to full battery.
In this case, you will not only have to throw out a lot of batteries after charging, but also spend a huge amount of time charging. But nevertheless, this is an excellent life hack for those who do not know how to charge their phone without electricity, at least to write a few messages or make a few calls, announcing themselves.
At least one Krona battery will be enough for you to turn on and you can ask for help by calling the single number 112.
This is one of the best life hacks for motorists who may find themselves in a deserted place with a dead phone and a completely dead car battery, which will not allow them to resuscitate the phone to call and ask for help. So we recommend several 9-volt Krona batteries.
Operating principle of the charger
The voltage at the non-inverting input of the microcircuit is greater than the voltage at the inverting input. The output voltage of the operational amplifier is close to the supply voltage, transistor VT1 is open and a current of about 10 mA flows through the LED. When charging the battery, the voltage across it increases, which means the voltage at the inverting input also increases. As soon as it exceeds the voltage at the non-inverting input, the comparator will switch to another state, all transistors will close, the LED will go out and the battery will stop charging. The maximum voltage at which battery charging stops is set by resistor R2. To avoid unstable operation of the comparator in the dead zone, you can install a resistor, shown in the dashed line, with a resistance of 100 kOhm.
This circuit is well suited not only for a conventional battery “Krona”, but also for other types of batteries. You just need to select the resistance of resistor R7 and, if necessary, install a more powerful transistor VT3.
The finished memory can be placed in any plastic box of suitable size. Cases for non-working mobile phone chargers are also perfect. For example, one working charger, converted to a higher voltage, is a 15V voltage source, and the other will contain circuit elements of the charger itself and contacts for connecting the “Krona”. Assembly and testing of the device: sterc
Forum for discussing the material CHARGING THE 9V BATTERY CROWN
Transistor audio power amplifier, from the DJ200 radio kit. Checking the operation of the circuit. High Quality Electric Guitar Amplifier - A complete guide to building and configuring a JFET and LM386 circuit. Passive cooling in radio electronics - the design and operating principle of a heat pipe.
Source
What batteries can be charged?
The principle of operation of batteries is two reagents that are connected to each other by an electrolyte. Moreover, in a salt-type battery, the substances are arranged so as to exclude the possibility of mixing, and the conductive-contacting role is played by the electrolyte entering through a small hole.
But the batteries transmit current directly to the device itself through the removers.
Despite their different composition, service life and effectiveness, salt and alkaline batteries have the same principle of operation. In particular, the most popular brand of alkaline batteries is Duracell. Such batteries are characterized by high capacity and high stability, even under extreme operating conditions.
There are several ways to revive a battery for a short period of time
Additionally, some batteries may discharge on their own, especially older batteries. Also, you should not combine a discharged battery with a new one, since galvanic cells of different types should not be mixed. Thus, it becomes clear that it is impossible to revive, restore or recharge a AA battery, and it is best to immediately purchase a new one.
Precautionary measures
Even reliable devices can sometimes fail or operate incorrectly, therefore, if it is necessary to recharge the Krona battery, it should not be left in the charger slot unattended for a long time.
Lithium batteries can catch fire when attempting to recharge or when the case is accidentally or intentionally depressurized. For this reason, batteries of this type should be handled with the utmost care.
There is no need to invent chargers for rechargeable batteries yourself. There are a sufficient number of working diagrams on the Internet that can be used to make chargers at home.
When using such charges, you should also try not to leave the device turned on unattended, and also observe the polarity, that is, connect the plus to the positive contact, and the minus to the negative.
Is it possible to charge batteries at home?
The battery is a self-contained portable source of electricity, the capacity of which is measured in milliamps per hour.
There are several types of batteries
Most batteries are disposable, but metal hydride batteries, or rechargeable batteries in other words, can store energy and therefore can be recharged. However, everyone should understand that it is better not to charge non-rechargeable batteries, as they will quickly become unusable again, and there is also a high risk of the alkali boiling or electrolyte leaking, which will certainly lead to damage to the device, and the alkaline composition may explode.
How long will it take?
We personally tried this life hack for charging your phone at hand. For example, it took us only 7 minutes to increase the charge of the iPhone SE smartphone from 60% to 67%. The exact charging time you'll need to revive your dead phone will depend on how low your device is and how much charge is left in the battery.
Of course, in order to somehow recharge a dead phone, you will have to hold the battery and charger in your hands in an awkward position. Your arms may get tired. But you can find a way. For example, secure the “Crown” to the charger with tape or place the structure on the table and press it with heavy books.
How much is a crown worth?
The price of this battery varies greatly. It will be different in each store. Most often, the higher the capacity of the power supply, the more expensive it is. Approximate prices:
- A 650 mAh rechargeable crown battery will cost 600 rubles.
- GP has a price from 60 rubles.
- Varta Superlife from 70 rubles.
- Space from 43 rub.
- Samsung Pleomax 6F22-1BL, price varies from 70 – 150 rubles.
- Fine Power (6LR61 KT-1151) – 85 – 160 rub.
- Smartbuy – 45 rubles.
Thus, from the above list it becomes clear that the price range is very wide. And 1 crown 9b can cost differently. If you purchase 20 CZK, there may be a discount. Price information was taken from online stores.