Now I will tell you how very quickly, literally within one hour, you can make a homemade tripod for a spotlight. This design is suitable for both a garage and any studio, but with one caveat: the lighting fixture itself should weigh no more than a kilogram, otherwise the stand will bend.
Source youtu.be
How to make a tripod for a spotlight in a home photography studio
Every craftsman at the Fair, regardless of the type of creativity, has to pick up a camera and take pictures of their products.
When photographing, a properly lit subject is half the battle. It’s good if you have the opportunity to take pictures on a sunny day, or at least during the day, and not at night. Ideally, you need at least three sources. Given the parameters of my products, I sit quite comfortably on the floor with a background. One problem - there was not enough overhead light. It seemed unnecessary to buy studio equipment for this; as a result of several hours of my husband’s work, I now have such a device.
Financially, it turned out to be super economical - we spent about 300 rubles on the stand itself for everything down to the smallest detail. Well, plus the spotlight itself for 235 rubles. I already had two of these. Together they provide the necessary light.
We will work according to the drawings - everything is serious!
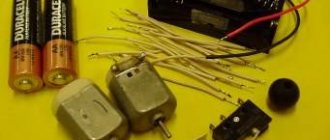
So what we need:
Materials: all are described in the drawing
Tools:
- drill, drill bit, electric file, jigsaw, screwdriver, awl, caliper, tape measure.
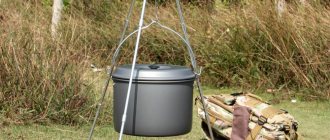
1. We cut the necessary parts from the timber - all dimensions are given in the drawing. We need three legs, a stand, a cross beam and a short block to mount the lamp.
2. On the block we make markings according to the drawing and using a jigsaw we cut out something like this with a rectangular hole in the middle. This will be the foundation to which everything is attached.
You get the following parts:
3. We insert the stand of our tripod into the hole:
4. Then we screw three legs to the resulting structure using a drill and pins.
5. Screw the transverse block perpendicularly to the vertical base. Three holes were made at different heights - if necessary, this block can be screwed higher or lower.
6. Well, at the end of this block we fix the last part, at the end of which we screw the lamp.
Now all that remains is the details - disassemble the structure, sand everything and cover it with stain, varnish or something else. The stain turned out to be of very poor quality, so we decided to leave it as is.
Next, the electrician’s job is to assemble all the wires into a single whole, connect them, and connect a separate switch to each lamp. It is better to entrust this part to a person who is well acquainted with electricity, so I will not give a detailed description.
We attach hooks for the wire on a horizontal block so that it does not dangle and does not fall into the frame.
What we came up with is something like a tripod - a stand, a holder... whatever you call it - it performs its function perfectly, the costs are minimal, the benefits are maximum.
It is easy to disassemble and assemble and takes up little storage space. All that remains is to sew a cover for it.
Source
Selecting a Power Source
For landscape lighting, a 220 V household power supply is used, autonomously powered by rechargeable batteries or solar panels. Unlike a traditional incandescent lamp, an LED lamp can only be powered by direct current.
To operate them, you will need a special current source that produces a constant voltage at the output. All power supplies differ in the type of assembly and voltage conversion option.
They are divided into the following groups:
Transformer .
The composition includes: transformer, filter, rectifier and stabilizer. Advantages: simple installation, withstand idle function. Disadvantages are vulnerable to overload and carry a lot of weight.- Pulse . Advantages: light weight, compact and able to work with increased impulses. Disadvantages: they do not tolerate idling and overload conditions well.
- Driver . Rectifies stabilized current, capable of operating at frequencies of 30-50 Hz. Wide range of output parameters adjustment.
There are 3 options for connecting the LED lamp to a 220 V household network :
- Consistently. When all the lamps are connected with one wire, a phase is applied to the beginning, and zero is applied to its end. The advantage is low installation costs. The disadvantage is that if one lamp fails, the entire lighting line will not work.
- Parallel. Each lamp is connected to a phase and a neutral or grounding. The advantage is the high efficiency of the circuit, even if one or more lamps fail. The disadvantage is the high consumption of wires for connection.
- A beam circuit is a particular type of parallel system, when the sources are installed around the perimeter, 2 or 3 grounded wires are supplied to each lamp.
Thus, for LED lighting in the local area, the best effective constant current source is considered to be a 220 V household network, with a parallel circuit for connecting lamps, with the installation of a driver for rectifying the current.
To illuminate objects on the site, non-volatile LED lamps powered by solar batteries or batteries can also be used.
Homemade spotlight stand made of polypropylene pipes
Authorization on the site
I bought 2 spotlights of 20 watts each + wires, a switch with a socket and decided to quickly make a telescopic stand with two spotlights, so to speak!
I used a polypropylene pipe as a telescopic stand. Diameter 40,32 and 20! 32 fits perfectly into a 40 pipe, and 20 into a 32 pipe, respectively! Drilled a series of holes. Where will the bolts be inserted, that is, the stoppers! To adjust the height!
As a crosspiece I took a 40mm by 120mm board! The cross turned out to be 60cm by 60cm. It's bulky, but it's stable! Believe me, I tried to do less, it’s not stable at a length of 2.80m! The spotlights are outweighed!
Using a crown, I drilled a hole 5 cm deep and inserted a 40 pipe there!
This is what happened in the end! Not very nice! But it's reliable!)
At the very top where the spotlights should be attached! I attached the mounts from a bicycle lock (I had it lying around))) so that I could spin them in a circle!
This is what the top bar looks like! Where will I mount the spotlights directly next?
I screwed a socket with a switch onto the crosspiece!
Fixed the lighting fixtures.
Voila. This is what happened in the end! Height adjustment from 1 meter to 2.80. I haven’t decided where to put the wire yet))) it’s still on electrical tape) I can’t yet tell from the light how good it is! Tests will show whether it was worth the hassle or not!
Source
Buy devices and podiums in the online store TUNING063: Tuning, spare parts and accessories tel.88
Instrument podium, horizontal, carbon effect, d 60 mm This instrument podium has a carbon finish, and this coating not only imitates its lattice structure, but also gives a glossy shine to the part. This makes her look not only sporty and even somewhat aggressive, but also elegant….
class “Device and podiums” will noticeably make the iron horse even more sporty.
Our partnership “TUNING063: Tuning, spare parts and accessories” strives to carry out the main installation for molding goods of the class: “Device and podiums”. The material of our products, if it is tuning: ABS plastic, composite (fiberglass), polypropylene.
If this is a wooden product: shelves, podiums for speakers, boxes for a subwoofer, then it is plywood covered with natural leather of various quality indicators or vinyl leather of various quality indicators or carpet.
If these are iron structures of products: thresholds, protection, for example: bumpers, decorative trims - then the raw materials are accordingly: stainless steel, coated with powder paint or otherwise processed to a gloss.
We carry out painting, tuning and packaging of painted and unpainted orders. Painted kits are packaged in several layers: cellophane film, bubble wrap, and then packed in corrugated cardboard. Unpainted sets are packaged in corrugated cardboard + stretch film; for supplying Russian airmail, we produce a textile package (from harsh calico) and an address sheet is pasted over.
- For your protection, payment is possible using the methods you need and delivery is subject to a minimum prepayment and cash on delivery.
- We carry out supplies using any practical option: Russian Post Office, any carrier company (TC), we work with passing baggage, we sell by self-pickup.
- Let's implement supply to any point in the Universe - everything is always connected with inaccessibility and remoteness, respectively, these factors mainly affect the course of transportation.
- We will be happy to answer, if you have any queries, please call8, or using the contacts listed at the top of the website.
On this page 2, we have tried to present a large number of products (in particular 222 pieces), but the largest part is in the operation of creating and joining the online service.
If it so happens that you have not found a sought-after copy, in the interests of updating the resource bar, try using the search or moving to the penultimate category: “Autoelectrics”, as well as moving to the category in which you are currently located: “All Autoelectrics products”, otherwise take a look to the beginning of the project.
We - manufacturers - work for you - the client!
Source: https://tuning063.ru/ves-tovar/avtoelektrika/pribor/?page=2
Tags: garage, spotlight, stand
Comments 56
LED lights are blinding when working, the glass needs to be frosted!
How does it work with frosted glass?
I took it into service!
Interesting. I'll have to do this myself. Thank you.
Original. I did it differently for myself, but this idea is better.
Cool stuff, well done. In the spring I will do something similar (with adjustable lamp distance from 10 cm from the floor to the height of the stand).
My friend and I did something similar, but given the crisis and simply lack of money, I took the material for the stand using ferrous metal... my friend ordered the lights from Ali. 50watt
Is this what they are glued to?
radiators from processors))) with coolers
I took note. Thank you.
The most stable structure on three legs.
Not bad, I'm just thinking about it.
I apologize for being off-topic, but am I the only one who first read “PIE stand”?))))
You just wanted to eat)))) This is subconscious
Nicely done, I'll take note! What kind of room is this so low?
part of the basement. thanks to the builders (
And if I had left one mounting bolt on the spotlight, and not two like now, I could adjust the left-right angle;)
And if you screw the spotlight mount not to a vertical surface, but to a horizontal one, then you can direct the spotlight one forward and the other backward, without moving the stand. And everything is so clear!