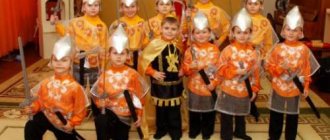
| I am the mighty Bogatyr, Greater than anyone else both upward and in breadth! I am the hero of a big picture, the one where there are three heroes. It was not in vain that I hurried to your Christmas tree from the epic. (poem by Natalia Ivanova) |
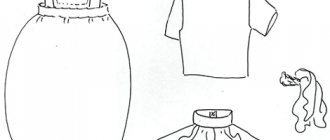
The Bogatyr carnival costume consists of the following elements:
1. Shirt 2. Trousers 3. Chainmail 4. Helmet 5. Cape 6. Boots 7. Sword 8. Shield
Recommendations for choosing fabrics and accessories
For the suit you will need: white fabric and braid with an ornament (for a shirt), any fabric for trousers (preferably in natural colors - light brown or the color of unbleached linen), red fabric (for a raincoat) and golden braid, fabric with lurex “mesh”, dublerin (or thick non-woven fabric), shield and sword, made independently or ready-made.
Description of work
Cut and sew the blouse, decorate with red braid along the collar, the bottom of the product and the bottom of the sleeves.
Cut straight trousers with elastic and sew according to any ready-made pattern.
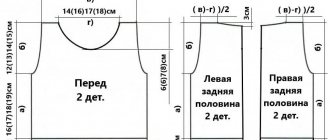
Sew chain mail from the mesh. The pattern is simple: two rectangles - front and back, two more rectangles - sleeves. Chain mail can also be made from disco fabric with silver or gold sequins. If you couldn’t find the right fabric, chain mail can be made as follows: paint any loose fabric, tulle or even gauze steel-colored with silver paint from a spray can.
The helmet can be made from papier-mâché, glued from cardboard, sewn from thick fabric, reinforced with a gasket. Attach a piece of “chain mail” to the bottom - protection for the neck.
Sew a cape from red fabric and decorate the bottom with golden braid.
Description, sketch: Lyudmila Orlova, design of the Bogatyr costume: Svetlana Makhotina, coordination and layout: Tatyana Evtyukova
The material was prepared specifically for the children's portal "Sun", and published on December 10, 2007.
For personal use only! Republication in other publications is prohibited!
New Year's knight/hero costume for a boy - how to sew it yourself?
Probably many mothers sewed their children’s New Year’s costumes themselves. But this is what a New Year's costume of a knight or hero could look like for a boy if you sew it yourself. If possible, a photo version would be desirable.
If you make a suit soft, it is quite simple, just basic sewing skills are enough.
You need straight pants and a long-sleeve T-shirt, whatever it is called correctly. From some plain fabric. It's very easy to sew them.
Then you go to a do-it-yourself store and buy foil-coated sheets of isolon. See the thickness for yourself, 0.5 will be too easy to bend, 1 cm may be inconvenient, especially for a baby, but it will definitely create the impression of armor. If you find an isolon, you will have to go to the tourist and hunting center and buy a metallized karemat (tourist rug) there, but this is more expensive. Cut large plates from isolon. The trousers will be made of thighs, shins (closed from the inside), you can make knees separately. On top - the chest, back (you can even use one piece with a neckline, it’s even better), plus flaps on the sides covering the upper third of the hips, plus forearms, shoulders and elbows. You can also use armpit rondels. You just sew it all on.
Additionally, you can take gloves and also sheathe them. Small plates on the top of the phalanx (it goes too far on the sides - you’ll have to walk with your fingers splayed, but there’s certainly no need to sheathe the inside), on the next one, and finally on the back of the hand. To make it absolutely beautiful, each next row hangs slightly over the previous one.
Like there are whole scales on my fingers. One plate per phalanx is enough. And let it be solid above the palm. The girdle (bell) is very good. If there is still material left, do it.
You can make a helmet from the same isolon. Here you will definitely have to take 1 cm thick.
This thing is called a "bascinet". It even has an edge, so by making it from two halves, we will remain close to the truth. You don't have to make a visor. The only thing I would recommend is to connect the two halves at the front and bottom so that they don’t bulge and the helmet keeps its shape.
The end result should be something like this:
You can not fool around, but make a knight of the 12th century. Sew a shirt, trousers and a hood from knitwear, matching the colors to match the chain mail. Or sew some kind of mesh on top. Put on a bright cott-d-arm on top - it’s simply a rectangle with a slot for the head and a couple of slits, stitched on the sides (for beauty, we draw some kind of coat of arms on it with acrylic). The helmet has a round bottom, we sew a rectangle and a face to it - the same isolon.
Manufacturing process
When starting work, it would be useful to talk with your child about who he wants to be, what materials he would like to use most. And based on his preferences, prepare the necessary funds for making an unusual costume.
From cardboard boxes
Boxes are an ideal material for creating a costume for a boy. For example, it’s very easy to make an image from the future – a “steel” robot.
To create you need:
- two boxes (rectangular for the body, square for the head);
- foil;
- scotch;
- scissors;
- colored paper;
- wire;
- hot glue;
- gouache.
The work process will take a little time, the main thing is to do everything step by step.
- Head. The excess parts are cut off from the box to create a cube with three sides. Make a cutout for the face on one of them. Cover the top of the box with foil. If desired, make the decor in the form of a small antenna (use wire, colored paper and tape for fastening).
- Torso. Trim the excess pieces so that the box does not have a bottom base. Cut a recess on the top for the head, and on the sides for the arms. Cover the box with foil, use colored paper and gouache to work out the decor (buttons, mini-screen, energy stripes).
- Legs, arms. It is enough to put a regular black or gray suit on your child and attach several foil elements with double-sided tape.
In addition to the robot, the following costumes for children can be made from the boxes: knight, dinosaur, house, Lego piece, SpongeBob and others.
From plastic bottles
This material allows you to make incredible DIY dresses for girls. Images of flower fairies, mermaids, and princesses will appeal to little fashionistas.
To make a mermaid dress you need to prepare:
- bottles of blue, white, blue colors (at least 20 pcs.);
- scissors;
- nail polish (pearl pink);
- glue Moment.
Work process.
- Cut oval scales from bottles (4-5 cm for the bodice and 6-7 cm for the skirt and train).
- Cover the elements with nail polish to get a color shimmer effect.
- Glue the scales to the base (you can take an old dress). Cover the bodice with small details, the skirt and train with larger elements. Arrange them randomly, imitating fish scales.
- Make a wreath. Cut 3 flowers from the green and blue bottles. Put the blue one into the green one and glue it. Wrap a plastic bag around the rim, straighten the free end, and fold it into a flower shape. Glue 3 bottle flowers to it.
When cutting out costume parts, you can easily get hurt on the edges of the bottle. This stage of work should be entrusted to an adult.
You can also make a costume from plastic bottles for boys (alien, transformer, superhero).
From disposable tableware
This material allows you to create simple but effective children's costumes. To make a ball gown for a girl, you need the following materials:
- plastic cups (depending on the child’s height, on average 200 pieces);
- stapler;
- scissors;
- zipper;
- thread, needle.
Work process:
- Bodice. Cut the glasses in half and remove the bottom. Place the two parts one inside the other (the top one is 2 cm higher than the bottom one), and fasten it with a stapler. Lay out the resulting fastened parts in 2 rows from bottom to top to the height of the bodice. Make the sides and back from smooth parts of glasses.
- Skirt. The glasses are collected in tiers and fixed with a stapler. The first tier is the widest. Closer to the waist, the skirt should taper due to the reduction in the number of glasses.
- Assembly. Sew the skirt to the bodice using threads. To hide the paper clips on the skirt, you can insert a whole one into each cup and secure it with glue.
If you use glasses of different colors, you can lay out a mosaic (geometric patterns, flowers, rainbows).
From old newspapers
A little imagination and free time will allow you to make a costume even from waste, for example, from unnecessary newspapers. It's easy to make a ballet tutu out of them.
Tools:
- newspapers;
- scissors;
- glue;
- stapler;
- thread, needle.
Description of work:
- Top. Wrap the newspaper around the fabric base, pin it together, and sew it on. Any unnecessary dress with straps can be used as a basis. Fold the newspaper like an accordion, straighten it to form a fan, attach it to the bodice, and secure it with threads as decoration.
- Skirt. Roll the newspaper sheet into a cone shape and fasten it with a stapler at the narrow part. The resulting parts need to be laid out in layers, forming a ballerina’s tutu. Attach the skirt to the base using glue and a stapler. If necessary, the edges of the cones can be made more textured - randomly cut out zigzags or pre-fold the newspaper like an accordion.
Making clothes from waste material is a simple and fun process. There are many variations of designing a dress for a girl from newspapers or magazines.
Required materials and tools
Preparing parts for the skirt Prepared triangles must be carefully connected to each other
What to make a helmet for a hero from
A hero’s costume without a headdress doesn’t look good at all, so the little warrior will need a beautiful helmet. It can be made from simple and affordable materials.
What you need for work:
- five liter plastic bottle;
- plastic glass 500 ml;
- laundry bag or piece of mesh;
- silver or gold paint in a can;
- mounting double-sided tape;
- scissors and glue.
Progress
- From the top of the bottle we cut out the base of the helmet. To do this, draw a wide frontal part with a marker, leaving the sides even. We cut off everything unnecessary.
- We make a conical top of the helmet from a plastic glass. To do this, cut out the bottom of the glass and cut it vertically. We cut out a cone from the resulting plastic sheet and fasten it with double-sided tape.
- Next, we connect the parts of the helmet. We attach the cone with tape to the plastic helmet from the inside.
- Let's start making chain mail for the helmet. We make it from a laundry bag. This mesh is quite durable and inexpensive. You can use mosquito netting or remnants of tulle, but this material is thin and stretches a lot.
- We paint the mesh with spray paint in silver or gold.
- Next, we paint the helmet itself, applying several layers so that it does not show through. Let the workpiece dry.
- We cut the mesh and try it on the helmet. At the fastening points we apply double-sided tape, to which we attach the chain mail mesh.
We try on the finished heroic helmet on the baby. Let's start making other parts of the costume.
Uniform
Maxim Griboyedov's uniform is sewn according to ancient cloth patterns. Cloth is a “viscous” material; if a soldier is “pulled” by a glancing blow from a saber, the fabric will protect and absorb shock. The cloth also “holds” small buckshot well at the end. The “ugly” blue-green color of the uniform corresponds to the original: it helped the huntsmen skillfully camouflage themselves in the forest.
On the chest of the uniform is the badge of the 21st Jaeger Regiment. The reenactors cast the badge and buttons from brass.
The color differentiation of uniforms and various attributes on shakos helped commanders from afar understand which branches of the military were in front of them.
DIY chain mail and shirt for a hero
An indispensable attribute of a heroic costume is a shirt with a Slavic pattern and chain mail. To sew a “Bogatyr” costume for a boy with your own hands, you need to stock up on the following materials:
- white loose shirt;
- a piece of border with a Slavic pattern;
- foil backing for laminate;
- glue, scissors, double-sided tape.
Progress
Step No. 1 Shirt of a hero
You can turn a simple white shirt or nightgown into a heroic shirt. To do this, just sew a beautiful border with a pattern along the bottom of the product. Nowadays you can find almost any border on sale. The shirt for the hero is ready.
Step No. 2 Chainmail
Chainmail can be made in several ways.
- A vest is cut out of an old knitted sweater and painted with spray paint. To do this, the vest is pulled over the back of the chair. This chain mail turns out to be quite light, but the smell of paint remains.
- You can make scaly chain mail armor. To make it, you will need rectangles of the same size, which are fastened in a checkerboard pattern. You need to start working from the bottom row of chain mail. In addition, the rectangles must be painted on both sides. The dried parts are sewn onto a thick sleeveless vest.
Important !
You can make a chain mail shell from a foil backing under the laminate, cardboard, plastic folder or other materials.
Bayonet
The bayonet is attached to the barrel of the gun and is fixed by turning it on the barrel. The reenactors have an iron bayonet, but not sharpened. This is done both for safety and to ensure that everything is according to the law, so that edged weapons are not used in the reconstruction of the battle. The soldiers who took part in the Battle of Borodino had sharp bayonets, of course. The bayonet and cleaver were worn “under the shoulder strap”, over the right shoulder on a special leather belt - a sling.
How to make boots and pants for a hero boy costume with your own hands
Old Russian heroes wore high boots with curved toes and a figured top. You won’t find these on sale, but making them is quite simple from scrap materials.
What you need for work:
- thick fabric for boots;
- doublerin;
- thick linoleum or leather for the sole;
- thick threads for decorative work;
- awl, scissors.
Step No. 1 Pattern of boots
We take the necessary measurements from the child’s leg and draw a pattern like this.
We transfer the details of the side and front of the boots onto the fabric, not forgetting about the seam allowances. We cut out the sole from thick linoleum or leather.
Step No. 2 Assembling boots
We iron all the details. We additionally seal the front part of the boot with doublerin so that the boots keep their shape.
We use an awl to make holes on the sole through which the boot will be sewn.
We fold the parts of the fabric boots with the right sides inward and sew them on a machine. Turn it inside out and try it on the sole. We distribute the fabric along the side of the sole, pinning it with pins. The sole must be sewn on by hand, using even and neat stitches.
The boots for the hero costume are ready!
The pants of the ancient Russian hero are made of plain fabric. For cutting them, the pattern of any sweatpants or bloomers is suitable. We transfer the pattern to the fabric and sew the pants along the side and crotch seams, not forgetting to tuck the bottom of the legs and insert the elastic into the waistband.
You can use ready-made sweatpants made of knitted fabric in soft colors.
Recommendations
Costumes made from scrap materials for girls and boys do not require large financial costs and effort to make. However, you must remember the safety rules:
- It is worth making sure that the child is not allergic to the materials of the future suit.
- Do not use sharp or dangerous objects that can dig into the skin, scratch or cause discomfort. Avoid small parts that a child could accidentally swallow.
- Before putting on the costume, you need to make sure that the glue is completely dry and its smell has completely disappeared.
Do not trust needles, scissors, stationery knives and hot glue to children. Even if a child knows how to handle them, an adult should always be nearby and supervise the work process.
By following these simple rules, a joint activity with your son or daughter will bring a lot of positivity, and a costume made from waste material will teach the child to appreciate nature, fantasize and create.
Shield and sword for a hero from scrap materials
Weapons make the outfit more impressive. As a rule, a handmade hero costume for a boy is complemented with a shield and sword.
To make a sword you will need:
- thick cardboard;
- spray paint;
- metal and plastic jewelry;
- glue, scissors.
On thick cardboard we draw a sketch of the future sword. We cut out several parts that we glue together. This will give additional strength to the finished product.
We cover the dried sword blank with several layers of spray paint to obtain an even and beautiful color. When the paint is dry, we begin decorating the sword.
To decorate the handle, you can take beads, multi-colored plastic or metal rhinestones, colored foil, etc. Decorations are glued in random order onto the handle of a cardboard sword.
The shield for a warrior is made light. In Slavic culture, the shape of the shield was simple, more reminiscent of a circle or oval. The shield for a hero consists of several parts:
- main part - 2 cardboard circles. We calculate the diameter of the circle as follows: measure the length of the arm from the tip of the middle finger to the child’s elbow;
- borders - a hoop made of cardboard about 3 -5 cm wide. The inner part of the hoop can be made curly;
- central circle with decoration: dragon head, sun or monogram.
The cardboard shield elements for the main part are glued together, then painted and allowed to dry. The border is painted separately, then applied to the main part and glued. The same goes for the central part of the shield. When the shield is ready, an elastic band is glued to the inside of it, which will fix it in the hand.
By working on a hero costume for a boy, you can give ordinary things a new purpose with your own hands. By using imagination and ingenuity, you can accurately copy all the details from ancient legends. It is important not to overdo it with decorations, because the hero is a rather strict and formidable image. Ideas for your option can be seen in the video:
Execution Methods
You should immediately decide how you will create the outfit. There are two options:
- Do everything from scratch.
- Create a set based on existing clothing, adding characteristic accessories.
The first method to sew a knight costume with your own hands is when you have a sufficient supply of time and already have experience in making clothes. The second method is recommended for beginning needlewomen or those who have absolutely no time to be creative, but for some reason it is not possible to buy a ready-made outfit.
Bogatyr costume.
Olga Salnik
Bogatyr costume.
costume master class that can be useful for any matinee, this is a hero costume !
What is included in a heroic costume ?
To do this, take a regular white shirt and a special braid with embroidery. Trim the cuffs and collar. We sew the braid along the edge of the collar and along the edge of the shelf on which the loops are located -15-20 cm down. We also sew the braid along the bottom of the sleeves.
This is what happened!
For protection, we take ordinary “double-thread”
. We cut it according to the shirt, only a little longer and wider. Accordingly, we make the neckline a little larger and the sleeves shorter. We sew gray bias tape along the bottom of the sleeves and along the edge of the neckline.
Next we take a leather substitute. We cut out square parts, and one should be larger than the others. We glue the parts onto a glue web so that they do not move during sewing.
We draw an ornament on the sewn parts using silver acrylic paint.
There are no special preferences here. You can take any pants that match the color and are wide enough.
We need thick cardboard for the helmet. Let's make something like this.
Glue the part according to the allowances with a glue gun.
We paint our helmet with bronze-colored spray paint (I used hammer effect)
.
We braid a braid from knitting threads and glue it along the edge of the helmet.
Next we glue the mesh to the back of the helmet.
The cloak requires a piece of red lining fabric - 1 meter and gold braid for decoration.
Mark and cut out the neck and bottom.
Next we process the edges and bottom.
Then we sew gold braid along the edges, and embroidered braid along the neckline.
Sew ties (gold braid)
. And our cloak is ready!
We make this pattern of parts and substitute leather.
We sew all the details along the edges.
We sew silver braid along the upper edge of the boots. And the boots are ready!
With a spear everything is very simple! We take a polyethylene pipe and cardboard. We paint the pipe with spray paint - bronze, and form a tip from cardboard (we also paint it with spray paint)
. We connect one with the other with a glue gun and the spear is ready!
For the shield we need cardboard, bronze spray paint, gouache paint (red and ocher, thick threads, a wide elastic band, a glue gun.
Cut out four circles of different sizes from cardboard. We paint them with paints. On the second circle we form a pattern of threads. On the first circle we make slits and insert an elastic band (for fastening on the hand)
.
There should be two fastenings to make it more convenient to hold the shield. Next, we assemble our shield (glue the circles together)
.
In the end, this is what happened.
This is Dobrynya Nikitich!
Fine art summary “Defenders of the Russian Land. Image of a hero" Topic: "Defenders of the Russian land. The image of a hero." Type of lesson: thematic drawing; UMK: perspective; Purpose: to introduce students to the image.
Summary of speech therapy educational activities for the development of coherent speech “THREE BOGATYRS” Summary of a lesson on the development of coherent speech “THREE BOGATYRS” in the group of speech therapy activities Program content: - Introduction to reproduction.
Notes on the development of speech in the junior group “acquaintance with the image of the hero” Notes on the development of speech in the junior group “Acquaintance with the image of the hero” Tasks. 1. Give children an idea of Russian heroes and their weapons..
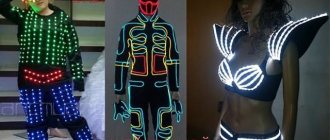
Flower costume I prepared flower costumes for the play “The Dragonfly and the Ant”. The costume consists of a hat - a flower and a cape. As I expected.
Costume for dance “Sarafan” Sundress. To make a children's sundress for a girl, you will need 5 - 6 years old. 70 centimeters of orange satin, 50 centimeters.
Lapbook “Russian Costume” Good day, dear colleagues! Last school year, I chose a laptop as the topic of my self-education. To be precise, “Lapbook.”
NOD “National Costume” Purpose: -to introduce the Mordovian national costume. Objectives: -to expand children’s ideas about their native land, culture, folk art;
Autumn suit "Milava". Outside the windows is golden autumn. Each person has their own memories, experiences and emotions associated with this time of year. For gardeners.
Russian folk costume Modern children cannot imagine what clothes looked like 50, 100 years ago. With the help of the presentation, they are immersed in those for a while.
Scenario for the prom evening “Three Heroes” in the “Preparing for School” group in the children’s room Characters: Alyosha Popovich Ilya Muromets Dobrynya Nikitich Bear Fairy Fairy Tale Princess Frog Dunno Vasilisa.
Gun
The Maxim gun is slightly different in design from the 1812 huntsman guns. Maxim honestly admits that in the years when it was assembled, it was impossible to find a flint lock, and the reenactors made do with what they had. Many people walked (and still walk) with simple dummies that “shoot” ordinary firecrackers; “powder” guns are a higher level. Therefore, the gun lock was assembled for a later era: flintlock guns were used in the Battle of Borodino, while Maxim used a percussion cap gun. Otherwise, the weapon corresponds to the original: the wood for the butt of the gun is birch, the barrel is iron, everything “yellow” on the gun is brass. Now this is easier: although authentic reconstruction guns are not cheap, they are relatively easy to purchase.
Gunpowder was poured onto the “shelf” of the flintlock gun and a stone was secured – the “flint”. When the trigger was pulled, the flint struck a steel plate extending upward from the “shelf.” The flying spark ignited the gunpowder. The fire passed through a hole on the side (brandt tube) into the barrel, where gunpowder was also poured in and a lead bullet was hammered. A shot sounded.
The gun comes with a cleaning rod to clean the barrel and clear the bullets.
Cartridge bag
This small leather bag was used to carry cartridges and spare flints. It was put on over the left shoulder, always after the sling. The logic here is this: if the cartridges run out, the bag can be quickly removed and replaced with a full one. Sometimes spare bags with cartridges were prepared separately, but in battle conditions they most often had to be removed from killed or seriously wounded soldiers.
On Maxim Griboyedov’s cartridge bag there is the number 21, according to the regiment number. At first, the brass numbers were large. Then the reconstructors found out that in the original they were much smaller. New numbers were cast, but traces of the old ones are still visible on the bag.
General view of the warrior
|See also: Reconstruction of the Battle of Borodino: why to go and how to go. Practical advice from an experienced viewer
Photo by Valentin Kharpalev
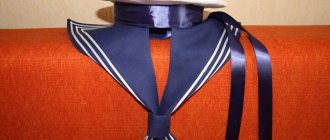
Suspenders, collar, sling
Maxim’s braces, according to him, are quite authentic. Their main task is clear - to support the complex construction of pants.
A tie, also known as a neckerchief or collar, was worn to prevent the uniform from chafing the neck.
The leather belt was intended for edged weapons. A cleaver and a bayonet were attached to it. There was a lot of leather - belts, belts, all kinds of leather parts. When you are so “laden”, there are few vulnerable places on your body - everything is protected either by cloth or leather. This, of course, did not save you from point-blank shots, but such uniforms could quite successfully delay a bullet or buckshot at its end.
At the time of shooting, Maxim’s uniform did not include an undershirt. The soldiers, of course, had it. It was sewn from simple white canvas.
Almost all Russian soldiers were Orthodox, and each had a pectoral cross on his neck.
September 8 is the Day of Military Glory of Russia - in memory of the day of the Borodino battle between the Russian army and the French army under the command of M.I. Kutuzov (this date was obtained by erroneous conversion from the Julian calendar to the Gregorian calendar, in fact, the day of the battle is September 7).