Matryoshka is a beautiful painted cylindrical doll. Traditionally, it is made of wood and has a cavity inside that contains toys similar to it, but slightly smaller in size. In this case, they must be inserted into each other.
Any tourist would never leave Russia without this round-faced beauty in a bright sundress and scarf. It has long gained worldwide fame and is now considered not just a traditional souvenir, but one of the cultural symbols of our country, along with the Dymkovo toy, samovar and balalaika. In this article we will tell you how to make a nesting doll with your own hands from various materials: salt dough, fabric and even paper. We recommend making this craft together with your child; he will definitely enjoy both the creative process and the result.
Master class: textile matryoshka. Let's make a fabric craft with our own hands
A beautiful nesting doll can be made quite simply from textiles. If you know how to sew at least a little, pay attention to the following simple and interesting master class.
How to make a matryoshka doll with your own hands? To begin, you will need to prepare the following materials and tools:
- cotton fabric of different colors (plain white, beige, burgundy);
- colorful fabric with a floral pattern;
- padding polyester;
- lace;
- threads;
- brush;
- pencil;
- scissors;
- acrylic paints.
After purchasing everything you need and preparing your workspace, you can start creating. Making a do-it-yourself matryoshka doll from fabric is very simple. You can use this pattern.
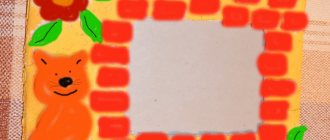
Gift fridge magnets
To create original souvenirs in the form of a magnet you will need the following kit:
- Dough.
- Cutting board.
- Rolling pin.
- Felt.
- Glue and magnet.
- Cardboard, pencil, scissors.
- Toothpicks.
For decoration, acrylic paints, brushes, varnish and coloring samples will be useful (if desired, the master can use his own ideas for decoration). How to make a craft from salt dough with your own hands:
- Prepare a template in advance. You choose a drawing or figure yourself, and then draw the outline of the future image on cardboard. The shape is cut out with scissors.
- In a separate container, knead the dough using one of the well-known recipes.
- On a cutting board, roll out the salted dough into a thin layer using a rolling pin.
- Place the prepared mock-up on the dough, lightly pressing it into the soft mass.
- The template is removed, leaving an imprint of the future magnet on the surface of the dough.
- Using a sharp knife, cut out the figure. Using a toothpick and other auxiliary objects (tweezers, sticks, buttons), highlight the relief and small details on the surface of the magnet.
- Dry the product in the oven.
- Focusing on the sample, paint is applied to the surface of the magnet.
A piece of felt is glued to the back surface, on top of which a magnet is placed. It is quite difficult for a novice master to choose the right design, and therefore you can use ready-made projects and ideas.
Technology for making textile crafts
Now we’ll tell you directly about how to sew a matryoshka doll with your own hands. To begin, take the white fabric selected for the top of the toy and fold it in half. We transfer the pattern onto it, but not the whole thing, but only its upper part. We cut along the contours and get two blanks that will become the face and back of the toy. We make a round hole in one of the parts. Next, take beige fabric and cut out a small square from it. We cut out a strip from dark red fabric; it will become the doll’s handkerchief. We also prepare a strip of lace equal to the length of the burgundy material. Now we sew a lace braid to the dark red stripe from one edge. Turn the piece over and iron it from the front side. Place a scarf blank on one edge of the prepared beige square. We cover these two parts from above with a white cloth with a hole cut in it. We fix all the elements with pins and sew them with a hem stitch (or buttonhole). Turning the product over, cut off the excess beige and dark red materials. The result is a head with a face and a scarf on the forehead.
We continue to create colorful textile souvenirs with our own hands
Let's start making the doll's body. To do this, take a colorful material with a floral print and fold it in half. We cut out the bottom of our nesting doll (the bottom part in the pattern). Now we put all the parts (the head, the back of the head, two elements of the body) with the front side inward, stepping back a little from the edge, mark the outline with a pencil and sew the product along it. Attention: we are not sewing up the bottom of the nesting doll yet. Through it we will fill the doll with padding polyester. We cut off the excess material, turn the toy inside out and stuff it with padding polyester. It is necessary to distribute the filler evenly and straighten it. After this, we sew the bottom of the toy with a hidden seam. Well, now we decorate the nesting doll at our discretion: sew lace to the body (on the border of white and multi-colored materials), beads, sequins, beautiful buttons. Using a pencil we outline the eyes, eyelashes, eyebrows, nose and lips. We paint them with acrylic paints. We paint the cheeks with blush. That's all, our textile matryoshka is ready!
How to make salt dough
The recipe for making play dough is simple.
- You need to take “Extra” salt and flour in equal proportions, one glass each.
- Mix in a deep bowl and add half a glass of ice water.
- Knead the dough well. To prevent the dough from sticking to your hands, you can add a tablespoon of vegetable oil.
- If you plan to sculpt small decorative elements, it is also recommended to add a dessert spoon of PVA glue to create a more elastic consistency of the dough.
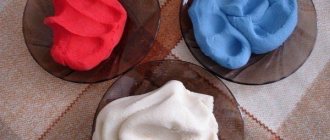
- Dough products can be painted with paints in finished form, or you can make the dough colored initially.
- You can get color in two ways: add gouache or acrylic paint when kneading the dough, or add food coloring to the water according to the recipe.
Different colors of dough are easily mixed, creating new shades.
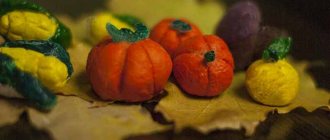
Making a craft from salt dough
A magnificent painted nesting doll can be made not only from textiles, but also from other available materials. For example, very interesting crafts are made from salt dough. Try making such a doll with your child; modeling not only brings satisfaction, but also develops fine motor skills. So, let's discuss how to make a matryoshka doll from salt dough with your own hands. It's actually also very simple. First you need to prepare the dough. We offer you this tried and tested recipe. Take 1 glass of salt (fine, extra), 2 glasses of flour, 250 ml of cold water and mix the ingredients. Add 1-1.5 tbsp to them. l. vegetable oil. The dough for this recipe is elastic and soft. Now we make a blank from cardboard - cut out the silhouette of a nesting doll. Using a rolling pin, roll out a piece of dough into an oval shape. In this case, its thickness must be at least 6 mm. We attach a cardboard silhouette and cut out the body of the nesting doll according to it. Next we sculpt the face (small circle). A little later - handles, and then attach them to the sides of the workpiece. Using a stack we draw the eyes, mouth, cheeks. Now we leave the workpiece to dry for some time.
Classic salt dough recipes
Salted dough for sculpting crafts can be prepared in three main ways. Each proposed option allows you to obtain three working masses with different properties:
A dense mass for sculpting panels and large parts is prepared from 1 part flour, 1 part salt and 0.75 parts water.
For the classic recipe for salt dough for sculpting crafts, you will need 1 part each of flour, water and salt (moreover, you need two types of salt - coarse and finely ground). This option is a viscous and very plastic base that allows you to sculpt the smallest details.
A very soft salty dough for creating crafts is prepared from a mixture of 1 part flour, ¼ part hot water, 1 part salt and PVA glue. After thoroughly mixing all the ingredients, the working mass is wrapped in cling film and left for 30-35 minutes or until completely cooled. A similar recipe is used to create three-dimensional figures with relief.
There are also several rules regarding the preparation of salted play dough:
- First of all, the dry ingredients are mixed in a container, and only then water (hot or cold, depending on the recipe used) is poured in fractionally.
- For subsequent decoration of dough crafts, it is better to give preference to wheat flour, as paint adheres better to it. You can also add fat to the dough to obtain an even decorating coating.
- When preparing any of the three recipes, you should avoid iodized salt, otherwise large cracks may appear on the surface of the finished product.
- Drying out of the working mass can be prevented by wrapping the dough in cling film.
- If the dough is too thick or too thin, you can add water or flour (depending on the situation).
- Finished salt dough crafts should be dried in the oven at low temperature. Mostly acrylic paints or gouache are used for decoration, and an additional layer of acrylic varnish will protect the toy from excess moisture loss.
There are quite a lot of nuances in working with salt dough, following which you can get stylish and durable toys, souvenirs, refrigerator magnets and even a set of decorative dishes.
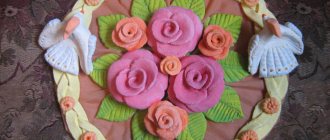
Bright matryoshka. We paint the product with watercolors with our own hands
First, we paint the face of our nesting doll and palm with beige paint. Then we decorate the scarf with watercolors. We paint the sleeves with blue paint, and the shirt with white paint. We decorate the skirt with any bright watercolor. If desired, you can draw some kind of pattern on the sundress, for example, flowers, geometric shapes, etc. Now let's proceed to the most difficult part of the work - we draw the eyes, nose and lips. Don't forget about the doll's hair. If desired, we also decorate the shirt by making various patterns on it. After the paint has dried, coat the craft with varnish. That's all, the nesting doll is made with your own hands! It can be glued to cardboard, decorated with a background and framed. This way you will get a beautiful panel.
DIY piggy bank
Content
How to make a piggy bank yourself?
How to make a piggy bank out of paper?
DIY piggy bank for paper money
DIY piggy bank from
DIY dog piggy bank
How to make a piggy bank yourself?
How to make a piggy bank yourself without investing a lot of money in the product? In this article you will find the most interesting and useful tips that will help you make an accessory at home.
The storage container can even be electronic or with a secret - it all depends on your imagination.
Handmade items are highly valued. Therefore, you can safely give a beautiful and unusual homemade piggy bank as a gift for a wedding or birthday.
What can a money organizer be made of? Surely every home has the following materials:
- shoe box;
- tin or cardboard jars;
- jars, bottles made of glass or plastic;
- unnecessary toys.
The craft can be decorated with beautiful paper, coins, clippings from glossy magazines, ribbons, beads, remnants of lace, etc. You can even use a wine cork and other elements that you can find at home.
If you have a child, they will surely love a kids piggy bank that is easy to make together.
How to make a piggy bank out of paper?
An organizer made of paper or cardboard is a simple option that does not require much time and effort. Prepare the necessary materials, and let's start creating a real handmade masterpiece.
To work you will need:
- cardboard box;
- white acrylic paint;
- PVA glue;
- decorative elements;
- scissors;
- stationery knife.
Step by step steps:
- prime the entire surface of the box with white acrylic paint or PVA glue;
- carefully cut a hole for coins or bills and process the edges;
- decorate the craft to your taste.
This is how you can make a nice interior item quickly and inexpensively.
There are many other options for making a savings organizer from improvised materials:
- it can be made from papier-mâché;
- if you know the origami technique, you can easily make an interesting accessory from several sheets of paper;
- a craft from a book or a children's model from Lego will be original and unusual;
- you can build a large composition from wood or a small accessory from plywood. The wooden model is durable and practical;
- You can make any figurine from plaster, just purchase a suitable shape. A plaster craft will decorate your home or be a good option for a gift.
All of these materials require some skill and experience, so adults can handle them. What can you use to make a piggy bank for a child? Young children can try to create their own version from salt dough, clay or plasticine.
DIY piggy bank for paper money
A money box can be designed for coins or banknotes. This should be taken into account when choosing base material. A product for jingling money should be stronger than for rustling money. It is also worth considering that the glass base is not suitable for coins due to its fragility.
You can use Lego for banknotes. This construction set is a favorite among modeling fans. A huge variety of shapes of parts allows you to experiment and create real masterpieces.
Making an organizer is simple: assemble a cube from individual elements and leave a hole for money. Use your imagination, which will definitely tell you how to make it creative and unusual.
But piggy banks are not just for money. Among collectors, similar organizers are used for wine corks or beer caps.
DIY piggy bank from a jar
You can make a beautiful and unusual thing from a glass jar or bottle. Knit a piece of clothing for this item, and it will become a bright accent in your interior.
Several interesting ideas will help you make your own practical and inexpensive piggy bank.
Master class No. 1. From a glass jar.
For work we will need:
- jar;
- metal or plastic cover;
- decorative rope;
- glue;
- elements for decoration.
Stages of work:
- wrap the middle of the can with rope, gluing its beginning and end;
- decorate the top of the rope with small decor, placing it on glue;
- roll up the jar or put on a plastic lid;
- cut a hole in the lid for bills.
All! The product is ready.
Master class No. 2. From a tin can.
If you have some pretty coffee jars left over, use them to create piggy banks. To make an original item, prepare the necessary materials:
- tin can;
- scrap paper of different colors (you can take gift wrapping paper or interesting wallpaper);
- stationery knife;
- glue.
Stages of work:
- close the jar and cut a hole on top for money. Do everything carefully so as not to get hurt;
- cut out a paper circle and glue it to the lid. Cut a hole in the paper so that it matches the one on the jar;
- Cover the walls with paper as well;
- prepare a second piece of paper. It should be narrower than the first one. Glue it in the center of the jar. You can pre-write an inscription on it;
- You can further decorate your product with beads, lace or other materials.
Admire your creative result!
Master class No. 3. From a plastic bottle.
Together with your child, you can make an unusual rocket piggy bank.
What we will use:
- plastic bottle (volume to choose);
- blue or light blue cardboard;
- stationery knife;
- glue;
- permanent marker.
So:
- Cut out a circle from blue cardstock. Cut it into two parts. We only need one;
- cut the round edge into segments. They will help glue it to the craft;
- bend the semicircle into a cone and glue the sides together;
- glue the cone to the bottle cap;
- on the side, at the top of the rocket, cut a hole for coins;
- Glue wings from quarters of a cardboard circle on the sides;
- glue the round portholes and trace their outlines with a marker;
- Draw the details of the space car with a marker.
This is such an interesting model we have!
DIY dog piggy bank
The Year of the Dog has imperceptibly approached. In order for him to pamper us with his attention, it is worth having elements in the form of this animal in the house. You can make good gifts for your loved ones and friends with your own hands for the New Year. And we will tell you how to make a dog piggy bank easily and simply.
For work we need:
- an old toy in the shape of a dog;
- glass jar or plastic bottle;
- scissors;
- needle and thread.
Stages of work:
- remove some of the filler from the toy;
- place a jar or bottle without a top in the middle;
- make a hole in the toy for money (preferably along the seam, securing the edges of the slot);
- sew up the place where you inserted the can.
Such a product can also serve as a hiding place for important little things.
An original handmade New Year's piggy bank will be a good present for a loved one. She will keep a piece of your warmth and love.
Modern technologies make it possible to create unusual and extraordinary options that surprise and delight. A striking example is the cat thief. There is a toy kitten hidden in a cardboard box, which will grab the coin you put with its paw.
But a simple cardboard house or a bottle rocket is much nicer than an interactive accessory. Why? The answer is simple - it is made with your own hands and is a source of your pride.
Let's make a matryoshka from paper
Together with your children, you can make a funny cardboard doll. To work you will need some materials and tools:
- thick white paper A4 size;
- paints;
- scissors;
- ruler;
- glue stick;
- white cardboard;
- backing for cutting.
You will also need a computer and a printer. After preparing the necessary “consumables”, we get to work. First we print out this template.
Then we cut out the parts from paper. We apply the resulting blanks to the cardboard, trace them and cut them out along the contour.
Let's paint our craft
Now let's start decorating the nesting doll. We begin to draw all the details using gouache or watercolor. We decorate the scarf with pink paint, and beige paint for the face and hands. We paint the skirt with red paint. The sleeves of the shirt can be made light green or blue. Make the doll's hair brown. Next we draw small details - eyes, lips, nose and cheeks. We decorate the craft the way you like, for example, we draw flowers or any fancy patterns on the hem of the sundress. We also paint the second part (the back of the doll) with gouache and leave the craft to dry. After this, we glue both parts at the top and bottom along the protrusions using a glue stick. Now the craft has become stable.
Do-it-yourself matryoshka made from paper. By analogy, we make another smaller doll. We hope you and your children enjoyed our master class.