A beautiful headdress perfectly decorates little ones and will always be in trend. The headband is very comfortable and practical to use. It is suitable for newborns, babies, girls, young women and women. It should be noted that the headband will vary in size and style depending on age. In this article we will learn how to make a headband for a baby with our own hands and look at four options for headbands with a step-by-step master class on how to make them.
Sewing steps
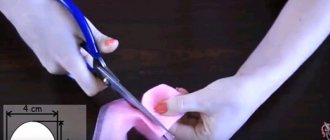
This stylish item will take very little time to make. Before starting work, you need to decide on the model and choose the appropriate fabric. Then you should measure the circumference of your head to find out the size of the product. Depending on the material and the chosen model, you need to make a pattern or draw a diagram. But in many cases this is not required.
Next, you need to cut the fabric to the desired size.
It is important to allow seam allowances. Typically, a strip is cut 2 times the width of the finished product.
Sew it on the wrong side and turn it inside out. After this, the women's headband needs to be decorated with the selected decorative elements, and if necessary, secure the elastic band. At the last stage, we sew the ends and process the edges.
Headbands with elastic band
A scarf is considered the best option because it can be tied in different ways. But for greater convenience, it is better to sew a similar model with an elastic band. It goes well with sporty and casual clothing and is suitable for women of any age. The easiest way to make it is to fold it in half and sew a strip of fabric into which the elastic is threaded.
This model looks original due to its soft folds, and it is comfortable and easy to put on. Another option is a type of scarf like a bandana. This is a wide strip of fabric, most often a single layer of thin material. At the ends it is gathered into a bun with an elastic band.
What you need to make it:
- cut a rectangle for the scarf itself measuring 25 x 45 cm;
- tuck the edges and stitch;
- prepare a second rectangle for elastic 5 x 25 cm;
- make a drawstring out of it, insert a wide elastic band 10-15 cm long;
- put the end of the scarf into the drawstring, after tucking the edges, sew;
- repeat the same on the other side.
Cut out three parts Sew two long edges on a large part Fold two small parts wrong sides and sew along the long sides Turn them inside out, iron them and turn both short sides inward by 2 cm Sew in the center, not reaching the edges 1.5 cm Gather the short edges of the large part into cute folds and sew in an elastic band. The folds on both sides should lie in one direction. The finished product
Overlap knit
To make this you will need two pieces of knitted fabric of different colors. A pattern is not required, but when cutting you need to take into account the size of the head. For a child 3-7 years old, you need to cut two strips 15 cm wide and 47 cm long. Older girls and young women will need to increase the size. To determine the length of one part, you need to add 4 cm to the volume of your head. Sewing such an original hair decoration is very simple, and for those who do not have experience, you can use step-by-step instructions. How to make a headband for a girl from knitwear with your own hands:
- Cut out two parts.
- Fold each one in half lengthwise and stitch.
- Finish the seams and turn them inside out.
- Place the seam in the middle and iron the stripes.
- Place the pieces together crosswise in the middle.
- Bend them in half to create an overlap.
- Align all 4 edges of the strips and stitch.
We fold the two patterns with the wrong side inward, lengthwise in half and sew them on a machine or by hand with a “back needle” seam. We turn both patterns right side out. We lay both parts on top of each other with the seams facing up. We fold the parts as shown in the photo. You will get a so-called “loop” Fold the 4 ends together , mark the volume of the head, baste along the drawn line. If the strip is not too tight, you can grind these 4 ends and trim off the excess. The bandage is ready.
With a bow for a girl
A headband for a girl will look beautiful if you decorate it with a bow. It’s not difficult to make even without a pattern. All you need is a bright fabric. It’s better to choose knitwear, then you won’t have to insert an elastic band. Sequencing:
- Cut out a rectangle whose length is slightly less than the circumference of your head. The exact size depends on how the jersey stretches; The width is determined as desired.
- The second rectangle from which the bow will be made should be the same width; its length when folded in half is approximately a third of the size of the headband.
- The parts need to be stitched along the long side from the wrong side and turned inside out.
- Sew up the ends to form a headband.
- Fold the second piece into a simple bow and attach it to the front.
- Use a small piece of the same fabric to fasten both parts.
Variety of colors
This felt headband looks more like a wreath. Large flowers are in the center of the craft, and closer to the edges their size decreases. The craft ends with leaves on both sides. The most lush flowers resemble autumn asters or dahlias. They are made from wide strips of felt by folding them in half. Then use scissors to cut the fold line with a “noodle”. The flower is made by winding a tight skein.
The centers of other large wreath buds are twisted in the same way. The petals are cut out according to the template. They can be simply round or have an elongated shape with a wavy edge. Each master decides this independently.
Original and beautiful DIY headbands for girls
It doesn’t take a lot of time or materials to make a beautiful head decoration. All you need is pieces of fabric, thread, scissors, a needle and satin ribbons. You can decorate the accessory in a variety of ways - with beads, ribbons, seed beads, or a finished brooch. Making a baby headband with your own hands is a pleasure.
Benefits of a headband for girls
- Tying knots takes no more than five seconds, and if there is a special elastic band inside the bandage, then even less.
- The headband will decorate both everyday and festive outfits.
- This hair accessory looks great with any hairstyle - loose hair, ponytails or braids.
- With a headband you can create extraordinary Greek hairstyles and diversify your child’s style.
- The accessory allows you to pull short, unruly hair back, and it will not interfere with the child during everyday activities.
- A wide accessory does not require constant combing of unruly hair.
The headband can be combined with any clothing: skirt, jeans, dress. This accessory is suitable for a newborn baby or a preschool girl. The accessory will immediately add zest to the outfit, making it beautiful and complete. A child's look changes depending on the accessories added to the outfit, and a headband is great for changing up the look.
Base for dressing
threading the elastic
It is better to choose soft, elastic fabric for the base. You should rely on the season in which you plan to wear the accessory. If the decoration will complement summer looks, it is better to opt for cotton, tulle, stretch, and organza. If the headband is a winter accessory, you should choose wool or velvet for wearing the accessory in the building
It is important to remember that such decoration is not an alternative to a hat, since it does not protect the head from the cold, even if it is made of woolen material. Part of the head in this accessory remains open, and this causes great harm to children's health.
It is better to choose cotton headbands for newborn babies, which will not cause allergies in children. Fur can cause irritation. During the hot period, wool and dense materials should be avoided to prevent the child’s head from sweating.
How to make baby headbands with your own hands
Materials:
- lace braid;
- tape measure;
- scissors;
- threads in the color of the braid;
- needle;
- cotton fabric for decoration;
- large beads or rhinestones for decoration.
Let's get started with step-by-step instructions for making a beautiful hair ribbon. To make a bandage with your own hands, you need:
Measure the circumference of the child's head. The length of the bandage should match the circumference of the head in centimeters. If the strip of braid is longer, the bandage will fall off. If the tape is shorter, the accessory will put pressure. Cut the lace to fit the circumference of the baby's head. Using thread and needle, connect the two ends of the ribbon
You need to sew the tape carefully. This can be done with hot glue, but then the decoration will not be as durable. For three colors, cut three strips of cotton fabric 30 cm long and 8 cm wide. Finish the lower part of the strip with large stitches
Stitch carefully. Assemble the workpiece into an accordion on a thread, slowly pulling it out. Close the strip of fabric into a circle and tie a knot. To make the circle look neat, tie a thread on the back of the product. Glue beads or rhinestones representing stamens onto the finished flower. Sew flowers onto the lace braid with threads or glue with hot glue. The decoration is ready.
How to make flowers for a headband
Materials:
- soft fabric;
- hot glue;
- scissors;
- felt.
To make a beautiful flower for a headband, you need:
- Cut 30 circles with a diameter of 5 cm from soft fabric. Such flowers will be lush and beautiful.
- Cut a circle with a diameter of 5 cm from felt. This is the basis of the future flower.
- Finish the edges of the fabric as necessary. If there are no threads sticking out of the fabric, then you can skip this step.
- Grab one of the fabric circles in the middle so that it gathers into a kind of bag. The bag may have a lot of folds, but this is normal. Glue the bag onto the felt base with hot glue.
- Fold the fabric circles into a bag and glue them onto a felt base, and then place them on top of each other. In the process, they can be fluffed to make the flower lush and beautiful.
A headband is a wonderful accessory for a little girl. It will complement any outfit and will be a beautiful addition to the image.
Where can I get detailed templates for felt products?
- The most important and probably the main source of ready-made templates is an image search in search engines (Yandex, Google). For example, if we ask “felt New Year toys templates” in Yandex pictures, then we will see a wide variety of patterns.
- Social networks (VK, Instagram), communities (liveinternet.ru, stranamam.ru, etc.), social. image services (Pinterest. Pinme, Postila, etc.)
- Children's coloring books, which can also be found in great abundance on the Internet.
- Just vector pictures on a given topic. Original vector images can also be found on stock image sites.
HandMadeObzor - ideas from all over the world
What substances does a cotton-gauze bandage or mask protect against?
A cotton-gauze bandage or mask is a special device for protecting the respiratory system. Let's look at the main situations when a bandage can be useful.
VMP can perform several functions:
- Protects against viruses that are transmitted by airborne droplets, such as influenza, whooping cough.
- Protects against dust, smog or smoke.
- It is an excellent protection during a fire, when toxic combustion products are released and there is a lot of smoke in the room for a long time.
Instructions for making a cotton-gauze bandage, face mask.
Used during a bacteriological attack, if poisonous gases are sprayed around. Useful during an accident at nuclear power plants. VMP perfectly filters dust that contains radioactive substances. Protects if the air is contaminated with ammonia or chlorine
In this case, the bandage must be additionally soaked in a solution that contains citric acid in the first case and a soda solution in the second.
It is important to know how to make a mask with your own hands and to be able to do it quickly. Let's say there is a fire in your building, but you cannot quickly leave the house. Of course, you can buy it at the pharmacy, but making it is very simple.
Yes, and it costs much less. For a cotton-gauze bandage, it is important to purchase high-quality material. It will be described a little below.
Scheme for tying a double mini bow on a fork
Charming little bows made of satin ribbons can be tied with your own hands in a very unusual way - using a real cutlery - a fork! Do not be surprised. These baby bows will decorate a funny card, a doll's hairstyle or clothes, an elastic band or a hairpin for little girls.
A master class on how to make them is presented in our photos.
And you can even tie a very tiny bow on a comb!
Headbands with flowers
For them you need to prepare an elastic band or ribbon, soft fabric (foamirin or felt), a needle, thread, glue and a measuring tape.
The work begins with making a blank for the flower. To do this, cut 4 circles from a piece of cloth. Fold the first one in half and glue the center. Place a second one on top, folded in the same way, and glue the circle again. Repeat the same steps with the remaining two blanks.
While the glue dries, measure the circumference of your head and cut the resulting length from an elastic band or ribbon. Sew the ends of the base and sew the already made flower to it.
Another version of the bandage can be made from the same materials:
- Cut 10 circles from the fabric and sew them in the center.
- Tighten the main thread to form a flower.
- Cut a length from the ribbon or elastic band corresponding to the circumference of your head.
- Sew the ends together and sew a flower to the product.
Multilayer bouquet
It is interesting to decorate the headband with different colors, making a spectacular bouquet. You've already learned how to make a rose, let's look at how to assemble another version of buds with separate petals from felt. Using one template, several parts are cut out - from 4 - 5 petals to 8, as in the photo below. Using the quilling technique, thin strips of yellow and white colors are used to twist a central dense skein.
Each petal is pressed in the center with your fingers before gluing it to the core. This tuck gives volume to the craft. Hyacinths are made from a strip of fabric cut into small “noodles” on one side. It is simply wound around the wire in a spiral.
Knitted headband with pompoms
The length of our strip is 49-51 cm, the width will be 16 loops (about 16 cm). It will be better if, to be sure, you make 5 rows of the “spikelet” pattern with your threads in order to calculate how many times this detail is repeated. At the beginning and end of the strip we perform garter stitch, and then move on to the “spikelet”. Abbreviations: knit - knit., purl - purl., row - p., loop - p., edge - hem.
Scheme of the “spikelet” pattern - the braids cross in the opposite direction.
To work you will need:
- Knitting needles 8 mm thick, regular.
- Additional spoke.
- Roving Bernat yarn (80% acrylic 20% wool, 110 m. 100g) - 2 skeins per strip and snood.
- Needle, scissors.
- A piece of cardboard for making a pompom.
- Centimeter.
We put 4 loops on the knitting needles.
1st row: edge, 3 faces. 2nd row: 5 faces, edge. do not knit (in each subsequent row we add 2 stitches in the middle of the row). 3rd row: knit 7, edge. do not knit (in order to get a smooth edge of the product, at the end of the row we remove the hem without knitting). Next R. We start by doing the faces. item 4th row: 9 persons, edge.
We knit this way until there are 16 stitches on the knitting needles. Turn the work. Next, enter the pattern (see the diagram).
- 1st. r.: hem., 3 p., 8 knits., 3 p., hem. We don’t knit it, we just transfer it to the left knitting needle.
- 2nd row: knit, purl 14, hem. didn't get stuck.
- Row 3: knit, purl 3, knit 8, purl 3, chrome. we don't knit.
- Row 4: k1, purl 14, chrome. we skip.
- 5th row: knit, purl 3, 4 stitches crossed to the right: (slip 2 stitches onto an auxiliary needle and leave for work, knit 2, knit 2 knit with an auxiliary needle), cross 4 stitches to the left: (remove 2 stitches on the auxiliary needle and leave it before work, knit 2, knit 2 with auxiliary needle, purl 3, edge 1).
Then we repeat these 5 rows again. And so on to the point where you need to reduce the work in a mirror order.
Cord for decoration
Our strip knitting continues. Let's start making the cord. To do this, you need to cast on 2 loops on the knitting needles, knit them, then without turning the work, transfer the loops from the right to the left knitting needle, leaving the working thread behind. We knit 2 persons. We do not turn the work, we continue to knit 2 knits. and again remove them to the left knitting needle. We make a cord of the required length (in total you will need 3 such cords - 2 for the headband and 1 for the snood).
Then you need to make 4 pompoms using a piece of cardboard.
Snood with purl stitch
The size of a children's snood is usually calculated as follows: head size plus 3 cm. Therefore, the width of the snood will be 55-57 cm. Of course, if it is possible to estimate the ideal width of the snood in centimeters, this should be done. You need to remember one thing: the child’s head must pass freely through the snood in 1 turn. The height of the children's snood will be 30 cm.
We cast on knitting needles 8 mm thick. 60 loops. After the snood is knitted, we will sew the side seam halfway on the right side (that is, we will sew the top 15 cm.)
1st row: edge, 58 purl stitches, edge 2nd row: edge, 58 knit, edge 3rd row: edge, 38 purl stitches, 16 stitches of the “spikelet” pattern ”, 4 p. n., edge
And then we knit in this way until we reach 29 cm. Finish the work, bind off the loops and sew the side seam halfway. Sew on the cord and pompoms.
How to tie a double bow on your fingers
YouTube channel Red Ted Art
How to make a bow
Spread your index and middle fingers. Place the tape on top and wrap it around them.
YouTube channel Red Ted Art
Wrap the long right end around your fingers again.
YouTube channel Red Ted Art
Pull the same part between your fingers under the loops.
YouTube channel Red Ted Art
Place the ribbon over your hand from top to bottom. Pass the tip through the bottom loop.
YouTube channel Red Ted Art
Pull the ribbon out and tighten the knot. After this, the formed bow will be visible.
YouTube channel Red Ted Art
Remove it from your fingers. The front side will be at the back, so face the bow towards you. Straighten the loops.
YouTube channel Red Ted Art
Trim the ends straight or as in the previous method.
We crochet an original headband for the baby for the summer
There's nothing better than a summer crochet headband. The girls look cute and love to show off in them. Four-ply worsted, cotton or linen yarn, as well as a hook no larger than 5 mm in size, are best suited.
Cast on a chain of chain stitches of the required length, but their number must be strictly a multiple of 4. Add three more lifting stitches. Insert the needle into the third loop from the hook and make three double crochets in one stitch.
Skip the next loop and then knit a single crochet. Repeat the skip and in the next stitch you already knit four double crochets. And then everything according to the diagram:
Having reached the end of the row, turn the knitting over and again follow the pattern from top to bottom. By tying a chain of air loops in a circle, you create a semblance of circular knitting. And the result is light floral motifs.
When you get to the beginning of the row, make one stitch up and the other down.
Using a single crochet stitch, connect the loops, secure the yarn, leaving the working thread longer
Carefully bring the ends of the bandage together. Before wearing, it is better to rinse under running warm water.
If everything was done correctly, the result should look like in the photo:
Fabric headband:
This fabric headband looks very original and can be easily decorated with a variety of decorative accessories.
Materials: scissors, elastic band for the head (head diameter minus 3 cm), sewing machine, satin fabric (approximate size - 30x10 cm), a small piece of fleece, sealant (non-woven fabric, for example), accessories.
- Sew the non-woven and satin strips together from the inside out, and overlay the edges. Don't touch one of them.
- Turn over the open edge and sew with a blind seam.
- Form folds and sew in the center using a machine.
- Sew the strip to the elastic, and fasten the fleece on the inside (so that nothing rubs).
- Decorate. All!
Large flower
A headband with one large element on the side looks great. A flower like the one in the photo below is made in layers. The middle is decorated in the manner described above, that is, a wide strip is folded in half and cuts are made along the fold line. Then they twist it into a tight skein and straighten the loops in all directions. The edge of the strip is attached to the last turn with threads or with a glue gun.
Next, you need to cut a lot of petals of three different sizes according to the template. Small parts are attached to the core first, the next row is medium, and the largest petals complete the assembly. To make them voluminous, the fabric of each element is cut slightly in the center at the base and the ends are placed one on top of the other.
As you can see, crafts made from felt are easy and quick to create; the headbands turn out to be bright and rich. Since the fabric is soft and warm, it is a pleasure to work with. Be sure to try making an original headband for yourself or your child! Good luck!
How to sew a headscarf for a girl
A headscarf for a girl is a necessary thing in summer. A child's skin is quite delicate and thin and is susceptible to rapid overheating. The mother must make sure that the girl’s head is protected from the sun’s influence.
Important! Before sewing a children's headscarf, you need to choose the right material. It is better to give preference to fabrics such as cotton, linen, calico, chintz
This instruction describes a step-by-step plan on how to make a scarf with an elastic band.
You will need the following: fabric, elastic band, measuring tape, sewing machine.
Before starting work, you need to measure the distance from ear to ear of the child + 2 cm.
- Select the length of the fabric according to the head measurements described above.
- Prepare a separate piece of fabric in the form of a small rectangle to decorate the elastic band.
- Select the length of the elastic to be half the size of the selected rectangle.
- Fold the small rectangle in half, wrong side up, and stitch along the length.
- Turn the resulting strip inside out and insert an elastic band, securing it at one end. In this case, do not completely remove the second end of the elastic band.
- Topstitch one edge along with the elastic.
- Pull the fabric over the entire elastic band (it should look like an accordion) and stitch the second edge. The elastic band for the scarf is ready.
- The edges of a large rectangle are beautifully decorated around the perimeter: folded on both sides and stitched.
- Place the resulting “accordion” for the scarf onto the cut.
- Fold the edge of the fabric in layers and stitch. In this case, all seams must remain inside.
- Do the same on the other side of the fabric, attaching the other side of the elastic.
The scarf is ready!
You can learn more about how to sew a headscarf using this video tutorial https://www.youtube.com/watch?v=1MuO40PNuGw.
Headscarf for girlsAcute flower
To make an original flower with sharp petals, you need to fold the ribbons correctly. To do this you need:
- Take a ribbon of the required length. Fold it at a right angle.
- Secure the fold with a bobby pin and iron it.
- Fold the horizontal part of the tape in half, turning it towards itself. Iron.
- Wrap it onto the second part of the tape, moving it from a horizontal to a vertical position. Iron to secure the folds.
- Make the required number of petals. Gather the lower flat part with a thread, fixing the end and gathering it.
- Close it in a circle, getting a flower from a certain number of petals.
Felt headband
Felt is a material that is perfectly suited for the job. It does not wrinkle and has neat edges. You can make very beautiful flowers from felt to decorate a headband, and not just flowers.
This work uses different flowers, which can be made from felt using glue or a needle and thread. After the flowers are made, they are sewn on with a wide elastic band. You can take any sizes of flowers, from 4 to 10 cm. It all depends on the age of the girl and the purpose (holiday, photo shoot). Flower stencils are located at the end of the article.
Flowers are easy to make. You only need to print or draw a few stencils by hand. Anemones turn out delicate and beautiful, roses and hyacinths are great for decorating a DIY headband.
Rose and hyacinth. For hyacinth, cut out a strip 20 cm long, height - from 10 to 15 cm. Bend the strip in half and make cuts, not cutting 1.5 cm to the end. Roll the workpiece into a tube and secure the leg.
For anemones you will need 6 petals, cut in 2 places and a black cut fringe - the middle detail. Don't forget the leaves for the flowers. It is better to take an elastic band that matches the color of the princess’s hair.
And here are anemones with different leaves and centers. Choose which ones you like best.
What to make from
If this is a light summer or home look, then it is better to choose a headband from breathable fabric, knitwear, cotton, chiffon, cambric. A winter headband is a great option for those ladies who don’t like to wear hats but care about their health. For knitted models, it is recommended to choose wool, linen, acrylic threads and yarn. They keep warm well.
Shawls, bandanas, scarves, kerchiefs, ribbons, even denim and lace are also used.
Important! You can choose any material, the main thing is that it holds well, does not slip off the hair, but does not put pressure. The scalp should breathe and blood circulation should not be impaired.
You might be interested in this Patterns for dresses and kimono robe: sewing it yourself Winter headbands
Materials
The choice of bandage material is varied, depending on the style and purpose. Summer models for girls are made from textiles (cotton, linen, knitwear, velvet, nylon, stretch, tulle, guipure, organza) and fine yarn. Textile headbands can be openwork, lace, knitted, or elastic. The design can be anything.
Knitted models are made from cotton, linen, acrylic and wool threads. If the choice of fabric has no restrictions, the use of yarn implies its own rules:
- Yarn models are not an alternative to a hat, no matter how beautiful they look. There is no need to risk the child’s health; the head should be covered completely, and not just the ears and forehead. The only possible exception is a wide model in the form of a turban, which has practically no open areas, so it will reliably protect the girl’s head from bad weather, cold and wind.
- Newborns should not wear bandages made of acrylic or wool: it is impossible to know in advance what the skin's reaction to the fiber will be. Synthetics are excluded in infancy, and wool is not suitable for every child.
- On a summer day, it is better to decorate the girl’s head with a bandage made of thin threads: this way the head will not sweat, which means the bandage will not create discomfort.
When creating an accessory, not only the base (the headband itself) is used, but also various additions that are pleasing to the eye. It is worth noting that decorative elements must correspond to the baby’s age, be securely fixed and not have a piercing or sharp edge.
Foamiran can be used as decoration in fashionable and elegant headbands, as well as felt, fabric, polymer clay, beads, brooches, feathers, rhinestones, sparkling crystals, sequins, beads, lace braid, ribbons, buttons.
Knitted patterns
Accessories knitted with knitting needles or crochet are in no way inferior to textile options. Sometimes they resemble light lace, and due to patterns of different density and volume, they add many beautiful styles to the design treasury.
Decorative techniques for knitted accessories include many elements. These include layered flowers, ruffles, ruffles, contrasting stripes, modest and lace knits, braids, all kinds of weaves, bows, knots and much more. Depending on the type and thickness of the yarn, such headbands can be decorated with beads, brooches, rhinestones, sequins, ribbons, buttons and even beads.
Techniques for making a ribbon bow
Nowadays, there are a large number of ideas for making bows from ribbons. The technique for performing them is simple, so even a novice needlewoman can cope with this task.
The most common types of bows are:
- simple classic;
- twisted;
- double;
- fluffy;
- multilayer;
- triple;
- bow-ball;
- flower bow.
These methods of making exquisite ribbon jewelry are the most popular. The kanzashi technique is also very often used. This Japanese style involves weaving elegant bows with different curls and additional decorative details.
Knowing the manufacturing technique and following step-by-step instructions, every creative person can create colorful and interesting bows from a variety of ribbons. And then any everyday thing will become elegant.
Headband made from Solokha fabric - master class
The Solokha headband for a little girl can be called universal. This headband is suitable for any hair, especially convenient in summer. A DIY solokh headband is a great solution for summer hair.
We make a pattern for OG = 48 cm. At the top are the main 2 parts, at the bottom is the part for the elastic band.
To work you will need:
- 2 pieces of fabric: 58/12 cm and 20/12 cm.
- Elastic band 10 cm.
- Sewing machine or needle and thread.
- Centimeter, scissors, paper.
- Tailor's pins.
We make a pattern on paper. For a head circumference of 48 cm, we will cut out a 20/12 cm rectangle for the elastic band and 4 more rectangles - 29/6 cm - for the main bandage. Measuring 10 cm from the end of the main part, we make 2 cuts at the top and bottom (this will be a bow). We pin the pattern to the fabric, add 1 cm seam allowances on all sides and cut out 5 parts.
We put the 2 main parts with the right sides facing each other - we will grind them down.
We sew it down, leaving a small hole through which we will insert the part with the elastic band. We sew, retreating 1 cm from the edge of the part.
We turn the main parts with the “ears” onto the face. We take a piece 20/12 cm and sew it along the length. Turn it inside out. Then use a pin to insert the elastic inside this part.
We secure the elastic band on both sides with two lines. You should have an assembled part. It is advisable to stitch this part along the entire length - in the middle.
Next, take 1 part with “ears” and insert the part with an elastic band into the hole that we left. We combine the edges and sew on the machine. We do the same with the 2nd part with the “ears”.
Bow on the headband
The simplest version of a felt headband is a metal hoop, lined or covered with felt, with a small bow attached to the side.
A pattern of a beautiful bow with dimensions will help you cut the fabric without loss. It's a jagged bottom piece, a main piece, and a thin center stripe to tie them all together. You can connect the pattern pieces using either thread or hot glue.
Benefits of a headband for girls
- Tying knots takes no more than five seconds, and if there is a special elastic band inside the bandage, then even less.
- The headband will decorate both everyday and festive outfits.
- This hair accessory looks great with any hairstyle - loose hair, ponytails or braids.
- With a headband you can create extraordinary Greek hairstyles and diversify your child’s style.
- The accessory allows you to pull short, unruly hair back, and it will not interfere with the child during everyday activities.
- A wide accessory does not require constant combing of unruly hair.
The headband can be combined with any clothing: skirt, jeans, dress. This accessory is suitable for a newborn baby or a preschool girl. The accessory will immediately add zest to the outfit, making it beautiful and complete. A child's look changes depending on the accessories added to the outfit, and a headband is great for changing up the look.
Lush bow made of paper ribbons for gift wrapping
Many people love to receive and give gifts, but for a gift to evoke the greatest admiration, it needs to be beautifully packaged and decorated. For this purpose, you can use regular newspaper, craft paper or any other paper that is not too thick. If you want without extra costs, then take a regular sheet of newspaper and cut it into strips, the length and width of the strips can be different, it all depends on the size of the gift box, it is advisable to make the size of the bow to match it. Next, mark the middle and glue both ends of the paper tape to it, forming loops. Then we collect the resulting curls together, glue them together and attach them to the gift. This is how quickly, simply and inexpensively you can wrap a gift beautifully)
Simple Solokha
The standard headband is created from strong fabric without the use of any auxiliary materials. The bow can be made in two ways: in the form of sharp or round ears. To create this beautiful headband, you need to take fabric with a bright polka dot or flower pattern. To create a solokh on your head with your own hands you will need:
- high density cotton fabric;
- quality threads;
- sharp scissors, special chalk, pins, needle;
- sewing machine.
Stages of work:
Calculate the dimensions of a piece of material. The width should be equal to twice the selected width of the item plus the width of the allowances. The length should correspond to the circumference of the head and the selected length of the ears along with the knot. It is best to make a seam allowance of at least 1 or 2 cm. Cut out a strip of material of the selected size, fold it lengthwise with the outside in. Make the ears using a pattern. Sew the bezel completely using a machine, leaving one part with a 4 cm long hole through which you will need to turn the part to the outside
Carefully turn the straw inside out and sew up the hole. All that remains is to steam the bandage and tie it on your head, giving the ears the necessary shape
If you take material with a low elastane content, you won’t have to straighten the product every time: it will stay perfectly on your head. To properly make a solokh headband, it is better to use a pattern.
Twisted bow
To make an original lush bow, you should adhere to the following rules during production:
- Take several ribbons of the same length. Fold one to form crossed loops. Secure the ends at the bottom. Repeat this action with all ribbons. the more of them there are, the more magnificent the bow will be. To avoid chaos, you should not take more than 5 tapes.
- It is worth paying attention that twisted tapes will overlap one another. Each subsequent one should be smaller in size than the previous one.
- When everything is done, they need to be placed one inside the other and secured with a needle and thread.
- Wrap in the middle with a separate ribbon and secure at the back. Attach it to the hairpin either with the same ribbon that collects the bow in the middle, or place it on a glue dot.
How to make a cotton-gauze bandage with your own hands
Making a cotton-gauze bandage for the face at home is not an insurmountable task. Parents of schoolchildren and children attending kindergarten often encounter this. To make a cotton-gauze bandage with your own hands for children in kindergarten or school, as well as for other purposes, you should read the instructions, which indicate the material, pattern, dimensions of the material and the finished product. Let's talk in more detail about each of the listed points.
Required material
From the name of the bandage it becomes clear what materials are used to make it. To sew a cotton-gauze bandage with your own hands, you need to prepare the following material: gauze or bandage, cotton wool, thread and a sewing needle.
Materials must be chosen correctly. When purchasing a bandage, you should give preference to denser options. A bad bandage is immediately visible. The threads from which it is made are rare. In this case, the bandage will not create a barrier to malicious agents.
A good bandage can be determined by its density, which is usually indicated on the packaging. A density of 36 g/m² is considered good.
The quality of the wool is also of great importance. It should not generate dust, otherwise it will only harm the respiratory tract (dust and air will penetrate into the bronchi). High-quality cotton wool consists only of cotton; chlorine and other chemical bleaches are not used in its production. Cotton fibers should stretch, not crumble.
Product dimensions
A cotton-gauze face mask should be of such size that it covers the nose to eye level, mouth and chin. Only the mouth and eyes remain open. There should also be no gaps on the side (cheeks). The ties should be long enough to be secured to the back of the head.
There are standard sizes of the bandage that are suitable for both children and adults:
- The length of the bandage is 90 centimeters, this includes the length of the entire bandage including the ties;
- The length of the part that covers a person’s mouth and nose (from the beginning of some ties to the beginning of others) is 20 centimeters;
- The length of the ties is from 30 to 35 centimeters;
- The width of the product is 20 centimeters.
Making a cotton-gauze bandage
When given the task of sewing a protective bandage, a person may have a question: how to do it? It really won't be difficult. There are 2 options for manufacturing this product. The manufacturing method depends on what kind of material will be used by the person.
To make your own bandage, you need to take 100 grams of cotton wool and a bandage 14 centimeters wide or a piece of gauze 90 centimeters wide (this option is simpler and less functional and is used in emergency cases when there is no time to sew a bandage).
If you take a bandage, then its length should be 60 centimeters (2 pieces of 60 each). Making a cotton-gauze bandage from a bandage:
- Make a square out of cotton wool, each side of which is 14 centimeters, and the thickness of the square is about 1 centimeter:
- From the bandage, measure a segment equal to 60 centimeters in length;
- Place the bandage on a straight, flat surface and smooth it well. You can use an iron for this;
- Place a square of cotton wool, which was prepared in advance, on the edge of the bandage;
- Wrap the cotton wool in a bandage;
- To secure the layers, they can be sewn by hand with large stitches;
- From the second piece of bandage, make ties that need to be sewn so that the edges do not fray;
- Thread the ties at the top and bottom of the headband blank;
- Sew the side parts of the bandage using a needle and thread using small stitches.
This bandage will reliably protect the upper respiratory tract in an emergency.
Multi-layered puffy bow
Let's take a closer look at how to make it yourself with your own hands, which is suitable for decorating a hairpin or headband. This product is also often used to create hairstyles for schoolgirls.
- You will need to prepare a base, which consists of 2 layers, they are connected to each other. These parts are for the rear.
- To get the outside of the product, you need to create a simple bow.
- Upon completion of the work, all the individual parts are glued together, and a center made of the same material is placed in the center.
- Receives a voluminous bow that can become a hair decoration.
Craftswomen also like to make three-dimensional products from a combination of three or four layers.
Variations on a children's theme
If you need to make bows to decorate a girl’s hairstyle, you should pay attention to the possibility of making the following types of bows:
- Two-color. There are several varieties. Different layers of petals are made in different colors. A narrow ribbon is laid out on top of a wide one of a different shade. Petals are made from the two simultaneously.
- A grosgrain bow will be the perfect addition to decorate your clothes. Moreover, due to the density of the fabric, such a product can be used on outerwear.
- Kanzashi bows are a real work of art that will attract attention to your hairstyle. They can be made in different ways, but those that combine several colors always look impressive.
If you haven't decided which bow to make, pay attention to the selection of photos. Here you can find any option that is suitable for a particular case.
Handmade bows
What admiration is sometimes caused by bows made from ribbons decorating a gift. In this article we will talk about how to make a large and fluffy bow with your own hands. It may seem like a troublesome and difficult task, but it is not. The essence of the master class is a special stencil.
You need to prepare:
- Tape 2.5 cm wide
- Corrugated cardboard
- Needle and thread
- Glue gun
Such bows in the form of balls can be a decorative element, also suitable for decorating gifts, and can also be used as a basis for creating hair clips.
For example, if a preschool institution organizes a Day of Knowledge, then such a bow can be attached to the girls. Then they will feel like real students who are about to go to school! It is important to know how to make a bow from ribbon.
wavy flower
You can create a delicate original flower hair clip if you follow these step-by-step instructions:
- Cut the tape to the required length in the amount of 7-12 strips.
- Fold the edges inward to create bevels on the sides.
- Then fold the curved edges in the opposite direction, obtaining a kind of loop-shaped petal.
- Make the required number of petals, collect them on a thread, wrap them in a spiral, laying out the shape of a flower.
- Place a large bead in the middle.
- Secure everything with a hairpin.