New Year's holidays are ahead and it's time to start decorating. You can make decorations for the New Year from a variety of materials, such as paper, beads, pine cones, and even old CDs. But in this article we will talk about New Year’s crafts made from satin ribbons. Crafts can be simple or made using a special Japanese technique - kanzashi.
Herringbone
Let's start our crafts according to tradition with the symbol of the New Year - the Christmas tree. Some people prefer to put up a large Christmas tree, while for others such a pleasure is an unaffordable luxury (pets or small children consider it their duty to knock over a forest beauty decorated with lanterns and New Year’s garlands). It’s okay, you can decorate your apartment with a miniature Christmas tree, which can be made from satin ribbons.
#1 Making a Christmas tree from ribbons with children
If there are small residents in the house, they must participate in the decorating process. Plus, creating together is a great time! Every child can make such a simple Christmas tree from a dry stick and various ribbons.
#2 Miniature Christmas tree made of ribbons
And here is a more complex version of the Christmas tree made from ribbons. This craft can be used to decorate not only your home, but also, for example, your desktop. To make it you will need ribbons, a foam cone, a lot of safety pins and a bow for the top. See the picture below for a step-by-step master class.
#3 Christmas tree made of ribbon and beads
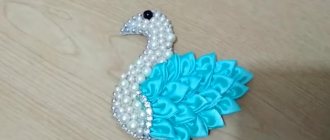
You can make a Christmas tree from ribbon, combining it with large beads. This craft can be hung on a real Christmas tree or given to someone as a souvenir. See step-by-step photo instructions below.
#4 Christmas tree in kanzashi style
And here is a mini Christmas tree made using the kanzashi technique. You will have to tinker with such a craft, because Japanese technology is for patient needlewomen. This craft will take a lot of effort and time, but the result will be truly impressive! Petals made from satin ribbons are glued onto a paper cone using glue. Additionally, the finished tree can be decorated with beads. By the way, the Christmas tree does not have to be monochromatic; you can combine colors to your taste.
#5 Christmas tree made of flowers using the kanzashi technique
But here is a very similar craft to the previous one, but there is only one difference: Christmas tree No. 4 is made from individual petals, and this Christmas tree is made from flowers. First you need to make petals from ribbons, then glue the flowers (5 petals each), and only then glue the flowers to the paper cone. See step-by-step instructions with photos below.
#6 Christmas tree hairpin using kanzashi technique
Using the kanzashi technique, you can make various decorations, in particular hair clips. For such a hairpin you will need: hairpin, ribbons, beads. See below for how to make a hairpin.
#7 Herringbone ribbon hairpin
Here is another original way to decorate a hair clip with ribbons. The result is a miniature Christmas tree that will perfectly complement the New Year's image. How to make a hairpin, see the picture below.
#8 Herringbone hairpin
You can also decorate a hairpin in this simple way: with an ordinary narrow ribbon and a star-shaped bead. It’s so easy to make ordinary hair accessories truly festive, and our step-by-step master class will help you with this.
#9 Kanzashi Christmas tree made from ribbon - a souvenir for the New Year
#10 Christmas tree made of ribbons
Look for more Christmas trees:
Christmas tree decoration using kanzashi technique - princess
A Christmas tree toy in the shape of a princess will win the hearts of girls, each of them dreams of being the most beautiful and most elegant on New Year's Eve. This will definitely happen. And on the Christmas tree there will be a miniature of a fairy-tale princess that you can imitate.
This tutorial shows how to make a Christmas tree decoration in the shape of Snow White dressed in a ball gown. The main thing is to get a ready-made cabochon of a suitable theme, and a beautiful dress can be made from all kinds of ribbons and lace using the kanzashi technique.
For a unique elegant Snow White you will need:
- triangular felt base in pink or red color - 6*6 cm;
- 15 pieces of soft pink satin ribbon - 1.2*4 cm;
- red lace runner (cut the strip in half lengthwise), lengths of 15.5 cm, 11 cm, 8 cm and 7 cm will be used;
- 30 pieces of white half beads - 4 mm in diameter;
- 4 pieces of red ribbon - 2.5*7 cm;
- 4 pieces of white ribbon with lurex - 1.2*7 cm;
- 1 piece of soft pink ribbon - 1.2*3.5 cm (for wrapping the cabochon and highlighting the princess’s waist);
- silver tire;
- cabochon Snow White;
- silver cord for the loop of the Christmas tree decoration - 12 cm.
Choosing the right cabochon is already half the success in such work.
It will help create the look of a beautiful princess, and simple ribbons and lace will create a fairy-tale dress. Christmas tree toy in the form of a princess step by step
1. The size of the toy directly depends on the cabochon. Usually such parts are not large, so the given size of the skirt template is optimal. The flounces of the ball gown will be made from soft pink narrow stripes and lace tracks, and beads are necessary for additional decor.
2. Make spiky petals using soft pink satin stripes. Fold in half at a 90 degree angle. Then bend it again, highlighting the house corner in the center. A pocket will be visible on the reverse side. This is the detail that is needed later.
3. Prepare a pink felt trapezoid. Cut the longest strip of red lace, 15.5 cm long. Glue white beads in a row.
4. Glue the strip to the wide side of the A-line skirt, creating a beautiful frill (the first flounce), forming an even fold.
5. On top, overlap a layer of 6 pointed petals of soft pink color.
6. Next, continue assembling the fluffy ball gown, layering similar strips, only they will decrease in length. For example, the third layer will be a track of red lace 11 cm long with white beads.
7. The fourth layer is 5 soft pink petals, the fifth is 8 cm long red lace with beads, the sixth is 4 soft pink petals, the seventh is the last 7 cm piece of lace. Make the last neat fold at the top.
8. A beautiful lush bow will be visible on the back of the dress. Prepare red stripes and white narrow tracks with lurex to model four loops. Align them lengthwise, bend and singe.
9. Assemble a bow from four parts.
10. Now the main parts are assembled: the hem of the dress with frills and a beautiful bow. Time to use the cabochon.
11. Glue the bow and the bottom. Attach a belt to the beauty's waist, which is not only designed to decorate the entire product as a whole, but also to hide the junction of the main parts. The belt will consist of a soft pink satin ribbon decorated with a silver splint.
12. Glue the ends of the lace into the center of the structure to form a loop. Decorate the top with a cabochon depicting Snow White.
The unique Christmas tree decoration is ready. The princess looks very cute, such an accessory will definitely take its rightful place among other toys.
Snowflakes
From ribbons, especially using the kanzashi technique, incredibly beautiful snowflakes are obtained. You can decorate not only a room with such a craft; a snowflake made from ribbons can be hung on a New Year tree or used as a decoration.
#1 Simple snowflake using kanzashi technique
It is best to start your creative journey in Kanzashi with simple crafts, such as this snowflake. You can master two types of sharp petals without much difficulty. By the way, you can glue the petals in your own way. Well, look at the author’s version on the step-by-step MK.
#2 Another simple kanzashi snowflake
And one more option for a not-so-complicated snowflake using the kanzashi technique. By the way, such a craft can be attached to a headband or hairpin and complement the New Year's image with an unusual handmade decoration.
#3 Snowflake kanzashi on the headband
Need to complete the look of a little snowflake? A snowflake using the kanzashi technique on the headband will cope with this task with a bang. Step-by-step MK in the picture below.
#4 Snowflake using kanzashi technique with several types of petals
This craft is more suitable for experienced needlewomen. To make a snowflake, a large number of petals are used, the production of which requires special skills. Well, if you are confident in your abilities, then watch MK and create!
#5 Snowflake made of ribbons and beads
And here is a version of a kanzashi snowflake with bead decoration. In addition to painstaking work with ribbons, you will also have to work with beads and weave a small flower. Please note that this craft includes several types of petals, each of which has special manufacturing features. See the picture below for a step-by-step master class.
#6 DIY snowflake made from ribbons
Snowflakes made using the kanzashi technique look unique, but a snowflake made from pieces of ribbon looks no less impressive. To make it you will need tape and a lighter (you can use a candle) to solder the parts.
#7 Christmas tree toy Kanzashi Snowflake
#8 Double-sided Snowflake made of narrow satin ribbon
#9 New Year's snowflake kanzashi with curls
#10 Headband Snowflake kanzashi made of satin ribbons
For more snowflakes, see the article:
Kanzashi crown for the New Year: how to please the little princess and the big queen
Any decoration has magical powers for a girl, girl or woman. To create a festive mood, a New Year's tiara or kokoshnik is suitable - whichever you like best.
As a basis for the crown, you can take a wide or narrow hoop, or even an ordinary, unremarkable crown from any toy store. It is better to choose two types of ribbons for decoration - satin and organza. This way the crown will look truly royal.
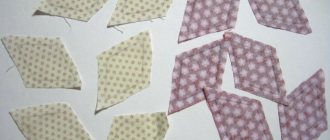
Here we will use a different technique. For a beautiful crown, you will have to cut the ribbon into squares. Therefore, it is better if the tape is wide. The only thing this technology has in common with the previous one is that the blanks also need to be folded into triangles. But their “production” does not end there - now the corners need to be pulled together and secured.
vnitkah.ru
To make the decoration even more beautiful, try placing satin and organza triangles on top of each other, and only then connecting the ends. You can also attach a bead in the middle of the resulting petal.
Connect the petals together with glue to form a crown. How to do it? Look at the petals - they look like a diamond. Keeping this association in your head, glue the side tops of the blanks together.
The decoration should not be flat, it should be voluminous so that such a “crown” can be placed on the table, and it would stand upside down without any problems.
Having completed the first circle, fasten the last petals together and place the workpiece on a felt round base. Now start creating the second circle: apply glue to the bottom top of the diamond and attach it between the two petals of the first circle.
Glue the finished crown to the rim. The original decoration is ready!
And this is how you can make a kokoshnik-kanzashi:
Wreath
The Christmas or New Year's wreath is an exclusively Western tradition that came to our homes from Hollywood films. Well, for those who accept Western values, we have prepared several master classes on creating wreaths from ribbons.
#1 New Year's wreath made of bows
A very simple ribbon wreath for the lazy. To make it you will need a base and ribbons of different colors. Tie the ribbons into bows around the base and the wreath is ready!
#2 Braided ribbon wreath
You can weave a wreath from ribbons. This product looks very impressive, but in fact there is nothing complicated in its manufacture. Follow the step-by-step instructions and you will succeed!
#3 Miniature New Year wreath using kanzashi technique
A mini wreath can be made from kanzashi petals. You need to make basic petals from ribbons, glue them in threes and connect them into a circle. The finished wreath can be decorated with a miniature bow.
#4 Miniature wreath made of ribbon and beads
A miniature wreath made of ribbon and beads can be hung on a Christmas tree as a decoration, or you can give it to someone as a handmade New Year's souvenir. To make it you will need fishing line, ribbon and beads. You can also use additional decorative elements, such as a pendant and a bow.
#5 Ribbon wreath for kids
Surely in kindergarten they gave me the task of doing some kind of New Year's craft with the children. Take note of this simple Christmas wreath. You will need: a base for a wreath, many pieces of different ribbons, glue.
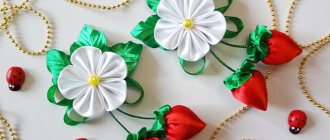
#6 Christmas wreath of satin flowers
And here is a version of a New Year's wreath made of satin flowers. The flowers turn out to be very realistic and it seems that making such a wreath will take a lot of time. Actually this is not true. Making such a craft from ribbons is quite simple. You can verify this through MK.
#7 Ribbon wreath: making New Year’s crafts with children
Here’s another great option for a New Year’s craft that kids can handle. You will need: a base, many ribbons of different colors and sizes, scissors. Cut the ribbons into strips of equal length and tie in knots around the base. The wreath is ready!
#8 Simple wreath made of satin ribbons
a very simple wreath made of satin ribbons. To make it you will need: a foam base, tape, safety pins or glue. Wrap the piece with ribbon and decorate it as you wish: with a bow, a snowflake, or leave it like that.
#9 Christmas Wreath Kanzashi
#10 New Year’s wreath “Snowman” made of ribbons
You'll like it:
Christmas ball made from bias tape
This lesson shows one of the options for decorating a Christmas tree - an elegant ball. It will turn out colorful and light, and will not break if it falls on the floor. You can rightfully consider it a creative handmade product that you can repeat and decorate your Christmas tree or give to friends.
The ball is made without a base. If you prepare fittings of the same size, you will get a product about 5-6 cm in size. So the decoration will be quite noticeable.
So, for work you will need:
- 8 pieces of red bias tape - 1.5*7 cm;
- 8 pieces of pink bias tape - 1.5*6 cm;
- 8 pieces of yellow bias tape - 1.5*5 cm;
- 8 pieces of gold bias tape - 1.5*4 cm;
- 8 pieces of white bias tape - 1.5*3cm;
- golden tire;
- half (longitudinal) lace Track - 2*20 cm;
- golden huggers: round and bell – 1 pc. each;
- crimson half bead with a diameter of 8 mm – 1 pc.;
- gold cord.
As you can see, what is used here for working in the kanzashi technique is not a standard satin ribbon, but a denser, elastic bias tape. The width of the segments is the same, they differ only in length, the stripes are gradually shortened, since the rings of the New Year's ball will be created from the parts. If you don’t have bias tape, then choose some other dense material; if you use satin or brocade ribbon, you will have to use a base - for example, a tennis ball.
New Year's kanzashi ball step by step
1. Cut the bias tape into lengths, guided by colors. The lengths are indicated in the list: 7 cm, 6 cm, 5 cm, 4 cm, 3 cm. Assemble the parts in pairs. You don’t have to singe the strips right away; it’s rational to do this at the second stage.
2. Fold the pieces in half lengthwise and solder the ends together using a lighter. Thus, the dense material will be doubled, and the ends will be singed and will not crumble.
3. Next, glue the bent pieces of the same length together in pairs. You need to get rings; to do this, connect each end to the other end at an angle of 90 degrees. The result will be rings - three-dimensional parts of the same shape, but decreasing in size and of different colors. These will be the starting layers for the interesting petals.
4. Then glue the resulting droplet rings into each other. The result is a convex petal. Assemble the parts like a pyramid.
5. The last white ring will be the smallest. It is difficult to model due to the short length of the segments. Glue it in carefully last. There will be a hole in the center of the five-layer petal. In total you will need 4 identical five-layer petals.
6. Glue the individual parts (these will be quarters of a volumetric ball) together. Make smooth and clear joints. Prepare a gold splint to mask the seams, apply it to the parts from top to bottom to measure the length.
7. Glue the ball together and glue pieces of the tire crosswise to enhance the decoration. In this case, you need to use a minimal amount of glue; you can only drop it into the upper and lower poles of the ball, then press down the ends of the segments.
8. Decorate the bottom of the toy with a gold hugger and a pink half-bead (they will not only decorate the product as a whole, but will also hide the joints that will remain in the glue). Press with your finger exactly at the center point.
9. For the top of the decoration you need lace and a bell hug with a cord. Thread the lace onto a thread, pull it off, and glue the resulting fluffy cloud to the bell (insert the assembled tip into the small hole). But first insert a loop of gold cord into the hole of the bell.
10. Glue the top to the ball. The Christmas tree decoration is ready, its shape is standard, it’s easy to hang the product on a green thorny branch.
This beautiful handmade ball is unique and has no repetitions. You can make a whole set of similar products of different shapes and sizes.
Balls and other Christmas decorations
Ribbons make very beautiful Christmas tree decorations, for example, balls, bells, cones, lanterns and more. We have found simple and complex MKs for you, with which you can create the Christmas tree of your dreams!
#1 Simple New Year's ball made of ribbons
To create such a Christmas ball you will need: ribbons, safety pins, foam blank. Roll the ribbons into a ring and secure them to the workpiece with a pin. Continue until the entire ball is decorated with ribbon rings.
#2 Christmas ball made of satin ribbons
To make such a ball you will need: a foam blank, tape cut into strips slightly larger than the diameter of the blank, two safety pins.
#3 New Year's ball made of ribbons using the artichoke technique
And here is a slightly more complex version of the craft. The whole difficulty actually lies in the fact that you will have to spend your time. You can arrange the colors to your taste, and you can learn the secrets of the “artichoke” technique from the step-by-step MK.
#4 Christmas ball made of ribbons
Here is another option for decorating a blank with a narrow ribbon. This MK uses glue instead of safety pins, and there is no need to cut the tape itself into pieces. The tape is wound obliquely through two points on the surface of the ball. Each time you pass the tape through one of these points, drop a drop of glue and secure a new layer. Step-by-step photo instructions are given below.
#5 Artichoke style cone
From ribbons you can make not only a ball, but a cone, for example. To do this, you will need a special blank, ribbons of a suitable color and safety pins in large quantities. Cut the ribbons into equal squares, wrap them into a triangle and secure them to the workpiece with a pin.
#6 Ribbon cone
And here is another version of a ribbon cone, only easier to make, but no less effective. To make it you will need a cardboard blank, a narrow ribbon of a suitable color and glue. The step-by-step process of making the craft is shown in the photo below.
#7 Icicle for Christmas tree made from ribbon
A very simple craft. To make such an icicle you will need a narrow ribbon, a pencil and thread. Wrap the tape around the pencil, secure it and leave it overnight. In the morning, remove the ribbon, sew on a thread and you can decorate the Christmas tree!
#8 Bell and lantern made of ribbons
#9 Kanzashi lanterns
#10 Kanzashi Christmas tree cones
#11 Christmas balls for the Christmas tree made of narrow ribbon
#12 Kanzashi Christmas balls without base
#13 New Year's ball kanzashi
See more ideas for New Year's balls:
New Year's composition.
To make a New Year's composition, in addition to a Christmas tree and a snowman, I needed:
- polyurethane foam (dried) - for the base;
- ceiling tiles - for the base;
- padding polyester - the basis for snow;
- foamed polyethylene foam - for snow;
- shaving machine - for snow;
- polystyrene foam - for gifts;
- paints - for gifts;
- glue “Titan”;
- toothpicks.
First the basics. I needed a “piece of snow-covered forest.” In principle, there are many options for how to do it. I used what I had available.
After foaming the door jambs, a piece of dried foam remained. She didn’t let her husband throw away the scraps of foam and in time she dragged a large piece of foam into the hole. I knew that sooner or later it would come in handy in needlework.
This piece of foam was used:
- I trimmed the foam. This will be a bump.
- I glued the foam to a piece of ceiling tile.
- I glued a piece of padding polyester on top and cut it off.
- Turned everything upside down. I folded the edges of the padding polyester and glued them to the ceiling tiles.
The question that remained was how to make artificial snow from scrap materials? After searching the Internet for information, I found the article “Snow in scrap.” The author of the article, Svetlana, gave wonderful advice on how to make snow from polyethylene foam.
It seems to me that this is the best way to make artificial snow from scrap materials. Svetlana, thank you and special thanks to your husband!
The essence of this method is simple: shave the polyethylene foam. And it turns out to be very realistic snow. Below in the final photos you can see that this snow is very similar to real snow.
Having prepared the amount of snow I needed, I glued it to the base. To do this, I applied a thick layer of “Titan” glue to the padding polyester. And on top, I sprinkled snow on the glue and pressed it lightly.
After covering the entire base with snow, I installed the Christmas tree. To do this, I inserted three toothpicks into the cork of the Christmas tree, and then pierced the base with them. I added more glue in the gap between the cork and the snow and pressed the cork to the base.
Separately, I would like to say that when assembling the New Year's composition, I had to give up my favorite hot-melt glue. Since this glue is hot, and the base of the composition is all synthetic and warps and melts due to temperature.
All that remains is to make beautifully “wrapped gifts” under the Christmas tree.
To do this, I cut foam cubes with a sharp knife.
I painted the foam cubes in different colors. And tied ribbons like holiday wrapping.
I pierced the “gifts” with toothpicks and stuck them in the snow, just like the Christmas tree.
Finally, the New Year's composition is ready!
This is what I got - a Christmas tree made of ribbons, a snowman made of cotton pads, gifts and snow!
I photographed the work on real snow. Look how homemade snow looks little different from the real thing.
Now, this snowman by the Christmas tree will decorate our New Year holidays.
And if you put white tinsel around the New Year’s composition, it will be even more interesting.
This is the New Year's fairy tale I came up with.
Friends, if you found my master class useful, share it with your friends!
New Year is the time when your most cherished dreams come true. It's time for miracles, garlands and firecrackers. And how can we do without a beautiful green Christmas tree? It is an indispensable attribute of the New Year, because it is the Christmas tree that creates the festive atmosphere.
For those who do not want to cut down a living tree, there are many alternative options for artificial Christmas trees, including the Kanzashi Christmas tree, which you can make yourself. Creating it is quite simple, the main thing is to stock up on the necessary materials and time.
Various products made from satin ribbons are quite popular today. Perhaps their secret lies in the fact that the ribbons look beautiful, stylish, and are universal. You can see this for yourself if you decide to create a kanzashi Christmas tree from satin ribbons. It can become both a worthy alternative to a live Christmas tree, decorating your home, and a good gift for your loved ones.
A green decorative tree, created with your own hands, will give you a festive atmosphere and help preserve a living tree.
Angels
Angels for the New Year also came to us from the West. However, the New Year holidays are followed by Christmas, and if your family is one of the believers, then why not make a craft for the future, especially since the ribbons make very cute angels.
#1 Simple angel made from ribbons
If you do handicrafts with children, especially those of preschool or primary school age, then be sure to take note of this simple but completely original craft made from ribbons. You will need tape, a stapler and beads.
#2 Angel for the Christmas tree or for table decoration
Here’s another very interesting craft that can be hung on a Christmas tree or decorated with a Christmas table. You will need a wide ribbon, a bead, a piece of wire (for the halo) and decorative elements.
#3 Angel using kanzashi technique
#4 New Year's Angel
#5 Mini Christmas Angel Kanzashi
Photo of a Christmas tree decorated with bows
You can come up with a lot of options for decorating your Christmas tree when the bows are ready and waiting in the wings. The basic rule: when decorating the main attribute of the New Year, there is no need to clutter the structure with crafts. Several design options:
- Traditional golden bows created a magical effect.
- A Christmas tree decorated with red bows and beads will shine and shimmer.
- A Christmas tree decoration made from a bow decorated with a pine cone instead of a bell looks original.
- On a lush, tall tree, next to the bows, you can hang other handmade crafts.
Bow
What's New Year without gifts? What is the most important thing in a gift? Well, of course attention and packaging! A beautifully wrapped trinket will bring much more pleasure! A chic bow, which you can make yourself from ordinary ribbons, will help complete the gift wrapping.
#1 Christmas ribbon bow
A variation of the classic Christmas bow made from thin ribbons. This bow will be a great addition to any gift. How to tie a Christmas bow from ribbons, see the photo instructions.
#2 Double ribbon bow for gift wrapping
Or here is another original version of a double bow. It’s quite simple to tie, but it makes a lasting impression! You will find a step-by-step MK below.
#3 Bow flower
A delicate bow in the shape of a flower will be an excellent addition to a gift for a loved one: mother, sister, best friend. You will need a satin ribbon, a needle and thread and a bead for the core. See below for how to make a bow.
#4 Large ribbon bow
And here is a big bow to decorate a massive gift. This bow can be used to decorate absolutely any gift, for example, for a loved one or a work colleague. It looks cool and is very easy to do. Step-by-step photo instructions are given below.
#5 Flower bow made from narrow ribbon
You can make a charming flower bow from a narrow ribbon using glue and a button. The perfect addition to a gift for your best friend, sister or daughter.
#6 DIY voluminous bow
Here is a version of a universal bow that can be used to decorate any gift. You will need tape and our master class.
#7 How to tie a simple bow
#8 How to tie a fancy ribbon bow
You will also like New Year's packaging ideas:
Technology for making a Christmas tree from satin ribbons
To decorate the “trunk”-base, cut off any bright, openwork ribbon to the required length and paste it onto a toilet paper roll.
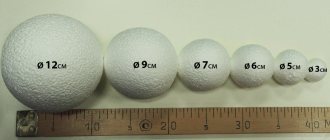
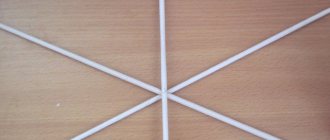
Let the openwork tape “grab the trunk” well, and at this time let’s move on to making the cone. Why use a compass to draw a semicircle on cardboard, which we cut out.
We twist the cut out semicircle into a cone and secure the joint at the base with a stapler (this will be more convenient), and glue the entire joint higher to the top.
To connect the cone with the “trunk”, lubricate the upper part of the base with glue and “push” the cone, pressing it a little. We leave this blank and move on to making “needles”. We cut off 6 cm from the tape. In principle, you won’t be doing many operations with the tape, so you don’t have to singe the ends. If you still want to be absolutely sure that the ends will not fray, then you can carefully singe them over a candle. Fold the ribbon in half lengthwise.
Then in the middle of our piece we fold one part towards itself.
We do the same with the other part.
And we fasten the ends with a stapler (you can sew them together).
Now we just glue the resulting “needles” tightly to each other onto the base.
We move up one row.
We decorate the top with bows on both sides, which can be made using different technologies, as you like.
Glue bows on both sides to the Christmas tree.
And we decorate the bows with beads, gluing them.
This is how, with a little effort and time, you can make a beautiful Christmas tree from available materials. You can choose a completely different color of the ribbons; you can make a multi-colored Christmas tree, for example, 2 rows of different colors. Choose, for example, green ribbon of different shades. And go from dark to lighter. Or you can turn on a row of red color after a few rows. Each row can be a different shade - purple, green, yellow, blue, etc. Imagine and create! Happy New Year holidays to you! And original Christmas trees!
The main association with the New Year holidays is, of course, a beautiful and elegant Christmas tree. Today, Christmas trees come in a wide variety of varieties, made from the most incredible materials and using unexpected techniques.
In this article, the News Portal “site” has prepared for you several ideas on how to easily and simply make a Christmas tree from ribbons.
Other crafts
You can make an incredible number of different crafts from ribbons and collecting them all in one place is simply impossible. But we tried to find as many different options as possible so that you can get inspired and create your own masterpieces. And next year, perhaps your master class will be on our website!
#1 Crown
Crowns for little snowflakes and princesses can be made from ordinary ribbons. The crown can be made using the kanzashi technique (for more experienced craftswomen) or a simpler technique.
#2 Crown made of ribbons and tulle
#3 Kanzashi crown made of narrow ribbon
#4 DIY New Year's crown, tiara made from bias tape
#5 Postcard
You can make a New Year's card from ribbons. For example, folding a narrow ribbon in the shape of a Christmas tree. You can decorate with beads or colored buttons.
More New Year cards:
Other toys
You will find even more Christmas tree decorations made from ribbons in the “Kanzashi” section:
Christmas balls
,
Snowflakes:
Herringbone
Decorations:
rubber bands with green snowflakes (Christmas trees)
In order not to forget the page address and share with friends, add to your social networks: Do you want to know news about competitions or master classes?
Tags: DIY Christmas tree decorations
Attention! It is better to write urgent questions in the comments on the website (form at the bottom of the page) or, better yet, directly by email. There are no notifications about comments from the VKontakte form! This form is more for feedback. 
DIY New Year cards: 30+ cool ideas
Published: December 20, 2017
The best gift for the New Year is, of course, a gift made with your own hands. And if socks or a sweater are not an option for you at the moment, then even a child can handle a postcard. A DIY New Year's card is suitable as a gift for absolutely everyone: friends, relatives, dearest and closest people. New Year's cards can be complicated […]
#6 Candy
As a mini souvenir for the New Year, you can make candies from ribbons. You will need a narrow ribbon of two or more colors, and then it’s a matter of technique!
#7 New Year's garland of ribbons
You can use ribbons to make a cool New Year's garland for room decor. To create this you will need wide ribbons of different colors and thick thread. Finished flags can be glued to a thread or sewn on. But sewing by hand takes a long time, so if you have a sewing machine, be sure to take advantage of its capabilities.
You may be interested in:
New Year's toy with kanzashi flowers
This video tutorial from Alena Handiwork shows how you can paste small kanzashi flowers over a foam ball. The flowers are made from grosgrain ribbon in two colors: purple and white. The flowers are based on round single-layer kanzashi petals. The flower consists of 5 petals. Before gluing the flowers onto the ball, a loop is made so that the toy can be conveniently hung on the Christmas tree. Then you can start decorating the ball itself, cover half of the ball with purple flowers, the other half with white ones. The Christmas tree decoration is ready!
DIY Christmas garlands: 60+ ideas on how to make a garland
Published: November 10, 2017
New Year is the most beloved holiday, associated with miracles and magic. Celebrating the new year is characterized by folk festivals and joyful meetings. It is impossible not to love this time of year, when everything around is transformed, and every house or storefront becomes like the scenery of a fairy tale. Everyone wants to participate in this transformation, and therefore they try to decorate their homes […]
Help us improve: if you notice an error, select a fragment and press Ctrl+Enter.
Standard forms
There are not so few of them:
- four-pointed
- pentagonal and hexagonal
- eight
- dahlia
- socket
- triangles
- tie
In addition, they can be simple and composite, multi-layered and of different textures. Fastening - on a knot, clip or elastic band. Choose what you like, combine and share ideas.