Even a child can make beautiful callas from cotton pads. This simple craft will be an excellent gift for your mother or grandmother, teacher or educator, especially for any holiday, for example, March 8th.
However, if you use hot glue from a hot glue gun to assemble the parts, then leave these steps to yourself. You can entrust your child with the first steps, where you need to prepare the stems and decorate the stamens. Then, together, create flowers from blanks to get a bouquet of callas from cotton pads.
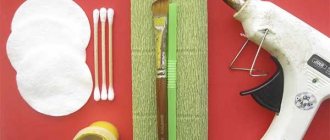
Necessary materials:
- three cotton pads;
- green corrugated paper;
- green plastic drinking straw;
- cotton buds;
- yellow gouache;
- brush;
- scissors;
- hot glue gun.
Stages of making a bouquet:
- As a stem, we will take a ready-made object - one plastic cocktail tube. Its color must certainly be any shade of green so that the craft looks natural and beautiful. We divide one tube into three equal parts. These will later become flower stems.
- Now we paint the cotton swabs with yellow gouache. This is necessary to give the required color to the calla stamens. To make the paint dry faster and absorb into the cotton part of the object, add a couple of drops of PVA glue to the gouache. Stir and apply the resulting mixture with a brush.
- Place one end of a cotton swab in the middle of a plastic drinking straw. Then we place one cotton pad at the bottom.
- We'll do the same with the other two blanks.
- Fill the drinking straws with hot glue to fix the cotton swabs in one position. Then glue this blank to a cotton pad. Twist at the base and apply hot glue for security.
- Then we cut out a thin strip of green corrugated paper. We wrap each plastic tube, which is the stem of a flower, with corrugated paper and fix it with hot glue from a hot glue gun.
- Cut out a large sheet of green corrugated paper. We put all the flowers together to make a bouquet. Glue the leaf to the base of the bouquet. Give the required shape.
- Now the callas from cotton pads and corrugated paper are ready.
- To add beauty, we use a thin golden ribbon.
- We wrap it around the base of the bouquet and make a bow.
Best regards, Just Crafts!
(7
Source: https://prostopodelki.ru/kally-iz-vatnykh-diskov.html
How to form a sharp kanzashi petal
Today, needlewomen have dreamed up a huge number of all kinds of products, the basis of which are satin petals of various shapes made from ribbons 2.5 cm and wider. However, the sharp petal remains traditional. It can be simple, double, triple. The technique for doing it is quite simple.
Initially, the blank for the sharp kanzashi petal is a square (photo 7).
The cut edge must be scorched with a flame. Next, the square is bent diagonally (photo 8), and the resulting triangle is bent again in height (photo 9).
The final small triangle (the original square folded in 4 layers) is the template for the sharp petal. All that remains is to close the two sharp corners and glue them together, or melt them with a flame and squeeze them (photo 10).
The resulting oblong petal is the basis of many hairpins and brooches. The bottom of the petal is usually cut off to make it neater and flatter.
Double and triple sharp kanzashi petals are made according to the same pattern, only using 2 or 3 squares of satin ribbon of different colors or with the inclusion of brocade (photo 11).
To model a triple petal, cut out 3 squares of satin ribbon in different shades. One of them can be sparkling, brocade (photo 12).
All squares are folded in the manner described above (to small four-layer triangles) (photo 13).
All triangles are superimposed on each other in the form of a sandwich, the ends are closed and the entire workpiece is cut with scissors at the base (photo 14).
How to make calla flowers from cotton pads with your own hands?
From cotton pads, you can make beautifully different flowers with your own hands at home, on your own, for a postcard, a voluminous craft for a holiday just like that or with children.
To make calla lilies from cotton pads, you will need a little time and some additional materials. This composition will be a wonderful decoration and gift for a holiday, like March 8th, for a mother or grandmother.
We take cotton pads to make lily petals, cotton swabs and yellow paint to create stamens, and drinking straws to make stems. You will also need PVA glue.
Using yellow paint, we add color to the part of the cotton swab that is on the outside and represents the stamen. Dip the stick into the paint and let it dry.
- When the cotton swab is dry, we connect it together with the tube, inserting the stick into the tube with the uncut part.
To make a calla flower, we connect two parts of cotton pads, giving it a characteristic shape. Glue it.
- We decorate the composition with sisal threads instead of grass.
- Happy creativity!
- Calla lilies can also be made as an applique postcard.
Source: https://www.bolshoyvopros.ru/questions/723962-kak-sdelat-cvety-kally-iz-vatnyh-diskov-svoimi-rukami.html
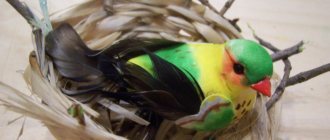
Origami "Koala"
Such cute gray “bear cubs” like koalas can only be seen in Australia.
They sleep about 18 hours a day. During this time, they can hold tightly to the tree and have sweet dreams.
So let's make such an animal, or better yet two - a mother and a baby!
- square sheets 12 x 12 cm, 8 x 8 cm, 6 x 6 cm and 4 x 4 cm;
- scissors;
- glue;
- marker.
Flowers made from cotton pads
Almost every home has cotton pads. In addition to carrying out hygiene procedures, you can create various crafts from cotton pads, for example, flowers. These creatures of nature always understand the mood, even if they are not alive, but made from scrap materials. You can do creativity yourself, but we recommend involving your children in the work. As a result, the joint craft can then be given to your mother, grandmother or sister.
Flowers made from cotton pads - necessary materials
For work you will need a little, namely:
- the cotton pads themselves;
- ear sticks;
- straws for drinking cocktails;
- yellow marker or felt-tip pen;
- glue.
Flowers made from cotton pads - master class
When you have everything you need, you can start creating delicate and sophisticated flowers from cotton pads with your own hands - calla lilies. So, follow the step-by-step instructions:
- Start creating a flower by coloring the end of a cotton swab yellow with a marker or felt-tip pen.
- After this, insert a cotton swab into the cocktail straw, but not deeply, but only hiding the end uncolored with a marker in it. Place a cotton pad under the cotton swab and the end of the tube, as in the photo.
- Then carefully apply a small amount of glue to the bottom edge of the cotton pad on the right or left. Do not overdo it with glue, otherwise it will protrude through the edges and, when dry, will color the future bud with a sloppy yellow color.
- Secure the lower edges of the cotton pad together, thus forming a bud shaped like a kala. You have a flower made from cotton pads.
- Repeat steps 1-4 several times to eventually create two more calla lilies. Flowers can be combined into a bouquet by wrapping them in a sheet of green colored paper.
By the way, if you attach calla lilies made by yourself to paper, you can create an applique or a postcard. Why not a gift for March 8 or Mother's Day? However, an original designer postcard can be an excellent gift for any occasion.
Source: https://womanadvice.ru/cvety-iz-vatnyh-diskov
Options for creating leaves for kanzashi flowers
The sharp green petals are made from pieces of green ribbon (but other colors are possible). For example, rectangles measuring 2.5 cm by 10 cm are suitable. The strips are folded in half, then the resulting double triangle is cut diagonally with a soldering iron. The result is two blanks: quadrangular and bag-like. Both parts are suitable for decorating flowers. Sepals are also suitable for attaching unopened buds (photo 28).
Round petals with wavy edges turn out beautiful and graceful, and they are made from rectangular blanks, cut in the shape of domes on one side. To create a beautiful wave, use a lighter. After singeing the edges with a flame, the hot satin should be stretched with your fingers so that the fabric is deformed. It is advisable to gather the lower (flat) side of the leaves into folds so that the details are voluminous (photo 29).
Crafts from cotton pads
Home / Educational games
Crafts made from cotton pads can be classified as educational games, during which a wide variety of skills are improved or developed. Children can get them in an entertaining way. Most often, it is during the preschool period of a child’s life that parents should pay attention to educational games. Practice shows that such children, with the help of these games, effectively train their own ingenuity, imagination, thinking and creativity. Against the backdrop of standard and slightly boring activities such as drawing and cutting out circles from cardboard, a variety of crafts made from cotton pads will help your child come up with something new and interesting.
And now about the benefits of such an educational game as a craft.
Motor skills and speech development
Let's see what set of actions your child will have to do when making such crafts.
- decorate a cotton pad;
- glue it onto cardboard;
- if necessary, twist cotton pads for curls;
- separate cotton pads from each other or divide one pad into two parts, etc.
Such actions and crafts, which are performed by the child’s hands, have a beneficial effect on his general motor skills, which, in turn, develops his speech. Don't forget about developing your imagination.
Children can elevate even the most insignificant things to the rank of real-life characters.
It could be a fairy-tale lamb, which they will draw on a cotton pad, or a friendly and smiling sun, to create which they will only have to paint the cotton wool yellow.
Examples of USP and 4U headings in the advertising text of a flower shop
How to supplement and develop your proposal? Make it as detailed, original and unique as possible. You don't need to be the best, you need to be the best at something specific. Let's just take the example of “flower delivery”.
Bad: Flower delivery.
Good: 100% anonymous 24/7 delivery. The courier does not give any checks to the recipient.
Bad: Flower delivery.
Good: We deliver flowers around the clock, knowing only your mobile phone number. If we are late, flowers as a gift! If you don’t like the bouquet, we will change it for free.
It is also good to use a creative component in the descriptions of each bouquet of flowers. A couple of sentences and the meaning changes. Compare:
Bad: Beautiful bouquet of roses.
Good: Do you want to arrange a celebration of the soul for someone dear to you? Our compliment bouquet of 21 Dutch roses with a dark cherry hue will drive away routine and boredom from the silence of everyday life!
Match what your original flower ad copy states. Otherwise, there will be an anti-effect that will bury your flower business in just a couple of months. After all, you sell beautiful things, and the appearance of the business should correspond to the product!
Making a decorative bouquet of callas from cotton pads and cocktail tubes
How to make a bouquet of white callas using cocktail straws, cotton swabs and discs
- To create a small bouquet of three flowers, we will prepare the following materials:
- - a sheet of green paper; - 3 green cocktail tubes; - yellow felt-tip pen; - 3 cotton swabs; - 3 cotton pads; - PVA glue; - double-sided thin tape;
- - scissors.
First, we will use a yellow felt-tip pen and use it to color one tip of the cotton swabs. The same can be done with paints (acrylic or gouache), but in this case additional drying time will be required.
Now let's prepare the stems for our flowers. To do this, you need to cut off a small part of the green tubes along with the bend. These slightly shortened cocktail tubes will later become stems. Insert a cotton swab into the stem. The lower part of it inside can be slightly fixed using PVA glue.
Glue a small strip of double-sided tape to the top edge of the green stem.
Remove the top protective layer, and then glue the cotton pad.
Additionally, we can fix its lower part using a drop of PVA glue. This is how we created one flower.
The leaves of calla lilies are wide and quite large. Cut out a blank for a sheet of green paper.
We will fix this leaf to the stem using double-sided tape. We glue a small strip of it to the green stem.
Having removed the protective top layer, glue the sheet. This is what our first finished flower looks like.
Having repeated all the previous stages of work, we create a couple more colors. Our bouquet of callas, made using tubes, cotton pads and sticks, is ready.
Source: https://citywomancafe.com/handmade/14/02/2018/delaem-dekorativnyy-buket-kall-iz-vatnyh-diskov-i-kokteylnyh-trubochek
Target audience in the text of a flower salon advertisement
Advertising text for a flower salon
Buying bouquets of flowers is usually either pre-planned or unpredictable. Depending on the situation. Be that as it may, the selling text for advertising flowers should be emotional, since the bulk of buyers are women who love bright emotions and impressions. Therefore, men who give flowers expect to evoke the right emotions in order to show their loyalty and care.
If you are more focused on wholesale flower sales and are looking for corporate clients, write the text of a commercial proposal for the sale of flowers for companies organizing festive events, restaurants, banquet halls, retail flower sales points, etc. In this case, the text of the flower shop advertisement should be more pragmatic and relate to financial benefits, highlight the organizational aspects of the florist service, and provide guarantees of good preservation of beautiful, but perishable goods.
Sentences like “will open at the recipient’s door and stay for more than 7 days” are interesting for both sellers and buyers, but sellers will be more interested in this. Especially if you provide detailed evidence. In both the first and second cases, you need to be able to choose words correctly in Wordstat. Hear, help, please - these are the three pillars of original advertising for a successful flower business on a website or on social networks.
DIY gift for mom: flower crafts made from cotton pads step by step photos
- Sveta Sharafutdinova
- 23 September
- 0/10 0 253
Wonderful calla lilies from cotton pads for March 8
You can give flowers to your mother for absolutely any occasion and even without a special reason. After all, flowers are a symbol of purity, love and goodwill. It’s just a pity that the beauty of fresh flowers is so fleeting, and their plastic counterparts don’t have such strong positive energy. Flowers made from simple materials with your own hands can be an excellent alternative. For example, from ordinary cotton pads. You can use them to make amazingly beautiful calla lilies, daisies, roses, snowdrops, and peonies. Such crafts will make an excellent holiday bouquet. Flowers made from cotton pads can also be used to decorate greeting cards, boxes, and photo frames.
Festive craft from cotton pads: snowdrops in a pot
Snowdrop is the main spring flower, which we associate with warmth and the end of winter. A pot of snowdrops will be a wonderful gift for mom on the eve of March 8th.
For snowdrops made from cotton pads you will need the following materials:
- cotton pads
- ear sticks
- children's plasticine
- coffee beans or other legumes (beans, peanuts, peas)
- small glass jar with a wide neck
- foam rubber/soil/gypsum
- glass pebbles
- scissors
- paper
Step-by-step instruction
- From paper we cut out a template of the flower and leaves of the future snowdrop.
- Using the resulting template, we cut out flowers from cotton pads. Use scissors to make a small hole in the middle of each.
- Remove the cotton from one end of the ear stick. We decorate the stick with green plasticine - this is the basis for the stem.
- We connect the resulting stem and flower blanks and secure them with plasticine.
- We put foam rubber (soil, plaster) at the bottom of the jar and insert our snowdrops into it. We decorate the top with pebbles.
- Now you need to turn an ordinary glass jar into a flower pot. To do this, apply plasticine evenly over the surface and attach coffee beans, peas, beans or regular cereal to it. You can also additionally decorate our pot with ribbons, beads, and stones.
LiveInternetLiveInternet
—Tags
—Categories
- Videos (24)
- Children's page (86)
- For the soul (22)
- Ideas (20)
- Illustrations (7)
- Interesting (47)
- Books, audiobooks (49)
- Computer (161)
- for diary (59)
- for computer (47)
- clipart (11)
- postcards (25)
- thank you-please (15)
- photoshop (9)
- Beauty and health (57)
- Cooking (341)
- meat dishes (26)
- fish dishes (8)
- baked goods (184)
- desserts (11)
- blanks (41)
- snacks (25)
- from vegetables (15)
- beautiful food (22)
- culinary site (4)
- drinks (7)
- seasonings (15)
- Music (25)
- By country and continent (18)
- amazing photos (7)
- Congratulations (3)
- Useful information (72)
- HANDCRAFTS (12768)
- "DOUBLET" and "FASHION MAGAZINE" (69)
- ASAHI ORIGINAL - handicrafts (33)
- knitted toys with Instagram (9)
- DO IT YOURSELF (7)
- "LENA", "HANDWORK" (80)
- "BURDA" - handicrafts (17)
- “KSYUSHA” – handicrafts (12)
- “Tuck to Tank” (31)
- iris folding (5)
- applique (126)
- paper applique (80)
- applique made of fabric, felt (217)
- butterflies (84)
- batik (8)
- birch bark (7)
- Library: ideas of folk craftsmen. (49)
- bouquets (6)
- Candy bouquets (23)
- paper plastic (56)
- valentines (27)
- felting (97)
- vintage (37)
- stained glass (18)
- Vologda and Yelets lace (4)
- all from pompoms (55)
- burning on fabric and wood (11)
- vytynanka, kirigami (258)
- embroidery - biscorn (51)
- cross stitch (336)
- embroidery – books, magazines (121)
- embroidery - seams, stitches (71)
- embroidery - different techniques (87)
- bead embroidery (90)
- Brazilian embroidery (191)
- satin stitch embroidery, volumetric embroidery (131)
- ribbon embroidery—books, magazines (83)
- embroidery with ribbons—MK, lessons (192)
- ribbon embroidery—works (183)
- embroidery on knitted items (13)
- cutwork embroidery (39)
- embroidery from Instagram (23)
- knitting (163)
- knitting - socks, mittens (50)
- knitting - tablecloths, napkins (484)
- Knitting from "grass" (19)
- crochet + fabric (22)
- crochet - "African flower" (79)
- crochet - collars (50)
- crochet - for kids (88)
- crochet - for home (192)
- crochet - border, stitching (162)
- crochet - ribbon lace (video) (19)
- crochet - patterns (515)
- crochet - motifs (196)
- crochet - bags (114)
- crochet - Tunisian (9)
- crochet - decorations (130)
- crochet - lessons (79)
- crochet - flowers, leaves (351)
- crochet applique (95)
- crochet—Brugges lace (37)
- crochet-Irish lace (101)
- crochet-Romanian lace (145)
- crochet patterns, patterns (265)
- knitting on a fork (22)
- knitting - lessons (43)
- knitting patterns, diagrams (96)
- knitting Tenerife (20)
- knitting - shawls, scarves, shawls. (82)
- decor bottles, vases (29)
- Interior decor, for comfort (55)
- Clothing decor, alterations (30)
- decoupage (68)
- jute filigree (32)
- for animals (2)
- craft magazines (152)
- pincushions (123)
- needle lace (12)
- toys - knitted, amigurumi (358)
- toys – knitted/magazines (43)
- toys - knitted / hares, squirrels, hedgehogs (33)
- toys - knitted / mice, foxes (62)
- toys - knitted / monkeys (12)
- toys - knitted/various (109)
- toys – knitted/cats (50)
- toys - knitted / bears, pandas (75)
- toys - horses, deer (9)
- toys - eyes, noses. (95)
- coffee toys, painted (16)
- various toys (155)
- toys - knitted / dogs (78)
- mouse toys (26)
- apple toys. mushrooms (2)
- toys - ladybugs, caterpillars (6)
- knitted toys, turtles, lizards (15)
- knitted toys/dolls, people (44)
- knitted/bird toys (55)
- magazine toys (77)
- bunny toys (19)
- cat toys (45)
- doll toys (35)
- chicken toys (7)
- fox toys (14)
- toys-frogs, turtles (21)
- teddy bear toys (54)
- monkey toys (16)
- toys-sheep, goats (14)
- bird toys (22)
- fish toys (6)
- elephant toys (8)
- toys-dogs, raccoons (42)
- from jeans (18)
- isothread (35)
- For Easter. (60)
- kanzashi - fauna (6)
- paintings from cereals and crafts from coffee (11)
- quilling (213)
- quilling - magazines (27)
- rugs, bedspreads, blankets (136)
- boxes (22)
- cats (198)
- crazy - vul (2)
- modeling - salt dough, plasticine (27)
- modeling from HF and PG (103)
- jigsaw (27)
- patchwork - applique (42)
- patchwork crafts, flowers (117)
- macrame (56)
- master classes (51)
- DIY furniture (9)
- My works (90)
- New Year-crafts (246)
- necessary for needlework (56)
- origami, modular origami (58)
- postcards (54)
- sequins (6)
- papier-mâché (4)
- Paper art (20)
- parchment (28)
- newspaper weaving (27)
- weaving from rubber bands (4)
- crafts - lessons (5)
- paper crafts (195)
- crafts made from plaster and polyurethane foam (5)
- cardboard crafts (25)
- crafts made of leather, fur (6)
- crafts from bags (23)
- crafts from plastic bottles (50)
- crafts made from natural materials (23)
- felt crafts (584)
- Crafts from Kinder Surprise cases, CD disco (35)
- pillows (including puffs) (267)
- pillows - toys (105)
- birds (199)
- buttons, made of buttons (17)
- patchwork - magazines, books (194)
- patchwork crafts from YO-YO (66)
- patchwork without a needle - kinusaiga (24)
- patchwork, quilt, shreds (476)
- Author's works (32)
- Frames for works (17)
- coloring pages (5)
- Drawing (44)
- painting (67)
- stone painting (40)
- Categories (11)
- various handicrafts (32)
- sites (54)
- download (13)
- scrapbooking (44)
- straw fairy tale (11)
- links (82)
- stitch and sashiko (44)
- rhinestones (7)
- bags, wallets (207)
- slippers (71)
- zigzag braid (13)
- topiary (8)
- spot painting (47)
- Stencils, templates (180)
- wire decorations and crafts (170)
- jewelry and crafts made of beads, beads. (201)
- lightning decorations (39)
- grosgrain ribbon decorations (45)
- soutache decorations (18)
- decorations made of textiles, cords, etc. (67)
- FLOWERS - books, magazines (64)
- flowers - origami made of fabric (34)
- flowers and accessories made of fur and leather (34)
- flowers and more from foamiran (129)
- beaded flowers (4)
- paper flowers (102)
- nylon flowers (26)
- flowers made of fabric and ribbons (505)
- felt flowers (113)
- caps, caps (92)
- sewing (89)
- sewing - puffs (26)
- curtains (15)
- Garden and vegetable garden (165)
- magazines (13)
- Photo and painting (266)
- animals-paintings, postcards (40)
- animal photos (50)
- cats (122)
- horses (7)
- underwater world (2)
- birds (50)
- dogs (13)
- Khokhloma, Gzhel, Palekh and. (49)
- Artists (28)
- Flower beauty(painting, photo) (90)
- Quotes, aphorisms (15)
- Encyclopedias, dictionaries (42)
- Humor (51)
Callas from cotton pads. Kindergarten teachers, school teachers and educators
Master class on making flowers
- I would like to say right away that, although in the master class posted a little higher, it is recommended to put a ready-made calla lily bud on a cocktail tube, if you wish, you don’t have to do this.
- If in the future you plan to use them to create an applique, you can paint the ear stick green with paints or paste it with plasticine.
- Recommendations for making calla lilies from cotton pads:
- Prepare cotton pads, ear sticks, glue, scissors and a yellow marker
- First of all, we begin to make the stamens of our future flowers
- To do this, take and paint as carefully as possible one side of the ear stick with a marker.
- Next, take one cotton pad and place the pre-made stamen on it (it should lie exactly in the center)
- Lubricate the lower part of the cotton pad with glue and glue the bud, trying to give it a characteristic shape
- We wait until the glue dries and place a cocktail tube on the protruding part of the stamen
Yes, and remember, if, after connecting the opposite parts of the cotton pad, you were unable to immediately give the bud the desired shape, then wait until the glue dries, and then turn the workpiece inside out. This will help make the top of the flower a little rounder.
How to make a rose from cotton pads?
Recommendations for making roses from cotton pads
If you want your rose to be as close to a living flower as possible, then you will have to work hard. The first thing you will have to do is paint the future petals.
Since it is very difficult to paint cotton wool evenly, using a brush in this case is undesirable.
Therefore, it will be better if you dilute gouache or acrylic paint in water and soak cotton pads in the resulting solution.
After they are saturated with paint, they will need to be laid out on a flat surface and wait until completely dry. If you still want to use a brush to paint the petals, then first starch the cotton pads and only then start painting them.
Recommendations for making roses from cotton pads:
- Prepare the disks as we taught you a little higher
- Then take one disk and twist it into a tight tube
- After this, wrap it with a second disk, but not so tightly
- Adjust the disc so that it visually resembles a rose petal
- Repeat the manipulation until you get a lush bud
- Next, take a needle and carefully sew all parts of your flower
- If desired, decorate the core of your craft with a pink bead
Snowdrops made from cotton pads: photo
Recommendations for making snowdrops from cotton pads
In principle, even a small child can handle such a craft as a snowdrop made from cotton pads. Since in this case you will need to make an applique, all you need to prepare is glue, scissors, colored paper and a green marker.
- First of all, draw a snowdrop template
- It is advisable to do this on cardboard (this will make it easier to transfer the outline onto a cotton pad)
- Next, attach the template to the disk and circle it with a marker
- Cut out the snowdrop along the lines, taking care so that no marker marks are visible on the finished flower.
- Make snowdrop stems and leaves from colored paper
- Take cardboard of the desired color and use glue to fix all the components of the applique on it.
Chamomile from cotton pads: photo
In order to make chamomile from cotton pads you will need the following materials:
- PVA glue
- Thick green and yellow paper
- Cotton pads
- Bamboo sticks
- First, cut out two perfect circles from cardboard
- Set the yellow one aside, and make a cone-shaped piece from the green one.
- Then lubricate it with glue and start placing cotton pads on it
- Place them in such a way that each next element overlaps the previous one with one side (Fig. No. 1)
- Once the entire bottom of your flower is filled with decorative material, place a yellow circle on top of it
- Wait for the glue to dry and place the bud on a bamboo stick
MORE ABOUT: Application. DIY snowman made from cotton pads
If you do not want to make a cone, then you can glue the cotton pads to the circle, slightly bending their lower part. How to do this correctly can be seen in Figure No. 2. Yes, and in this case it is best to starch the cotton pads in advance. This must be done so that the finished chamomile does not lose its shape after some time.
Cotton pad lilies
Lilies, like other crafts of this type, can be made quite simply. You need to start making a flower by preparing templates for the petals.
You can do them in a completely standard way.
So, take cardboard, draw a petal of the required size on it (be sure to keep in mind that you will be applying it to a very small piece of material), and then carefully cut it out.
If you are not very good at drawing, but at the same time strive to achieve maximum realism, then just find a suitable template on the Internet. When it is ready, you can proceed directly to making lilies.
Manufacturing recommendations:
- Cut out the base of your future craft
- Roll a small ball out of plasticine and attach it to the base
- Using the template, cut out the required number of petals
- Attach each petal individually to a match
- Insert the resulting blanks into a plasticine ball.
- When the flower is ready, attach a stem to it
If you want your lilies to be as beautiful as possible, then try making them in several stages. First, attach the largest petals to the ball, and then the smaller ones, and at the very end, cover the middle of the craft with the smallest ones. If you do everything correctly, then visually your flower will look like a water lily.
Daffodils made from cotton pads: photo
Flower elements cut from painted and starched cotton pad
In principle, a daffodil can be made in several ways, but no matter which one you choose, remember that this flower has a rather unique core. Therefore, if you want to make the most realistic craft, then make it not from a yellow cardboard circle, but from pieces of corrugated paper.
In order to make the core, you will need to take a strip 5 millimeters wide and cut it into small pieces. And when your daffodil is ready, you will need to drop a little glue into its center, and then carefully place the shredded paper on it. As a result, you should have an airy and fluffy core.
First way:
- Make a template and cut out petals using it
- Next, cover the thick paper with a tinted base.
- Place three petals on the base and connect them with glue
- In the gaps formed between the petals we again lay out three blanks
- Cut out the leaves and stem of the narcissus from colored paper and glue them under the flower
Second way:
- Cut out the required number of petals according to the cardboard template
- We make a cardboard base from thick paper
- Using glue, attach the petals to it
- We wait until everything dries and fix everything on a paper or wooden stick