To crochet a napkin, backpack, hat and much more, you first need to learn how to make an even circle, without distortions or corners. This is exactly what we propose to do right now.
Having mastered knitting, you can make original things for yourself and your loved ones. For beginners, the first thing is to learn how to knit a circle. This technique is used to create beautiful clothes for girls: blouses, dresses, skirts, snoods, scarves. Openwork elements are also used to decorate coasters for dishes, tablecloths, and children's toys.
Where to start crocheting a circle
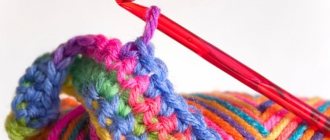
First you need to prepare the necessary tools: threads and a hook. For circular knitting, it is important that they match each other. The easiest way is to choose threads whose label indicates what diameter the tool should have. If there are no such instructions from the manufacturer, you will have to select its thickness yourself:
- place the thread in the recess of the tool;
- gently pull;
- the thread should completely fit into the recess (if there is free space left, the hook is large; if, on the contrary, it is small).
Crocheting a round row begins with choosing a method: double crochet (dc), half double crochet (dc) and single crochet (sc).
Each of these techniques is discussed in detail below. Regardless of the method chosen, remember that in each new row as many columns are added as are at the base of the circle.
Subtleties of choosing a hook
This is the only tool used in the work, so it is important to choose it responsibly. Some needlewomen are surprised that they cannot knit or have constant discomfort. Often the situation improves when the instrument changes.
When choosing a hook, pay attention to its surface. If any clues or other defects are found, it is better to look for another one. Many people find it easiest to knit with a plastic tool, but it wears out quickly and has to be replaced periodically. The most durable are metal ones, which are more expensive but have a long service life.
Do not buy a hook with a too sharp or, conversely, rounded head. Its thickness should be several times greater than the thickness of the yarn used. It can be any length, but usually medium ones are chosen. Long instruments (more than 20 cm in length) are intended for Tunisian technology.
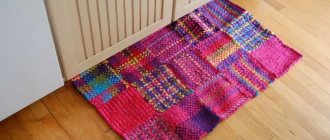
Rug made of round motifs
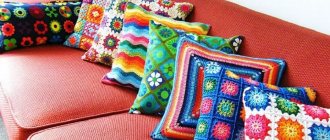
When talking about how to crochet circles from rags, professional knitters often say that it is not at all necessary to work on a large round rug. After all, you can make many small fragments - the same size or different. And then collect them into a single composition. Such product options look much more original and interesting. Although, according to many beginners, they are performed easier and faster. Next, we invite the reader to look at the image of such a rug. It looks really impressive!
Circle rule for double crochets
To crochet circular patterns using this method, follow simple steps:
We make the initial loop.
We leave the ring on the finger, knit 3 air loops (VP) - this is a step to the next row.
Remove the ring from your finger and knit the first row into it. 3 VPs are equal to one DC, in total we knit 12 such columns. Yarn over, insert the hook under the ring, and knit. Repeat 11 times.
Pull the free end of the thread to tighten the loop into the ring. We connect the end and beginning of the row, to do this we insert a hook into the 3rd VP and knit a connecting stitch.
To move to the second row, we cast on 3 air loops, add 2 dc in 1 loop to each loop.
For each subsequent row we make 12 increases in columns.
For crochet stitches in circular knitting, several air stitches are usually used.
I'm proud of my work!
“Finally, if you want to be able to create your own knits, knit without a pattern, or adjust existing patterns, you need to learn a little knitting math,” Ida said, adding that there is always a formula in knitting. “For example, there are only a few ways to make a sweater or a sock. Once you learn the steps and math behind a particular knitting method, you can easily knit items without a pattern. For example, the formula for reducing a toe cap might be something like this: decrease every other row until about 50% of the stitches remain, then decrease every row until 30% of the stitches remain,” concluded Ida.
Circle rule for half double crochets
Below is a circular crochet technique for beginners step by step:
We collect a chain of 4 VPs.
We close the chain into a circle: insert the hook into the 1st VP, grab the thread and pull it through.
For the first circular row we knit 2 VP lifts, they act as a half double crochet.
We knit 7 more half double crochets and connect them into a circle, inserting the hook into the second VP of the lift.
The third and each subsequent row is knitted in the same way, increasing by 8 half double crochets.
LiveInternetLiveInternet
Good afternoon, dear needlewomen and all guests of my diary!
Today I have a small topic: I decided to show you how you can make coasters for mugs with your own hands. A lot of people are interested in this issue.
Crochet is the closest thing to me, so I made a small selection of simple patterns for crocheted mug coasters. They often learn to crochet from such things.
I was inspired primarily by these photos I saw on the Internet.
Wow, such adorable sets! They can be used for cups and glasses when setting the table.
Even on weekdays, the kitchen or dining room should be beautiful. And these knitted little things add both comfort and mood.
In addition, mug coasters serve a practical function: they protect the surface of the furniture from stains and scratches, especially if you place something hot on the table.
Of course, some wooden or wicker coasters may be more practical and convenient, but we, needlewomen, need to use the leftover yarn and in general, knitting coasters for mugs with our own hands is much more pleasant, in addition, this fashionable decoration for the kitchen will surprise both home and guests .
Let's show our creative imagination and knit coasters for mugs!
You can use any thick thread. You should take into account the style of the interior and choose a nice color for knitted coasters.
We choose, as always, a hook that matches the yarn.
Schemes of round coasters for a mug
The crocheted mug stands in the top main photo are crocheted according to the diagram below:
In principle, you can use the pattern of any small napkin to knit round coasters. The diagrams posted here are perfect >>, I won’t repeat myself and post them again. By the way, there is a diagram close to the pink stands.
Here is another simple diagram, read about it below:
When knitting colored patterns, you should correctly make the transition from one color to another, knitting the last loop of the row with a new color. You can see how to do this in the master class here>>.
Schemes of square coasters for a mug
I haven’t knitted any sets of coasters yet, but I do have one coaster for a mug. It turned out completely unexpectedly.
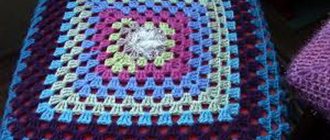
The fact is that some of my friends at home really like to drink tea while sitting in an armchair watching the TV. Trying to put a hot mug on the coffee table with my snow-white napkin caused, to put it mildly, very strong emotions. I immediately found something to substitute. And one day I came across a motif that I had knitted specifically for a blanket with sunflowers to make a master class. So it remained to serve as a stand for hot mugs, which roams from an armchair to a sofa, and from a sofa to a computer desk, and is in no way tied to the style of the interior, but is quite a nice stand for a mug with your own hands.
You can also knit openwork square motifs from thick yarn, which is also an excellent option for coasters.
But this article probably wouldn’t exist if I hadn’t come across the following knitted coasters, which simply fascinated me: the first amaze with their simplicity, while the others, on the contrary, have an unusual shape and openwork pattern.
Despite the fact that these coasters are knitted from gray yarn, they look very elegant, which is what captivated me, like all the simple Japanese ideas that I really love.
The last row of a simple circle (diagram above) or square is knitted with a crochet stitch, which gives a finished look to the product and a very beautiful edge design.
The diagram of the square motif was taken from the same magazine as the photo of the model, but for some reason they forgot to add an openwork path, the same as on the round stand, and the strapping in a slow step, keep this in mind.
Or these square stands can be connected using the same pattern:
A wonderful gift set in combination with a knitted cup cover:
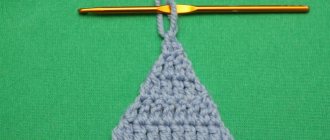
Coasters for mugs and glasses in the form of a leaf
As I already mentioned, I liked these coasters for their interesting leaf shape.
The stand for the glass (mug) is knitted according to the pattern, starting from the wide part of the sheet, with a set of air loops. Knit in reverse rows, moving towards the narrow part of the sheet.
Finally, a row is knitted on the other side of the chain of air loops, turning into knitting of the handle, and then the entire leaf is tied around the perimeter with single crochets.
Which crocheted mug coasters did you like?
DIY crochet mug coasters
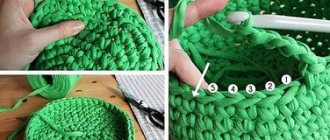
Circle rule for single crochets
A detailed description of the circle for RLS has its own characteristics:
We make the initial loop as for the dc.
We knit 1 VP and remove the ring from the finger.
We knit the 1st row into a ring. 1 VP is equal to one sc. In total we knit 6 such columns. Insert the hook under the ring and knit. Repeat 5 times.
Pull the free end of the thread to tighten the loop into the ring. We connect the end and beginning of the row, to do this we insert a hook behind the 1st VP and knit a connecting stitch.
For the second row we make 6 increases to make 12 columns. We knit 2 sc in each loop of the previous row.
For each next row we make 6 increases.
Content plan and ideas for posts
To prevent your news feed from looking like a vinaigrette, you need to immediately select the topics of the published materials. The standard set of profile blocks about knitting on Instagram includes:
- Products. The main emphasis should be on the goods, so that the buyer who looks into the store for the first time understands that you are selling handmade products. Use your imagination to the maximum, photograph things from different angles and process the pictures.
- Training materials. This is necessary in order to keep subscribers active. Post knitting patterns, photos of the hooks and knitting needles you use. You can also post a photo of your workplace.
- Competitions, sweepstakes, master classes. These tricks are needed to attract new people who may turn out to be buyers in the future.
It is important to create a schedule for posting posts. To do this, needlewomen can use one of the tools for scheduled posting on Instagram.
The frequency of posting is no more than 2-3 times a day. Think through every detail - a high-quality photo, an interesting text accompaniment to it. You can write a phrase in the text that can prompt the subscriber to write a comment.
How to change colors when knitting in the round
To change colors when crocheting in the round, you need to knit a VP at the end of the next knitted row, after which you need to change the color. The hook is removed from it and placed in the previous one, grabbing the thread with a new color. All that remains is to pull it out and make a lifting loop. During subsequent knitting, it doesn’t matter if RLS or SSN are made, the left VP is captured and regular knitting follows.
The color transition performed in this way remains unnoticeable, the left VP is invisible, it remains tied inward. You can change the threads as much as you like, each new row can be a different color.
Decoration options
Beads of different sizes and satin ribbons are perfect for decorating a knitted stand. You can decorate the product with embroidery. The most interesting are shaped crafts made in the form of any objects or animals.
| Animal shaped stand | Cat: sew triangular pieces of fur instead of ears, make whiskers from fishing line |
| In the form of a bird | Owl: beak made of fabric, eyes embroidered with yellow and black floss threads |
| Set of several fruits, vegetables | Lemon or orange cut. Instead of seeds, you can attach several small beads |
| Flower | The core is knitted as a large circle. Petals are the same circles, but smaller in size |
The simplest option for decorating a stand for cups is to crochet a single-color circle and embroider a smiley face on it using two threads of floss. A novice craftsman should know that you should not use metallic sequins for decoration. Such a stand will look impressive, but decorative elements may melt under the influence of high temperatures. After this, the product will no longer be suitable for use.
Based on standard solutions, a craftswoman can independently come up with something new.
If you made a knitted coaster as a gift, you can embroider the initials of the future owner on it. A small loop is attached to the side of the finished product. When the craft is not being used for its intended purpose, it can simply hang in the kitchen.
Making a stand for hot crochet will help beginning knitters improve their skills. You can make several of these accessories in different colors and shapes and change them periodically. Lovely crafts would make a wonderful gift for your mom, grandma, or friend. It is better to start with the simplest options (a monochromatic circle), gradually moving on to more complex and interesting tasks.
What to do if the knitted fabric is mowing
If the fabric begins to squint, it means that mistakes were made when performing the circular crochet pattern. They usually happen when:
- the number of columns is lost;
- displacement occurs when changing a thread of a different color;
- The connection loops are knitted incorrectly.
When skewed, you have to unravel the knitted rows to a flat section of the fabric and knit them again. The sooner the problem is noticed, the less work will have to be redone.
To avoid distortions when knitting in the round, you must first learn from simple patterns using dc, sc, hdc. Then you can master circular rotary crochet, spiral technique and others.
Elastic band diagram
You can crochet an elastic band in a circle. It will not be as elastic as we would like, but quite beautiful. Again, first cast on the required number of air loops and knit the elastic according to the pattern. Then the product is wrapped and connected to form a circular elastic band. A crochet elastic pattern in the round is attached.
Related article: If you decide to make a shoe shoe...
Or you can use the second option:
How to finish knitting in the round
At the end of the work, the question arises of how to join circular crochet. Having finished knitting the product, you need to cut the thread, pull it out of the penultimate loop, and thread it into a needle with a suitable eye. We insert a needle and thread under the loop from one part of the row, pull it through, and bring it out under the loop from the other part of the row.
Then the thread is fixed on the wrong side of the product. The seam is invisible. It is important to finish knitting carefully; if you rush and tighten the knot too much, it will be visible. To connect, you also need to select a sharp needle so that it passes freely under the loop.
Circular knitting skills will be useful for coquettes who want to add femininity to their look. Beautifully designed necks and sleeves will be an excellent addition to your favorite item. The circular technique can also be used for other purposes.
author All posts by the author (33)
Mug stand. Decoupage. Master class for beginners
This master class is intended for children of secondary school age, teachers of additional education, as well as all lovers of needlework.
Purpose: mug stand, DIY gift.
Purpose: making a stand for a mug.
Objectives: – introduce the technique of decorating objects using decoupage; – improve skills in working with paint, glue, napkins; – cultivate purposefulness, accuracy, artistic taste.
About 20-30 years ago, coasters for mugs took a strong place in the life of almost every person, and they began to choose an original name for them. The most popular were bonfire, coaster and beermat. The name “beerdekel” was borrowed from the German language and translated means the lid of a beer mug. In Germany there were beer mugs that had lids on top. Such mugs cost a lot of money, and in beer shops beer in these mugs was served only to wealthy people. And ordinary people drank beer from ordinary mugs, which had a small felt circle on top. The Germans put this mug under the mug so that it would not get in the way, and at the same time absorb any accidentally spilled beer. Thus, the lid was renamed into a mug stand. Later, various companies began placing their advertisements on mug stands. Travel enthusiasts bring with them from various countries such mug coasters with various designs or inscriptions as souvenirs. We will make a stand for a mug from old CDs, old postcards and napkins with a pattern.
For work we will need the following materials:
- CDs, - old postcards, - napkins with a pattern, - white acrylic paint, - gouache, - beautiful cord, - pencil, - scissors, - hair dryer, - PVA glue, - Moment-Crystal glue.
Sequence of work: For one stand you need to cut out 2 circles from postcards. Colored cardboard will not work, because... Repeated application of paint and glue will warp. The postcards have a laminated layer on one side and do not warp when applying paint and glue.
These mug coasters are convenient to use at work during your lunch break.
Good luck to everyone who wants to repeat this master class!
Types of stands
Modern coasters can be made on wood, rubber, cork, cardboard, glass-ceramic, plastic, fabric and other bases. They can be produced in square, round or any other shape to choose from. There are the following types of hot pads:
- coasters for glasses and other kitchen utensils for tea and coffee;
- tight-fitting and non-slip plate stands;
- serving - for clay pots and portioned pans;
- kitchen - for frying pans, pots and kettles.
Thanks to the decorative design, various types of stands for hot dishes will decorate the kitchen.