Such doors are often installed in offices and shops, but they are quite appropriate at home. First of all, the thought of them comes when you need to arrange a bathroom or kitchen. That is, places with high humidity that require frequent hygienic cleaning. Glass doors on a spacious balcony and elegant terrace are also very good. They can become an interesting element of the original design of an apartment, making it lighter and more spacious. In addition, due to its small volume, the glass door will not interfere in a narrow corridor. In general, such doors should be considered by anyone who values individuality and well-groomed appearance in their home. Especially for those who like to improve them with their own hands.
Advantages and disadvantages of glass doors
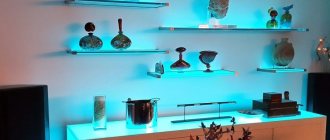
Glass objects in the interior can add sophistication and uniqueness to the design of the room. Such an element of the room as glass doors can be successfully mixed with different style trends. An unusual decorative result can be achieved by decorating the “transparent screen” with a drawing or painting.
Glass doors are installed both in public institutions, offices, banks, and in residential buildings - interior partitions in bathhouses, saunas, dining rooms, etc. This popularity is justified by a number of advantages of glass doors:
- Glass is not exposed to virtually any chemical or physical action, so the service life of such doors is very long.
- Glass doors let in and reflect sunlight - this fills the room with an atmosphere of comfort and comfort.
- Mold bacteria, which quite often appear on wooden structures in conditions of high humidity, will not be able to develop on the glass door. This property is very important for systems installed in saunas, swimming pools and bathtubs.
- The door leaf does not deform under the influence of temperature and humidity changes.
- Easy to install. For installation you do not need complicated fittings consisting of a huge number of small parts. Doors are almost always secured using special fasteners.
- Wide decorative capabilities. Achieving a unique design is very simple - just show your imagination and spend not a lot of time. You can apply a pattern, a sticker, or use the decoupage technique on the door without the help of others.
And such impeccable designs are not without their drawbacks:
- Incorrectly processed and selected material for doors can significantly worsen the design. First, the resistance of glass to mechanical action suffers. To produce doors, it is necessary to select glass coated with layers of acrylic, triplex and special films that prevent the canvas from scattering into a huge number of fragments when disintegrating.
- Certain difficulties in care. Fingerprints and stains from steam (bath/sauna) appear on the glass, and the use of abrasive products can cause scratches.
- You will have to pay a lot for a good quality glass structure. The cost is determined by the complex production process and the thickness of the material used.
Selecting a lighting fixture
- They focus on the size of the lamps and their compliance with the exterior plan. For a house in the style of minimalism or hi-tech, massive ornate lanterns would be inappropriate, but simpler and more laconic light sources would be suitable.
- You will also need to pay attention to the resistance of the lighting elements to temperature changes, humidity, and strong winds.
- When choosing lamps, you need to consider how economical the energy consumption is when using a particular model.
- Ease of replacement in case of malfunction.
- Sensitivity to voltage changes.
Which glass is suitable for the door
The canvas for glass doors and hinged partitions is made according to the latest achievements of science and technology. Based on production methods, the following groups of glass applicable for the production of doors can be distinguished:
- Plexiglas - created from a synthetic polymer. The plus of the material is lightness, the minus is susceptibility to mechanical action and flammability. This type of glass is almost always used for the production of shower doors.
- Tempered glass is produced by heating to +700°C and sharp cooling by blowing air. This hardening makes the material heat-resistant and increases its resistance to external influences.
- Triplex is a multilayer laminated glass created by connecting 2-3 sheets of glass with layers of laminating films. The main advantage is the highest impact resistance. In addition, if the glass manages to break, there will be no sharp fragments. Depending on the type of polymer used and the number of layers of glass, triplex receives different decorative, optical and protective characteristics.
According to the processing method, glass sheets for the production of partitions/doors are:
- Bent - using stencils and templates, a certain shape of glass is created.
- Faceted - the edges of the glass are processed thermally.
- Frosted - the surface of the glass is treated with various mineral salts, giving the material a suitable level of protection and properties.
- Sandblasting - nanoparticles of abrasive are fed under amazing pressure. A suitable sketch appears on the surface of the glass.
- Stained glass - glass elements of different colors and textures are glued together. A certain sketch or a whole plot comes out. Developing a treatment is not easy, but the result is an artistic masterpiece.
The listed types of glass are widely used in the production of various door systems.
Products by topic
- Choose …
View
Plexiglas Altuglas ClearWhite
10083 ₽ – 76030 ₽
- Choose …
View
Plexiglass Altuglas Dual Satin
12444 ₽ – 20991 ₽
- Choose …
View
Plexiglas Altuglas Colors
11138 ₽ – 14620 ₽
- Choose …
View
Plexiglas Altuglas Transparent Colors
13065 ₽ – 14620 ₽
- Add to cart
View
Plexiglas GS
29746 ₽
- Choose …
View
Altuglas Elit LED plexiglass
25140 ₽ – 26689 ₽
- Choose …
View
Extruded acrylic glass black
6785 ₽ – 10651 ₽
- Choose …
View
Extruded acrylic opal glass
9344 ₽ – 52181 ₽
- Choose …
View
Extruded acrylic glass white
6429 ₽ – 8554 ₽
- Choose …
View
Extrusion acrylic glass transparent
2375 ₽ – 106688 ₽
Features of different glass door designs
Glass interior doors are often hinged or sliding according to the opening method.
Swing models are the most popular, as they are easy to install and affordable. If we associate them with ordinary wooden doors, glass doors are structurally no different. They also consist of a door frame, door leaf and awnings. The main difference is the design of the hinges. The box can be made of MDF, aluminum or wood. If the design does not have a door frame, then the glass sheet is attached to the floor and ceiling with hinges.
Sliding compartment doors are made without a frame. The system is installed on special rollers using one of the following methods. The first option - “runners” are fixed through holes in the glass, the second option - installing rollers on the end of the canvas.
Folding and revolving doors are often used in the bathroom. The folding design is well suited for small bathrooms - the door is designed like a fan and does not take up much space. Revolving doors are appropriate in spacious rooms.
Designers recommend
Transparent doors are not suitable everywhere. For bathrooms and shower stalls, 8 mm triplex is very good, especially with white film. Sandblasting or etching can make glass less transparent. It is good to decorate interior glass doors with a delicate pattern or tint them, and a stained glass door can become the center of the entire design solution of any room. Where can I get the components for future doors?
Construction supermarkets also have ready-made glass doors, but most factories offer them in wooden frames, while many prefer aluminum or stainless steel frames. The fittings should be the same. It must be selected in advance - BEFORE ordering the glass, since all the holes and cutouts must be made on it.
Separate glass for internal doors, as a rule, is ordered from the factory, or, in extreme cases, from the workshop. But wherever you place glass doors, first of all, take care of their strength. The best glass thickness is 8-10 mm. It should be remembered that in general such an object is quite heavy. For example, a door measuring 1.6 m x 0.7 m with a glass thickness of 10 mm will weigh 28 kg. Therefore, the structure for its installation must be durable.
The most reliable are frames and fittings made of euro titanium, but metal-plastic, aluminum door profiles and wood are quite suitable.
Independent installation of sliding glass doors
Before you start work, you should prepare the tools:
- Screwdriver and screws;
- Roulette;
- Drill;
- Building level;
- Pencil for marking;
- Watery nails;
- Anchor bolts;
- Polyurethane foam.
The kit for installing sliding doors almost always includes:
- Rails for moving the door leaf;
- Rigel;
- Door handles that do not support the plane of the door;
- Factory kit for fastening glass doors;
- Limiter – protects the glass unit from unnecessary movements.
Important! The choice of rails and rollers for moving the door depends on the weight of the glass sheet. Light doors (weight up to forty kilograms) are installed on two rollers, heavy structures (from forty kilograms) are installed on four rollers or more. The length of the rails should be twice as long as the width of the doorway
Let us outline the sequence of installation of sliding interior doors with glass with our own hands using the example of a single-leaf model:
- Measure the door clearance and check the evenness of the adjacent walls. The top should be strictly parallel to the bottom, and the right side should be parallel to the left. A serious condition for high-quality installation and uninterrupted operation is the evenness of the wall, against which the glass will be pressed when opened.
- Mount the floor rail so that one of its edges supports the door clearance by 5 cm. Check the levelness of the installation using a building level. If the tilt is not removed in time, then later the door will open/lock itself depending on the tilt.
- Place the glass sheet on the bottom guide and measure the height to the top bar.
- Mount the upper guide and add a locking block to it.
- The appearance of the guides can be improved and decorated with decorative panels.
- Install the canvas - for this work you need to hire an assistant. It is not enough to tilt the upper part of the glass and place it under the upper bar so that the rollers engage with the guide.
- Connect the canvas to the bottom rail.
- Check for smooth operation - push/pull the door a couple of times.
Glass shower doors are installed in the same way. But in this case, increased attention is paid to sealing the connections.
Types of street lamps
- Floor lamps. They are found very often on garden paths, near gazebos and ponds. The design is simple - a metal support on which the lampshade is located.
- Wall-mounted. They are hung directly next to the front door. They come in completely different shapes and colors. Stylized to suit many interior solutions. For large areas, large wall spotlights are used.
- Hanging. They are similar to indoor chandeliers, but stronger and more resistant to external influences. They decorate terraces and gazebos.
- Ground. Installed directly into the road surface. The light emanating from them is soft and dim. They illuminate sculptures, benches, and trees. For some models, the movement of light rays can be adjusted at different angles.
- Columnar. Modern floor lamps. Lower than classic counterparts. They resemble cylinders in shape, small columns of light. Suitable for spot and main lighting.
Lamps can emit cold and warm light, you need to take this into account when choosing lighting for different areas. For example, in recreation areas it is recommended to install lanterns with warm light. By the way, cold light in the dark visually distances objects.
Installation of glass swing doors
The glass sheet can be ordered according to personal measurements or purchased ready-made. Upon completion of delivery of the door, installation is carried out in the following sequence:
- Secure the edges of the door leaf - they can be wrapped with pieces of fabric or soft carpet. Prepare wooden wedges to level the door.
- Check that the door frame matches the dimensions of the glass panel.
- Attach the hinges to the door jamb:
- Place a polyvinyl chloride gasket under the loop;
- Press down the loop on the inside of the glass;
- Place a pressing bar on the reverse side of the door and screw it to the hanging hinge;
- Install masking caps on the clamping strips and hinges.
- Attach the lock box to the inside of the glass panel.
- Mount the handles and check that the lock tongue matches the size of the hole in the door frame.
Beautiful exclusive furniture to order
When a designer is working on the interior, it is difficult to find suitable furniture in the store. Most often, individual cabinet furniture is ordered to order. For this apartment we made: cabinets for children's rooms and hallways, cabinets and shelves for TV areas, furniture for the bathroom and laundry room, wooden wall panels with lighting and much more.
Also, according to the manufacturer’s special specifications, a decorative overlay was made for the front door. All products have a chic appearance and excellent quality. You will find a detailed description of all objects in our detailed video review.
How to change glass in a door with your own hands
First, you should carefully remove the remaining glass from the door. To do this, simply loosen the fasteners from above - glazing beads, without removing them completely. Huge fragments must be removed first. Once the broken glass has been dismantled, the glazing beads can be removed.
If there is a rubberized gasket left in the door, it is also pulled out and inspected. A warped ribbon will need to be replaced.
The following steps for inserting glass into a door with your own hands:
- Measure the clearance and order new glass. It is normal if the canvas is 1.5-2 mm smaller than its own bed on each side.
- Prepare the gap for glass insertion: remove old putty and sealant; Clean the perimeter of the opening with sandpaper/abrasive net.
- Remove the door from its hinges and place it on a horizontal surface, such as a long and wide table.
- Apply a layer of silicone using a construction gun along the entire contour of the stock.
- Tuck the glass sheet into the rubberized gasket and stick it in the same place. If the glass does not fit tightly, the rubber band must be cut.
- Place the fastening beads onto the sealant, pressing them perfectly against the glass and each other.
- Secure the glazing beads with decorative final nails.
- Hang the door back on its hinges.
Additional Tips
When driving a nail into a bead, cover the glass with cardboard so that the hammer slides over it and does not scratch or break the glass. Be careful when working with silicone so as not to smear it on the frosted surface of the glass. Excess silicone should be removed after 2 days when it is completely dry. To do this, you can use a new spare knife from a stationery knife. Well-treated silicone doors do not shake and are also safer in the event of glass breakage.
The polished edge of the mirror is easier to joint. Since today all mirrors on the market are almost the same, for a longer service life of the mirror in wet rooms, its back side, including the perimeter of the edge, can be coated with appropriate paint in several layers.
If you are dealing with replacing broken glass, then before placing the glass in the door, pay special attention to removing any remains from it. Small glass particles can get stuck in the opening
Inspect it carefully. Incomplete cleaning can not only cause injury, but also prevent the installation of new glass in the door.
You can consider different types of glass arrangement
Which glass should you choose?
Regarding what thickness of glass to choose - 3 mm, 4 mm or 6 mm - the only difference is in weight and breaking strength. Although this may play a role when you want to order a bevel on glass. The thicker the glass, the wider the bevel can be made on it, and it will become an additional decoration of the door.
More details about the top and bottom of the glass
If your doors consist of four glasses, of which there are two upper ones with one or two waves, and two lower ones as well, you should definitely write on each template (without turning it upside down) - “top of the doors” - where the top of the glass is, and “ bottom of the doors" - where the bottom of the glass is.
It is especially important to indicate the front side when you have several doors facing the corridor (for example, there are doors that have only one glass in the shape of a crescent). As you can see, the process of installing new glass in a door is not as complicated as it might seem at first glance
To do this kind of work you just need to be attentive and extremely careful. If you know other methods for installing glass in a doorway, share your comments with readers under this article
As you can see, the process of installing new glass in a door is not as complicated as it may seem at first glance. To do this kind of work you just need to be attentive and extremely careful. If you know other methods for installing glass in a doorway, share your comments with the readers under this article.
DIY glass decor on the door: design options
In addition, the most unique and beautiful interior items become boring over time and cease to be as fun as before. You can change glass doors and add a touch of freshness to the room without the help of others, using one of the technologies:
- Decoupage;
- Decorative stickers;
- Drawing with paints.
To perform decoupage you will need materials:
- Double-sided paper with a pattern;
- Paper towel;
- Contour paints on glass;
- Stationery knife;
- Glass glue;
- Cutting mat;
- Scissors and brushes.
Let's look at step by step how to decorate glass on a door with your own hands. Decoupage technique:
- Carefully cut out the image from a decoupage card or napkin.
- Cut out the inner parts with a knife, placing a napkin on the mat.
- It is better to cut off long and narrow parts of the design. Later they may be painted with a brush.
- You should start gluing from large fragments of the drawing. Dip the sketch into just heated water.
- Remove the image from the water, use a cardboard towel to remove any drops, and spread glue on one side.
- Attach the sketch to the glass, and pressing down, release the air space in the direction from the center to the edge.
- After drying, coat the sketch with glass glue.
- Scrape off the remaining glue with a wood stick.
- On the reverse side of the glass sheet, stick the cut-off narrow parts of the design with tape. Trace the stripes with paints and remove the fixed piece of the image from the glass.
Decorating glass with stickers: photo
More hard work is painting on glass with stained glass paints.
Choosing a location for a fictitious window and design tips
When starting to create a false window structure, you need to select the type of structure, a suitable picture, and determine the location.
Living room or hall
This is the place where people most often gather: family, visiting guests. Because of this, there may be a feeling of lack of space, especially if the room is small.
Living room
The way out of this situation will be a false construction. The main thing is to choose the right image. How to do it?
- The picture should focus on distant objects.
- It is better if the image contains light colors - it will create the illusion of lighting.
- Try to make the picture contain fewer objects, animals, people - it will give the impression of fullness of the space.
Popular articles How to use a refrigerator compressor as an airbrush
Children's room
The best options for simulating children's room windows are:
- In the first place you can put on the facade a window into a fairy-tale kingdom, a forest.
- The depths of the sea are for dreamers.
- If a child dreams of becoming an astronaut, then install a skylight with a starry sky in the room. Children's Image should be selected according to the child's wishes.
Children's
Bedroom
A bedroom is a place to relax, which means the selection of images must be appropriate. The picture should contain calm tones. It is not recommended to use bright colors.
Pictures with sunsets and seascapes will greatly help to calm you down. You can install the window structure opposite the bed - at the feet, and look at the landscapes before going to bed.
If the false window opening is located on the ceiling, then images of the starry sky and tree branches in the evening are recommended.
Workplace
In this case, everything depends on the nature of the work performed in the room. If you are busy with office work, it is better to install a large window with a plastic frame. Using a view of a big city as a background creates the illusion of an office in a high-rise building.
If the owner is engaged in gardening: growing seedlings, replanting house plants, then it is better to place a small window with shutters on the front wall and a view of the garden.
Bathroom
An original solution would be to design an open room, devoid of walls, but with windows on all sides. These techniques are used in large villas by the sea.
Bathroom
On all sides you need to attach photo wallpaper with a view of the sea beach and frame it with a false window structure. In such a room you can immerse yourself in a bath and imagine yourself on the seashore of a southern resort.
Kitchen
It is recommended to equip the kitchen with large windows, but window structures should be located on one or two walls.
The right picture can visually increase the space.
General instructions
Now let's look at how to make simple but very useful things from plexiglass: a price tag holder and a phone stand.
Preparing tools
To work with plexiglass you will need the following tools:
- ruler;
- knife, circular saw or jigsaw;
- weight;
- inclined stop;
- thermal cutter
You can make the cutter yourself. For this you will need:
- nitrochrome wire 0.5–1 mm thick and 30–50 cm long;
- frame;
- 12V power supply.
Thanks to a special knife for plexiglass, you can easily cut out the necessary parts from this material. The wire is fixed to the frame and connected to a power source. This device is needed to bend plexiglass.
Draw exact diagrams of the workpieces in advance: an error of 1 cm can make the item unusable. Both structures have vertical parts, so the base must be secure so that they do not fall.
Making a holder for price tags
There are several types of price tag holders. For example, consider the manufacture of a tabletop. It has the following shape: an inclined vertical part extends from the base with a tight clip at the top, thanks to which the price sheet does not fall out. For such a product you will need a transparent sheet 1.5–3 mm thick.
The work is carried out like this:
Making a phone stand
As an example, consider creating a stand with a base, a vertical part, a bottom stop and side holders. All these parts can be rectangular or artistic.
A plexiglass phone stand is quite easy to make
The stand is made as follows:
Having learned to work with plexiglass, you can even set up your own business, creating either standard inexpensive items in large quantities, or unique products that also have artistic value.
Often the desire to make their home even more attractive and interesting prompts owners to use very rare and intricate materials in their work. Previously, vinyl records and metal alloys, matchboxes and scorched wood, textiles and leatherette, and much more were used for decoration: an experienced craftsman will find a use for everything. Today, polymer plexiglass has gained wide popularity, which can be used both for decorative purposes and as a material for creating intricate devices for household use. Thanks to a creative approach, skillful hands and certain knowledge, you can create truly unique objects from organic glass, which will later become your pride and home decoration.