The bright heads of sunflowers always turn towards the sun. Today we will show you an option for creating a flower like a sunflower from corrugated paper. All steps will be demonstrated step by step in this master class.
To make a sunflower we will prepare:
- - corrugated paper of yellow, brown, green color;
- - scissors with a ruler;
- - wire of different thicknesses;
- - glue gun;
- - floral tape.
How to make a carnival costume of a forest, flower Fairy with your own hands?
Girls may need a Forest Fairy costume for the Autumn Festival and New Year. Just as all living things in the forest change their color at different times of the year, so this costume can be very different:
- bright, light green, with pink, red or lilac in the spring, then the fairy will be floral
- rich shades of green in summer
- green, golden, yellow, orange in autumn
Flower Fairy Costume.
Forest Fairy Dress.
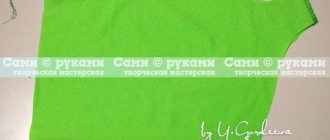
The easiest way to make a Forest Fairy costume for a girl is from a T-shirt and felt. You will need:
- green or light green T-shirt in girl’s size, preferably long
- felt green, light green, yellow, orange
- scissors
- glue gun
- marker
Forest Fairy costume step by step.
Leaves for the Forest Fairy costume.
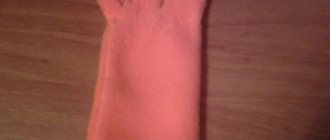
- The bottom of the T-shirt to the chest line is cut into thin strips to create something similar to a fringe. The stripes can be tied into knots at the bottom.
- Leaves are cut out from sheets of felt. They can be of different shapes - maple, walnut, birch, etc. Shades are chosen depending on the theme of the matinee.
- Use a marker to draw veins on the leaves.
- Using a glue gun, decorate the T-shirt bodice and fringe with leaves.
- All that remains is to choose the girl’s leggings to match the color and make a head decoration for her. The Forest Fairy may also have wings.
A girl in a forest fairy costume.
A more complex and painstaking way to make a forest or flower sorceress costume with your own hands is to make a tutu skirt or a tutu skirt.
IMPORTANT: It is better to make a tutu for this outfit from thick organza. The technology can be studied in the article “How to sew a tutu skirt for adult women, girls, girls and newborn babies? DIY tutu skirts made of tulle, organza and chiffon."
For a suit with a skirt you will need:
- T-shirt of the desired color or mesh top
- artificial flowers and/or felt leaves
- tulle in several colors
- satin ribbons 3 cm wide
- glue gun
- scissors
- beads
Materials for the Forest Fairy's skirt.
Production of tulle ribbons.
Making a Forest Fairy skirt.
Forest Fairy Skirt.
- The tutu skirt is made according to the same principle as for the Winx fairy costume. It can be green, green with pink, green with yellow, green with yellow and orange. The bottom of the skirt is made smooth or torn (then the tulle strips will be of different colors).
- When all the tulle strips are strung on the belt, it is braided with a satin ribbon.
- A decoration for the head of the Forest Fairy is made from satin ribbons, artificial flowers and leaves. Small leaves and other decor can be glued to the skirt.
Making the headdress of the Forest Fairy.
Headdress of the Forest Fairy.
IMPORTANT: If the forest fairy dress has an elasticated top, tulle ribbons are tied to its edge. A satin ribbon, decorated with flowers and greenery, will be tied across the girl’s neck.
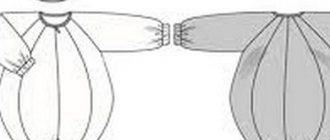
Preparing the center and petals
Cut each black strip finely from one edge so that about 1 cm remains to the other. Lightly twist the fringe with your fingers.
Cut the yellow strips into pieces about 1 cm wide or a little more. The distance to the opposite edge should remain 1 cm. Using small scissors, round off the ends of the petals, leaving a sharp tip. Bend the middle of each, slightly stretching the corrugation.
Form a sepal from the green strip by cutting triangles from one edge, as in the photo.
Baby outfit
It’s very easy to create such a costume for a small child; he will look very cute in it. Take a red or yellow bodysuit, or sew it according to a ready-made pattern using the dimensions of your baby. A green cap is suitable as a hat.
Sew leaves from emerald-colored fabric and attach them to the hat and body of the apple-shaped sticker. You can cut an apple from the remaining fabric and sew it on the front of the bodysuit. In such an outfit, the baby will not be too hot, and he will look unusual and playful.
Important! If the suit with bodysuit is very simple, then you can sew an apple outfit using a jumpsuit or sew it yourself using a pattern.
creative mask
You will need: cardboard, scissors, a thin rubber band or elastic thread, a stationery knife, felt-tip pens or pencils, a hole punch.
Master Class
- Fold a sheet of cardboard in half.
- Draw a mask template on the half.
- Cut out a hole for the eyes using a utility knife.
- Use a hole punch to make a hole for the elastic.
- Cut out the mask.
- Draw a face on the mask - nose, ears, mustache.
- Secure the elastic band.
The creative mask is ready! I recommend watching this video!
How To Make Easter Bunny Masks! Kids Craft!
How to make a crown for a fairy carnival costume: instructions
Crown for a fairy carnival costume The crown turns an ordinary fairy into a real princess. The simplest option is to make this accessory from colored paper, velvet or other similar material. How to make a crown for a fairy carnival costume? Here are the instructions:
You will need:
- Colored cardboard
- Thin elastic band
- Scissors
- Rhinestones for decoration
Using a template, you need to cut out a crown blank from colored cardboard:
Crown for fairy carnival costume: template
- Then punch holes in place of the dots and insert an elastic band there so that the crown can be put on your head.
- After that, decorate to your liking. Glue rhinestones, beads, etc.
If you wish, you can make the crown more complicated. For example, from rhinestones, beads and wire:
Crown for fairy costume
Butterfly mask
You will need: foam board, scissors, rubber band, tape measure, glue, sheet of paper, pencil.
Master Class
- Measure the distance from the ear to the bridge of the child's nose.
- Fold a sheet of paper in half, measure the resulting distance from the fold and draw a butterfly wing.
- Cut out the template.
- Attach the template to the child's face and mark the locations of the eye holes.
- Cut out the eyes on a paper template with a small margin.
- Trace the template onto the foam board, then cut it out.
- Make a decoration for the mask from foam cardboard (it can be eyebrows, droplets, flowers) then glue them.
- Measure the size of the elastic from one ear to the other, make small holes along the edges of the mask and secure the elastic.
The carnival mask “Butterfly” is ready! I recommend watching this video!
DIY by Creative Mom #2 — how to make Butterfly Masquerade Mask 123 Kids Fun
Wings for a fairy carnival costume made of wire and gelatin - how to make: instructions
Wings for a fairy carnival costume made of wire and gelatin Such wings cannot be made large, so they are not for a carnival costume. Although they can be made in miniature size and glued, for example, onto a magic wand or to decorate a costume. How to make wings from wire and gelatin? This method is quite difficult. But this instruction will tell you about the easiest of the methods.
To do this you need:
- Gelatin
- Vegetable or olive oil
- The wire is not thin, but not very thick either
- Document file or any other polyethylene
- Large and small brushes
- Sequins and rhinestones - optional
Step-by-step instruction:
- Dissolve gelatin. In order to get wings, you need to use less water than indicated on the package. (Approximately 1 teaspoon of gelatin to 2 teaspoons of water ). Leave this mass to swell for 5-7 minutes.
- Next, make a frame from the wire - the shape of a wing. So you need to make 4 parts.
- After this, take the polyethylene and grease it with oil. Place a wire mold on this prepared place and pour gelatin inside the frame. Using brushes, smooth the surface so that there are no bubbles or unfilled areas.
- If you want, you can add sparkles or rhinestones into the uncured gelatin.
- To make the gelatin harden faster, leave it for 15-20 minutes and then remove the finished wing from the surface.
Do the same with the remaining parts of the wings, and then fasten them together. Now you can use the wings to decorate a costume or additional accessories.
How to decorate a Fairy costume?
The smallest, most insignificant additions to the Fairy's outfit make the costume complete. Thanks to various accessories, the image takes on a unique look.
Fairy Costume
- It is enough to sew beautiful rose flowers, daisies made of paper or other material onto the dress, and you will see how the costume will be transformed.
- Wings decorated with all kinds of patterns make the Fairy's image more natural.
- Shoes can also be decorated with leaves, flowers or beautiful accessories, such as colored stones or brooches.
Sunflower drawing
When drawing its core, you can use various round-shaped objects at hand - even a cardboard roll of toilet paper or disposable paper towels. And if you bend this roll on both sides, you get a great stamp for drawing petals: just dip it in yellow paint and apply prints around the core. Look what a wonderful sunflower you can draw using this technique! We covered the center of the sunflower with glue and sprinkled it with real black pepper. The drawing turned out voluminous and very natural!
By depicting flower petals, you can also give freedom to your imagination. For example, you can draw petals using a toothbrush. If you make the core from a circle of black colored paper, you will get a fairly simple, accessible yet interesting craft for younger children.
Leaves on the stem can also be drawn in an unusual way. For example, original leaves are obtained from children's handprints made with green paint. You can use handprints to paint the flower itself using yellow paint.
Simple application
For this craft, it is better to take regular colored paper. Single-sided or double-sided, coated or velvet, or maybe you need to add corrugated - it all depends on the specific idea and the desired result.
For an applique with an element of weaving technique, we will use simple single-sided colored paper. In addition to this, we will need cardboard, glue, scissors, a pencil and a ruler.
First, cut out templates from cardboard, as in the photo:
They are very convenient to use when working with children, and also when many identical elements are required.
Having cut out these parts from colored paper, we prepare strips for weaving the core. It is advisable to use 2 colors. For a sunflower, you can take shades of black, brown, gray, or you can experiment with colors. The length of each strip is slightly longer than the middle, and the width is approximately 0.5 cm.
We glue the strips to the round blank from the inside. There should be no glue between the front side and the workpiece, otherwise weaving will not work.
Carefully weave, inserting a strip of a different color through one. It should look like this:
We also bend the ends of these strips back and glue them to the inside of the workpiece.
From yellow and green paper we cut out the remaining parts according to the templates.
Glue the parts together. The work is very simple, for kids. Teach them to distinguish color, shape, arrangement of parts. This craft can be attached to the refrigerator with a magnet or made into a postcard.
The core could have been made a little differently. First, make a weave from the stripes, and then cut it out and glue it. Do what is most convenient and easier for the baby.
Several options for this application in the photo:
Headdress
The final accessory in creating a carnival costume is a hat. It can be made from residual foam rubber, unnecessary yellow fabric or an old headdress.
Materials:
- foam;
- takes yellow tones;
- gouache or paints;
- brush;
- scissors;
- glue;
- sewing meter;
- colored paper.
Using a sewing meter, measure the circumference of the child's head. We cut out a rectangle from foam rubber that corresponds to the obtained indicators. We make the top edge zigzag to obtain the desired shape of the product. Using glue, connect the edges and let dry completely. Carefully paint the resulting cap with gouache.
To ensure that the paint lies evenly on the foam rubber, it is recommended to dilute gouache, a small amount of water and PVA glue.
After dyeing, leave the headdress until completely dry. The top can be decorated with several small leaves. We also decorate the finished beret or light hat with greenery.
The suit is ready.
Applique for a postcard: using trimming
Cut out 16 rectangles (5 by 7 centimeters) from yellow corrugated paper. These will be the petals of the flower. You can add other shades. And a sunflower made from colored paper with your own hands can safely be called rainbow! We round the edges so that they resemble triangles. Use scissors to bend the petals a little.
Cut out two circles with a diameter of 5 centimeters from black corrugated paper. On one we lay out the petals in several rows. Glue the second circle on top.
Now we will make the seeds using the cutting technique. We make about 30 squares (1 by 1 centimeter) from black corrugated paper. We wrap each piece onto a toothpick and then remove it from it. We coat the core with glue and fill it with “seeds”. Now this sunflower made with love from corrugated paper (with your own hands) can be placed on a card and given to a loved one.
DIY paper sunflower: master class with photos
There is all kinds of paper - white, colored, watercolor, pastel, corrugated, cardstock, cardboard, scrap paper... The list can be endless. It varies in texture, density, and area of application. The same product made from different materials looks different. In some places, corrugated paper is suitable, but in others it is better to use colored coated paper. There are also many techniques for performing work from it. And for each technique certain types of paper are suitable. For example, we will make a sunflower from different types of paper with our own hands.
Symbolic meaning
Sunflower is a very bright flower with petals that resemble rays of the sun. When you admire such beauty, your soul becomes warm and joyful.
The sunflower can rightfully be called a sunny flower. Its scientific name helianthus is translated from Greek as “sunny flower.” In Russia it is called a sunflower because its cap follows the light source throughout the day. That is, he always strives to be under the sun. When a sunflower grows to its maximum, it remains facing east. It is because of this feature that the meaning of devotion is attributed to this sunny flower.
If you want to give your loved one a gift with a sunflower, then be sure to play with it. Say that this is a symbol of fidelity, happiness and joy. So, let's look at how to make a sunflower out of paper with your own hands in different ways.
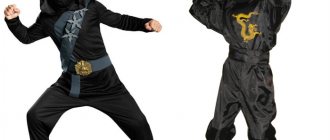
DIY apple costume for a boy
The following photo shows a universal option for any age and gender. Its main advantage is the speed of production.
The set includes a red vest and cap. The first item is easy to sew even from two identical parts. If it is wide and involves dressing over the head, no zipper or buttons will be required. You can use the ribbons on the waistband to gather the vest at the waist according to your figure.
It is easy to sew a hat from two semicircles in one seam, having first folded the edge. Use leaves and a twig to decorate a hat or both elements of a masquerade outfit. You can wear this outfit with a white shirt or colored clothes. It’s better, of course, to match everything.